

In this guide, you’ll learn how to install Xfce on AlmaLinux 9 or 8, a task that’s both straightforward and rewarding. Xfce, known for its speed and low resource usage, is an excellent desktop environment for those seeking efficiency and simplicity. It’s especially suited for older hardware or systems where performance is a priority.
Xfce: A Brief Overview
- Xfce stands for XForms Common Environment. It’s a lightweight yet powerful desktop environment, often favored for its minimalistic approach.
- It is part of the GNU Project, ensuring it remains free and open-source.
Key Features of Xfce
- Lightweight & Fast: Consumes fewer system resources, making it ideal for older or less powerful hardware.
- User-Friendly: Offers a straightforward and easy-to-navigate user interface.
- Customizable: Users can easily modify the look and feel of their desktop.
- Stable & Reliable: Known for its stability and low likelihood of crashing or freezing.
- Good for Multi-tasking: Efficient window management and workspace features make it ideal for multitasking.
Installing Xfce on AlmaLinux, either version 9 or 8, involves a series of steps that are both manageable and clearly defined. This process will rejuvenate your system, providing a fresh, efficient, and responsive computing experience.
Install Xfce on AlmaLinux 9
Step 1: Update AlmaLinux 9 System Packages
Before installing Xfce, it’s essential to update your AlmaLinux 9 system. Updating ensures that you have the latest versions of existing packages, reducing the risk of compatibility issues and conflicts.
Use the following command to update and upgrade your system packages:
sudo dnf upgrade --refreshStep 2: Add EPEL and EPEL Next Repositories
Next, integrate the Extra Packages for Enterprise Linux (EPEL) and EPEL Next repositories. These repositories contain additional software packages that are not available in the standard AlmaLinux repositories. EPEL Next includes packages for the forthcoming minor RHEL release.
Execute the command below to add these repositories:
sudo dnf install \
    https://dl.fedoraproject.org/pub/epel/epel-release-latest-9.noarch.rpm \
    https://dl.fedoraproject.org/pub/epel/epel-next-release-latest-9.noarch.rpm
Step 3: Install XFCE on AlmaLinux 9 via DNF Command
With the necessary repositories added, proceed to install the Xfce Desktop Environment. AlmaLinux uses DNF as its default package manager. The --enablerepo option specifies the EPEL, EPEL Next, and CRB repositories as the source for Xfce packages.
Use the following command:
sudo dnf --enablerepo=epel,epel-next,crb group install "Xfce"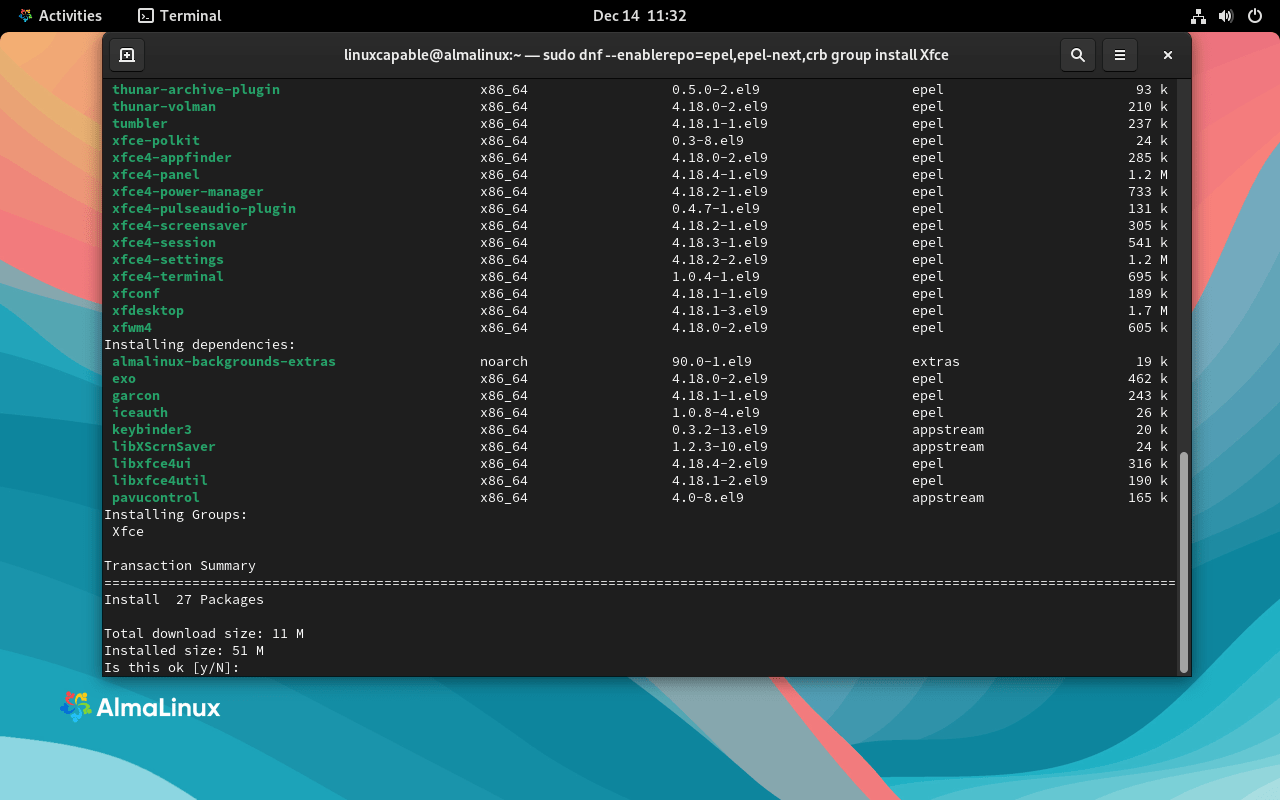
Step 4: Finalize Installation with System Reboot
After the successful installation of Xfce, reboot your AlmaLinux system. This step is crucial as it allows the system to initialize the newly installed desktop environment.
After rebooting, Xfce will be ready for use. Reboot your system using:
sudo rebootInstall Xfce on AlmaLinux 8
Step 1: Updating AlmaLinux 8 Packages Before Xfce Installation
Initiate the installation process by updating all existing system packages to their latest versions. This step is crucial to ensure system stability and prevent any conflicts or dependency issues during the Xfce installation.
sudo dnf upgrade --refreshThe dnf upgrade --refresh command synchronizes your system’s packages with the latest updates available on the server.
Step 2: Integrating EPEL and EPEL Next Repositories in AlmaLinux 8
The next step involves adding the Extra Packages for Enterprise Linux (EPEL) and EPEL Next repositories to your AlmaLinux 8 system. These repositories provide access to a broader range of software packages not included in the default AlmaLinux repositories, thus enhancing your system’s capabilities.
sudo dnf install \
    https://dl.fedoraproject.org/pub/epel/epel-release-latest-8.noarch.rpm \
    https://dl.fedoraproject.org/pub/epel/epel-next-release-latest-8.noarch.rpm
Step 3: Install Xfce on AlmaLinux 8 via DNF Command
The central part of this guide is installing the Xfce Desktop Environment on AlmaLinux 8. This is achieved using the dnf command, specifying the --enablerepo option to source installation packages from the EPEL and PowerTools repositories. Note the potential case sensitivity with ‘PowerTools’; if an error occurs, retry with ‘powertools’.
Additionally, include the “base-x” group in the installation command to ensure all necessary base packages for a graphical user interface are installed.
sudo dnf --enablerepo=epel,PowerTools group install "XFCE" "base-x"
If an error occurs due to case sensitivity, use:
sudo dnf --enablerepo=epel,powertools group install "XFCE" "base-x"
Step 4: Rebooting the System to Finalize Xfce Installation on AlmaLinux 8
Conclude the installation process by rebooting your system. This crucial step allows the system to initialize the newly installed Xfce environment, ensuring it operates smoothly upon your next system start.
sudo rebootLogging into Xfce on AlmaLinux
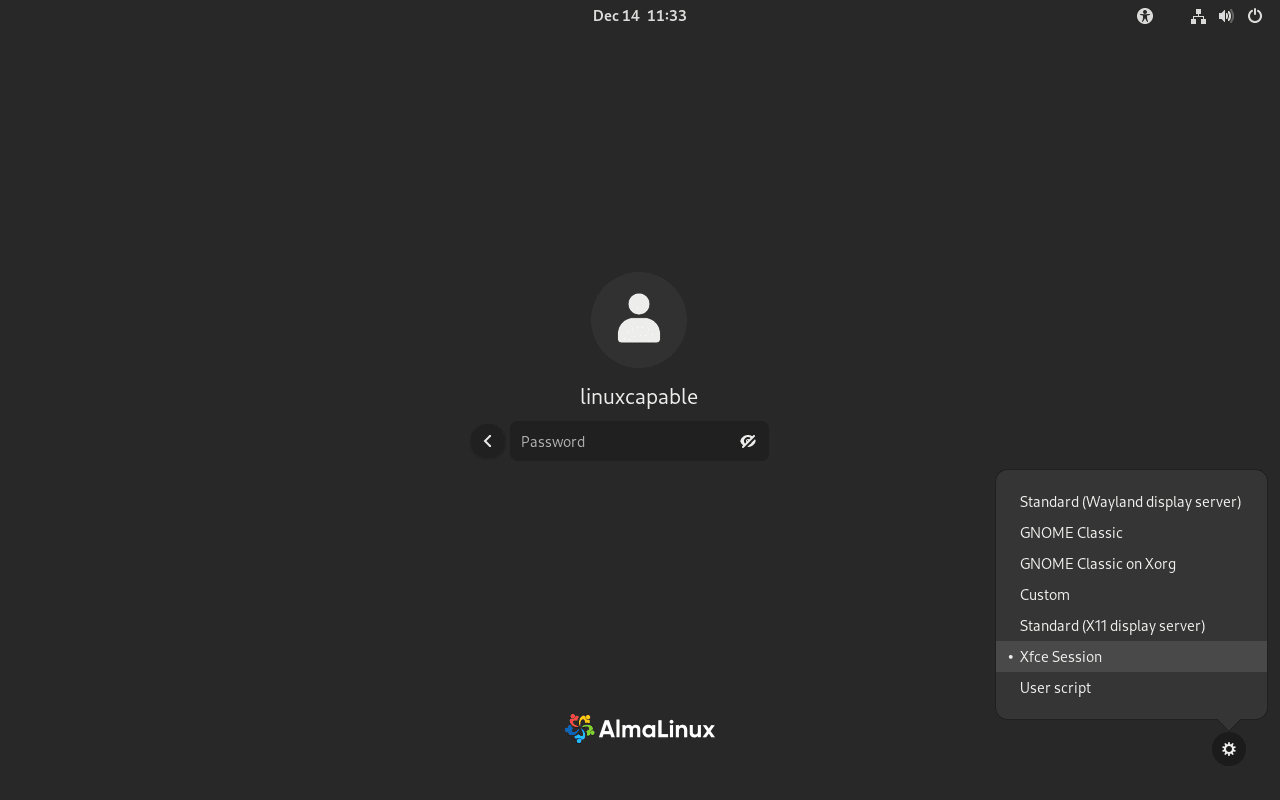
Step 1: Accessing Desktop Environment Selection
Following the installation of Xfce, your next step is to log into this new environment. After rebooting your system, you will arrive at the user login screen. Here, look for a gear-like symbol, which represents the settings for desktop environment selection. Clicking on this symbol will reveal a list of all desktop environments installed on your system.
Step 2: Selecting the Xfce Environment in AlmaLinux
Upon expanding the dropdown menu by interacting with the settings cogwheel, locate and select “XFCE Session” from the list. Choosing this option initiates your session in the Xfce environment, immersing you in its user-friendly, efficient, and customizable interface.
First-Time Tips for Xfce on AlmaLinux 9 or 8
Now that you have Xfce installed on AlmaLinux, let’s explore some essential tips for first-time users. These suggestions will help you get the most out of your new desktop environment.
General Tips for Navigating Xfce on AlmaLinux
- Familiarize with the Workspace: Xfce provides multiple workspaces, allowing for efficient organization of open applications. Explore how to switch between these workspaces for better multitasking.
- Keyboard Shortcuts: Learn and customize keyboard shortcuts. Xfce’s ability to set custom shortcuts can significantly speed up your workflow.
Customizing Your Xfce Experience on AlmaLinux
- Personalizing the Panel: The Xfce panel is highly customizable. Right-click on the panel to access its preferences and tweak it to suit your needs.
- Changing the Appearance: Modify the look of your desktop through the “Appearance” settings. Here, you can change themes, icons, and fonts.
- Window Manager Tweaks: Access the Window Manager settings to adjust window behaviors and title bar actions. Tailoring these settings can enhance window management efficiency.
Other Helpful Tips for Xfce on AlmaLinux
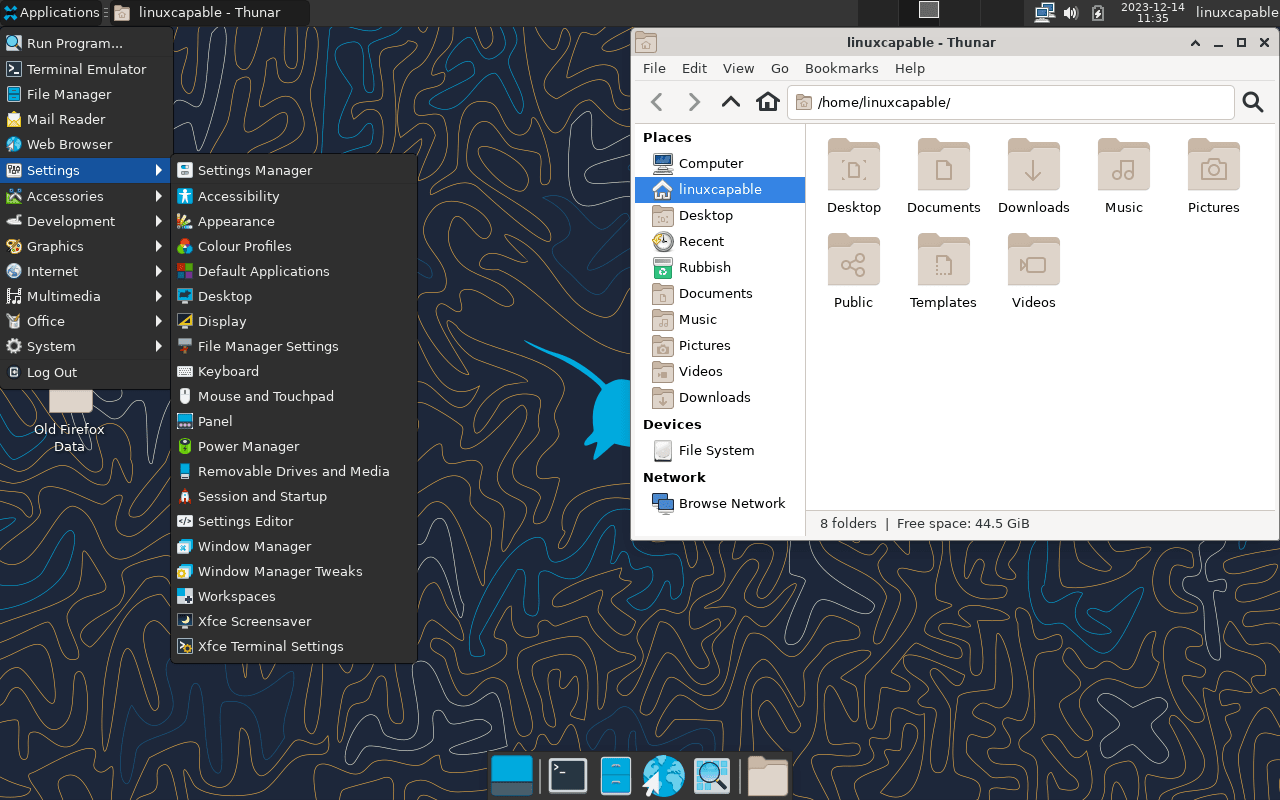
- Using Thunar File Manager: Get to know Thunar, Xfce’s default file manager. Its simplicity and customization options make file management straightforward and efficient.
- Utilizing Desktop Widgets: Add widgets to your desktop for quick access to useful information like time, weather, or system status.
- Exploring Settings Manager: The Settings Manager in Xfce is a one-stop shop for most system settings. Spend time here to understand the various options available for customizing your experience.
Managing Xfce on AlmaLinux 9 or 8
Updating Xfce on AlmaLinux
Keeping Xfce updated is crucial for accessing new features, enhancements, and security updates. The command-line interface is a practical tool for this purpose, especially for users who prefer a more hands-on approach over desktop notifications.
To update Xfce along with all installed packages, use the dnf package manager with the following command:
sudo dnf upgrade --refreshThis command instructs the dnf package manager to refresh the package database and upgrade all software, including Xfce and any associated packages from the EPEL and Appstream repositories.
Removing Xfce from AlmaLinux
If you decide to switch to a different desktop environment or need to remove Xfce for any reason, the process is straightforward. Again, the dnf package manager simplifies this task.
Execute the command below to remove Xfce and its related packages:
sudo dnf group remove "XFCE"After completing the uninstallation, a system reboot is required. Use this command to restart your system:
sudo rebootStep 3: Choosing a New Default Desktop Environment
Upon rebooting after Xfce removal, you’ll be greeted with the login screen. Here, select a new default desktop environment that suits your needs and preferences.
Conclusion
Throughout this guide, we’ve navigated the essentials of installing, managing, and customizing Xfce on AlmaLinux. From the initial setup to personalizing your workspace and ensuring your system stays updated, we’ve covered a comprehensive range of steps to help you get the most out of Xfce. Remember, regular updates are key to maintaining a secure and efficient environment. Embrace the flexibility and simplicity of Xfce on AlmaLinux, and don’t hesitate to experiment with its customizable features to tailor a desktop experience that’s uniquely yours.