
Linux Mint does not include Wine by default, but WineHQ gives you a straightforward way to run many Windows applications without setting up a virtual machine. If you need to install Wine on Linux Mint 22.x or 21.x, the WineHQ repository keeps stable, staging, and development builds closer to upstream than Mint’s own package sources.
The same workflow covers 32-bit support, Mono and Gecko setup, Winetricks, updates, removal, and the common fixes that usually send readers searching again. If you came here looking for a Wine download for Linux Mint, the maintained path is the WineHQ APT repository so updates stay manageable through the normal package manager.
Install Wine on Linux Mint
WineHQ publishes three branches with different update cadences. Stable is the right default for most Linux Mint systems, while staging and development are better reserved for testing or application-specific compatibility work.
| Branch | Update Frequency | Stability | Best For |
|---|---|---|---|
| Stable | Major releases every 1-2 years | Thoroughly tested | Production use, everyday applications, users who prioritize reliability |
| Staging | Biweekly updates | Beta quality with experimental patches | Testing upcoming features, specific application compatibility fixes |
| Development | Biweekly updates | Cutting-edge, may have regressions | Developers, advanced users who need latest features and can troubleshoot issues |
Stable is the safest choice when you want Windows applications to work without much babysitting. Staging adds experimental patches that sometimes fix a specific game or launcher sooner, while development tracks the newest upstream code and is more likely to break something that worked last week. Start with stable unless you already know you need one of the faster-moving branches.
Update Linux Mint Before Wine Installation
Before installing Wine, update your Linux Mint system to ensure all packages are current and reduce the likelihood of conflicts during installation.
Refresh the package list first:
sudo apt updateThese commands use
sudobecause the WineHQ repository and packages modify system files. If your account does not have sudo access yet, follow the guide on how to create and add users to sudoers on Linux Mint before continuing.
Then install any pending upgrades:
sudo apt upgrade -yInstall Required Packages for WineHQ Repository
WineHQ only needs the certificate, download, and GPG tools used in the next repository step.
Install those prerequisites with:
sudo apt install ca-certificates curl gnupg -yEnable Wine 32-bit Architecture Support
Most Windows applications and games require 32-bit libraries, even on 64-bit systems. While technically optional, skipping this step will prevent many Wine applications from running correctly.
Enable 32-bit architecture support:
sudo dpkg --add-architecture i386Verify the architecture was added:
dpkg --print-foreign-architecturesi386
Only skip this step if you exclusively run 64-bit Windows applications. Most games, older software, and many modern applications still require 32-bit components.
Import WineHQ Repository
WineHQ’s Linux Mint path is an APT repository, not a standalone installer download. Once the key and source file are in place, Linux Mint can update Wine through the normal package manager.
Download WineHQ GPG Signing Key
Import the WineHQ repository’s GPG signing key to verify package authenticity and ensure secure package installation.
sudo install -m 0755 -d /usr/share/keyrings
curl -fsSL https://dl.winehq.org/wine-builds/winehq.key | sudo gpg --dearmor --yes -o /usr/share/keyrings/winehq.gpg
The --yes flag lets you rerun the command without stopping for an overwrite prompt if the keyring already exists.
Verify the key was imported successfully:
test -s /usr/share/keyrings/winehq.gpg && echo "WineHQ keyring ready"WineHQ keyring ready
Identify the Ubuntu Codename for WineHQ
Linux Mint is based on Ubuntu, but the WineHQ repository uses Ubuntu codenames rather than Mint codenames. Running lsb_release -cs on Linux Mint returns the Mint codename (wilma, xia, vanessa), which will cause repository errors since WineHQ does not have packages for those names.
Check your Ubuntu base codename using the UBUNTU_CODENAME variable from /etc/os-release:
grep '^UBUNTU_CODENAME=' /etc/os-releaseUBUNTU_CODENAME=noble
Here is the Linux Mint to Ubuntu codename mapping WineHQ expects:
| Linux Mint Version | Mint Codename | Ubuntu Base | Ubuntu Codename |
|---|---|---|---|
| Linux Mint 22.x | Wilma, Xia, Zara, Zena | Ubuntu 24.04 LTS | noble |
| Linux Mint 21.x | Vanessa, Vera, Victoria, Virginia | Ubuntu 22.04 LTS | jammy |
These instructions cover Linux Mint 22.x and 21.x. Repository configuration differs based on the Ubuntu base version, so you will see separate command blocks for noble (Mint 22) and jammy (Mint 21). All other commands work identically across supported Mint releases.
Add WineHQ Repository
Add the WineHQ repository using the DEB822 format. Choose the command block that matches your Linux Mint version.
Linux Mint 22.x (Wilma, Xia, Zara, Zena), Ubuntu 24.04 noble:
printf '%s\n' 'Types: deb' 'URIs: https://dl.winehq.org/wine-builds/ubuntu/' 'Suites: noble' 'Components: main' 'Signed-By: /usr/share/keyrings/winehq.gpg' | sudo tee /etc/apt/sources.list.d/winehq.sources > /dev/nullLinux Mint 21.x (Vanessa, Vera, Victoria, Virginia), Ubuntu 22.04 jammy:
printf '%s\n' 'Types: deb' 'URIs: https://dl.winehq.org/wine-builds/ubuntu/' 'Suites: jammy' 'Components: main' 'Signed-By: /usr/share/keyrings/winehq.gpg' | sudo tee /etc/apt/sources.list.d/winehq.sources > /dev/nullsudo tee writes the DEB822 file as root. A plain > redirection would still run from your regular shell and fail to create the file in /etc/apt/sources.list.d/.
Verify the repository file was created:
cat /etc/apt/sources.list.d/winehq.sourcesThe Suites line should show noble on Mint 22.x or jammy on Mint 21.x.
Update the package list to recognize the WineHQ repository:
sudo apt updateRelevant output includes the WineHQ repository fetch line:
Get:1 https://dl.winehq.org/wine-builds/ubuntu noble InRelease [8,910 B]
Mint 21.x shows the same line with jammy instead of noble.
Install Wine
Install only one WineHQ branch at a time. Stable is the safest default, while staging and development are better choices when you need newer patches for a specific application.
Install Wine Stable Branch
Install Wine Stable on Linux Mint for the most tested branch and the least surprise during everyday use.
sudo apt install winehq-stable --install-recommends -yVerify the installation by checking the Wine version:
wine --versionwine-11.0
The exact stable version changes over time, but the command should return a Wine version string instead of a missing-command or repository error.
Install Wine Staging Branch
Install Wine Staging on Linux Mint when you need experimental patches that have not reached the stable branch yet.
sudo apt install winehq-staging --install-recommends -yVerify the staging installation:
wine --versionwine-11.7 (Staging)
WineHQ refreshes the staging branch frequently, so a newer point release than the example above is normal.
Install Wine Development Branch
Install Wine Development on Linux Mint when you want the newest upstream branch without the staging-only patch set.
sudo apt install winehq-devel --install-recommends -yVerify the development installation:
wine --versionwine-11.7
The development and staging branches can share the same version number during one release cycle because staging starts from the same upstream snapshot, then layers its extra patches on top.
Configure Wine Environment
Install Wine Mono and Gecko Runtimes on Linux Mint
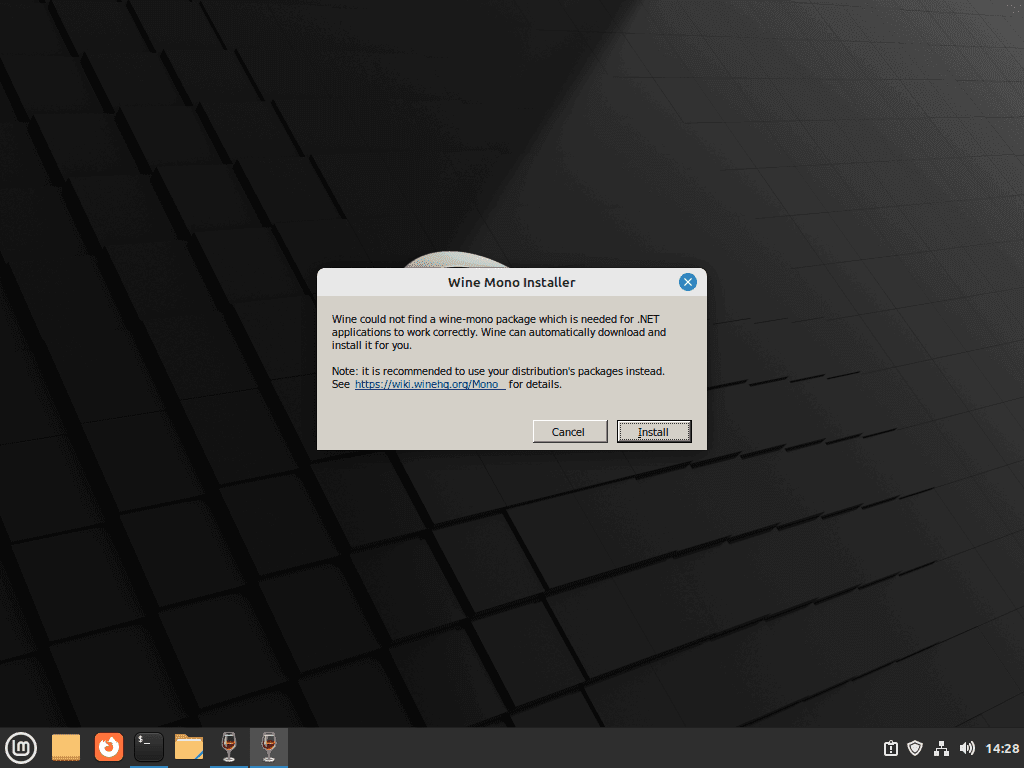
After installing Wine, the first prefix setup usually prompts for two extra runtimes. Wine Mono handles many .NET-based applications, while Wine Gecko provides the embedded web components some installers and launchers still expect.
Initialize your default Wine prefix to trigger those prompts:
winecfgWine usually prompts for Mono first, then Gecko, before the configuration window opens fully.
Click Install to add these essential components to Wine.
After both prompts complete, verify Wine Mono is present in your prefix:
ls ~/.wine/drive_c/windows/monomono-2.0
The directory is named mono-2.0 regardless of the Wine Mono version installed. This is the expected output.
Similarly, verify Gecko was installed:
ls ~/.wine/drive_c/windows/system32/gecko2.47.4 plugin
The plugin directory is a stub that Wine always creates. The version directory (2.47.4) confirms Gecko installed correctly. If you only see plugin without a version directory, Gecko did not install. See the manual installation method below.
If either prompt does not appear or the download fails during
winecfg, install the runtime packages manually with the commands in the next subsection.
Install Wine Mono and Gecko Manually on Linux Mint
If the winecfg prompts did not appear, the download failed, or you only see plugin in the Gecko directory without a version folder, install the runtimes manually instead. The current WineHQ runtime builds are Wine Mono 11.0.0 and Wine Gecko 2.47.4.
Download the MSI files first. If you do not use curl often, the curl command in Linux guide explains the flags used here.
curl -fsSL -o ~/wine-mono-11.0.0-x86.msi https://dl.winehq.org/wine/wine-mono/11.0.0/wine-mono-11.0.0-x86.msi
curl -fsSL -o ~/wine-gecko-2.47.4-x86.msi https://dl.winehq.org/wine/wine-gecko/2.47.4/wine-gecko-2.47.4-x86.msi
curl -fsSL -o ~/wine-gecko-2.47.4-x86_64.msi https://dl.winehq.org/wine/wine-gecko/2.47.4/wine-gecko-2.47.4-x86_64.msi
Install the downloaded runtimes through Wine’s MSI handler:
wine msiexec /i ~/wine-mono-11.0.0-x86.msi /qn
wine msiexec /i ~/wine-gecko-2.47.4-x86.msi /qn
wine msiexec /i ~/wine-gecko-2.47.4-x86_64.msi /qn
Remove the MSI files after the installs finish:
rm -f ~/wine-mono-11.0.0-x86.msi ~/wine-gecko-2.47.4-x86.msi ~/wine-gecko-2.47.4-x86_64.msiEach msiexec line takes a moment to complete. You may see harmless fixme: messages in the terminal output, which can be ignored.
Verify both runtimes installed correctly:
ls ~/.wine/drive_c/windows/mono
ls ~/.wine/drive_c/windows/system32/gecko
mono-2.0 2.47.4 plugin
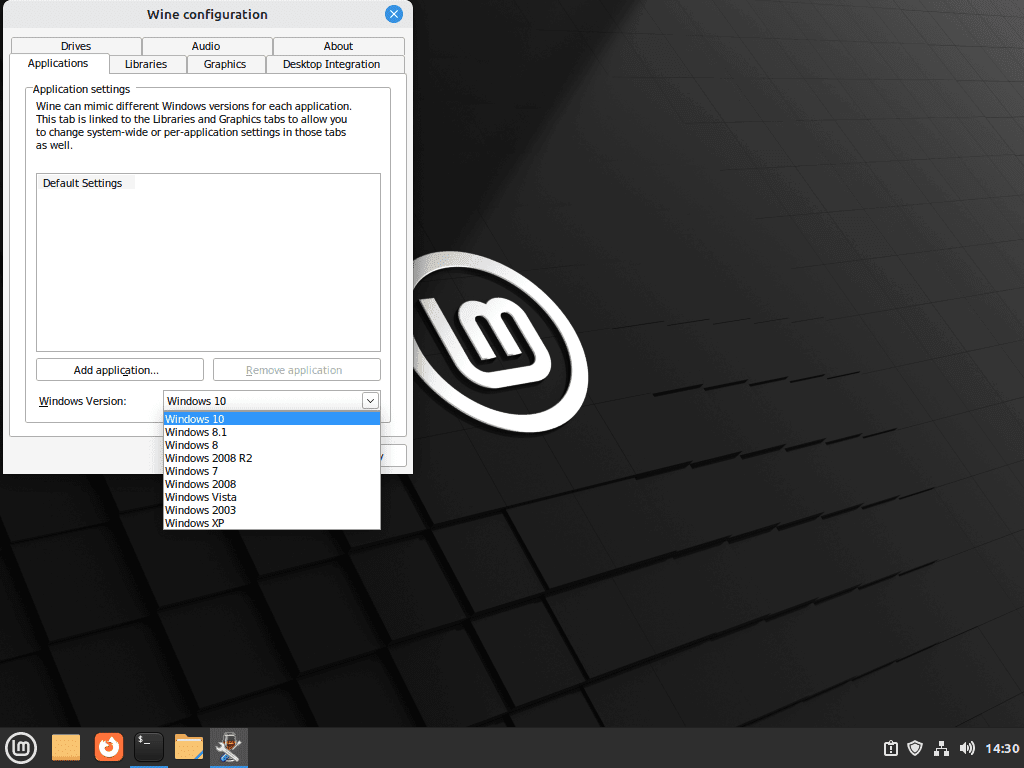
Customize Wine Settings on Linux Mint
With the environments installed, the Wine configuration dialog box will open. This interface offers customization options to tailor Wine to your specific needs. For instance, it allows you to select the default Windows version that Wine will emulate. While the default is often set to Windows 7, you can change this to a more recent version like Windows 10, depending on the compatibility requirements of your applications.
The configuration dialog also provides access to various settings tabs, such as audio and graphics. These tabs enable further customization of Wine, allowing you to adjust performance and visual aspects to align with your system’s capabilities and personal preferences. After making any desired changes, close the dialog box to finalize the configuration.
Install Windows Applications with Wine
Download and Open the Notepad++ Installer with Wine on Linux Mint
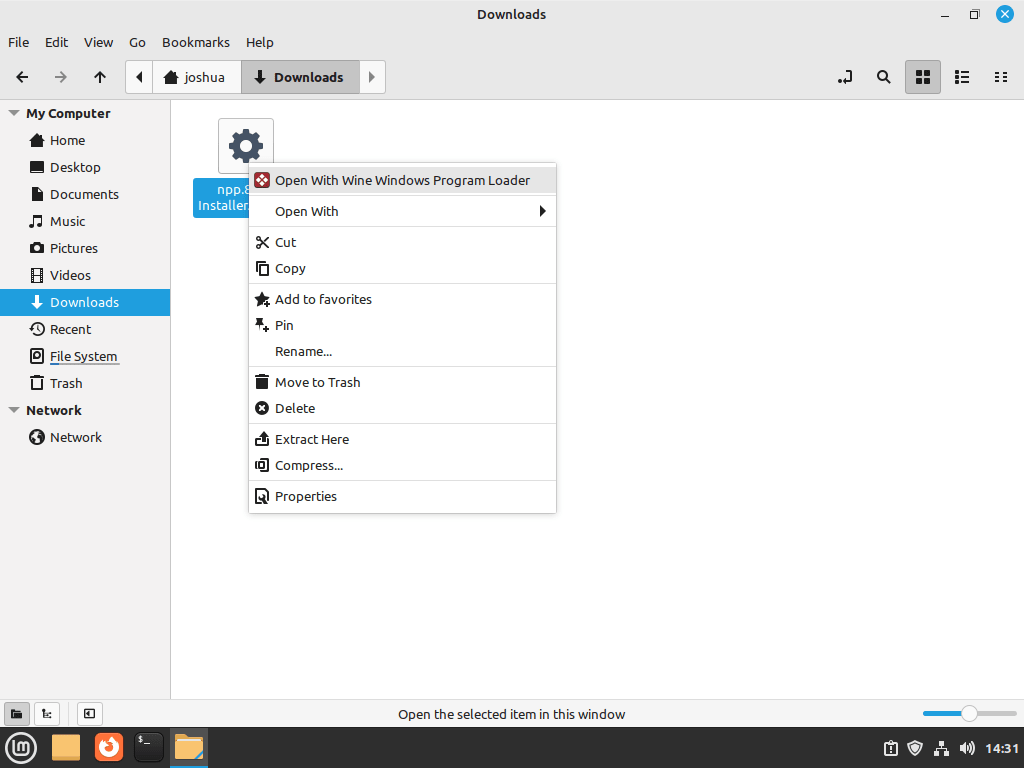
For a quick first test, download the Notepad++ Windows installer and open it with Wine. Notepad++ is lightweight, widely tested, and easy to remove again if you only wanted to confirm that Wine is working.
After the download finishes, right-click the installer, choose Open With Other Application, and select Wine. That starts the .exe in your current Wine prefix the same way it would launch on Windows.
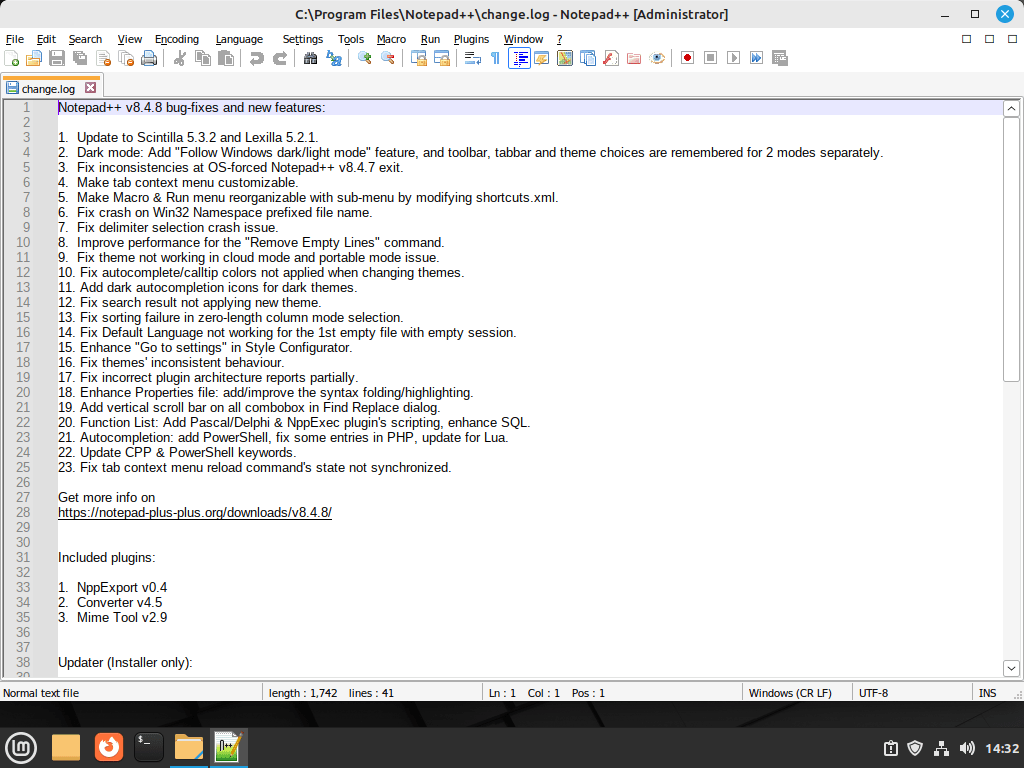
Complete the Notepad++ Installation in Wine on Linux Mint
Work through the installer as you normally would on Windows. The default options are fine for a quick compatibility check, so this step is mostly about confirming that Wine can finish the install, create shortcuts, and launch the program cleanly.
Launch the Notepad++ Wine Application from the Linux Mint Menu
After installation, Notepad++ appears in your application menu. Search for “Notepad++” on your Linux Mint desktop or browse the menu to locate it. The application runs with full functionality for coding, scripting, and general text editing.
Notepad++ is only one example. The same pattern works for many Windows installers that Wine AppDB marks as usable on your chosen branch.
Configure Wine for Gaming and Applications
Install Winetricks for Wine on Linux Mint
Install Winetricks on Linux Mint with the default repositories after Wine is already working. Winetricks stays separate from the WineHQ packages and makes it easier to add common Microsoft runtimes, fonts, and DirectX components.
Install Winetricks with:
sudo apt install winetricks -yFor example, install the Microsoft Visual C++ 2015 runtime with:
winetricks vcrun2015That verb installs the Microsoft Visual C++ 2015 runtime into your current Wine prefix. If you keep separate prefixes for different applications, run it in the prefix that actually needs the runtime. Relevant output ends with:
------------------------------------------------------
Install of vcrun2015 done
Manage Wine Prefixes on Linux Mint
A separate prefix is the cleanest way to keep one awkward Windows application from changing the rest of your Wine setup. The default prefix lives in ~/.wine, but you can point Wine at a different directory whenever you want a fresh environment.
WINEPREFIX=~/.custom_wine_prefix winecfgReplace ~/.custom_wine_prefix with any directory name you prefer. The first run creates that prefix and opens winecfg against it.
Then check that the new prefix contains the usual Wine directory layout:
ls -la ~/.custom_wine_prefixRelevant entries include dosdevices, drive_c, and system.reg. If those are missing, the prefix did not initialize correctly.
Launcher-style applications such as Battle.net are better kept in a named 64-bit prefix instead of the default ~/.wine prefix. Create the prefix once, then reuse the same WINEPREFIX value for the installer, Winetricks verbs, cache cleanup, and future launches.
export WINEPREFIX="$HOME/.wine-battlenet"
export WINEARCH=win64
winecfg
Before starting the installer, confirm the downloaded file is actually in ~/Downloads:
ls -lh "$HOME/Downloads"/Battle.net-Setup*.exeIf the command reports No such file or directory, download the installer again or move it into ~/Downloads. If the filename differs, use the exact name reported by ls or tab completion. Start the installer from the download directory through the same prefix:
cd "$HOME/Downloads"
WINEPREFIX="$HOME/.wine-battlenet" wine ./Battle.net-Setup.exe
If Wine reports failed to open, the installer path still does not match. Recheck the filename and make sure any typed quotes are straight ASCII quotes, not smart quotes copied from rich text.
Use the same pattern for any app-specific Winetricks command. For example, if an application needs the DirectX and DXVK command in the next section, prefix that command like this. Without the prefix assignment, Winetricks modifies ~/.wine instead of the launcher prefix.
WINEPREFIX="$HOME/.wine-battlenet" winetricks d3dx9 d3dx10 dxvkCustomize Wine Appearance on Linux Mint
The Desktop Integration tab is where Wine picks up theme, font, and menu behavior that can otherwise feel out of place on Cinnamon, MATE, or Xfce. Open winecfg and change these settings only when an application looks wrong or ignores your desktop theme.
winecfgSmall font and color changes here are usually enough. Leave the defaults alone unless you are fixing a specific display problem, because aggressive theme overrides can make older applications render worse instead of better.
Improve Wine Gaming Performance on Linux Mint with DirectX and DXVK
Older Windows games often need Microsoft’s legacy D3DX runtime files, and newer DirectX 10 or 11 titles usually run better when DXVK translates those calls to Vulkan. Install these components with Winetricks only in the prefix that needs them, because not every application benefits from extra overrides.
winetricks d3dx9 d3dx10 dxvkRelevant output includes:
------------------------------------------------------
Install of d3dx9 done
Install of d3dx10 done
Install of dxvk done
Winetricks does not provide a combined d3dx11 verb. If a current Wine AppDB note for a specific application names d3dx11_42 or d3dx11_43, install that exact numbered verb separately.
DXVK depends on working Vulkan drivers. AMD and Intel users should upgrade Mesa drivers on Linux Mint for a newer Vulkan stack, and NVIDIA users should install NVIDIA drivers on Linux Mint before testing demanding games.
For larger game libraries, Steam Proton is usually easier to manage once a title already has known working launch options. Keep plain Wine for standalone launchers, utilities, and programs that need a custom prefix.
Check Wine AppDB for Compatibility Notes on Linux Mint
Before you spend time troubleshooting a Windows installer, check the Wine Application Database (AppDB). It is usually the fastest way to see whether an application works out of the box, needs a small tweak, or is still a bad fit for your current Wine branch.
Search for the application name, compare recent reports against the branch you installed, and pay more attention to current notes than to older Platinum or Gold badges. AppDB is most useful when you need to know whether a program wants a specific Windows version, a winetricks package, or a separate prefix.
Manage Wine from Terminal on Linux Mint
Create a 32-bit Wine Prefix on Linux Mint
Some older installers and games behave better in a dedicated 32-bit prefix than in your default Wine environment. Create that prefix in a fresh terminal session so WINEARCH=win32 is set before Wine initializes the new directory.
export WINEARCH=win32
export WINEPREFIX=~/.wine32
winecfg
The first line forces a 32-bit prefix, the second chooses where to store it, and winecfg creates the prefix the first time it runs. You cannot convert an existing 64-bit prefix into a 32-bit one later, so start with a new directory.
Run Windows Executables with Wine on Linux Mint from Terminal
Run a downloaded .exe file from the terminal when the file manager association is missing or you want to see Wine’s terminal output while an installer starts.
wine /path/to/program.exe [arguments]For example, to launch an installer you downloaded into ~/Downloads:
wine ~/Downloads/example_app.exeThis is also the quickest way to capture any startup warnings in the same terminal instead of guessing what failed from the desktop launcher alone.
Update Wine on Linux Mint
Update Wine on Linux Mint with sudo apt update followed by an --only-upgrade install for the branch you already use.
sudo apt update
sudo apt install --only-upgrade winehq-stable
Replace winehq-stable with winehq-staging or winehq-devel if you installed a different branch.
Verify the update with:
wine --versionwine-11.0
Staging prints the current version with the (Staging) suffix, while development prints the current development version number on its own.
Remove Wine from Linux Mint
Remove the WineHQ branch you installed, then clean up the repository files if you no longer want Wine updates from WineHQ.
sudo apt remove --purge winehq-stableReplace winehq-stable with winehq-staging or winehq-devel if you installed a different branch.
For a complete removal including the repository and GPG key:
sudo rm -f /etc/apt/sources.list.d/winehq.sources
sudo rm -f /usr/share/keyrings/winehq.gpg
sudo apt update
Optionally, remove your Wine configuration directory to delete all installed Windows applications and settings:
This command permanently deletes your entire Wine prefix, including all installed Windows applications, saved data, and configurations. Back up any important files from
~/.wine/drive_c/before proceeding.
rm -rf ~/.wineDelete any custom prefixes such as ~/.wine32, ~/.custom_wine_prefix, or ~/.wine-clean as separate cleanup steps if you created them earlier.
Verify the package removal with:
dpkg -s winehq-stable 2>/dev/null | grep '^Status' || echo 'winehq-stable package not installed'winehq-stable package not installed
Replace winehq-stable in that check if you removed the staging or development branch instead.
Troubleshoot Common Wine Issues
Fix Wine 32-bit Library Dependency Errors on Linux Mint
Many Windows applications require 32-bit libraries even on 64-bit Linux Mint systems. If applications fail to launch with library errors, enable 32-bit architecture support and install missing dependencies.
Error:
wine: Call from 00007B7CE7A09F66 to unimplemented function api-ms-win-core-path-l1-1-0.dll.PathCchRemoveBackslash
0024:err:module:import_dll Library libFAudio.so.0 (which is needed by L"C:\\windows\\system32\\winex11.drv") not found
Diagnostic:
dpkg --print-foreign-architecturesIf this returns nothing, then 32-bit support is not enabled.
Fix:
sudo dpkg --add-architecture i386
sudo apt update
sudo apt install libfaudio0:i386 -y
Verification:
dpkg --print-foreign-architecturesi386
Fix Wine DirectX Errors on Linux Mint
Games and graphics-intensive applications often fail when legacy DirectX helper libraries are missing or DXVK is not present in the Wine prefix. Install the needed components through Winetricks, then verify the files instead of relying only on the final line of Winetricks output.
Error:
Application requires DirectX 9.0c or later
failed to initialize graphics subsystem
Diagnostic:
Check which DirectX libraries are currently installed in your Wine prefix:
ls ~/.wine/drive_c/windows/system32/d3d*A minimal output with only a few files indicates missing DirectX components.
Fix:
sudo apt install winetricks -y
winetricks d3dx9 d3dx10 dxvk
The d3dx9 verb installs the numbered DirectX 9 helper DLLs from d3dx9_24.dll through d3dx9_43.dll. The dxvk verb adds Vulkan-based Direct3D 9, 10, and 11 translation files such as d3d11.dll and dxgi.dll.
Verification:
ls ~/.wine/drive_c/windows/system32/d3dx9*.dll | wc -l20
A count of 20 DirectX 9 DLLs is expected for current Winetricks. Higher counts are not required because the numbered d3dx9 set runs from 24 through 43.
Verify DXVK’s Direct3D 11 files separately when a launcher or game depends on them:
ls ~/.wine/drive_c/windows/system32/d3d11.dll ~/.wine/drive_c/windows/system32/dxgi.dllFix Audio Not Working in Wine Applications on Linux Mint
Audio issues typically stem from missing PulseAudio or ALSA libraries. Install the appropriate audio backend for your Linux Mint configuration.
Diagnostic:
winecfgNavigate to the Audio tab and check if any drivers are listed. If the dropdown is empty, then audio libraries are missing.
Fix for Linux Mint 21.x:
sudo apt install libpulse0:i386 libasound2:i386 libasound2-plugins:i386 -yFix for Linux Mint 22.x:
Due to the time_t transition in Ubuntu 24.04, the ALSA package was renamed. Use this command instead:
sudo apt install libpulse0:i386 libasound2t64:i386 libasound2-plugins:i386 -yVerification:
Open winecfg, navigate to Audio, and verify PulseAudio or ALSA appears in the driver list. Click Test Sound to confirm audio output.
Fix Wine Prefix Corruption on Linux Mint
Failed installations or incompatible application updates can corrupt Wine prefixes. Reset the default prefix or create a clean isolated environment to resolve this.
Error:
wine: configuration in '/home/user/.wine' has been updated
Segmentation fault (core dumped)
Diagnostic:
Test whether Wine can initialize the prefix correctly:
WINEDEBUG=-all wine cmd /c echo testIf this produces errors or crashes instead of printing “test”, the prefix is corrupted.
Fix (reset default prefix):
mv ~/.wine ~/.wine.backup
winecfg
This renames the corrupted prefix and initializes a fresh environment. You will need to reinstall applications into that new prefix, but the corrupted configuration is gone.
Alternative (create isolated prefix):
WINEPREFIX=~/.wine-clean winecfgThis creates a separate Wine environment at ~/.wine-clean without affecting your default prefix. Use this pattern to isolate problematic applications from your main Wine configuration.
Verification:
WINEDEBUG=-all wine cmd /c echo testtest
A clean test response confirms Wine can initialize the prefix again.
Fix Wine Mono or Gecko Download Failures During winecfg on Linux Mint
When initializing a Wine prefix with winecfg, Wine attempts to download Mono and Gecko from its servers. If the download fails, you see errors in the terminal and the runtime is not installed. This commonly occurs behind corporate firewalls, on systems with strict DNS filtering, or when Wine’s internal HTTP client encounters proxy configurations.
Error:
Wine Mono installation
Error. Download failed

0138:err:wininet:open_http_connection create_netconn failed: 12029
0024:err:environ:run_wineboot boot event wait timed out
Diagnostic:
Test whether your system can reach the WineHQ download server outside of Wine:
curl -fsI https://dl.winehq.org/wine/wine-mono/If this returns an HTTP 200 response, your Linux system has connectivity but Wine’s internal downloader cannot connect. If it fails entirely, the issue is DNS or firewall on your network.
Fix:
Bypass Wine’s built-in downloader by downloading the MSI files yourself and installing them with wine msiexec.
Verification:
ls ~/.wine/drive_c/windows/mono
ls ~/.wine/drive_c/windows/system32/gecko
mono-2.0 2.47.4 plugin
Fix WineHQ Signed-By Conflicts on Linux Mint
If you previously attempted to install Wine using different instructions (such as the WineHQ wiki or other guides), you may have conflicting repository configurations that prevent APT from working. This happens when two source files point to the same WineHQ repository but reference different GPG key locations.
Error:
E: Conflicting values set for option Signed-By regarding source https://dl.winehq.org/wine-builds/ubuntu/ noble: /etc/apt/keyrings/winehq-archive.key != /usr/share/keyrings/winehq.gpg
E: The list of sources could not be read.
Diagnostic:
Check for multiple WineHQ source files and keyring files:
ls -la /etc/apt/sources.list.d/wine* /etc/apt/sources.list.d/winehq* 2>/dev/null
ls -la /etc/apt/keyrings/wine* /usr/share/keyrings/wine* 2>/dev/null
If you see multiple files (such as both winehq.sources and winehq-noble.sources, or keys in both /etc/apt/keyrings/ and /usr/share/keyrings/), conflicting configurations are causing the error.
Fix:
Remove all WineHQ-related source files and keyring files, then start fresh:
sudo rm -f /etc/apt/sources.list.d/winehq*.sources
sudo rm -f /etc/apt/sources.list.d/winehq*.list
sudo rm -f /etc/apt/sources.list.d/wine*.sources
sudo rm -f /etc/apt/sources.list.d/wine*.list
sudo rm -f /etc/apt/keyrings/winehq*.key
sudo rm -f /etc/apt/keyrings/winehq*.gpg
sudo rm -f /usr/share/keyrings/winehq*.gpg
Verification:
sudo apt updateAPT should complete without errors. Once it does, recreate one WineHQ keyring and one winehq.sources file instead of mixing multiple repository setups.
Conclusion
Wine is running on Linux Mint with WineHQ handling future updates. Separate prefixes give you room to keep one awkward application from breaking the rest of your setup. If gaming is next, install Steam on Linux Mint for Proton-managed titles, then make sure the graphics stack is ready before you start stacking launchers and installers into the same prefix.

Hi,
Thank you for all of this, I only have a question:
ls ~/.wine/drive_c/windows/system32/d3dx9*.dll | wc -l
only gives me 20. What could be the problem? (I already tried the fix which seemed to make it better, especially after I upgraded mesa to kisak, although the output was not exactly what was written there but: OpenGL version string: 4.6 (Compatibility Profile) Mesa 26.1.1 – kisak-mesa PPA)
Linux Mint 22.3 cinnamon
I am trying to install irfanview and battlenet (for some reason it doesn’t work on steam)
Thanks!
Faniel
Faniel, 20 is actually the expected result. I re-tested this on Linux Mint 22.3 and 21.3 with WineHQ 11.0:
d3dx9installsd3dx9_24.dllthroughd3dx9_43.dll, which is exactly 20 files. The article’s old 24+ check was wrong, and I have corrected it.Your Mesa/OpenGL result looks fine for that check. For Battle.net, verify DXVK in the same prefix:
If Battle.net still fails, use a separate 64-bit prefix and share the terminal error before adding more verbs. It may need an app-specific runtime such as
vcrun2022. IrfanView usually does not need the full DirectX/DXVK stack.Dear Joshua James,
Thank you so much! Irfanview does work!
Battlenet does not, can you help me how to use a separate prefix for that? I got a reeeeally long txt file with the unexpected error.
Thanks!
Faniel
Good, that means Wine itself is working. Keep Battle.net out of
~/.wineand start with a fresh 64-bit prefix:Then run the installer through that same prefix:
If it still throws the unexpected-error report, send the first 40-80 lines around the actual error. Battle.net failures usually come from missing 32-bit Vulkan/graphics pieces, font/cache problems, or a launcher update issue, and the log decides which one it is.
Hi Joshua,
The terminal gave this for the new wine prefix after creating the new configuration directory:
002c:fixme:actctx:parse_depend_manifests Could not find dependent assembly L”Microsoft.Windows.Common-Controls” (6.0.0.0)
004c:fixme:actctx:parse_depend_manifests Could not find dependent assembly L”Microsoft.Windows.Common-Controls” (6.0.0.0)
0054:fixme:actctx:parse_depend_manifests Could not find dependent assembly L”Microsoft.Windows.Common-Controls” (6.0.0.0)
0054:err:ole:StdMarshalImpl_MarshalInterface Failed to create ifstub, hr 0x80004002
0054:err:ole:CoMarshalInterface Failed to marshal the interface {6d5140c1-7436-11ce-8034-00aa006009fa}, hr 0x80004002
0054:err:ole:apartment_get_local_server_stream Failed: 0x80004002
0054:err:ole:start_rpcss Failed to open RpcSs service
004c:err:ole:StdMarshalImpl_MarshalInterface Failed to create ifstub, hr 0x80004002
004c:err:ole:CoMarshalInterface Failed to marshal the interface {6d5140c1-7436-11ce-8034-00aa006009fa}, hr 0x80004002
004c:err:ole:apartment_get_local_server_stream Failed: 0x80004002
009c:fixme:file:NtLockFile I/O completion on lock not implemented yet
009c:fixme:ntdll:NtQuerySystemInformation info_class SYSTEM_PERFORMANCE_INFORMATION
00a4:fixme:file:NtLockFile I/O completion on lock not implemented yet
00a4:fixme:ntdll:NtQuerySystemInformation info_class SYSTEM_PERFORMANCE_INFORMATION
00a4:fixme:msi:internal_ui_handler internal UI not implemented for message 0x0b000000 (UI level = 5)
00a4:fixme:msi:internal_ui_handler internal UI not implemented for message 0x0b000000 (UI level = 5)
009c:fixme:msi:internal_ui_handler internal UI not implemented for message 0x0b000000 (UI level = 1)
009c:fixme:msi:internal_ui_handler internal UI not implemented for message 0x0b000000 (UI level = 1)
0108:fixme:msg:pack_message msg 14 (WM_ERASEBKGND) not supported yet
002c:err:setupapi:do_file_copyW Unsupported style(s) 0x10
002c:err:setupapi:do_file_copyW Unsupported style(s) 0x10
012c:err:setupapi:do_file_copyW Unsupported style(s) 0x10
002c:err:setupapi:do_file_copyW Unsupported style(s) 0x10
012c:err:setupapi:do_file_copyW Unsupported style(s) 0x10
And then when I wanted to install:
WINEPREFIX=”$HOME/.wine-battlenet” wine “$HOME/Downloads/Battle.net-Setup.exe”
wine: failed to open “/home/faniel/Downloads/Battle.net-Setup.exe”
I hope you understand it more than I do.
I am continuously eternally grateful for your help!
Faniel
Faniel, I reproduced that prefix noise on Mint 22.3 with WineHQ 11.0. The
fixmeandRpcSslines did not stop the installer from starting. The blocker is the last line: Wine cannot find the installer at that exact path. First check the real filename:Then run it from Downloads:
If
lsprintsNo such file, download it again or move it into Downloads. If it finds a slightly different name, use that name or tab-complete it. Smart quotes from rich text also become filename characters in Bash.seriously thank you so much, from a linux noob
Thank you, this is my first time using linux and it was super easy, thank you for your work
Joshua,
Am stuck at > verify gecko< terminal responds with 'plugin'.
When I went to install mono and gecko runtimes with winecfg there was a pop up to configure Mono, but never one for gecko.
Cannot find any solution. Have tried finding other commands to download gecko but nothing clear.
Marc
Marc, good to see you made progress since the Signed-By fix. The “plugin” output is normal. Wine always creates that stub directory. What is missing is the version directory (like
2.47.4) that appears when Gecko fully installs.When the Gecko prompt does not appear during
winecfg, you can install it manually. Copy and paste this entire block to download both Gecko MSIs, install them silently, and clean up:After it finishes, verify with the same command from the guide. You should now see
2.47.4alongside the plugin folder. The guide has been updated with this manual install method for anyone else who hits the same issue.Linux Mint 22.2 Cinamon
I haven’t gotten any further than this
hans@hans-VivoBook-15-ASUS:~$ winecfg
Wine Mono installation
Error. Download failed
00b8:fixme:wineusb:query_id Unhandled ID query type 0x5.
0134:fixme:urlmon:InternetBindInfo_GetBindString not supported string type 20
0138:err:wininet:open_http_connection create_netconn failed: 12029
0024:err:environ:run_wineboot boot event wait timed out
Hans, the error 12029 means Wine could not reach its download server to fetch Mono. The “boot event wait timed out” message follows because Wine gives up after the download fails.
First, test whether your system can reach the WineHQ server at all:
If that succeeds with an HTTP 200 response, the issue is Wine’s internal downloader, not your network. Download the Mono and Gecko MSI files directly with
curlinstead:Then install each one manually through Wine’s MSI installer:
If the
curltest fails, the issue is DNS or firewall on your end. Tryping dl.winehq.organd check if your system uses a proxy or VPN that might be blocking HTTPS connections. Thefixme:wineusbandfixme:urlmonmessages in your output are harmless diagnostics and can be ignored.I’ve managed to first use information that didn’t work, then probably made mistakes of my own.
Your instructions are the best I’ve seen and my previous work and mistakes are certainly the problem. I’m going to continue with your instructions.
I’m left with this> marc@marc-ThinkCentre-M78:~$ sudo apt install re Signed-By regarding source https://dl.winehq.org/wine-builds/ubuntu/ noble: /etc/apt/keyrings/winehq-archive.key != /usr/share/keyrings/winehq.gpg,
[sudo] password for marc:
E: Conflicting values set for option Signed-By regarding source https://dl.winehq.org/wine-builds/ubuntu/ noble: /etc/apt/keyrings/winehq-archive.key != /usr/share/keyrings/winehq.gpg
E: The list of sources could not be read.
And> “Your APT configuration is corrupt. Do not install or update anything doing so could break your os! To switch to a different linux mint mirror and solve this problem click ok.”
I’ve tried to delete all wine files and start over but the above message in terminal and the corrupt apt remain.
Fortunately this is a test bed machine; everything on it is elsewhere. This could be wiped and no loss, but I’m going to repeat this process on 2 other machines; I hope to get it right here first – those will matter. This ssd has been around; it was originally LM19 and has successfully upgraded to lm 22.3 in the machine it’s in now.
Thank you Joshua.
Thanks for the kind words, Marc, and glad you are working through this on a testbed first. You are on the right track. The error happens because different Wine guides use different keyring locations, so you ended up with two source files pointing to the same repository but disagreeing on where the GPG key lives. Easy fix once you know what to clean up.
Run these commands to wipe all the conflicting WineHQ configurations:
Then verify APT is happy again:
That scary Linux Mint warning about corrupt APT should disappear. After that, start fresh from the “Download WineHQ GPG Signing Key” section and follow straight through. Once you have it working on your testbed, the other two machines should go smoothly since you will be starting clean. The guide now includes a troubleshooting section for this exact situation in case anyone else runs into it.
Hello guys! Today i installed linux mint 22.x and now im trying to install wine and i cant pass thru Verify the WineHQ repository appears in the update output, im getting W: GPG error: https://dl.winehq.org/wine-builds/ubuntu noble InRelease: The following signatures couldn’t be verified because the public key is not available: NO_PUBKEY 76F1A20FF987672F and E: The repository ‘https://dl.winehq.org/wine-builds/ubuntu noble InRelease’ is not signed. What can i do right now?
Andrew, this error means the GPG key file is missing. The
Signed-Byline in your sources file points to/usr/share/keyrings/winehq.gpg, but that file does not exist.Run the key import command again:
Verify the key file was created:
You should see a file around 2.3KB. Then run
sudo apt updateand the WineHQ repository should work without GPG errors.Everything worked perfectly, tested with 123freesolitaire.exe.
But now I’m stuck with Evernote.
Thanks for confirming the installation worked, Barny. Glad 123freesolitaire.exe ran successfully.
For Evernote, try launching the installer with
wine EvernoteSetup.exefrom the directory containing the file. If it fails, check the terminal output for missing dependencies. Evernote often needswinetricks corefontsandwinetricks vcrun2015for .NET components. Run those commands, then retry the installer. If you are still stuck, share the specific error message and I can help troubleshoot further.Thank you for your help; following your clear instructions it worked well.
I do not understand the YouTube posts as the definition of their movies is not clear and there is no way to copy and past to Terminal. Mint 22.1
Thanks again Peter
Thanks for the kind words, Peter. Glad the guide worked well for you on Mint 22.1.
You make a great point about video tutorials. Written guides let you copy commands directly, pause at your own pace, and search for specific steps instantly. Videos force you to pause, squint, and manually type commands while hoping you did not miss a character. That is exactly why LinuxCapable focuses on text-based tutorials with copy-paste ready code blocks.
The command ‘echo deb [signed-by=/usr/share/keyrings/winehq.gpg] http://dl.winehq.org/wine-builds/ubuntu/ noble main#’
It just prints ‘deb [signed-by=/usr/share/keyrings/winehq.gpg] http://dl.winehq.org/wine-builds/ubuntu/ noble main#’ right under the same command and does NOT do anything else.
Thanks for reporting this, pooky2483. The
echocommand by itself just prints to the screen. It needs output redirection to create the file.The current guide uses the DEB822 format with proper redirection. Run this command block for Linux Mint 22.x:
For Linux Mint 21.x, use
jammyinstead ofnoblein the Suites line. The guide includes complete instructions for both versions with the correct repository format.This is THE MOST comprehensive ‘how to’ that I have been fortunate enough to come across.
The steps are not only easy to follow, but explained as to how and why they are done. Have had and ongoing battle with WINE for too long now, this tutorial solved it all. Heading over to the Virtual Box install now.
Thank you so much.
Running Mint 21.3. Instructions failed right from the start. Ran the command: sudo apt install dirmngr ca-certificates software-properties-common apt-transport-https and received this message
“E: Unable to locate package dirmgr” I then did a repository search (sudo apt-cache search dirmgr) and did not get any hits.
I had a previous version of WineHQ on this machine before a hard drive failure last year. Can’t seem to reinstall it since changing the HD and reloading Mint.
I am just a beginner here, but maybe I can help. It looks like your command has ‘dirmngr’ while the response message has ‘dirmgr’. Could you be dealing with a typo?
Thanks for catching that typo, Wayne. You were absolutely right. The article had
dirmgrinstead ofdirmngrwhen you commented in January. The command has since been corrected to:After running the corrected command, continue with enabling 32-bit architecture support and importing the WineHQ repository key. If you are still having issues after the hard drive replacement, verify that your sources are clean by checking /etc/apt/sources.list.d/ for any old WineHQ entries from your previous installation that might be conflicting.