

This guide will demonstrate how to install Nvidia Drivers on Linux Mint 22, 21, or 20 releases utilizing the command-line terminal with Linux Mint’s default repository, CLI or Desktop GUI Installer, Graphics Drivers LaunchPAD PPA, or Nvidia CUDA APT Repository builds.
Nvidia drivers are pivotal for optimizing the performance and compatibility of Nvidia graphics cards in Linux Mint environments. These drivers ensure that users can fully leverage the advanced features of their Nvidia hardware, from gaming and graphic design to computational workloads with CUDA technology. The right driver installation can significantly enhance system stability, graphical performance, and the overall user experience. Key highlights include:
- Enhanced Performance: Optimizes graphics rendering and computational tasks, ensuring smooth and efficient operation.
- Broad Compatibility: Supports a wide range of Nvidia graphics cards, ensuring users can find a driver that matches their specific hardware.
- Advanced Features: Access to Nvidia’s proprietary features such as G-Sync, PhysX, and CUDA for specialized tasks.
- Improved Stability: Reduces system crashes and graphics-related errors, contributing to a more reliable computing environment.
- Energy Efficiency: Optimizes power usage, reducing energy consumption and heat output for laptops and desktops.
- Regular Updates: Frequent driver updates provide compatibility with the latest games and applications, along with security improvements.
- Customizable Settings: Allows users to adjust graphics settings to balance performance and quality, tailoring the experience to their needs.
- Streamlined Installation: Various installation methods cater to different user preferences and expertise levels, ensuring a straightforward setup process.
Transitioning seamlessly from understanding the importance of Nvidia drivers, we’ll delve into the technical how-to, ensuring a smooth installation process on Linux Mint.
Remove Previous Nvidia Installations from Linux Mint
Before installing the new Nvidia drivers, it is essential to remove any previous installations to avoid conflicts or unexpected issues. This is particularly important if you have installed Nvidia drivers from different sources, such as the default and CUDA repositories. To ensure a smooth installation, follow the steps below to remove the previous Nvidia drivers from your system.
APT Remove Method for Nvidia Drivers
First, use the following command to remove any traces of Nvidia installation on your system. This command will uninstall all Nvidia-related packages and their configuration files:
sudo apt autoremove nvidia* --purgeRunfile Remove Method for Nvidia Drivers Installation
If you have installed the Nvidia drivers using the .run file, which is not recommended but can be found on some Linux blogs; you need to uninstall it using a different command. The .run file installation method is less preferable due to the availability of better alternatives, such as the Nvidia CUDA repository.
To remove the runfile type of installation, use the following command:
sudo /usr/bin/nvidia-uninstallCUDA Toolkit Runfile Remove Method Installation
Lastly, if you have installed the CUDA toolkit using the runfile, you can remove it by running the following command. Replace X.Y with the appropriate version number:
sudo /usr/local/cuda-X.Y/bin/cuda-uninstallFollowing these steps, you can successfully remove any previous Nvidia driver installations from your system and prepare for a fresh installation.
Pre-installation Steps for Nvidia Drivers on Linux Mint
Before installing the Nvidia drivers, performing some pre-installation steps is essential to ensure a smooth installation process. These steps include determining your graphics card model and ensuring your Linux Mint system is up-to-date.
Determine Your Graphics Card Model on Linux Mint
For users with older NVIDIA graphics cards, it’s crucial to determine the card model and verify its compatibility with the latest drivers. Users with new graphics cards can skip this step as their cards will likely be supported.
First, find your graphics card model by running the following command:
lspci | grep -e VGAExample output:
03:00.0 VGA compatible controller: NVIDIA Corporation TU117 [GeForce GTX 1650] (rev a1)If you have an older graphics card, check the NVIDIA website to determine if the latest NVIDIA drivers still support it. In some cases, you may need to install legacy drivers for compatibility.
Update Linux Mint Before Nvidia Drivers Installation
Before proceeding with the driver installation, updating your Linux Mint system to avoid any conflicts during installation is crucial. Updating your system ensures that all packages, including new kernels and graphics card drivers, are compatible with your current setup.
To update your system, first, run the following command to check for any available updates:
sudo apt updateNext, upgrade any outdated packages using the following command:
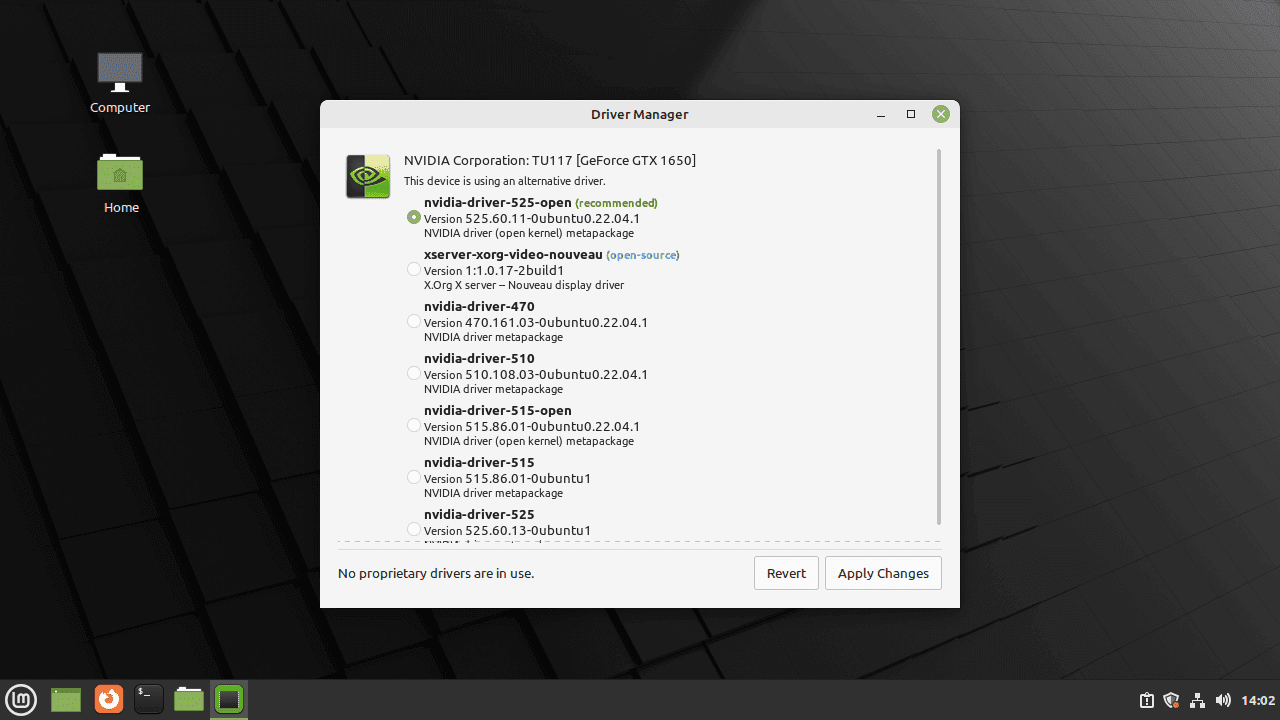
sudo apt upgradeInstall Nvidia Drivers on Linux Mint via Driver Manager (GUI)
The recommended method for most Linux Mint users is to install the Nvidia drivers using the built-in Driver Manager. This method typically installs the open-source version of the drivers and provides some alternative options for better system compatibility.
Accessing the Driver Manager on Linux Mint
To access the Driver Manager in Linux Mint, follow these steps:
- Click on the Menu (Taskbar) in the lower-left corner of your screen.
- Navigate to Administration.
- Click on Driver Manager.

Install Nvidia Drivers on Linux Mint via Driver Manager
Once you have opened the Driver Manager, follow these steps to install the Nvidia drivers:
- The Driver Manager will prompt you for your password. Enter your password and click on Authenticate.
- The Driver Manager will scan your system for available drivers. Once the scanning is complete, you will see a list of available drivers for your graphics card.
- Select the recommended Nvidia driver from the list.
- Click on Apply Changes to start the installation process.
Rebooting Your System To Complete Nvidia Drivers Installation
After installing or removing any Nvidia drivers, it’s essential to reboot your system for the changes to take effect. To reboot your system, either use the graphical interface to restart your computer or run the following command in the terminal:
rebootInstall Nvidia Drivers on Linux Mint via APT PPA
The second method for installing Nvidia drivers involves using the command-line terminal to access the well-known PPA maintained by the Graphics Drivers team. This PPA is recognized for providing the most up-to-date Nvidia proprietary drivers, making it a suitable choice for users who wish to update their graphics cards regularly.
Import the Graphics Drivers Team PPA
To add this repository to your Linux Mint system, run the following command:
sudo add-apt-repository ppa:graphics-drivers/ppa -yUpdate Your System After Graphics Drivers Team PPA Imported
With the PPA imported, run an APT update:
sudo apt updateCheck for Recommended Drivers on Linux Mint with new PPA
Next, enter the following command in the terminal to display recommendations for your graphics card:
ubuntu-drivers devices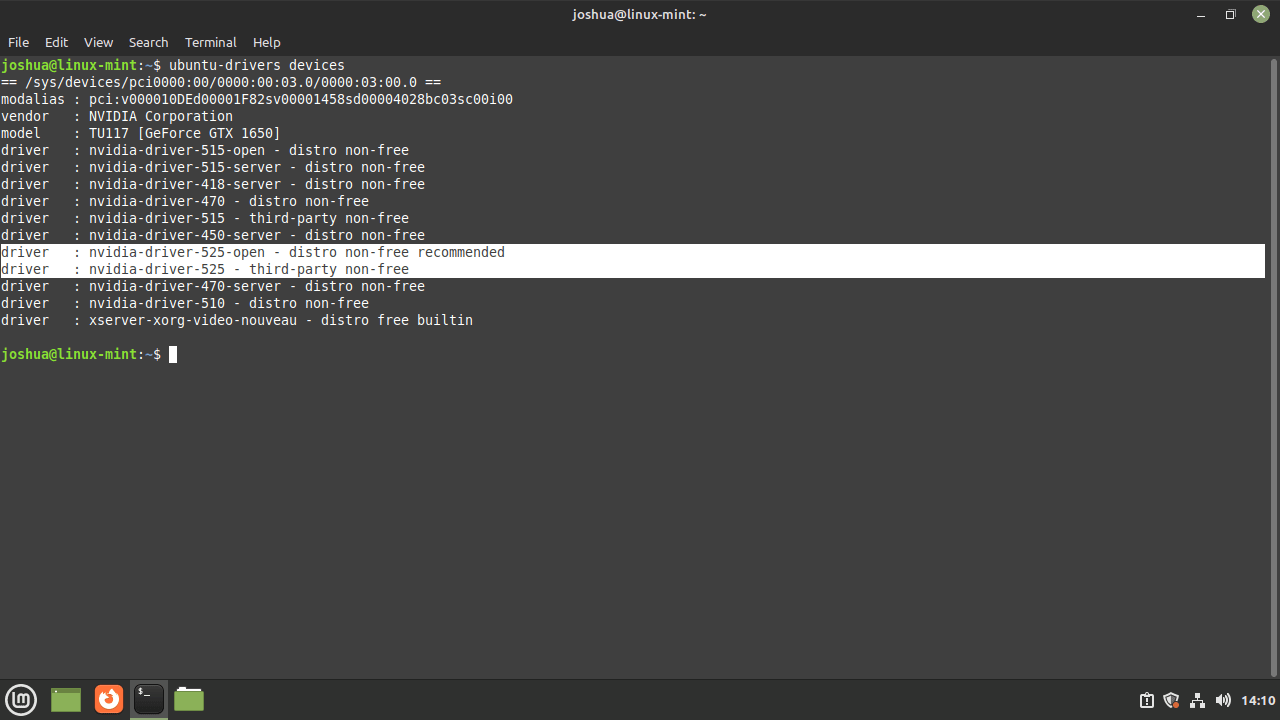
As shown in the output, there is a third-party recommended driver, but you can technically install any of the available drivers.
Install the Recommended Driver or Choose a Different Version
If you are satisfied with the recommended version, use this command to install it:
sudo ubuntu-drivers autoinstallAlternatively, you can install a specific driver version by choosing from the commands below:
sudo apt install nvidia-driver-545sudo apt install nvidia-driver-535sudo apt install nvidia-driver-525sudo apt install nvidia-driver-525sudo apt install nvidia-driver-520sudo apt install nvidia-driver-515sudo apt install nvidia-driver-510sudo apt install nvidia-driver-470sudo apt install nvidia-driver-450sudo apt install nvidia-driver-390Reboot Your System After Nvidia Drivers Installation
Once the installation is complete, reboot your system for the changes to take effect:
rebootInstall Nvidia Drivers on Linux Mint CUDA APT PPA
The third and final method of installing Nvidia drivers is utilizing the Nvidia CUDA repository. This repository is frequently updated and supports Debian, Ubuntu, RHEL, and the most popular Linux distributions. Since Linux Mint is based on Ubuntu, installing drivers from this repository works just as well as on any Ubuntu system.
Note: Linux Mint 22 Nvidia Drivers or CUDA build is not available yet, once it is I will update the guide, so far only Linux Mint 21 and 20 are available.
Import the Nvidia APT PPA on Linux Mint
First, ensure the following packages are installed; they may already be present on your system:
sudo apt install dirmngr ca-certificates software-properties-common apt-transport-https dkms curl -yNext, import the GPG key and ensure it matches your distribution version. The first command is for Linux Mint 21:
curl -fSsL https://developer.download.nvidia.com/compute/cuda/repos/ubuntu2204/x86_64/3bf863cc.pub | sudo gpg --dearmor | sudo tee /usr/share/keyrings/nvidia-drivers.gpg > /dev/null 2>&1And the second command is for Linux Mint 20:
curl -fSsL https://developer.download.nvidia.com/compute/cuda/repos/ubuntu2004/x86_64/3bf863cc.pub | sudo gpg --dearmor | sudo tee /usr/share/keyrings/nvidia-drivers.gpg > /dev/null 2>&1Now, import the repository for your system, ensuring you choose the correct one to match your Linux Mint distribution version. The first command is for Linux Mint 21:
echo 'deb [signed-by=/usr/share/keyrings/nvidia-drivers.gpg] https://developer.download.nvidia.com/compute/cuda/repos/ubuntu2204/x86_64/ /' | sudo tee /etc/apt/sources.list.d/nvidia-drivers.listAnd the second command is for Linux Mint 20:
echo 'deb [signed-by=/usr/share/keyrings/nvidia-drivers.gpg] https://developer.download.nvidia.com/compute/cuda/repos/ubuntu2004/x86_64/ /' | sudo tee /etc/apt/sources.list.d/nvidia-drivers.listInstall Nvidia Drivers on Linux Mint (Proprietary or Open-Source)
Update your sources list to include the newly added repository:
sudo apt updateNext, install the latest Nvidia drivers. Most users should know the version they prefer. You can also use the APT search command to display the complete list if you want to investigate what is available:
apt search nvidia-driver-*This tutorial demonstrates how to install the latest version currently available. To install a different version, replace “545” with “535”, “530,” “525”, “520”, “515”, etc.
Proprietary Drivers: Install Nvidia Drivers 545.xx Without Cuda Support Example Command:
sudo apt install nvidia-driver-545Proprietary Drivers: Install Nvidia Drivers 545.xx With Cuda Support Example Command:
sudo apt install nvidia-driver-545 cudaOpen-Source Drivers: Install Nvidia Drivers 545.xx Without Cuda Support Example Command:
sudo apt install nvidia-driver-545-openOpen-Source Drivers: Install Nvidia Drivers 545.xx With Cuda Support Example Command:
sudo apt install nvidia-driver-545-open cudaConfirm Nvidia Drivers are Installed on Linux Mint
CLI Method to Check Nvidia Drivers Installation
After installing the Nvidia drivers and restarting your system, verifying that the installation was successful is essential. You can do this using the command line terminal with the nvidia-smi command:
nvidia-smi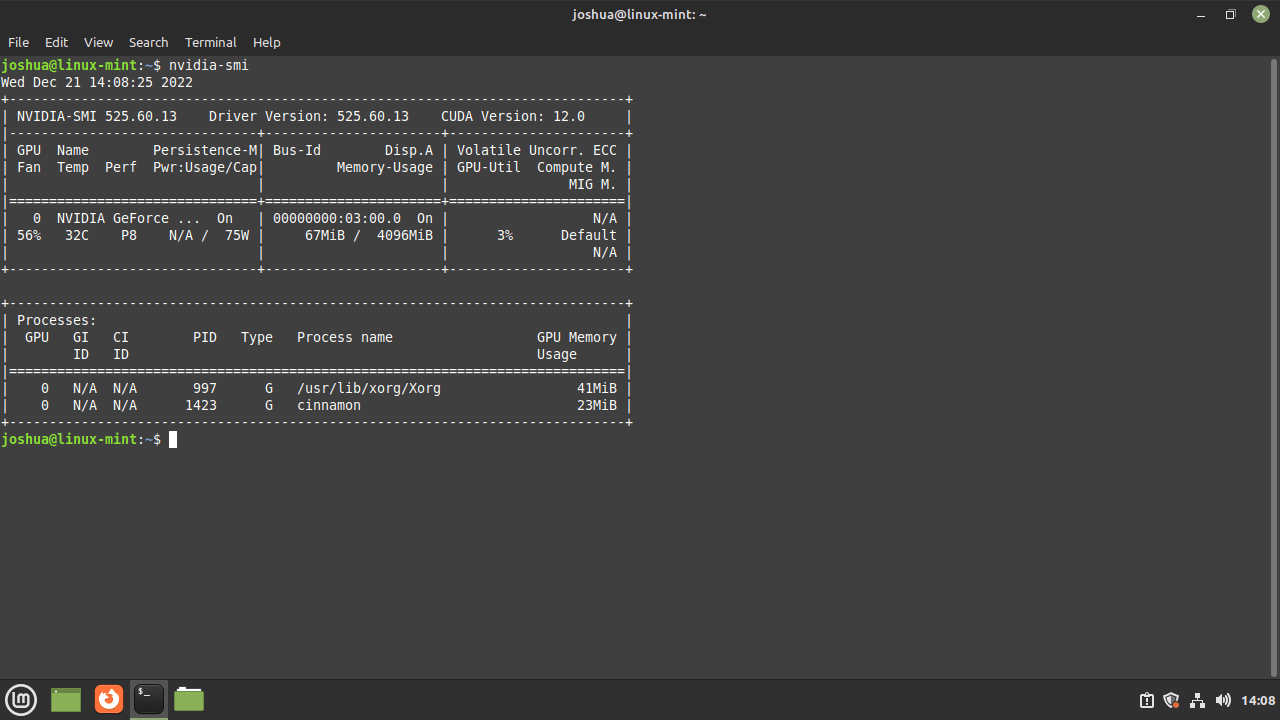
GUI Method to Check Nvidia Drivers Installation
Alternatively, you can launch the NVIDIA settings GUI by running:
nvidia-settingsOr, navigate to Taskbar > Administration > NVIDIA X Server Settings.
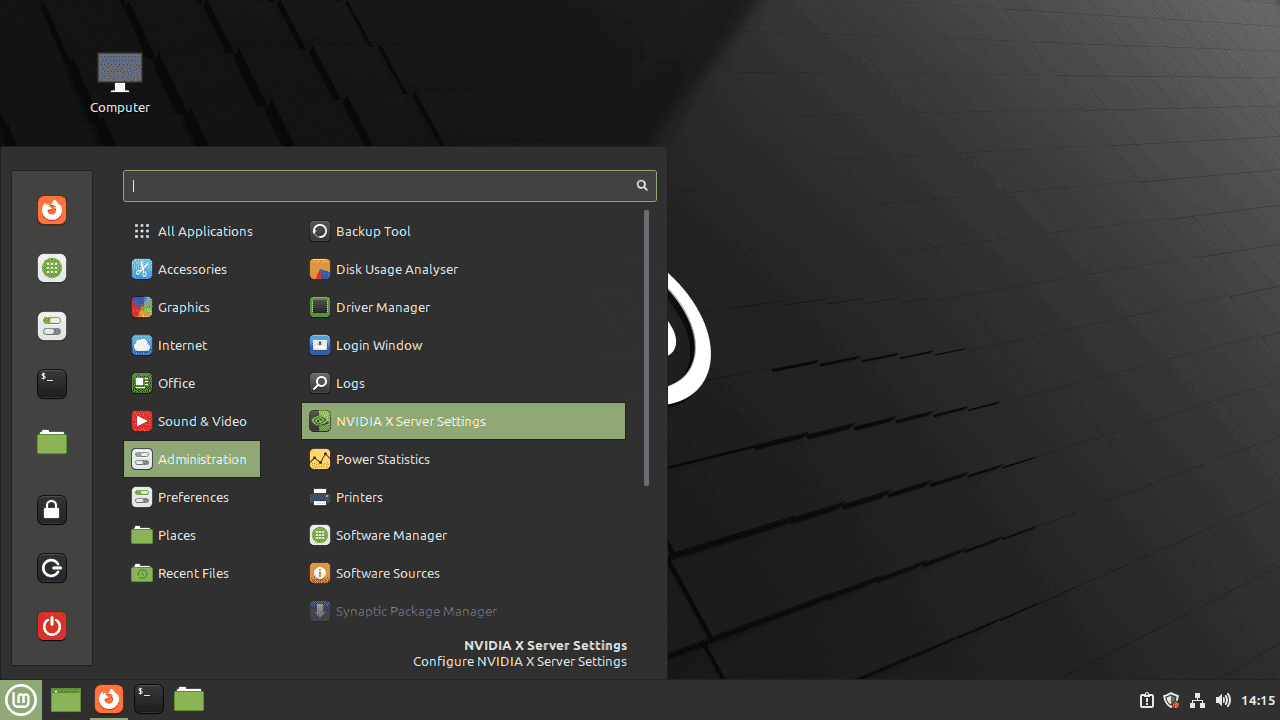
Once open, you can view your NVIDIA card configuration, information, and various settings.

Conclusion
In wrapping up our guide, we’ve walked through the steps to get your Nvidia drivers up and running on Linux Mint, whether you’re on version 22, 21, or 20. The key takeaway is to choose the installation method that feels right for you through the command-line interface, the Desktop GUI Installer, the Graphics Drivers PPA, or the Nvidia CUDA repository. Remember, keeping your drivers updated ensures you’re getting the best performance and stability from your Nvidia card. Don’t shy away from experimenting with different methods to find what works best for your setup. And always feel free to revisit this guide if you need a refresher. Here’s to smoother graphics and cooler computing on your Linux Mint system!