
A spare Linux Mint system can become a polished home media server without turning into a full NAS rebuild. You can install Plex Media Server on Linux Mint through Plex’s current APT repository, then stream movies, TV shows, music, and photos to browsers, phones, smart TVs, and other clients from one library.
The current Plex APT source works the same way on Linux Mint 22.x and 21.x, with updates handled through normal APT maintenance. Because Plex uses TCP port 32400 for the web interface and streaming, plan for firewall rules, media-directory permissions, headless SSH access, and optional Nginx reverse proxy setup when your server sits on another machine or public domain.
Install Plex Media Server on Linux Mint
Update Linux Mint Before Installing Plex
Start by updating your system to ensure all existing packages are current. This prevents dependency conflicts during the Plex installation:
sudo apt update && sudo apt upgradeThese commands use
sudofor tasks that need root privileges. If your account is not in the sudoers file yet, see how to create and add users to sudoers on Linux Mint.
Import the Plex APT Repository
Use Plex’s current https://repo.plex.tv/deb/ source, not the retired downloads.plex.tv/repo/deb entry that older instructions may still show. The cleanup step removes old Plex source files before the new DEB822 source is written, preventing APT from offering the older package branch.
Add the official Plex repository so your system receives updates directly from Plex. Install the tools used to fetch and store the signing key:
sudo apt install curl gpg -yRemove older Plex source files and keyrings before writing the current source. This clears the retired downloads.plex.tv/repo/deb repository as well as older article-created files:
sudo rm -f /etc/apt/sources.list.d/plex.list
sudo rm -f /etc/apt/sources.list.d/plex.sources
sudo rm -f /etc/apt/sources.list.d/plexmediaserver.list
sudo rm -f /etc/apt/sources.list.d/plexmediaserver.sources
sudo rm -f /usr/share/keyrings/plex.gpg
sudo rm -f /usr/share/keyrings/plexmediaserver.gpg
Create the keyring directory, then import Plex’s v2 signing key. The Signed-By directive in the repository definition limits this key to Plex packages only, so no other repository can use it. The curl -fsSL flags keep the download quiet unless something fails; the curl command in Linux guide breaks down that shorthand.
sudo install -d -m 0755 /etc/apt/keyrings
curl -fsSL https://downloads.plex.tv/plex-keys/PlexSign.v2.key | sudo gpg --dearmor --yes -o /etc/apt/keyrings/plexmediaserver.v2.gpg
Create a DEB822-format repository definition using Plex’s current repository fields. Plex’s repository update instructions use the same public suite, so Linux Mint does not need Ubuntu codename substitutions for this source:
printf '%s\n' 'Types: deb' 'URIs: https://repo.plex.tv/deb/' 'Suites: public' 'Components: main' 'Architectures: amd64' 'Signed-By: /etc/apt/keyrings/plexmediaserver.v2.gpg' | sudo tee /etc/apt/sources.list.d/plexmediaserver.sources > /dev/nullThis printf and sudo tee pattern writes the file immediately with root permissions, so the terminal returns to the prompt as soon as the command finishes. Current Linux Mint 22.x and 21.x desktop installations use amd64 on supported PCs, so leave that architecture field in place unless you deliberately maintain a different Debian-compatible architecture and have confirmed that Plex publishes a matching package.
Install the Plex Media Server Package
Refresh the package index to include the new Plex source:
sudo apt updateConfirm APT can see the Plex package before installing it:
apt-cache policy plexmediaserverplexmediaserver:
Installed: (none)
Candidate: 1.43.2.10687-563d026ea
Version table:
1.43.2.10687-563d026ea 500
500 https://repo.plex.tv/deb public/main amd64 Packages
If the candidate is missing, confirm /etc/apt/sources.list.d/plexmediaserver.sources exists, then run sudo apt update again before checking apt-cache policy plexmediaserver one more time. If the source row still shows downloads.plex.tv/repo/deb, an older Plex source file is still enabled.
Install Plex Media Server:
sudo apt install plexmediaserver -yThe package creates a dedicated plex service account and the /var/lib/plexmediaserver data directory. Keep that account in mind when setting media-directory permissions later.
Verify Plex Media Server Installation on Linux Mint
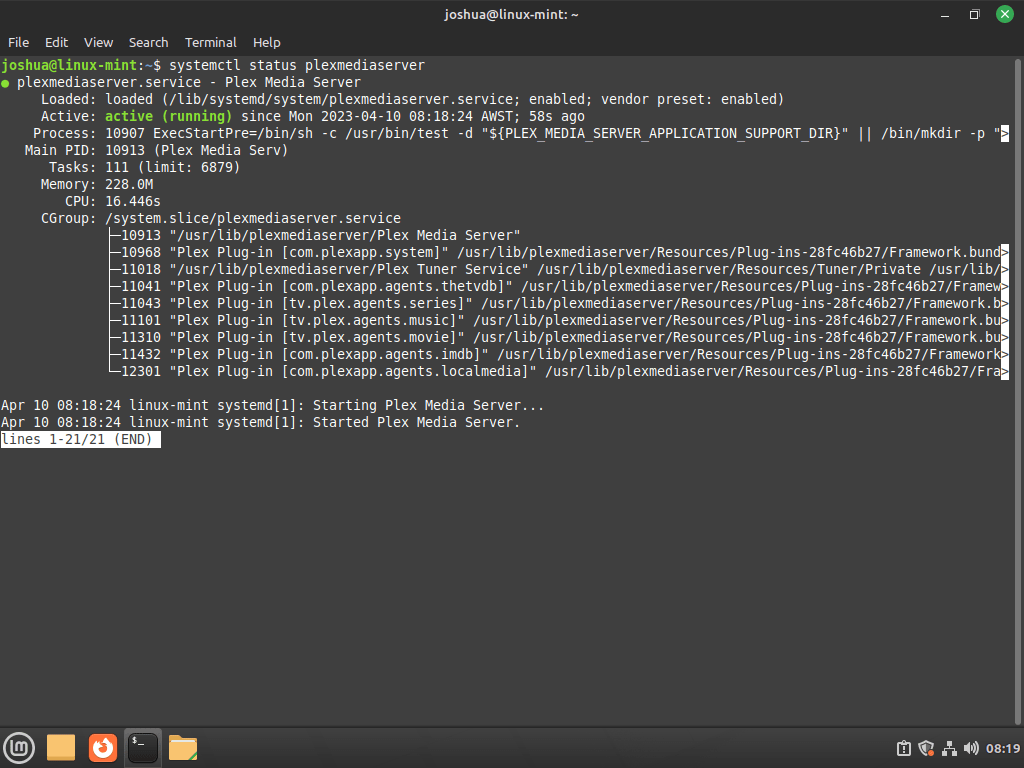
The Plex Media Server service starts automatically after installation. Confirm it is running:
systemctl is-active plexmediaserverA healthy service reports:
active
If the service shows as inactive or failed, start it manually:
sudo systemctl start plexmediaserverThe installer also enables Plex to start automatically on boot. Verify this:
systemctl is-enabled plexmediaserverenabled
If the service is not enabled, configure it for automatic startup with sudo systemctl enable plexmediaserver. Confirm Plex is listening on its web and streaming port before opening firewall access:
sudo ss -ltnp | grep ':32400'A LISTEN row for port 32400 confirms the local service is ready. To apply configuration changes or restart Plex after updates:
sudo systemctl restart plexmediaserverConfigure UFW Firewall for Plex on Linux Mint
Plex Media Server listens on TCP port 32400 by default. If clients on your LAN or remote devices need to reach the server, open that port in UFW and then add optional discovery ports only when you use those Plex features.
Enable UFW for Plex
UFW is usually pre-installed on Linux Mint but may not be active. Ensure it is installed:
sudo apt install ufw -yIf you access this system remotely via SSH, allow SSH before enabling UFW. Skipping this step locks you out immediately and may require physical console access to recover.
Allow SSH (if connecting remotely) and enable the firewall:
sudo ufw allow OpenSSH
sudo ufw enable
Confirm the firewall is active:
sudo ufw statusStatus: active To Action From -- ------ ---- OpenSSH ALLOW Anywhere
Add Plex Media Server Port Rules
The primary Plex web interface runs on TCP port 32400. Allow incoming connections on this port after the listener check shows Plex is active:
sudo ufw allow 32400/tcpConfigure Plex Discovery and Companion Ports
Plex uses several additional ports for device discovery and client communication. Plex’s firewall port reference lists these as local-network ports for features such as DLNA, Roku control, mDNS, and GDM discovery.
Do not forward these optional discovery ports through your router or expose them on a public-facing host. Restrict them to your LAN subnet when you need local discovery. Replace
192.168.1.0/24with the subnet your clients actually use.
Allow the optional local discovery and companion ports from your LAN only:
sudo ufw allow from 192.168.1.0/24 to any port 1900 proto udp
sudo ufw allow from 192.168.1.0/24 to any port 5353 proto udp
sudo ufw allow from 192.168.1.0/24 to any port 8324 proto tcp
sudo ufw allow from 192.168.1.0/24 to any port 32410 proto udp
sudo ufw allow from 192.168.1.0/24 to any port 32412 proto udp
sudo ufw allow from 192.168.1.0/24 to any port 32413 proto udp
sudo ufw allow from 192.168.1.0/24 to any port 32414 proto udp
sudo ufw allow from 192.168.1.0/24 to any port 32469 proto tcp
Here is what each port provides:
- 1900/udp: SSDP access for Plex DLNA Server discovery on the local network.
- 5353/udp: Older Bonjour/Avahi discovery for clients that still use mDNS.
- 8324/tcp: Plex Companion control for Roku devices.
- 32410/udp, 32412/udp, 32413/udp, and 32414/udp: GDM discovery for local Plex clients.
- 32469/tcp: Plex DLNA Server access for DLNA-capable devices.
These additional ports are optional if you only access Plex through the web interface or remote streaming. Source-restricting them keeps the rule set useful for smart TV apps and mobile devices without opening discovery traffic to every network that can reach the host.
Configure SSH Tunnel for Plex on a Remote Linux Mint Server
If Plex is running on a headless Linux Mint box or another room’s desktop, an SSH tunnel gives you a quick way to open the web setup from your workstation without exposing anything beyond SSH. For SSH package and account setup details, see how to install OpenSSH on Linux Mint.
Set Up the Plex SSH Tunnel
From your local workstation, create a tunnel that forwards port 8888 to the server’s Plex port. Replace youruser with your Linux username and server-ip with the server’s actual IP address:
ssh -L 8888:127.0.0.1:32400 youruser@server-ipKeep the SSH session open during initial setup. Closing it breaks the tunnel and disconnects you from Plex.
If SSH is not installed on the server yet, install the server package first:
sudo apt install openssh-server -yLinux Mint 22.x usually reports SSH through ssh.socket, while Linux Mint 21.x keeps the familiar ssh.service check. Verify the one that matches your release:
Linux Mint 22.x:
systemctl is-active ssh.socket
systemctl is-enabled ssh.socket
active enabled
Linux Mint 21.x:
systemctl is-active ssh
systemctl is-enabled ssh
active enabled
Access Plex via SSH Tunnel
Open the following address in your web browser to access Plex through the tunnel:
http://127.0.0.1:8888/web
If that does not work, try the explicit setup path:
http://127.0.0.1:8888/web/index.html#!/setup
The SSH tunnel redirects the request to http://localhost:32400/web on the remote server.
Access Plex Remotely After Initial Setup
Once you finish the initial setup, access Plex Media Server from any device on your LAN:
http://server-ip:32400
You can also connect through Plex’s relay at app.plex.tv, which terminates on a trusted plex.direct hostname.
Complete Plex Media Server Initial Setup
Open your browser and navigate to the Plex web interface:
http://127.0.0.1:32400/web
If that does not load, try:
http://localhost:32400/web/index.html#!/setup
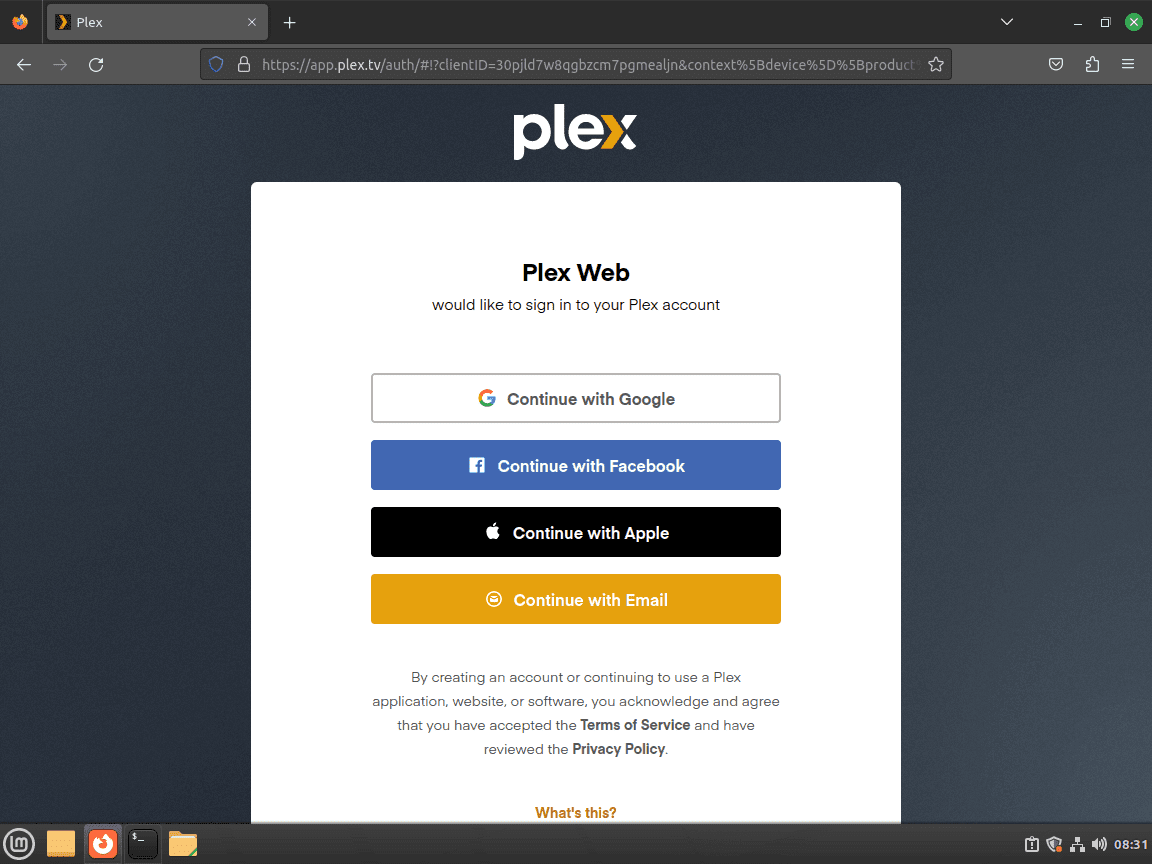
Sign in with your Plex account, or create one if this is your first Plex server.
Walk Through the Plex Welcome Screen
The first configuration page explains what Plex is and how it works. Click GOT IT! to continue.
Firefox users may see a message prompting them to enable DRM. Approve it so the Plex Web UI can display video previews correctly.

Evaluate Plex Pass (Optional)
Plex offers a Plex Pass subscription that unlocks mobile sync, HDR tone mapping, and early access builds. Click the X in the corner if you are not ready to subscribe.

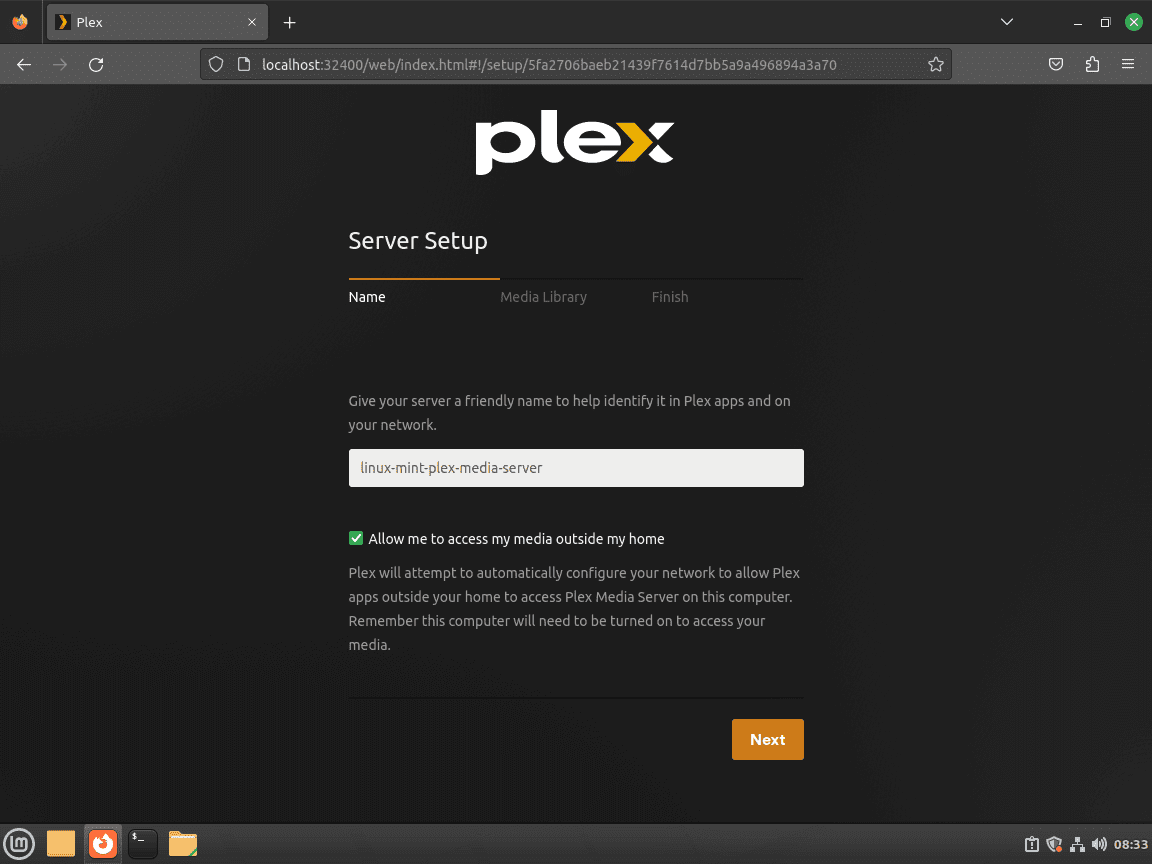
Name the Plex Server and Enable Remote Access
Give the server a recognizable name. You also have the option to disable Allow me to access my media outside my home. Leaving it on lets Plex broker connections through its relay service; disable it if you prefer to rely strictly on your own reverse proxy or VPN.
Click NEXT to continue.
Add or Skip Plex Media Libraries
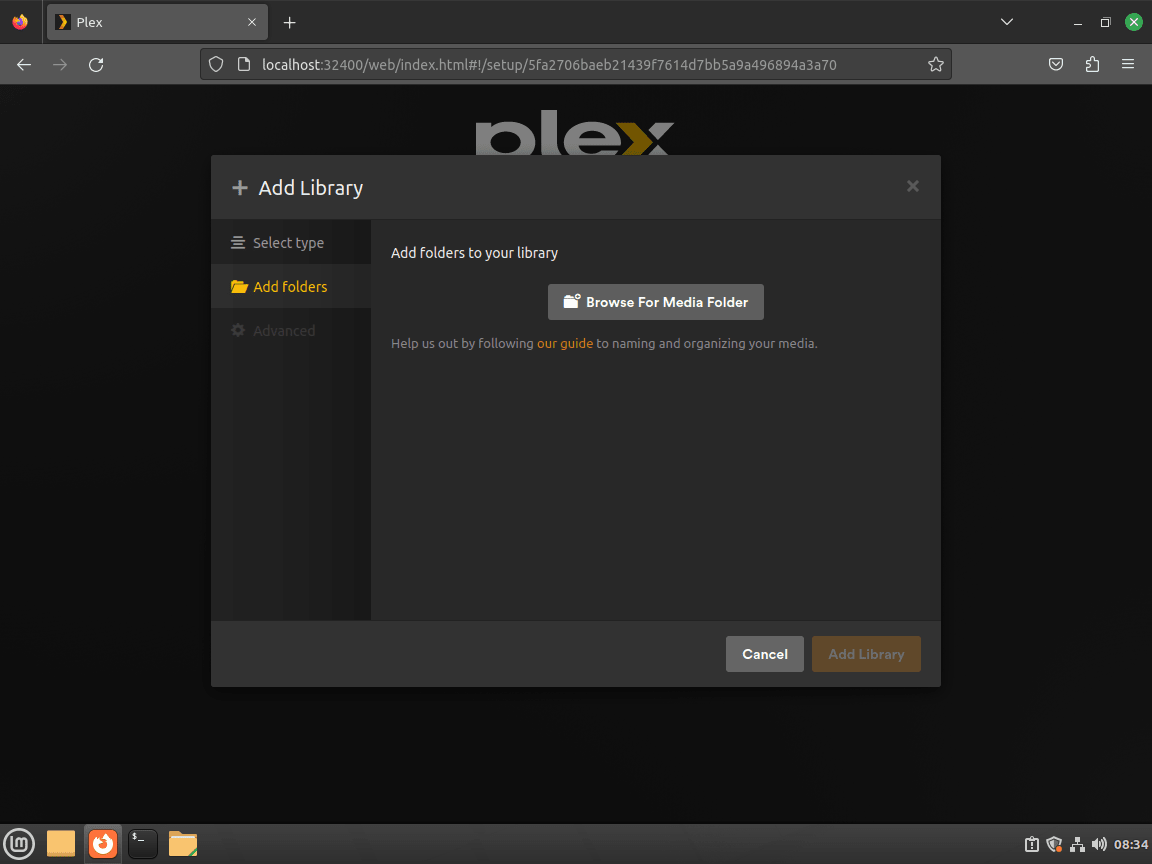
You can pre-load media folders now or skip and return later from the dashboard. Click ADD LIBRARY when you are ready.
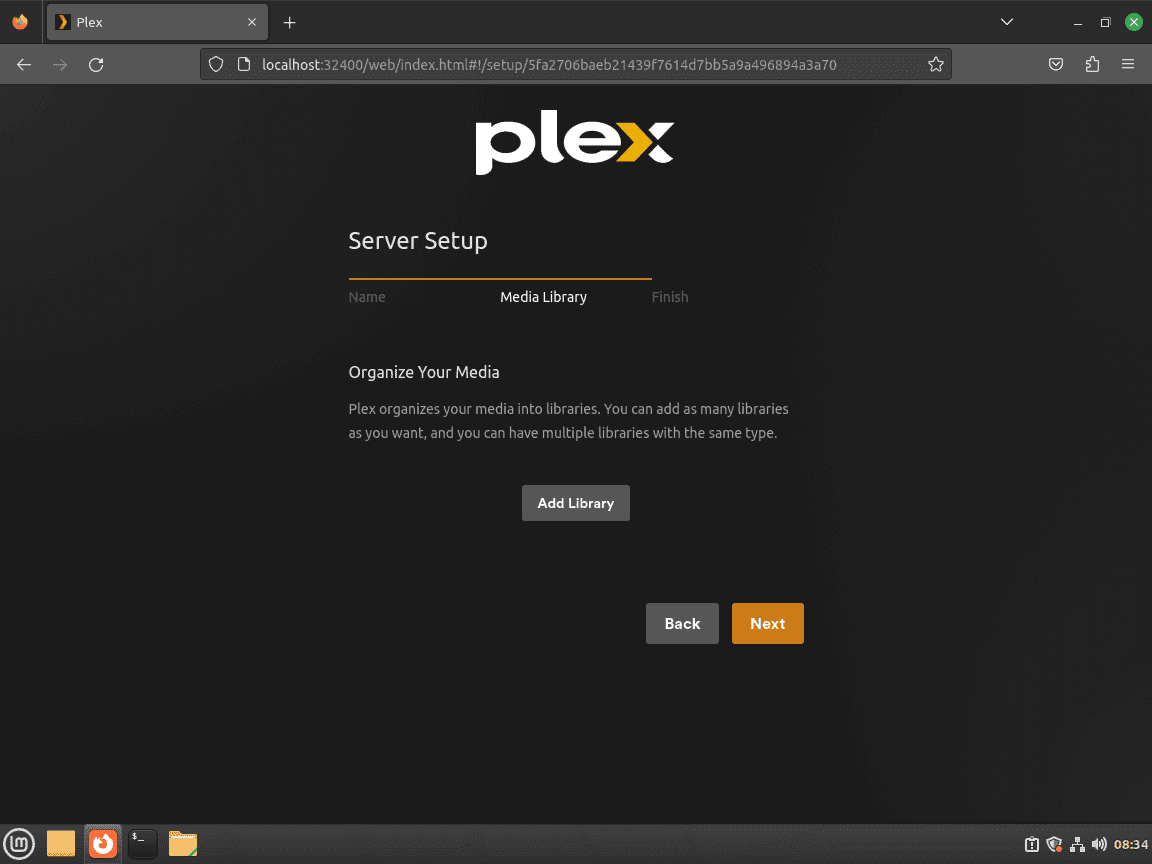
Select the type of media you want the folder organized as (TV shows, movies, music, etc.) and click NEXT.

Click BROWSE FOR MEDIA FOLDER and select the media directory.
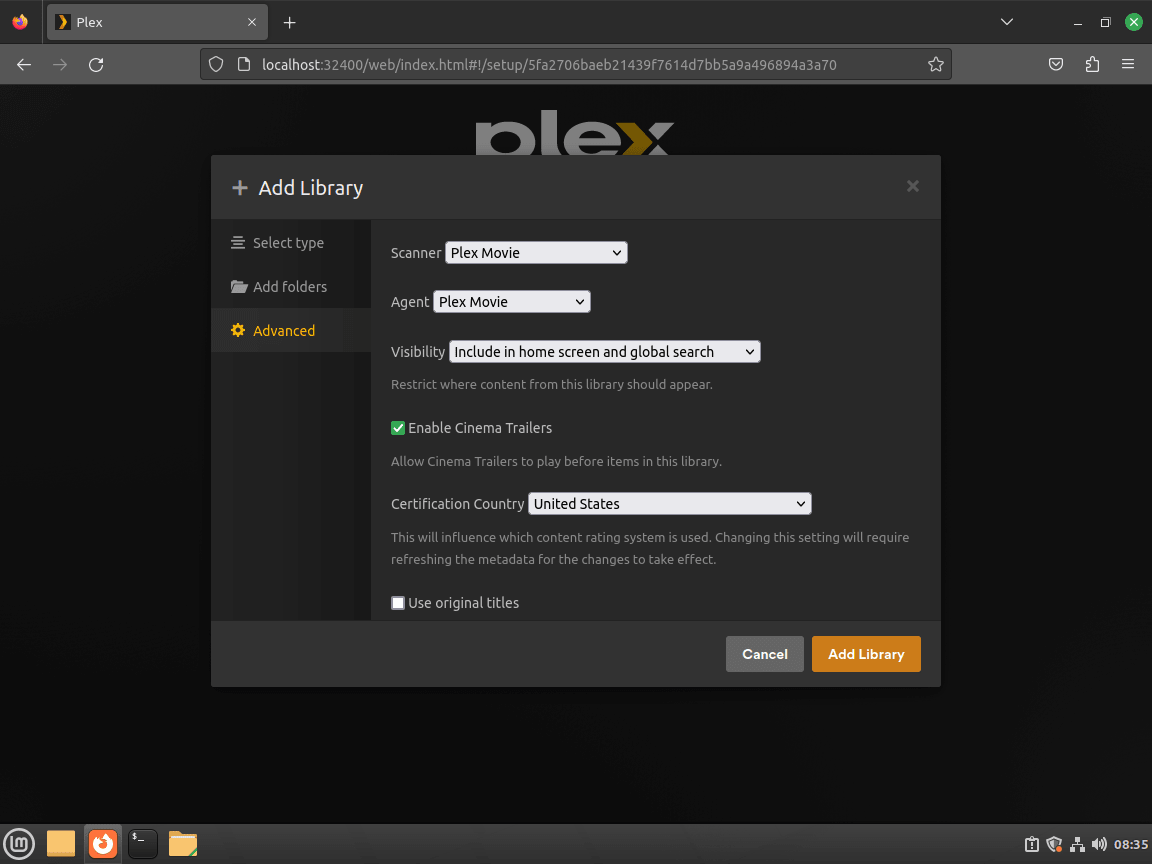
Once the folder is added, the Advanced options appear for further customization. Click ADD LIBRARY to finish adding this library.
Finish the Plex Setup Wizard
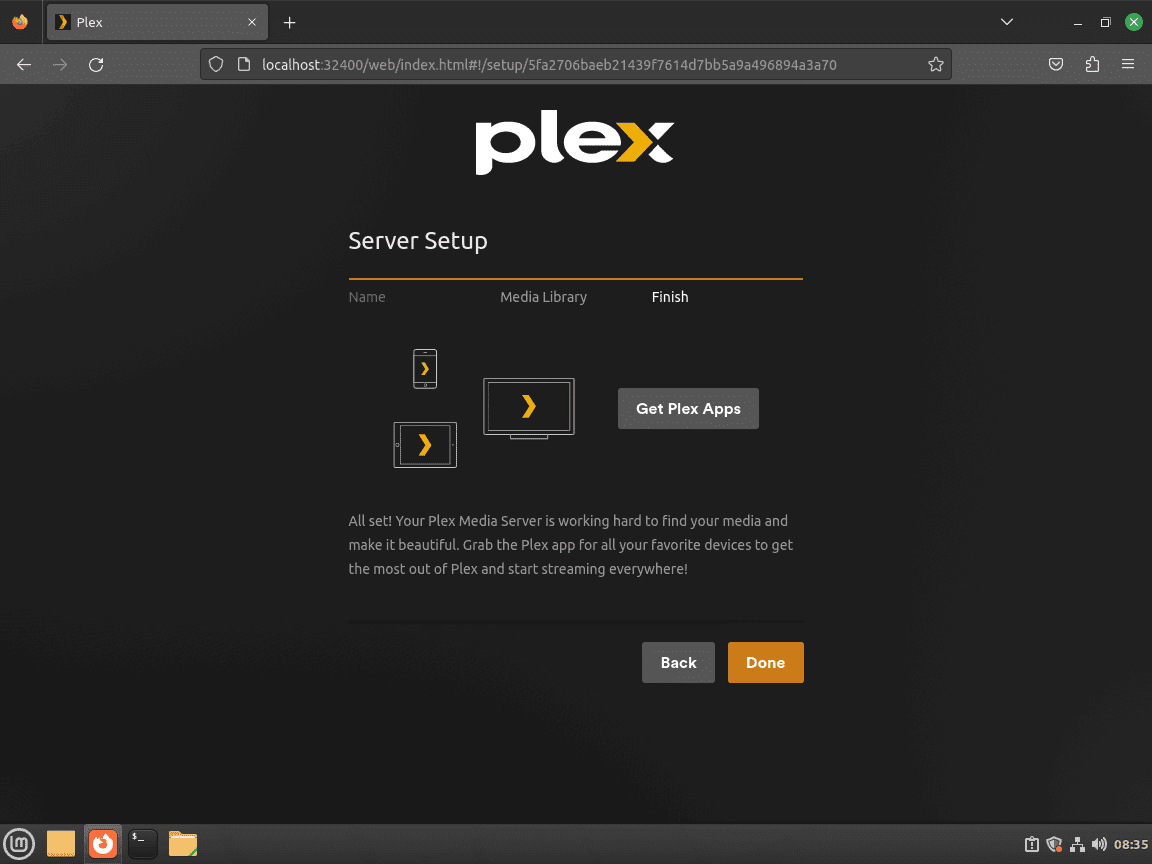
Click NEXT to finish the initial setup, with or without adding a media library. The next screen confirms everything is configured. Click DONE to reach the Plex Dashboard.
Set Media Directory Permissions for Plex on Linux Mint
Plex runs as a dedicated plex user account, which needs read and execute permission on your media directories. If your libraries appear empty despite files being present, permissions are the most common cause.
Two approaches work: setfacl grants Plex access without changing file ownership (best for shared drives where other users also need access), while chown transfers ownership entirely to Plex. The setfacl command examples explain the ACL model in more depth if you need to adapt this to several shared folders.
Grant Plex Access with setfacl
Grant read and execute access to the plex user without changing ownership, then set a default ACL so new files added directly under the library root inherit Plex access:
sudo setfacl -R -m u:plex:rx /media/yourfolder/
sudo setfacl -d -m u:plex:rx /media/yourfolder/
Verify the permissions:
getfacl /media/yourfolder/# file: media/yourfolder/ # owner: yourusername # group: yourusername user::rwx user:plex:r-x group::r-x mask::r-x other::r-x default:user::rwx default:user:plex:r-x default:group::r-x default:mask::r-x default:other::r-x
Repeat the same ACL pair for each separate library root, such as /media/yourfolder/tv or /media/yourfolder/movies, when those directories are managed independently.
Transfer Ownership to Plex with chown
If Plex should fully own the media directories:
sudo chown -R plex:plex /media/yourfolder/To set ownership on individual folders within a shared drive:
sudo chown -R plex:plex /media/yourfolder/tv
sudo chown -R plex:plex /media/yourfolder/movies
Verify ownership:
ls -la /media/yourfolder/drwxr-xr-x 4 plex plex 4096 Nov 28 10:00 . drwxr-xr-x 3 root root 4096 Nov 28 09:00 .. drwxr-xr-x 2 plex plex 4096 Nov 28 10:00 movies drwxr-xr-x 2 plex plex 4096 Nov 28 10:00 tv
Install the ACL Package for Plex (If Needed)
If setfacl is not found, install the ACL package:
sudo apt install acl -yConfigure Nginx Reverse Proxy for Plex on Linux Mint
A reverse proxy lets you access Plex from outside your network using a custom domain with SSL encryption. For more Nginx configuration options, see how to create a reverse proxy in Nginx.
Install Nginx for Plex on Linux Mint
Install Nginx from the Linux Mint package base:
sudo apt install nginx -yNginx should start and enable automatically. If it is not active:
sudo systemctl enable nginx --nowVerify Nginx is running and enabled:
systemctl is-active nginx
systemctl is-enabled nginx
active enabled
Create a Plex Nginx Server Block
Create a new server block configuration file. You need an active domain with DNS records pointing to your server IP. The quoted heredoc keeps Nginx variables such as $host and $proxy_add_x_forwarded_for literal while writing the file:
sudo tee /etc/nginx/conf.d/plex.conf > /dev/null <<'EOF'
server {
    listen 80;
    server_name plex.example.com;

    location / {
        proxy_http_version 1.1;
        proxy_pass http://127.0.0.1:32400;
        proxy_set_header Host $host;
        proxy_set_header X-Real-IP $remote_addr;
        proxy_set_header X-Forwarded-For $proxy_add_x_forwarded_for;
        proxy_set_header X-Forwarded-Proto $scheme;
        proxy_set_header Upgrade $http_upgrade;
        proxy_set_header Connection "Upgrade";
        proxy_read_timeout 3600;
    }
}
EOF
Replace plex.example.com with your actual subdomain before running the block. The proxy_read_timeout value of 3600 seconds prevents long transcoding sessions from timing out.
Test and Reload the Plex Nginx Proxy
Test the configuration for syntax errors:
sudo nginx -tnginx: the configuration file /etc/nginx/nginx.conf syntax is ok nginx: configuration file /etc/nginx/nginx.conf test is successful
Reload Nginx to apply the changes:
sudo systemctl reload nginxSecure the Plex Reverse Proxy with Let’s Encrypt SSL
For production use, add a TLS certificate from Let’s Encrypt. If UFW is active, open the Nginx HTTP and HTTPS profile before requesting the certificate because HTTP-01 validation needs port 80:
sudo ufw allow 'Nginx Full'Install Certbot with the Nginx plugin:
sudo apt install python3-certbot-nginx -yObtain a certificate and configure Nginx for HTTPS redirects automatically. Replace the email and domain with your own values:
sudo certbot --nginx --non-interactive --agree-tos --no-eff-email --redirect --email you@example.com -d plex.example.comAfter completion, your Plex server is accessible at https://plex.example.com with automatic HTTP-to-HTTPS redirection. Non-interactive flags handle terms acceptance and email-sharing choice, but DNS, firewall, and HTTP reachability still need to be correct.
Verify Plex SSL Certificate Renewal
Certbot installs a systemd timer that handles automatic renewal. Verify it is active:
systemctl is-active certbot.timer
systemctl is-enabled certbot.timer
active enabled
Test that the renewal process works correctly:
sudo certbot renew --dry-runCongratulations, all simulated renewals succeeded: /etc/letsencrypt/live/plex.example.com/fullchain.pem (success)
The timer checks for renewal twice daily and renews certificates within 30 days of expiration. No manual cron job is required.
Troubleshoot Common Plex Media Server Issues on Linux Mint
APT Still Uses the Old Plex Repository
If sudo apt update still reports the older Plex repository or a signing error, use grep to list the Plex source entries APT can still read:
grep -RInE 'repo\.plex\.tv/deb|downloads\.plex\.tv/repo/deb' /etc/apt/sources.list /etc/apt/sources.list.d 2>/dev/nullRemove stale Plex source files, then re-run the repository setup commands from the install section so the v2 key and current source file are recreated together:
sudo rm -f /etc/apt/sources.list.d/plex.list
sudo rm -f /etc/apt/sources.list.d/plex.sources
sudo rm -f /etc/apt/sources.list.d/plexmediaserver.list
sudo rm -f /etc/apt/sources.list.d/plexmediaserver.sources
After recreating the current source, refresh APT and confirm that the candidate comes from repo.plex.tv:
sudo apt update
apt-cache policy plexmediaserver
Plex Cannot Find Media Files
If Plex shows empty libraries despite media files being present, the plex user likely lacks read permissions.
Check current permissions:
ls -la /media/yourfolder/If the folders are owned by your user (not plex):
drwxr-xr-x 4 youruser youruser 4096 Nov 28 10:00 .
drwxr-xr-x 2 youruser youruser 4096 Nov 28 10:00 movies
drwxr-xr-x 2 youruser youruser 4096 Nov 28 10:00 tv
Grant Plex access:
sudo setfacl -R -m u:plex:rx /media/yourfolder/Verify Plex now has access:
getfacl /media/yourfolder/ | grep plexuser:plex:r-x
After fixing permissions, rescan the library in the Plex WebUI: Settings, Libraries, select library, Scan Library Files.
Plex Service Fails to Start
If Plex does not start after installation or reboot, check the service status:
sudo systemctl status plexmediaserverA failed service looks like:
plexmediaserver.service - Plex Media Server
     Loaded: loaded (/usr/lib/systemd/system/plexmediaserver.service; enabled)
     Active: failed (Result: exit-code)
Check the journal for specific error messages:
sudo journalctl -xeu plexmediaserver --no-pager | tail -30A common cause is port 32400 already in use. Check what process is using it:
sudo ss -tulpn | grep 32400If another service occupies port 32400, stop the conflicting service or remove the duplicate Plex instance. Plex expects its local web service on port 32400, so do not edit /etc/default/plexmediaserver as a port-change shortcut.
After resolving the conflict, restart Plex and verify the service started:
sudo systemctl restart plexmediaserver
systemctl is-active plexmediaserver
active
Plex Remote Access Not Available
If the Plex Remote Access page shows Not available outside your network, the server cannot receive incoming connections on TCP port 32400.
Verify the public IP, local listener, and UFW rule state before changing router settings:
curl -4 ifconfig.me
sudo ss -ltnp | grep ':32400'
sudo ufw status numbered
The first command shows your public IP; confirm it matches what Plex reports. The second confirms Plex is listening locally. The third verifies UFW allows TCP port 32400. If all checks pass, log into your router and forward TCP 32400 to the Plex server’s LAN IP, then refresh the Remote Access page in Plex.
Manage Plex Media Server on Linux Mint
Update Plex Media Server
Because you installed Plex from the official APT repository, updates arrive through the package manager alongside regular system updates. Refresh the package index first:
sudo apt updateTo upgrade only Plex without affecting other packages:
sudo apt install --only-upgrade plexmediaserverAlternatively, update Plex as part of a full system upgrade:
sudo apt upgradeRemove Plex Media Server from Linux Mint
To remove Plex cleanly, purge the package first, then delete the repository files and keyrings it used.
Purge Plex, then review any now-unused dependencies before removing them:
sudo apt purge plexmediaserver
sudo apt autoremove
Confirm the package itself is gone before you remove the repository metadata:
dpkg -s plexmediaserverdpkg-query: package 'plexmediaserver' is not installed and no information is available
Remove the current DEB822 source file and older Plex source-file names that may exist from earlier setups:
sudo rm -f /etc/apt/sources.list.d/plexmediaserver.sources
sudo rm -f /etc/apt/sources.list.d/plexmediaserver.list
sudo rm -f /etc/apt/sources.list.d/plex.list
sudo rm -f /etc/apt/sources.list.d/plex.sources
Refresh the package cache after removing the repository, then check that no Plex source entries remain:
sudo apt update
grep -RInE 'repo\.plex\.tv/deb|downloads\.plex\.tv/repo/deb' /etc/apt/sources.list /etc/apt/sources.list.d 2>/dev/null
The grep command should return no output after the source files are gone. If it still prints a Plex source path, remove that specific file or stanza before deleting the keyrings:
sudo rm -f /etc/apt/keyrings/plexmediaserver.v2.gpg
sudo rm -f /usr/share/keyrings/plex.gpg
sudo rm -f /usr/share/keyrings/plexmediaserver.gpg
Remove Plex UFW Rules (If Applicable)
If you opened Plex ports with UFW, review the current rule set before deleting anything. Remove only the Plex rules you added:
sudo ufw status numberedDelete the primary Plex port rule when it is no longer needed:
sudo ufw delete allow 32400/tcpIf you also added the optional LAN-restricted discovery and companion rules, delete those matching rules. Replace 192.168.1.0/24 if you used a different subnet when adding them:
sudo ufw delete allow from 192.168.1.0/24 to any port 1900 proto udp
sudo ufw delete allow from 192.168.1.0/24 to any port 5353 proto udp
sudo ufw delete allow from 192.168.1.0/24 to any port 8324 proto tcp
sudo ufw delete allow from 192.168.1.0/24 to any port 32410 proto udp
sudo ufw delete allow from 192.168.1.0/24 to any port 32412 proto udp
sudo ufw delete allow from 192.168.1.0/24 to any port 32413 proto udp
sudo ufw delete allow from 192.168.1.0/24 to any port 32414 proto udp
sudo ufw delete allow from 192.168.1.0/24 to any port 32469 proto tcp
These cleanup commands permanently delete Plex configuration, metadata, library data, and the package-created
plexservice account. Export any playlists or settings you want to keep before running them.
Review the Plex data directory and service account before deleting them:
sudo du -sh /var/lib/plexmediaserver 2>/dev/null
getent passwd plex
getent group plex
To remove all Plex server data including metadata and preferences, then remove the service account when it still exists:
sudo rm -rf /var/lib/plexmediaserver
if getent passwd plex >/dev/null; then
    sudo deluser --system plex
fi
if getent group plex >/dev/null; then
    sudo delgroup --system plex
fi
Verify Plex is fully removed:
apt-cache policy plexmediaserverN: Unable to locate package plexmediaserver
Remove the Plex Nginx Reverse Proxy (If Applicable)
If you set up the Nginx reverse proxy, remove the configuration, test the remaining Nginx files, and reload Nginx:
sudo rm -f /etc/nginx/conf.d/plex.conf
sudo nginx -t
sudo systemctl reload nginx
If you opened HTTP and HTTPS through UFW for Certbot, remove that profile rule when the reverse proxy is no longer used:
sudo ufw delete allow 'Nginx Full'If you no longer need Nginx or Certbot at all:
sudo systemctl disable nginx --now
sudo apt purge nginx certbot python3-certbot-nginx
sudo apt autoremove
First-Time Plex Media Server Tips for Linux Mint
Organize Your Plex Media Library
Plex’s metadata agents rely on consistent file naming to fetch posters, descriptions, and episode data. Follow these naming conventions:
- Movies:
/media/movies/Movie Name (Year)/Movie Name (Year).mkv - TV Shows:
/media/tv/Show Name/Season 01/Show Name - S01E01.mkv - Music:
/media/music/Artist Name/Album Name/01 - Track Name.mp3
Including the year for films and season/episode numbers for TV shows gives Plex enough context to match metadata correctly.
Control Plex Library Scan Behavior
Open Settings, Library in the Plex dashboard to customize how Plex watches for new content:
- Scan my library automatically: Reacts immediately when files sync over network shares.
- Run a partial scan when changes are detected: Uses inotify to rescan only affected folders, saving time on large collections.
- Update my library periodically: Runs a scheduled rescan for content added via download managers or scripts.
Disable CPU-heavy extras like Generate video preview thumbnails on older hardware until your initial library import completes.
Optimize Plex Transcoding Performance
Transcoding converts high-bitrate media into streams each device can handle. Keep sessions smooth with these adjustments:
- Enable hardware acceleration in Settings, Transcoder if your CPU or GPU supports Intel Quick Sync, AMD VCN, or NVIDIA NVENC. Linux Mint users with NVIDIA cards can follow how to install NVIDIA drivers on Linux Mint for hardware transcoding support.
- Point the transcoding temporary directory to SSD storage so Plex does not stall on slower spinning disks.
- Ask remote users to select appropriate quality presets in the Plex app to avoid unnecessary 4K to 1080p conversions.
Compare Plex and Jellyfin on Linux Mint
Plex still has the smoother client ecosystem, broader smart TV support, and the easiest remote-streaming setup, but it ties some features to a Plex account and Plex Pass. Jellyfin stays fully open-source, drops the account requirement, and is the better fit if you want a media server that remains entirely under your own control. If that trade-off fits your setup better, see how to install Jellyfin Media Server on Linux Mint.
Conclusion
Plex Media Server is running on Linux Mint with the official Plex repository handling updates and port 32400 ready for browser access. From here, tune hardware transcoding with NVIDIA drivers on Linux Mint, finish library scan settings in the Plex dashboard, and keep the repository cleanup notes handy if older source files reappear.

Worked perfectly. I especially appreciate the explanations throughout. Thank you.
tried this, failed
Import Plex APT Repository did nothing
the 2nd part of this actually just sat there doing nothing. had to force quit terminal to end it.
Gaz, you were right. The repository step could look like it was hanging because it used a heredoc. The guide now keeps that part as a one-line source write and uses Plex’s current repository path:
This writes
plexmediaserver.sourcesimmediately and returns you to the prompt instead of waiting for more input. After importing the v2 key, runsudo apt updateand continue with the install step. Good catch.Great tutorial. Only one thing missing. And that is how to configure plex server to use on dynamic address that would be nice to add.
Thank you. Followed the steps and it worked perfectly.
What a fantastic blow-by-blow detail of how to get the Plex media server going on Mint! As a newbie this is just what I want; all I have to do now is try it out!! Many Thanks!
I will try this as I am stuck on getting Plex to see my files. Why is it so complicated? The installer should do all this stuff.