Node.js, a powerful JavaScript runtime, is highly sought after for its ability to build scalable network applications. This guide will demonstrate how to install Node.js on Fedora Linux, offering a step-by-step approach tailored for beginners and experienced users. Leveraging the V8 engine by Google, Node.js enables efficient and swift execution of JavaScript outside a web browser.
Key Features of Node.js:
- Asynchronous and Event-Driven: All APIs of the Node.js library are non-blocking (asynchronous). It efficiently handles concurrent operations without multiple threads, using events instead.
- Fast Execution: Node.js utilizes the V8 JavaScript runtime engine, which compiles JavaScript directly to native machine code, resulting in enhanced execution speed.
- Single Programming Language: Node.js allows for writing both client-side and server-side scripts in JavaScript, enabling the development of dynamic web page content before the page is sent to the user’s web browser.
- Large Ecosystem: With an extensive package ecosystem, npm (Node.js package manager) provides access to thousands of reusable packages.
Node.js’s non-blocking, event-driven architecture makes it an excellent choice for developing data-intensive real-time applications that run across distributed devices. Our focus on installing Node.js on Fedora Linux brings this powerful tool to your development environment, laying a strong foundation for building robust applications.
Node.js Pre-Installation Steps on Fedora Linux
Step 1: Update Fedora System Packages Before Node.js Installation
Before installing Node.js, it’s crucial to ensure your system is up-to-date. Keeping your system updated minimizes potential compatibility issues and ensures that you have access to the latest features and security patches. To update your Fedora system, open the terminal and run the following command:
sudo dnf upgrade --refreshThis command performs a crucial function: it directs the DNF package manager to upgrade every package currently installed on your system. The --refresh option is significant as it ensures that the package repository metadata is current. This metadata contains information about the latest versions of packages and their dependencies, ensuring you get the most recent updates available for your system.
Install Node.js on Fedora Linux via Default Appstream
Step 1: Install Node.js via DNF Command
Begin the Node.js installation process by using the DNF package manager. This method ensures compatibility with your Fedora system, leveraging Fedora’s official repository for a stable and secure version of Node.js. Open your terminal and enter the following command:
sudo dnf install nodejsThis command tells DNF to install Node.js, ensuring you get a version tested and approved for Fedora, which is essential for system integrity and security.
Step 2: Verify the Default Appstream Node.js Installation
After installing Node.js, verifying the installation is essential to ensure it was successful. In your terminal, execute this command:
node --versionThis command checks the installed version of Node.js. The output should display the version number, confirming that Node.js is correctly installed on your system.
Install Node.js on Fedora Linux via NodeSource RPM
For a custom version of Node.js that you will primarily work with, NodeSource is a good source for these versions. Follow the commands below that suit the version you want.
Node.js v21.x Installation
To install Node.js version 21.x on Fedora Linux, execute the following commands:
sudo dnf install https://rpm.nodesource.com/pub_21.x/nodistro/repo/nodesource-release-nodistro-1.noarch.rpm -y
sudo dnf install nodejs -y –setopt=nodesource-nodejs.module_hotfixes=1
This process involves two steps. First, you add the NodeSource repository specific to version 21.x. Then, you install Node.js, ensuring the correct version gets installed through the NodeSource repository.
Node.js v20.x Installation
For Node.js version 20.x, the installation process remains similar. Use these commands:
sudo dnf install https://rpm.nodesource.com/pub_20.x/nodistro/repo/nodesource-release-nodistro-1.noarch.rpm -y
sudo dnf install nodejs -y –setopt=nodesource-nodejs.module_hotfixes=1
Again, the process starts with adding the repository for version 20.x. Following this, the Node.js installation command targets the newly added repository.
Node.js v18.x Installation
To install Node.js version 18.x, follow these steps:
sudo dnf install https://rpm.nodesource.com/pub_18.x/nodistro/repo/nodesource-release-nodistro-1.noarch.rpm -y
sudo dnf install nodejs -y –setopt=nodesource-nodejs.module_hotfixes=1
As with the previous versions, this method first adds the NodeSource repository for version 18.x. Then, it installs Node.js from this specific repository.
Node.js v16.x Installation
For installing Node.js version 16.x, the commands are:
sudo dnf install https://rpm.nodesource.com/pub_16.x/nodistro/repo/nodesource-release-nodistro-1.noarch.rpm -y
sudo dnf install nodejs -y –setopt=nodesource-nodejs.module_hotfixes=1
This sequence involves adding the NodeSource repository for version 16.x first. Following that, the installation command ensures Node.js version 16.x is installed from the added repository.
Install Node.js on Fedora Linux via NVM (Node Version Manager)
NVM (Node Version Manager) offers a versatile solution for installing Node.js on Fedora Linux. This method is particularly beneficial for developers needing to manage multiple Node.js versions for different projects or testing purposes. With NVM, you can seamlessly switch between Node.js versions and stay updated with the latest releases.
Step 1: Install NVM on Fedora
To install NVM, use either of the following commands to download and run the installation script:
curl -o- https://raw.githubusercontent.com/nvm-sh/nvm/master/install.sh | bashor
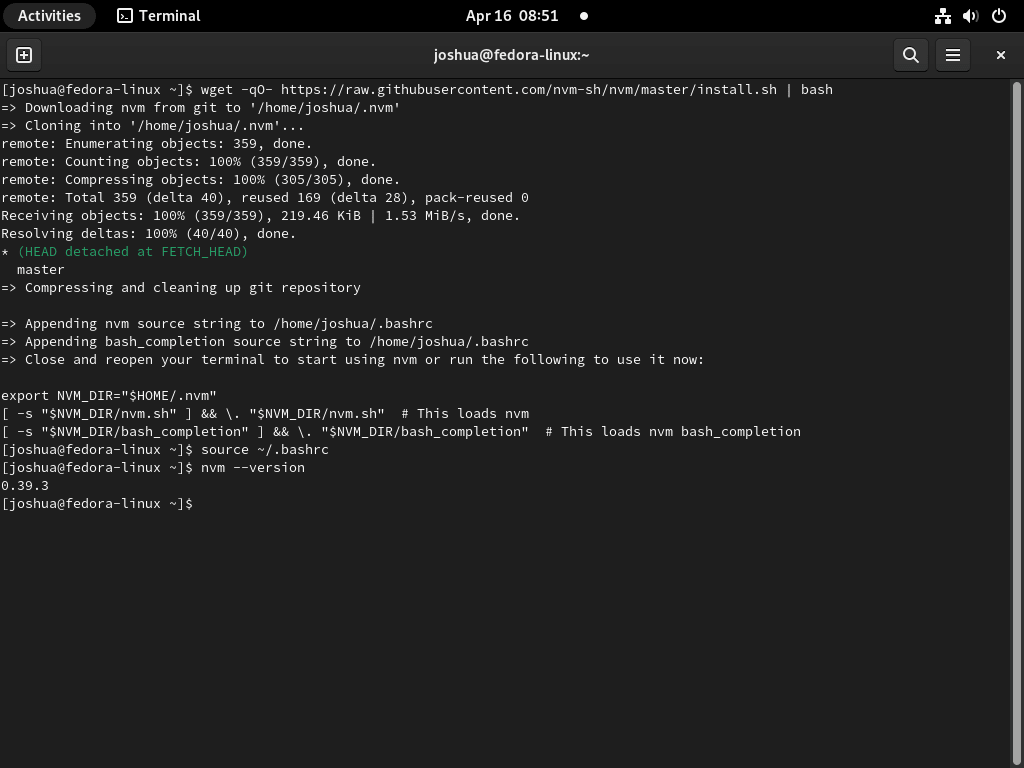
wget -qO- https://raw.githubusercontent.com/nvm-sh/nvm/master/install.sh | bashAfter running the script, restart your terminal or update your session with:
source ~/.bashrcStep 2: Install Node.js using NVM
With NVM installed, you can now install Node.js. For the latest LTS release:
nvm install --ltsFor the latest Current release:
nvm install stableOr to install the most recent version:
nvm install nodeTo switch between Node.js versions, use the command nvm use <version number>, such as:
nvm use 18.16.0With NVM, managing multiple Node.js versions on your Fedora system is simple and efficient, allowing you to work on various projects with ease and confidence.
Step 3: Common NVM Commands on Fedora
This section will cover more examples of using NVM to manage multiple Node.js versions on your system. These examples demonstrate switching between different versions, setting a default version, listing installed versions, and more.
List Installed Node.js Versions on Fedora
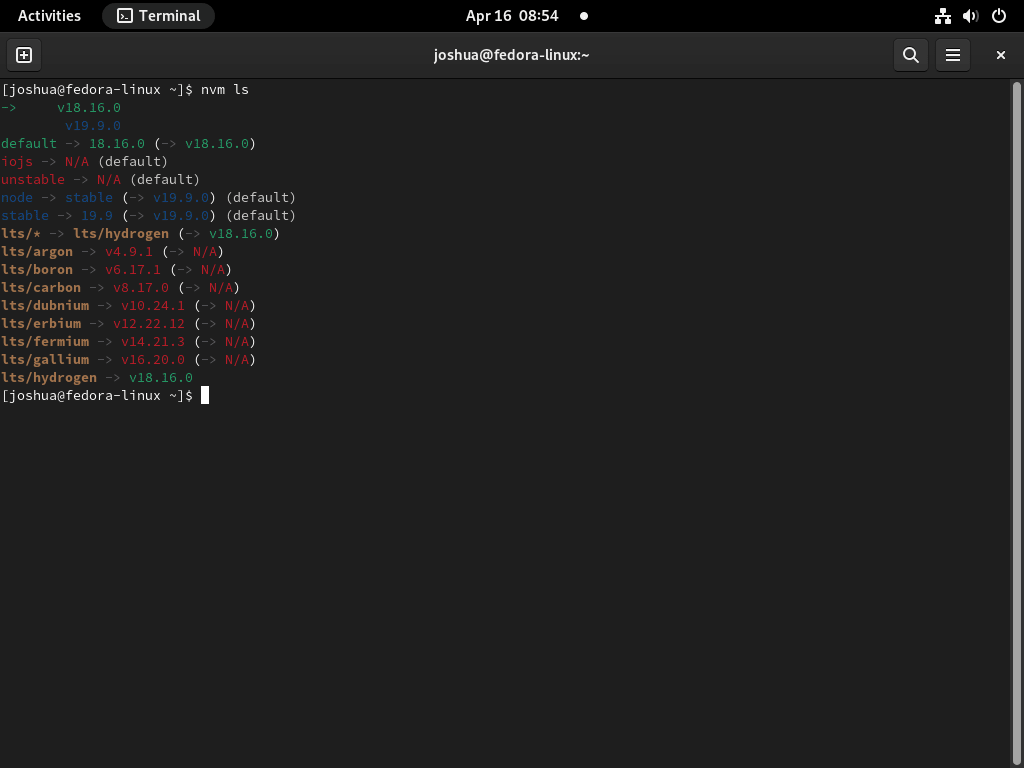
To list all installed Node.js versions on your system, run the following command:
nvm lsThis command will display a list of installed Node.js versions, with an arrow indicating the currently active version.
Switch Between Node.js Versions on Fedora
As mentioned earlier, you can switch between Node.js versions using the nvm use command. For example, to switch to Node.js version 19.9.0, run:
nvm use 19.9.0Your system will now use the Node.js version for any new terminal sessions.
Set the Default Node.js Version on Fedora
To set a default Node.js version that will be used every time you open a new terminal session, use the nvm alias command. For example, to set Node.js version 18.16.0 as the default, run:
nvm alias default 18.16.0Every time you open a new terminal session, Node.js version 18.16.0 will be automatically activated.
List Available Node.js Versions for Installation on Fedora
If you want to check which Node.js versions are available for installation, you can use the nvm ls-remote command:
nvm ls-remoteThis command will display a list of available Node.js versions you can install using NVM.
Remove a Node.js Version on Fedora
To uninstall a specific Node.js version, use the nvm uninstall command followed by the version number. For example, to uninstall Node.js version 19.9.0, run:
nvm uninstall 19.9.0This command will remove the specified Node.js version from your system.
Update the Default Node.js Version and Uninstall the Old One on Fedora
You can combine the previously mentioned commands if you want to update the default Node.js version and remove the old one. First, install the new version using nvm install. Then, set the new version as the default using nvm alias. Finally, uninstall the old version using nvm uninstall. For example:
nvm install 19.9.0
nvm alias default 19.9.0
nvm uninstall 18.16.0
These commands will install Node.js version 19.9.0, set it as the default version, and uninstall the old version 18.16.0.
Managing Node.js on Fedora Linux
Remove Node.js from Fedora
In this section, we will discuss the process of removing Node.js from your Fedora system. The steps depend on the method you used to install Node.js, either from the Fedora repository, NodeSource RPM, or NVM (Node Version Manager).
Step 1: Uninstall Node.js Installed from Fedora or NodeSource
If you installed Node.js from the Fedora Repository or NodeSource, you can uninstall it using the dnf program. Let’s understand the command:
sudo dnf remove nodejsThis command will remove Node.js along with its associated configuration files. It will prompt you to confirm the removal, and after confirmation, it will proceed with the uninstallation.
Step 2: Uninstall Node.js Installed using NVM
If you installed Node.js using the Node Version Manager (NVM), you can uninstall it by following these steps:
2.1: Check the Current Node.js Version
First, check the current version of Node.js installed by running the command:
nvm currentThis command will display the active Node.js version on your system.
2.2: Deactivate NVM
Before uninstalling the current version of Node.js, you need to deactivate NVM by running the following:
nvm deactivateThis command will unload the active Node.js version from your current session.
2.3: Remove Node.js Version using NVM
Now, run the following command to uninstall a specific version of Node.js installed using NVM:
nvm uninstall <version>Replace <version> with the version number you want to uninstall. For example, if you want to uninstall Node.js version 19.9.0, you would run:
nvm uninstall 19.9.0This command will remove the specified Node.js version from your system.
Conclusion: Installing Node.js on Fedora Linux
This guide covered various methods to install Node.js on Fedora Linux, including using the Fedora repository, NodeSource RPM, and Node Version Manager (NVM). Depending on your requirements, you can choose the most suitable method to manage and maintain Node.js versions on your Fedora system. Each method has unique advantages, and understanding the differences will help you decide which approach best fits your needs.


