Managing project dependencies for PHP developers using Fedora Linux can be significant. However, with PHP Composer, this task becomes straightforward and efficient. Composer is a powerful dependency management system that streamlines the handling of PHP packages, ensuring your web development projects run smoothly. This guide will walk you through how to install Composer on Fedora Linux, allowing you to harness its full potential in your development workflow.
Here’s why Composer is a game-changer for PHP development:
- Dependency Management: Composer organizes your project dependencies, making them easier to maintain and update.
- Autoloading: No need to manually include files in your code. Composer does it for you, automatically loading your dependencies.
- Easy Updates: Updating libraries is more straightforward with Composer. It ensures your project always uses the latest compatible versions.
- Interoperability: Composer supports PSR-0 and PSR-4, promoting shared PHP software’s interoperability. This broadens the range of PHP projects you can engage with.
In essence, Composer is a must-have tool for PHP developers. It simplifies project management and enhances the overall web development experience.
Prepare the Environment with PHP and Required Packages
Before installing Composer, you must execute some crucial preparatory steps. This includes setting up PHP and several additional packages on your Fedora system. Composer depends on php-cli to run PHP scripts through the command line and unzip to extract zip archives. Now, let’s proceed with installing these vital prerequisites.
Step 1: Update the Package Database
Our first business order is to refresh your system’s local package database. The command sudo dnf update performs this task by synchronizing the package index files from their sources. This operation ensures that your system is knowledgeable about the most recent updates and versions of packages.
sudo dnf updateStep 2: Upgrade Existing Packages
For your system’s stability and security, upgrading the packages already installed on your machine is wise. When you run sudo dnf upgrade, the system will install any available upgrades of all packages currently installed based on the sources configured through DNF.
sudo dnf upgradeStep 3: Install PHP CLI, Unzip, and Curl
Next, we’ll install the essential packages that Composer depends on. The php-cli package provides the ability to execute PHP scripts from the command line. The unzip package is necessary to extract the downloaded packages. And curl is used for data transfer to and from a server.
You can install these packages using the following command:
sudo dnf install php-cli unzip curlUpon completing this step, you have successfully installed all the necessary prerequisites and are now ready to proceed to the next stage of installing Composer on your Fedora system.
Download and Install Composer on Fedora Linux
To install Composer on Fedora Linux, use the PHP installer script provided by Composer. Begin by downloading this script, then verify its authenticity, and finally, use it to install Composer on your Fedora system.
Step 1: Acquire the Composer Installer
Firstly, navigate to your home directory. Subsequently, use the curl command to download the installer. The flags -sS ensure curl operates quietly while continuing to display errors, and -o directs the output to a specific location.
cd ~
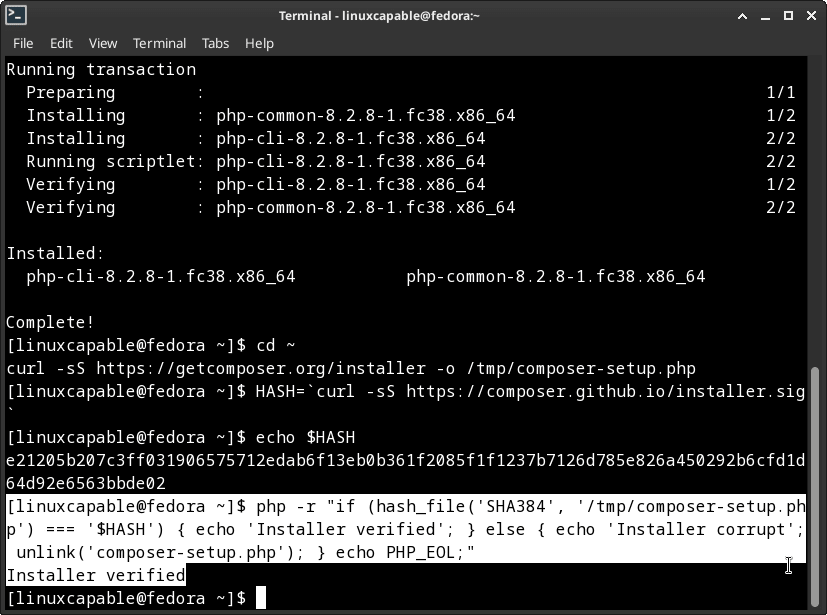
curl -sS https://getcomposer.org/installer -o /tmp/composer-setup.php
Step 2: Confirm the Installer’s Authenticity
Composer furnishes an SHA-384 hash of the most recent installer on their Public Keys/Signatures page. It’s crucial to compare the hash of our downloaded file with this provided hash to affirm its authenticity.
Fetch the latest hash from the Composer page programmatically and store it in a shell variable:
HASH=`curl -sS https://composer.github.io/installer.sig`Inspect the fetched hash with the following command:
echo $HASHNext, verify the integrity of the installation script by comparing the hash of the downloaded file with the acquired hash. The subsequent PHP command verifies if they match:
php -r "if (hash_file('SHA384', '/tmp/composer-setup.php') === '$HASH') { echo 'Installer verified'; } else { echo 'Installer corrupt'; unlink('composer-setup.php'); } echo PHP_EOL;"
If the output returns’ Installer verified,’ the script is ready. If it says ‘Installer corrupt,’ re-download the script, confirm you’re using the correct hash, and repeat the verification process.
Step 3: Install Composer on Fedora
Now that you have verified the installer, you can install Composer globally. This installation grants system-wide access to Composer with the command name ‘composer’, located in /usr/local/bin.
To do this, execute the following command:
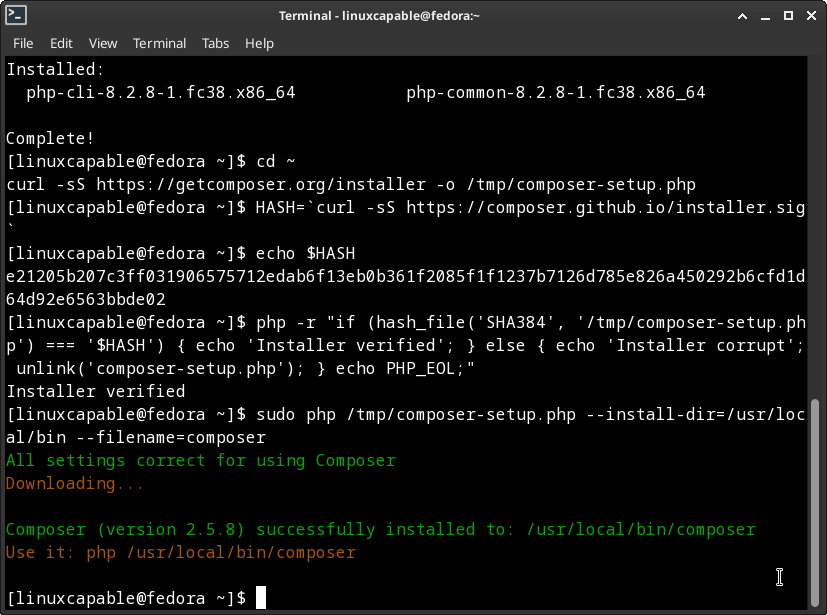
sudo php /tmp/composer-setup.php --install-dir=/usr/local/bin --filename=composerShould everything proceed smoothly, the output should denote a successful installation:
All settings correct for using Composer
Downloading...

Composer (version x.x.x) successfully installed to: /usr/local/bin/composer
Use it: php /usr/local/bin/composerStep 4: Verify the Installation on Fedora
Run the following command to confirm that Composer has been installed correctly and is operational:
composerThis should present the Composer version and an array of available commands, confirming its successful installation on your system.
If you prefer separate Composer executables for each project on your server, or if your system user does not have sufficient permissions for system-wide software installations, you might want to consider project-specific installations. These can be achieved with the command php /tmp/composer-setup.php, which generates a composer.phar file in your current directory, executable via php composer.phar.
Applying Composer to a Project on Fedora Linux
In this portion of the guide, we will further explore the practical application of Composer in a PHP project. Through the lens of a hands-on example, our goal is to equip you with knowledge to manage dependencies in your projects adeptly.
Step 1: Kickstart Composer in Your Project
Our journey begins by navigating to your project’s directory. Once inside the project directory, invoke Composer. This operation generates a composer.json file, which is fundamentally the schematic for your project’s dependencies.
cd /path/to/your/project
composer init
Step 2: Specify Your Project Dependencies
With Composer initialized, we now transition to defining the dependencies for your project. Accomplish this with the require command, accompanied by the package name and the version you intend to utilize.
For example, to incorporate the monolog/monolog package, a highly favored logging library for PHP, you would execute:
composer require monolog/monologThe require command retrieves the necessary package and its dependencies, then autonomously updates the composer.json file. Furthermore, the fetched packages are preserved in the vendor directory, and an autoloader script is generated, ensuring all the dependencies are accurately loaded when called upon.
Step 3: Employ Your Dependencies
With the needed dependencies, you are now poised to incorporate them into your project. The most efficient approach to leverage the Composer autoloading feature is by embedding the autoloader in your PHP scripts.
require __DIR__ . '/vendor/autoload.php';Upon including this line in your PHP script, you can seamlessly utilize any classes from your installed dependencies without requiring each one individually.
Step 4: Maintain Your Dependencies Current
Keeping your project’s dependencies updated is of paramount importance. Composer simplifies this updating process. Steer to your project directory and execute the update command. This command probes for newer versions of the libraries specified in your composer.json file and updates them if required.
cd /path/to/your/project
composer update
Conclusion and Final Thoughts
Throughout this article, we have walked you through installing and configuring Composer on Fedora Linux, explaining each step in an easy-to-understand, step-by-step manner. Beginning with downloading and installing Composer, we demonstrated how to use Composer in a project, emphasizing how to initialize it, define project dependencies, use them, and keep them updated. We trust this guide will be valuable in quickly and efficiently managing your PHP project dependencies.


