
Budgie is a practical Fedora add-on when you want a panel-based desktop without reinstalling around a new Spin, but the package set matters more than older examples suggest. To install Budgie Desktop on Fedora, use the current DNF5 environment for the full desktop or the smaller Budgie group for a leaner session, then verify which login-session file Fedora installed before rebooting into it.
For a clean Budgie-first system, download the official Fedora Budgie Spin instead of converting an existing Fedora Workstation install. Use DNF when Fedora is already installed and you want Budgie beside GNOME, KDE Plasma, Xfce, or another mutable desktop.
The commands target mutable Fedora Workstation and comparable DNF-managed Fedora desktop installs. Fedora Budgie Atomic and other Atomic desktops use rpm-ostree image workflows, so they are not a good fit for the DNF environment and group commands used here.
Install Budgie Desktop on Fedora
Update Fedora Packages First
Refresh Fedora metadata and apply pending package updates before adding another desktop environment. This keeps the Budgie transaction aligned with the current Fedora graphics stack, desktop libraries, and DNF group metadata.
sudo dnf upgrade --refreshThese commands use sudo for system package changes. If your account cannot run sudo on Fedora, configure the user in the Fedora wheel group for administrator access before continuing.
Choose the Budgie Installation Path
Fedora publishes Budgie through one DNF environment and two useful package groups. The environment is the best default for most existing desktops because it installs the core Budgie session and Fedora’s curated Budgie application group together.
| Path | DNF Target | What It Installs | Best For |
|---|---|---|---|
| Full Budgie environment | budgie-desktop-environment | Core Budgie desktop, Fedora desktop support groups, SDDM Wayland support, portals, multimedia, printing, and the Budgie application set. | Most existing Fedora desktop installs that should gain a complete Budgie experience. |
| Core Budgie group | budgie-desktop | Budgie session, Budgie Control Center, desktop view, defaults, backgrounds, portals, and login-manager support without the curated app group. | Lean Budgie add-on installs where you prefer choosing applications yourself. |
| Budgie applications group | budgie-desktop-apps | Recommended desktop applications such as Bluejay, Dolphin, Kate, Konsole, Okular, Parole, Plasma Discover, Rhythmbox, and Seahorse. | Core-group installs that should gain the same application layer the full environment includes. |
Use the full environment unless you have a clear reason to keep the first transaction smaller. If you choose the core group, install budgie-desktop-apps only when you want Fedora’s curated Budgie application set as well.
Use Fedora’s DNF environment and group targets for normal Budgie installs. A direct sudo dnf install budgie-desktop command can install the shell package, but it bypasses Fedora’s group metadata for defaults, portals, display-manager support, and application selection, so treat it as a repair or dependency-level action rather than the normal install path.
Fedora also publishes Budgie-adjacent documentation, development, wallpaper, display-configuration, and release-identity packages. Treat those as optional add-ons or Spin and Atomic branding pieces, not separate desktop installation methods for an existing mutable Fedora system.
Check Budgie Environment and Group IDs
Check the available DNF targets before installing. This also helps catch stale examples that use old display names or DNF4-era aliases.
dnf environment list --available | grep -i budgie
dnf group list --hidden | grep -i budgie
Relevant lines should include these IDs:
budgie-desktop-environment        Budgie Desktop
budgie-desktop                    Budgie
budgie-desktop-apps               Budgie Desktop Applications
Inspect the full environment when you want to see the Fedora groups DNF will add:
dnf environment info budgie-desktop-environmentOn Fedora 44, the environment includes the core budgie-desktop group and the budgie-desktop-apps group alongside standard Fedora desktop support groups:
Id                   : budgie-desktop-environment
Name                 : Budgie Desktop
Required groups      : admin-tools
                     : base-x
                     : budgie-desktop
                     : budgie-desktop-apps
                     : core
                     : desktop-accessibility
                     : dial-up
                     : fonts
                     : guest-desktop-agents
                     : hardware-support
                     : input-methods
                     : multimedia
                     : networkmanager-submodules
                     : printing
                     : standard
DNF5 uses dnf environment install, dnf group install, and matching remove subcommands. Avoid older one-word aliases such as groupinstall; the DNF5 group commands on Fedora reference covers the syntax in more detail.
Install the Full Budgie Desktop Environment
Install the complete Budgie environment when you want Fedora’s existing-system equivalent to the Budgie Spin package set.
sudo dnf environment install budgie-desktop-environmentReview the DNF transaction before accepting it. The full environment can install hundreds of packages because it adds Budgie, supporting desktop groups, login-manager components, portals, media support, printing support, and the curated application group.
Install Only the Core Budgie Group
Install the core group when you want the Budgie session without Fedora’s recommended application bundle.
sudo dnf group install budgie-desktopThe core group still installs more than the shell alone. Fedora’s current group metadata includes Budgie Control Center, Budgie desktop defaults, Budgie Desktop View, SDDM Wayland support, portals, NetworkManager applets, and related desktop integration packages.
Add Budgie Desktop Applications
The full environment already installs the Budgie application group. Add it manually only after a lean core-group install when you want Fedora’s recommended app set.
sudo dnf group install budgie-desktop-appsFedora’s Budgie app group intentionally includes several KDE applications, including Dolphin, Kate, Konsole, Okular, Plasma Discover, and Plasma System Monitor. That mix is part of the Fedora Budgie package set, not a dependency mistake.
Verify Budgie Packages and Session Files
Confirm the main Budgie packages and the login-session file after DNF finishes:
rpm -q budgie-desktop budgie-session budgie-control-center budgie-desktop-view budgie-desktop-defaults
find /usr/share/xsessions /usr/share/wayland-sessions -maxdepth 1 -type f -iname '*budgie*' -print 2>/dev/null
budgie-desktop --version
On Fedora 44, relevant output includes Budgie 10.10 packages and a Wayland session file:
budgie-desktop-10.10.2-1.fc44.x86_64
budgie-session-1.0.1-1.fc44.x86_64
budgie-control-center-2.1.1-1.fc44.x86_64
budgie-desktop-view-10.10.2-1.fc44.x86_64
budgie-desktop-defaults-0.5.4-3.fc44.noarch
/usr/share/wayland-sessions/budgie-desktop.desktop
budgie-desktop 10.10.2
Fedora’s Budgie package page tracks the packaged version for each Fedora release. The Budgie project also identifies Budgie 10.10 as the current stable Wayland line in its Get Budgie release overview.
Log In to Budgie Desktop on Fedora
Reboot after installation so the display manager reloads its available desktop sessions.
sudo rebootSelect the Budgie Desktop Session
At the Fedora login screen, select your user, open the session selector, and choose Budgie Desktop before entering your password. Existing Fedora Workstation installs can keep GDM as the active display manager, and GDM can launch Budgie from the session selector.
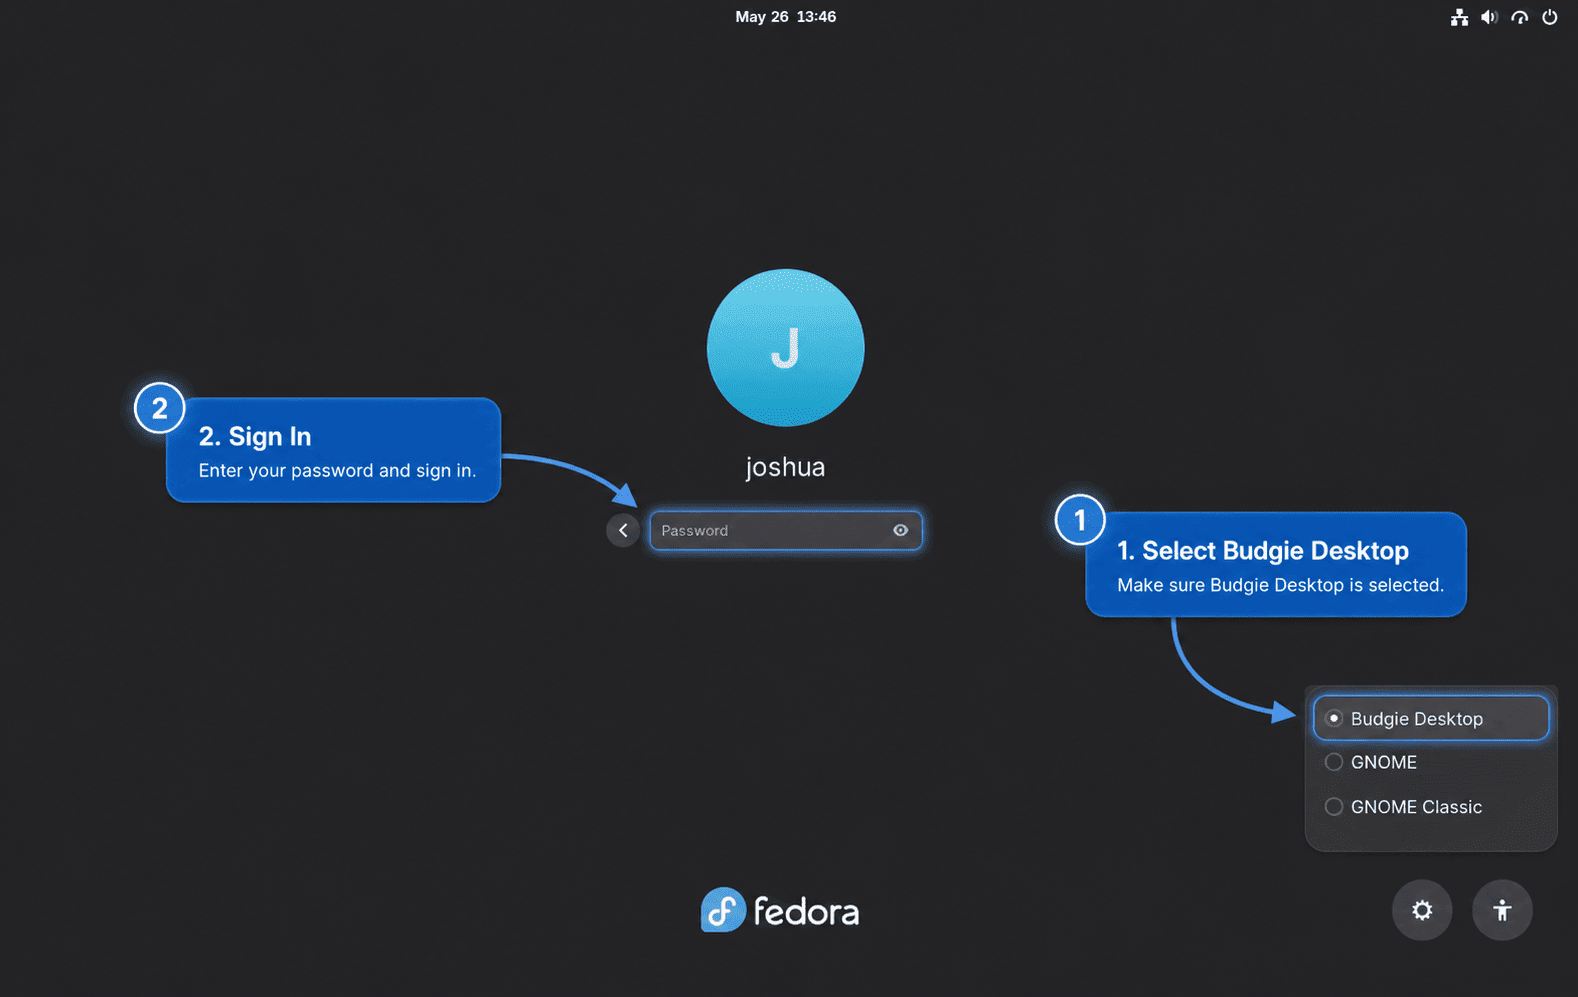
Fedora 44’s Budgie 10.10 package provides /usr/share/wayland-sessions/budgie-desktop.desktop. If your system still shows an X11 Budgie entry, it is using an older Budgie package set; start with the default Budgie entry offered by your display manager.
Verify the Active Budgie Session
After logging in to Budgie, open a terminal from the application menu and check the session variables:
printf '%s\n' "$XDG_CURRENT_DESKTOP"
printf '%s\n' "$XDG_SESSION_DESKTOP"
printf '%s\n' "$XDG_SESSION_TYPE"
budgie-desktop --version
The desktop values should identify Budgie. On Fedora 44’s Budgie 10.10 session, $XDG_SESSION_TYPE should report wayland; older Fedora package sets that still expose an X11 Budgie entry can report x11.
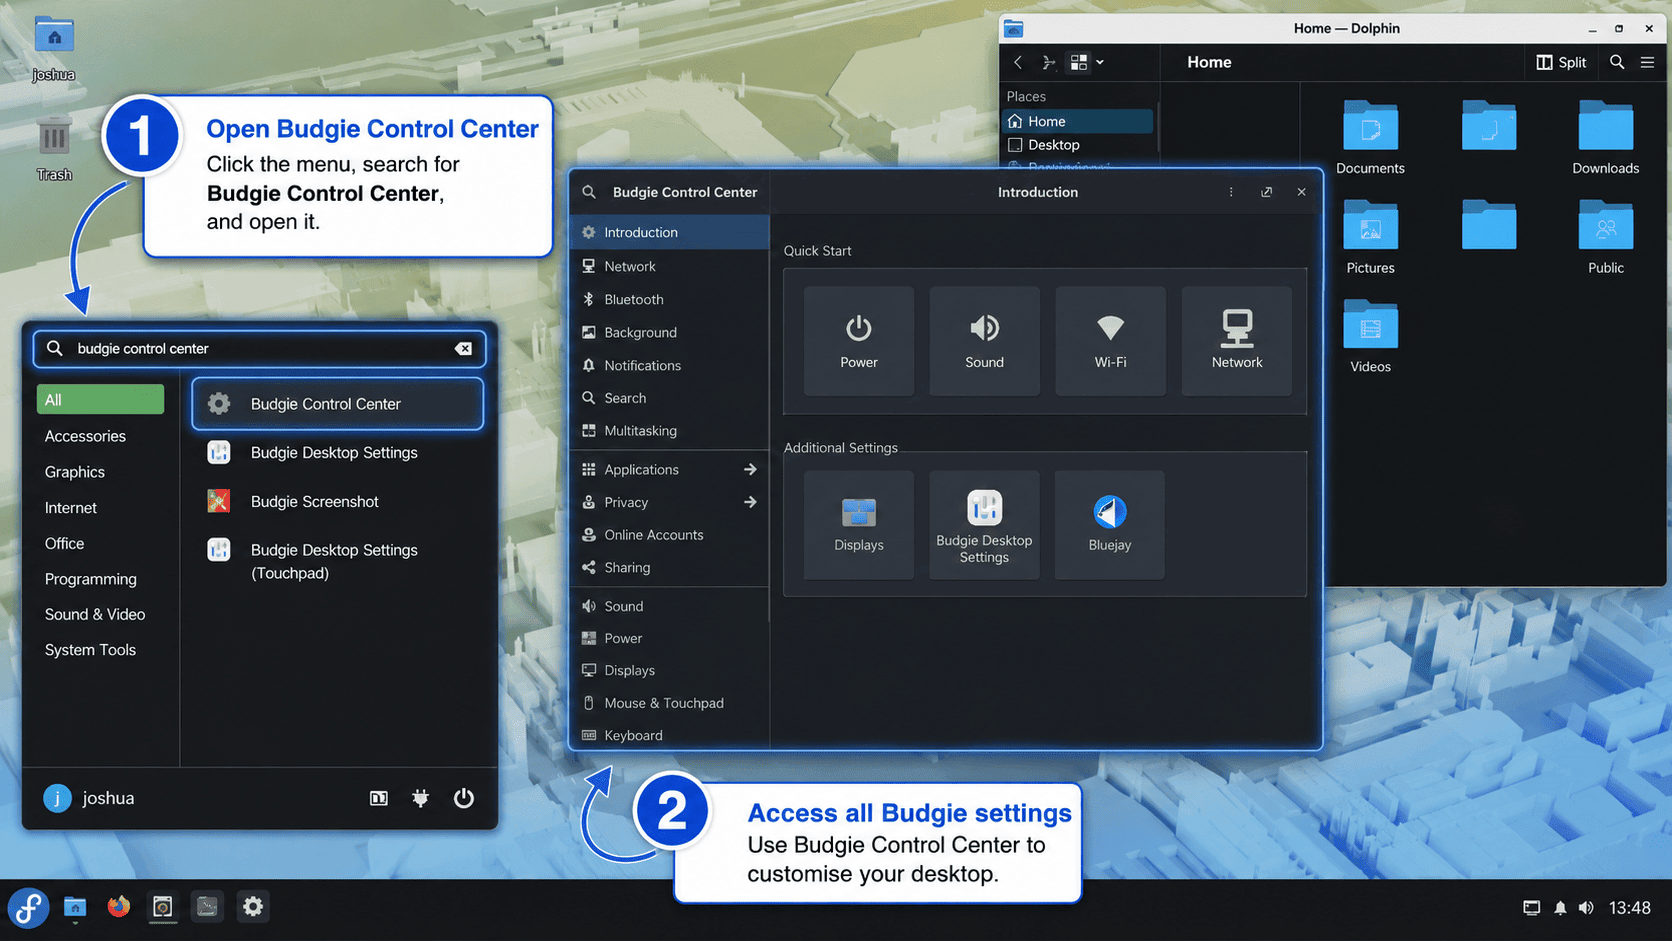
Use Budgie Settings and Raven
Budgie opens with a panel, application menu, system tray, and Raven sidebar for notifications and widgets. Use Budgie Desktop Settings for panel layout, applets, themes, and Raven behavior. For upstream usage notes, see the Budgie user documentation.
Optionally Switch to SDDM
Switching display managers is optional. The Budgie group installs sddm and sddm-wayland-miriway, but an existing Fedora Workstation system can keep GDM and still launch Budgie.
Check the active display manager before changing it:
systemctl status display-manager --no-pagerChanging the display manager affects graphical login. Keep another administrator session or a TTY available so you can switch back if the new login screen does not start correctly.
To use SDDM after installing Budgie, enable the service with --force because display managers share the display-manager.service alias:
sudo systemctl enable --force sddm.service
sudo reboot
To return Fedora Workstation to GDM later, enable GDM again and reboot:
sudo systemctl enable --force gdm.service
sudo reboot
Manage Budgie Desktop on Fedora
Update Budgie Packages
Budgie packages update through Fedora’s normal DNF workflow. Regular system updates refresh Budgie, SDDM packages, desktop libraries, and the rest of the system together.
sudo dnf upgrade --refreshFor scheduled package checks or unattended updates, configure DNF Automatic on Fedora separately and keep reboots aligned with desktop-session and graphics-stack updates.
Remove Budgie Desktop from Fedora
Do not remove Budgie from inside an active Budgie session. Log into GNOME, KDE Plasma, Xfce, another installed desktop, or a text console, and make sure a working display manager remains enabled.
If you switched to SDDM and want to return to Fedora Workstation’s default login path, restore GDM before removing Budgie packages:
sudo systemctl enable --force gdm.service
sudo reboot
Remove the full environment if you installed budgie-desktop-environment:
sudo dnf environment remove budgie-desktop-environmentRemove the core and application groups if you installed them directly. After a full environment removal, this command is harmless when the group state is already gone; if DNF reports nothing to remove, continue to the autoremove review for dependency-only leftovers.
sudo dnf group remove budgie-desktop-apps budgie-desktopPreview unused dependency cleanup before accepting it. DNF can identify packages that are no longer required, but the list can include libraries or desktop tools shared with another environment.
dnf --assumeno autoremoveRun autoremove only when the preview contains Budgie-related leftovers or other packages you intentionally want to remove:
sudo dnf autoremoveCheck that the main Budgie packages and session entries are gone after removal:
rpm -q budgie-desktop budgie-session budgie-control-center budgie-desktop-view budgie-desktop-defaults sddm sddm-wayland-miriway
find /usr/share/xsessions /usr/share/wayland-sessions -maxdepth 1 -type f -iname '*budgie*' -print 2>/dev/null
The package check should report that the Budgie packages are not installed, and the find command should print no Budgie session file. SDDM should be absent only if you allowed DNF to remove it and no other desktop still uses it.
Package removal does not delete personal desktop settings, app data, or dconf-backed Budgie preferences. Back up important profile data before resetting or deleting user configuration by hand.
Troubleshoot Budgie Desktop on Fedora
DNF Cannot Find the Budgie Environment
Check the environment and hidden group IDs before assuming Fedora lacks Budgie. The full environment is visible in the environment list, while the underlying groups are easiest to see with --hidden.
dnf environment list --available | grep -i budgie
dnf group list --hidden | grep -i budgie
If the IDs do not appear, refresh metadata and check again:
sudo dnf clean metadata
sudo dnf makecache --refresh
Legacy DNF Commands Fail
Older Fedora examples may use dnf groupinstall "Budgie Desktop" or similar DNF4-era aliases. Current Fedora uses DNF5, so install by the environment or group ID instead.
If DNF suggests installing dnf5-command(groupinstall), skip that compatibility path for this workflow. Fedora’s supported Budgie install commands are the DNF5 environment and group subcommands.
sudo dnf environment install budgie-desktop-environmentFor the lean install path, use the group subcommand:
sudo dnf group install budgie-desktopBudgie Does Not Appear at Login
If the login screen does not offer Budgie, first confirm the installed packages and session file:
rpm -q budgie-desktop budgie-session budgie-control-center
find /usr/share/xsessions /usr/share/wayland-sessions -maxdepth 1 -type f -iname '*budgie*' -print 2>/dev/null
If the package check fails or no session file appears, complete the full environment install again, then reboot so the display manager reloads its session list.
sudo dnf environment install budgie-desktop-environment
sudo reboot
Lean installations can rerun sudo dnf group install budgie-desktop instead.
Expected X11 Budgie Session Is Missing
On Fedora 44, the absence of /usr/share/xsessions/budgie-desktop.desktop is normal because the packaged Budgie 10.10 session is installed under /usr/share/wayland-sessions/. Use the find check rather than hardcoding one session directory.
find /usr/share/xsessions /usr/share/wayland-sessions -maxdepth 1 -type f -iname '*budgie*' -print 2>/dev/nullIf a workflow requires an X11 desktop session, choose another installed desktop that still provides one. The Fedora Xfce installation path remains useful for a lightweight X11-first desktop, while KDE Plasma on Fedora has a separately installable X11 session package.
Display Manager Fails or Loops at Login
A black screen, login loop, or failed greeter usually points to the display manager, graphics stack, or session startup rather than a missing Budgie package. Inspect the active display manager and recent boot logs from a TTY or another working desktop:
systemctl status display-manager --no-pager
sudo journalctl -b -u display-manager -n 100 --no-pager
sudo journalctl -b -p warning..alert -n 100 --no-pager
If you switched to SDDM and the login screen itself is failing, return to GDM and reboot:
sudo systemctl enable --force gdm.service
sudo reboot
Systems with proprietary NVIDIA drivers can also hit display-session problems. Use the Fedora-specific NVIDIA driver installation guide before treating Budgie itself as broken.
Conclusion
Budgie Desktop is installed on Fedora through the DNF5 environment path for a complete desktop or the core group for a leaner session. Keep GDM if it already works, switch to SDDM only with a recovery path ready, and use the official Budgie user documentation when you are ready to tune panels, applets, Raven, and keyboard behavior.

Formatting tips for your comment
You can use basic HTML to format your comment. Useful tags currently allowed in published comments:
<code>command</code>command<strong>bold</strong><em>italic</em><blockquote>quote</blockquote>