
Linux Mint does not ship a current SeaMonkey package in its default repositories, so the package source matters before installation. The suite still fills a useful niche when you want browsing, mail, IRC, and Composer in one application instead of four separate installs. To install SeaMonkey on Linux Mint 22.x or 21.x on a 64-bit x86 system, use the community-maintained Ubuntuzilla APT repository so updates stay inside normal package management.
The official SeaMonkey Linux x64 download is useful when you deliberately want a manual tarball install outside APT, but updates and cleanup stay in your hands. Ubuntuzilla packages the suite as seamonkey-mozilla-build, while the terminal command stays seamonkey and the menu entry appears as Mozilla Build of Seamonkey.
Install SeaMonkey on Linux Mint
Open a terminal from the applications menu, then work through this single APT method. The repository layout is version-agnostic, so the same commands apply to supported 64-bit Linux Mint 22.x and 21.x installs.
Check for an existing SeaMonkey install
Check whether SeaMonkey is already available before you add a third-party source:
command -v seamonkey && seamonkey --versionInstalled systems return a binary path and version string like this. No output usually means SeaMonkey is not installed yet.
/usr/bin/seamonkey
Mozilla SeaMonkey 2.53.23
If you see that output, SeaMonkey is already installed; use the update commands when you want a newer build, or open it from the menu when you only need to start the suite.
Confirm the supported SeaMonkey package architecture
Ubuntuzilla provides SeaMonkey packages for 64-bit x86 Linux Mint systems. Check the local APT architecture before adding the repository:
dpkg --print-architectureamd64
Continue only when the output is amd64. Do not continue on arm64 or aarch64 systems because the Ubuntuzilla SeaMonkey package index does not provide that architecture.
Prepare Linux Mint for the SeaMonkey repository
Refresh package metadata before installing repository helper packages:
sudo apt updateThese steps use
sudowhen they need administrator privileges. If your Linux Mint account is not in the sudoers file yet, create a sudo-capable user on Linux Mint before continuing.
Next, install the packages needed for HTTPS downloads, certificate trust, and GnuPG key management:
sudo apt install ca-certificates curl gpgFetch the Ubuntuzilla signing key
Ubuntuzilla signs its packages, but it does not publish a project-hosted HTTPS key file. Download the key into a temporary directory, convert it locally, and install the final keyring with root-owned permissions. The subshell keeps the cleanup trap local to this key setup step.
(
  key_tmp="$(mktemp -d)"
  trap 'rm -rf "$key_tmp"' EXIT
  curl -fsSLo "$key_tmp/ubuntuzilla.asc" 'https://keyserver.ubuntu.com/pks/lookup?op=get&search=0xC77205F7194A3E1ABE2DF9A4B7B9C16F2667CA5C'
  gpg --dearmor --yes -o "$key_tmp/ubuntuzilla.gpg" "$key_tmp/ubuntuzilla.asc"
  sudo install -m 0644 "$key_tmp/ubuntuzilla.gpg" /usr/share/keyrings/ubuntuzilla.gpg
)
Verify that the saved keyring matches the expected Ubuntuzilla signing-key fingerprint:
gpg --quiet --show-keys --with-fingerprint /usr/share/keyrings/ubuntuzilla.gpgpub rsa8192 2016-11-12 [SC]
C772 05F7 194A 3E1A BE2D F9A4 B7B9 C16F 2667 CA5C
uid Daniel Folkinshteyn (Ubuntuzilla signing key) <nanotube@users.sourceforge.net>
sub rsa8192 2016-11-12 [E]
Add the Ubuntuzilla repository for SeaMonkey
Create a dedicated DEB822 source file for the SeaMonkey package:
case "$(dpkg --print-architecture)" in
  amd64)
    printf '%s\n' \
    'Types: deb' \
    'URIs: https://downloads.sourceforge.net/project/ubuntuzilla/mozilla/apt' \
    'Suites: all' \
    'Components: main' \
    'Architectures: amd64' \
    'Signed-By: /usr/share/keyrings/ubuntuzilla.gpg' | sudo tee /etc/apt/sources.list.d/ubuntuzilla.sources > /dev/null
    ;;
  *)
    printf 'Ubuntuzilla currently provides the SeaMonkey package for amd64 Linux Mint systems only.\n' >&2
    false
    ;;
esac
This uses tee because plain > redirection would still run as your regular user and fail to write under /etc/apt/sources.list.d/. The .sources file keeps the repository in the current DEB822 format, Suites: all is intentional because Ubuntuzilla publishes one generic repository layout for both Mint 22.x and 21.x, and the architecture guard stops unsupported systems before they write a source that cannot provide the package.
Refresh APT and confirm the SeaMonkey package candidate before you install it:
sudo apt update
apt-cache policy seamonkey-mozilla-build
seamonkey-mozilla-build:
Installed: (none)
Candidate: 2.53.23-0ubuntu1
Version table:
2.53.23-0ubuntu1 500
500 https://downloads.sourceforge.net/project/ubuntuzilla/mozilla/apt all/main amd64 Packages
APT refers to the package as seamonkey-mozilla-build, but the command and desktop launcher stay seamonkey.
Do not download a SeaMonkey DEB package, or .deb file, directly for a normal install. Using the repository keeps the signing key, package metadata, and future updates tied to APT instead of leaving a one-off local package behind.
Install the SeaMonkey package
Once APT sees the package candidate, install SeaMonkey from the Ubuntuzilla repository:
sudo apt install seamonkey-mozilla-buildVerify the SeaMonkey installation
Confirm that the binary is on your path and that the installed build responds normally:
command -v seamonkey && seamonkey --version/usr/bin/seamonkey Mozilla SeaMonkey 2.53.23
Launch SeaMonkey on Linux Mint
SeaMonkey adds a menu launcher and can also be started from the terminal when you want to see startup messages directly.
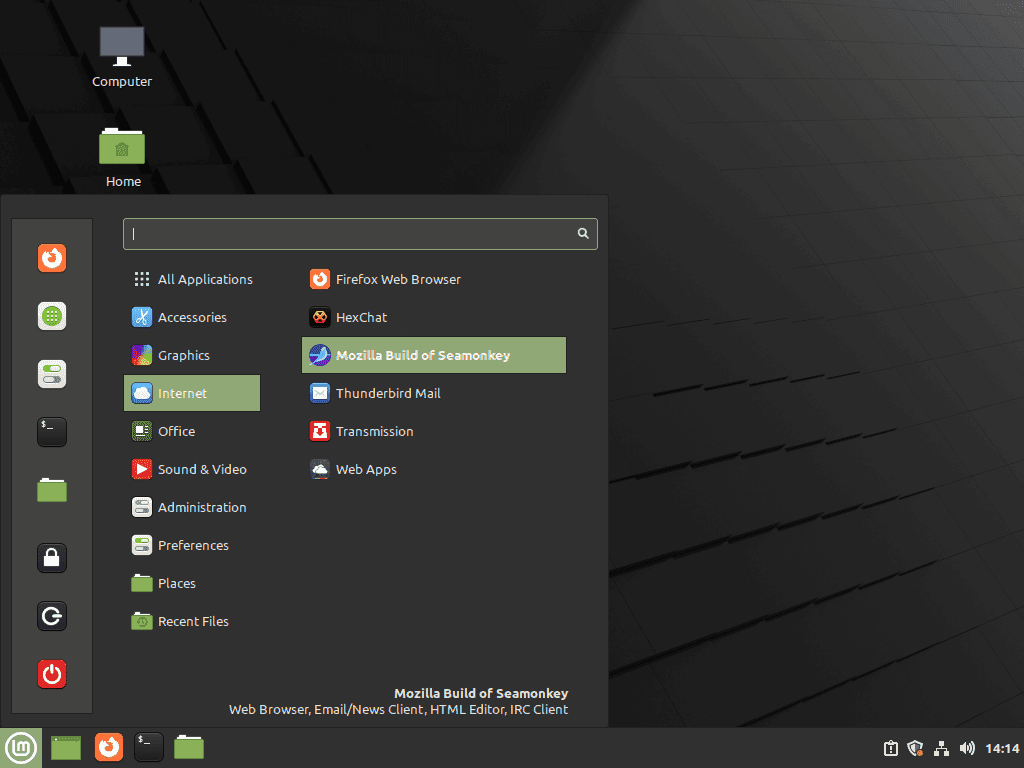
Open SeaMonkey from the Linux Mint menu
Open the application menu, search for SeaMonkey or Mozilla Build of Seamonkey, and launch the suite from there if you prefer the normal desktop workflow.
Open SeaMonkey from the terminal
The terminal launch path is useful when you are testing profile changes or want to catch startup errors in the shell:
seamonkeyThe first successful start creates your profile under ~/.mozilla/seamonkey, which is also the directory you back up or remove later.
Use SeaMonkey’s Built-In Tools on Linux Mint
SeaMonkey still bundles several classic Mozilla tools in one profile. That matters if you want the browser, Mail and Newsgroups, ChatZilla, and Composer living in the same application instead of as separate installs.
Understand SeaMonkey ports on Linux Mint
SeaMonkey does not install a background service or listen on a fixed local port. The package adds a desktop application only; web, mail, newsgroup, and IRC traffic uses outbound connections based on the account or server you configure. You normally do not need a Linux Mint firewall rule just to install or open SeaMonkey.
Set up SeaMonkey Mail and Newsgroups
Open Window > Mail & Newsgroups to start account setup. SeaMonkey supports IMAP, POP3, SMTP, and newsgroups, and modern providers such as Gmail or Outlook usually expect an app-specific password rather than your regular account password. Keep SSL or TLS enabled in the account settings so mail traffic stays encrypted.
Open SeaMonkey Composer on Linux Mint
Open Window > Composer when you want the built-in HTML editor. Composer is still useful for quick static pages, email templates, or light HTML and CSS edits when opening a full IDE would be overkill.
Back up the SeaMonkey profile directory
SeaMonkey stores bookmarks, mail data, account settings, and other profile content in ~/.mozilla/seamonkey. If you rely on the suite for mail or saved logins, back up that directory before major upgrades or before testing an upstream tarball build.
Update SeaMonkey on Linux Mint
Once Ubuntuzilla is configured, SeaMonkey updates like any other APT-managed package. Use a targeted upgrade when you want to refresh SeaMonkey without upgrading everything else at the same time:
Upgrade SeaMonkey with APT
sudo apt install --only-upgrade seamonkey-mozilla-buildCheck the version afterward if you want to confirm the current build:
seamonkey --versionMozilla SeaMonkey 2.53.23
Remove SeaMonkey from Linux Mint
Removing SeaMonkey cleanly takes three parts: purge the package, remove the Ubuntuzilla repository, and delete the profile directory if you do not want to keep personal data.
Purge the SeaMonkey package
Start by removing the package itself:
sudo apt purge seamonkey-mozilla-buildThis removes the installed program and system-side package data, but it does not touch your personal SeaMonkey profile.
Remove the Ubuntuzilla repository
Delete the repository file and key so future apt update runs stop querying Ubuntuzilla:
sudo rm -f /etc/apt/sources.list.d/ubuntuzilla.sources
sudo rm -f /usr/share/keyrings/ubuntuzilla.gpg
sudo apt updateDelete SeaMonkey user data
This step permanently deletes your local SeaMonkey data, including bookmarks, mail, account settings, and saved profile content. Back up
~/.mozilla/seamonkeyfirst if you want to keep any of it.
find "$HOME/.mozilla" -maxdepth 1 -type d -name 'seamonkey*' -print 2>/dev/nullNo output means there is no matching SeaMonkey profile directory for the current account. Remove the profile only after you confirm that the listed path is safe to delete:
rm -rf "$HOME/.mozilla/seamonkey"Verify SeaMonkey removal
Check both the package state and the launcher path so you know the suite is gone and not just missing from the current shell session:
if dpkg-query -W -f='${db:Status-Abbrev}\n' seamonkey-mozilla-build 2>/dev/null | grep -Eq '^(ii|rc)'; then
dpkg-query -W -f='${db:Status-Abbrev} ${Package}\n' seamonkey-mozilla-build
else
echo "package status: not installed"
fi
hash -r
command -v seamonkey || echo "seamonkey not found"package status: not installed seamonkey not found
Troubleshoot SeaMonkey on Linux Mint
Most SeaMonkey install problems on Linux Mint come down to key import failures, an inactive Ubuntuzilla source file, or a broken profile. These checks help isolate each case quickly.
Fix Ubuntuzilla key download errors
If the key download fails, first confirm that curl, certificate trust, and gpg are installed:
sudo apt install ca-certificates curl gpgThen recreate the keyring through the HTTPS keyserver lookup URL:
(
key_tmp="$(mktemp -d)"
trap 'rm -rf "$key_tmp"' EXIT
curl -fsSLo "$key_tmp/ubuntuzilla.asc" 'https://keyserver.ubuntu.com/pks/lookup?op=get&search=0xC77205F7194A3E1ABE2DF9A4B7B9C16F2667CA5C'
gpg --dearmor --yes -o "$key_tmp/ubuntuzilla.gpg" "$key_tmp/ubuntuzilla.asc"
sudo install -m 0644 "$key_tmp/ubuntuzilla.gpg" /usr/share/keyrings/ubuntuzilla.gpg
)Confirm the saved keyring before retrying the APT refresh:
gpg --quiet --show-keys --with-fingerprint /usr/share/keyrings/ubuntuzilla.gpgpub rsa8192 2016-11-12 [SC]
C772 05F7 194A 3E1A BE2D F9A4 B7B9 C16F 2667 CA5C
uid Daniel Folkinshteyn (Ubuntuzilla signing key) <nanotube@users.sourceforge.net>
sub rsa8192 2016-11-12 [E]
This path avoids the older keyserver helper ports and uses normal HTTPS. If curl still fails, check DNS, proxy, or TLS inspection on the network before repeating the repository setup.
Fix missing SeaMonkey package candidates
If apt says it cannot locate seamonkey-mozilla-build, verify that the DEB822 source file is present, refresh APT, and then check whether the package candidate is visible again. Relevant output includes:
cat /etc/apt/sources.list.d/ubuntuzilla.sources
sudo apt update
apt-cache policy seamonkey-mozilla-buildTypes: deb
URIs: https://downloads.sourceforge.net/project/ubuntuzilla/mozilla/apt
Suites: all
Components: main
Architectures: amd64
Signed-By: /usr/share/keyrings/ubuntuzilla.gpg
seamonkey-mozilla-build:
  Installed: (none)
  Candidate: 2.53.23-0ubuntu1
  Version table:
     2.53.23-0ubuntu1 500
        500 https://downloads.sourceforge.net/project/ubuntuzilla/mozilla/apt all/main amd64 Packages
Reset a broken SeaMonkey profile
If SeaMonkey opens with a corrupted profile or the first-run setup never finishes cleanly, move the old profile out of the way and let SeaMonkey generate a fresh one:
if [ -d "$HOME/.mozilla/seamonkey" ]; then
  mv "$HOME/.mozilla/seamonkey" "$HOME/.mozilla/seamonkey.backup.$(date +%Y%m%d-%H%M%S)"
else
  echo "SeaMonkey profile directory not found"
fi
Relaunch SeaMonkey after that move. If the application starts normally, you can copy specific mail or bookmark data back from the backup directory instead of restoring the whole broken profile.
Conclusion
SeaMonkey now runs on Linux Mint with APT handling future updates, while the browser, mail, IRC, and Composer tools stay together in one profile. If you later decide you only need a browser, you can also install Chromium Browser on Linux Mint or install Tor Browser on Linux Mint.

Formatting tips for your comment
You can use basic HTML to format your comment. Useful tags currently allowed in published comments:
<code>command</code>command<strong>bold</strong><em>italic</em><a href="https://example.com">link</a><blockquote>quote</blockquote>