In the ever-evolving landscape of Java development, Oracle’s Java 17 LTS emerges as a beacon of innovation and stability. For those harnessing the power of Debian systems, this guide will show the process to install Oracle Java 17 on Debian 12 Bookworm, Debian 11 Bullseye, or Debian 10 Buster, ensuring you’re equipped with the latest advancements in Java technology.
Oracle Java 17 LTS: Key Features
Java 17 LTS, while preserving the foundational strengths of the Java platform, introduces many enhancements over its predecessor, Java 11 LTS. Here’s a snapshot of its pivotal features:
- Language and API Improvements:
- Pattern Matching (JEP 394): Streamlines coding patterns, enhancing code clarity and robustness.
- Records (JEP 395): Offers a concise syntax for classes, minimizing boilerplate code associated with data carriers.
- Performance Boosts:
- Foreign-Memory Access API (JEP 393): Facilitates efficient access to foreign memory, optimizing application performance and memory usage.
- Security Augmentations:
- Encapsulation of JDK Internals (JEP 396): Bolsters platform security by restricting access to JDK’s internal components.
- Further Encapsulation of Internal APIs (JEP 403): Continues the endeavor to safeguard the JDK’s internal APIs.
- Tooling Upgrades:
- Packaging Tool (JEP 392): Enables developers to package Java applications in platform-specific formats.
- Removal of AOT and JIT Compiler (JEP 410): Phases out the experimental compilers in favor of cutting-edge compiler technologies.
These enhancements underscore Oracle’s commitment to refining Java, making it more agile and adept for contemporary development challenges.
As we delve deeper into this guide, you’ll be presented with a detailed walkthrough on installing Oracle’s Java 17 LTS into your Debian system, unlocking its myriad of features and benefits.
Install Oracle Java 17 on Debian 12, 11, or 10 via .deb
For those who prefer Debian package management, this section provides a comprehensive step-by-step guide to installing Oracle Java 17 LTS utilizing the .deb package.
Step 1: Download Oracle Java 17 .deb Package
We need to obtain the Oracle Java 17 .deb package to initiate the installation process. A simple and efficient method is to employ the wget command, a potent tool for downloading files from the web in a non-interactive manner. It supports HTTP, HTTPS, and FTP protocols and retrieves files via HTTP proxies.
Utilize the following command to download the Oracle Java 17 .deb package:
wget https://download.oracle.com/java/17/latest/jdk-17_linux-x64_bin.debExecuting the above command engages wget to establish a connection with the designated URL and download the Java 17 Debian package onto your local system.
We are ready to proceed to the installation phase with the package in your possession.
Step 2: Install Oracle Java 17 via DPKG Command on Debian
With the .deb package downloaded, we now employ the dpkg command to install Oracle Java 17 LTS. dpkg is an effective tool that allows you to install, remove, and manage Debian packages on your Debian system with relative ease.
Prior to utilizing the dpkg command, verify that you’re in the directory where the downloaded .deb package is stored. To install Java, enter the following command:
sudo dpkg -i jdk-17_linux-x64_bin.debThis command prompts the dpkg utility to install the specified .deb package. The -i flag is a directive indicating our intention to install a package. Depending on the size of the package and the processing speed of your system, the installation duration may vary.
Step 3: Confirming the JDK 17 Installation
Following the successful installation of Oracle Java 17 LTS, ensuring that the system recognizes the correct Java version is essential. This can be achieved by querying the installed Java version using the --version command, as shown below:
java --versionThis command will return the version of Java currently active on your system. If the installation process was completed successfully, it should display Java 17. This affirms that Oracle Java 17 JDK has been properly installed and is ready for use.
Install Oracle Java 17 on Debian 12, 11, or 10 via source
Certain users may prefer a hands-on approach to software installation, granting them total control over the procedure and enabling customization to meet their specific needs. For such scenarios, Oracle Java 17 LTS offers a manual installation option using the archive. Let’s delve into the steps necessary to achieve a customizable and adaptable Java development environment.
Step 1: Download Oracle Java 17 Archive
The initial task involves obtaining the Oracle Java 17 archive. This can be efficiently done with the curl command, a versatile tool for downloading files from a server via various protocols, including HTTP and FTP.
Firstly, confirm that curl is installed on your Debian system. If it’s not, execute the following command to install it:
sudo apt install curlNext, download Oracle JDK 17 latest release, with the following command:
curl -O https://download.oracle.com/java/17/latest/jdk-17_linux-x64_bin.tar.gzEquipped with curl, we can proceed to download the Oracle Java 17 archive:
tar -xvf jdk-17_linux-x64_bin.tar.gzExecuting this command unravels the Oracle Java 17 archive, laying the groundwork for the subsequent installation stages.
Step 3: Navigate to the Extracted Directory Java 17 Files
Next, navigate to the directory where the archive was extracted:
cd <directory_name>Upon entering the directory, execute the following commands to relocate the Java 17 files to the desired directory:
sudo mkdir -p /usr/local/jdk-17
sudo mv * /usr/local/jdk-17
Step 4: Configuring Environment Variables with JDK 17
With the Java 17 files appropriately positioned, the focus now shifts to setting up the environment variables. This configuration allows your system to recognize the Java installation location and interact with it properly. Append the following lines to your .bashrc or .bash_profile file:
export JAVA_HOME=/usr/local/jdk-17
export PATH=$JAVA_HOME/bin:$PATH
To apply the modifications to your environment variables, source the .bashrc or .bash_profile file with the following command:
source ~/.bashrcTo make the changes to the environment variables permanent and avoid using source every time, you need to add the export commands to your .bashrc or .bash_profile file.
This way, every time you open a new terminal session, these files are sourced automatically, making the variable changes persist across sessions.
The commands would look like this in your terminal:
echo 'export JAVA_HOME=/usr/local/jdk-17' >> ~/.bashrc
echo 'export PATH=$JAVA_HOME/bin:$PATH' >> ~/.bashrc
These commands append the export lines to the end of your .bashrc file.
After these commands have been executed, for the changes to take effect immediately, you still need to source your .bashrc or .bash_profile file. If you do not wish to source it now, the changes will be applied the next time you start a new terminal session.
To source the .bashrc file, you can use:
source ~/.bashrcStep 5: Validate the Java 17 Installation
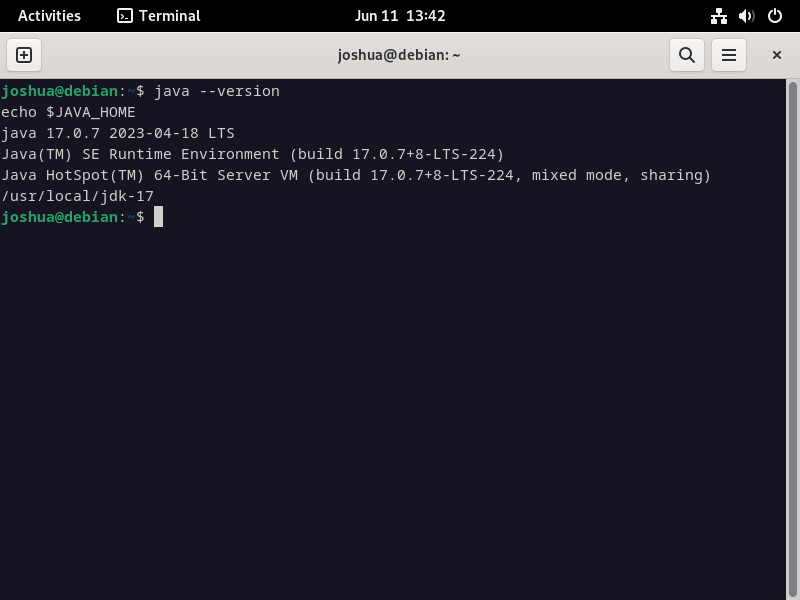
Lastly, verifying that Oracle Java 17 LTS is correctly installed and your environment variables are accurately set is crucial. To accomplish this, inspect the installed Java version and the JAVA_HOME variable:
java --version
echo $JAVA_HOME
Provided everything was executed correctly, the output should present the Java version and the path to the Java installation. This result signifies a successful installation and setup process.
Create Test Java Applications on Debian 12, 11 or 10
After accomplishing the Oracle Java 17 LTS installation on your Debian system, it’s essential to affirm the effectiveness of your setup. A suitable way of doing this involves developing a basic Java application. This not only ascertains the integrity of your installation but also familiarizes you with the procedure of building, compiling, and running Java applications on Debian.
Step 1: Writing Your Initial Java Application
The first order of business is creating a new Java file using a text editor. The ‘nano’ text editor is frequently employed for this purpose due to its simplicity and user-friendly interface. With the following command, create a new file named ‘Greeting.java’:
sudo nano Greeting.javaInside this freshly created file, you’ll write your first Java application. Below is a sample of a simple program which, upon execution, will display a cheery greeting:
public class Greeting {
  public static void main(String[] args) {
    System.out.println("Hello, Debian world!");
  }
}
Preserve your code by pressing CTRL+O and subsequently closing the text editor using CTRL+X.
Step 2: Compiling and Running the Java Application
With your code set, the next step involves its compilation. Java operates on a two-step mechanism to execute code: initially compiling it into bytecode, then running the bytecode. Accomplish this with the javac command:
javac Greeting.javaProvided your code is error-free, this command will generate a file named ‘Greeting.class’ that contains the Java bytecode.
Next, to execute the bytecode and behold your meticulously crafted message, use the java command:
java GreetingThe output should be “Hello, Debian world!”, signifying the successful operation of your application and hence, the effective functioning of your Java installation.
Step 3: Create an Additional Java Test Application
To further confirm the operability of your Java development environment and cement your understanding and comfort with Java on Debian, crafting and testing a second Java application is a prudent move.
Establish another file, ‘Goodbye.java’, and embed the following simple code:
public class Goodbye {
  public static void main(String[] args) {
    System.out.println("Goodbye, Debian world!");
  }
}
Compile and execute this program similar to the previous one:
javac Goodbye.java
java Goodbye
The output will read: “Goodbye, Debian world!”, thereby reinforcing the successful functioning of your Java development environment.
By creating and testing these two rudimentary applications, you’ve corroborated the functionality of your Java environment and have gained familiarity with the process of creating, compiling, and executing Java programs on Debian.
Concluding Thoughts
In this guide, you learned how to install Oracle’s JDK 17 on Debian Linux. You followed the steps to download the archive, extract its contents, organize the files, and set the required environment variables. You also created and ran Java applications to confirm your setup and understand the Java development process on Debian. Now, you’re ready to work on advanced Java projects on your Debian system.

