GParted gives Ubuntu a visual way to create, resize, move, delete, and format disk partitions before you commit changes to a drive. That makes it useful for dual-boot preparation, reclaiming space from old installs, and USB or secondary-drive layout work where a terminal partition editor would be easy to misread. To install GParted on Ubuntu 26.04, 24.04, or 22.04, start with the default APT package unless you have a specific reason to use the newer xtradeb PPA builds.
The default Ubuntu package is the best fit for most systems. Verified default candidates are 1.8.0 on Ubuntu 26.04, 1.5.0 on 24.04, and 1.3.1 on 22.04; the optional xtradeb PPA currently provides 1.8.1 for 26.04 and 24.04, and 1.6.0 for 22.04.
Install GParted on Ubuntu
Quick GParted Install Commands for Ubuntu
On a clean Ubuntu system, install GParted from the default repository with APT:
sudo apt update
sudo apt install gparted
These commands require
sudoprivileges. Verify your account belongs to thesudogroup before proceeding. See how to add a user to sudoers on Ubuntu if you need to configure access.
If you prefer older APT syntax, sudo apt-get install gparted installs the same gparted package. If a PPA or previous GParted install is already present, check the package source first and remove conflicting source entries before switching methods.
Choose a GParted Package Source
Use the default repository unless you specifically need a newer xtradeb build. The PPA is community-maintained, so pin it to GParted packages only instead of letting every xtradeb package outrank Ubuntu’s archive.
| Method | Source | Candidate | Updates | Best Fit |
|---|---|---|---|---|
| APT (Default) | Ubuntu archive | 26.04: 1.8.0; 24.04: 1.5.0; 22.04: 1.3.1 | Automatic via apt upgrade | Most users who want the Ubuntu archive package |
| APT (xtradeb PPA) | xtradeb PPA | 26.04 and 24.04: 1.8.1; 22.04: 1.6.0 | Automatic via apt upgrade | Users who need a newer community-maintained build |
At the moment, Snapcraft does not publish a gparted snap and Flathub does not list a GParted app ID, so neither store is a practical GParted install source on Ubuntu.
For normal Ubuntu desktop use, you do not need a separate .deb download for GParted. APT installs the package and keeps it updated; use the GParted Live ISO download only when you need bootable media for inactive system partitions.
Keep the package names separate if you see older references to gpart. Ubuntu’s gpart package is a different partition-recovery utility from the Universe component; the graphical partition editor uses the package name gparted.
Kubuntu, Xubuntu, Lubuntu, and other official Ubuntu flavors use the same package commands because they share Ubuntu’s package base, although the application menu location can differ by desktop.
Update Your Ubuntu System Before Installing GParted
Before either full install method, refresh your package lists so APT uses current repository metadata:
sudo apt updateInstall GParted from the Default Ubuntu Repository
Install the repository package when you want the simplest and most conservative path:
sudo apt install gpartedVerify the installation by checking the package source and installed version:
apt-cache policy gpartedRelevant version lines include:
Ubuntu 26.04:
gparted:
  Installed: 1.8.0-1
  Candidate: 1.8.0-1

Ubuntu 24.04:
gparted:
  Installed: 1.5.0-1build4
  Candidate: 1.5.0-1build4

Ubuntu 22.04:
gparted:
  Installed: 1.3.1-1ubuntu1
  Candidate: 1.3.1-1ubuntu1
Install GParted from the xtradeb PPA
The xtradeb PPA provides newer GParted builds for Ubuntu 26.04, 24.04, and 22.04. A PPA (Personal Package Archive) is a community-maintained repository hosted on Launchpad that delivers packages outside Ubuntu’s default archive.
Minimal Ubuntu installations may not include
add-apt-repository. Install the helper package only if the PPA command is missing.
sudo apt install software-properties-commonAdd the PPA and refresh your package lists in one step:
sudo add-apt-repository ppa:xtradeb/apps -yConfigure GParted APT Pinning (Recommended)
APT pinning restricts the PPA preference to GParted and its shared data package, preventing unrelated xtradeb packages from overriding Ubuntu defaults:
printf '%s\n' \
'Package: *' \
'Pin: release o=LP-PPA-xtradeb-apps' \
'Pin-Priority: 100' \
'' \
'Package: gparted gparted-common' \
'Pin: release o=LP-PPA-xtradeb-apps' \
'Pin-Priority: 700' | sudo tee /etc/apt/preferences.d/xtradeb-gparted > /dev/null
The first rule deprioritizes all packages from this PPA to 100. The second rule raises only gparted and gparted-common to 700, so APT prefers the PPA build for GParted without broadly switching other applications to xtradeb.
Install GParted from the PPA:
sudo apt install gpartedVerify the PPA version is active by checking the package source:
apt-cache policy gparted gparted-commonRelevant output with pinning active includes:
Ubuntu 26.04:
gparted:
  Installed: 1.8.1-1xtradeb1.2604.1
  Candidate: 1.8.1-1xtradeb1.2604.1
 *** 1.8.1-1xtradeb1.2604.1 700
     1.8.0-1 500

Ubuntu 24.04:
gparted:
  Installed: 1.8.1-1xtradeb1.2404.1
  Candidate: 1.8.1-1xtradeb1.2404.1
 *** 1.8.1-1xtradeb1.2404.1 700
     1.5.0-1build4 500

Ubuntu 22.04:
gparted:
  Installed: 1.6.0-1xtradeb1
  Candidate: 1.6.0-1xtradeb1
 *** 1.6.0-1xtradeb1 700
     1.3.1-1ubuntu1 500
The priority value of 700 on the PPA line confirms that APT pinning is active and the PPA version takes priority over the default repository.
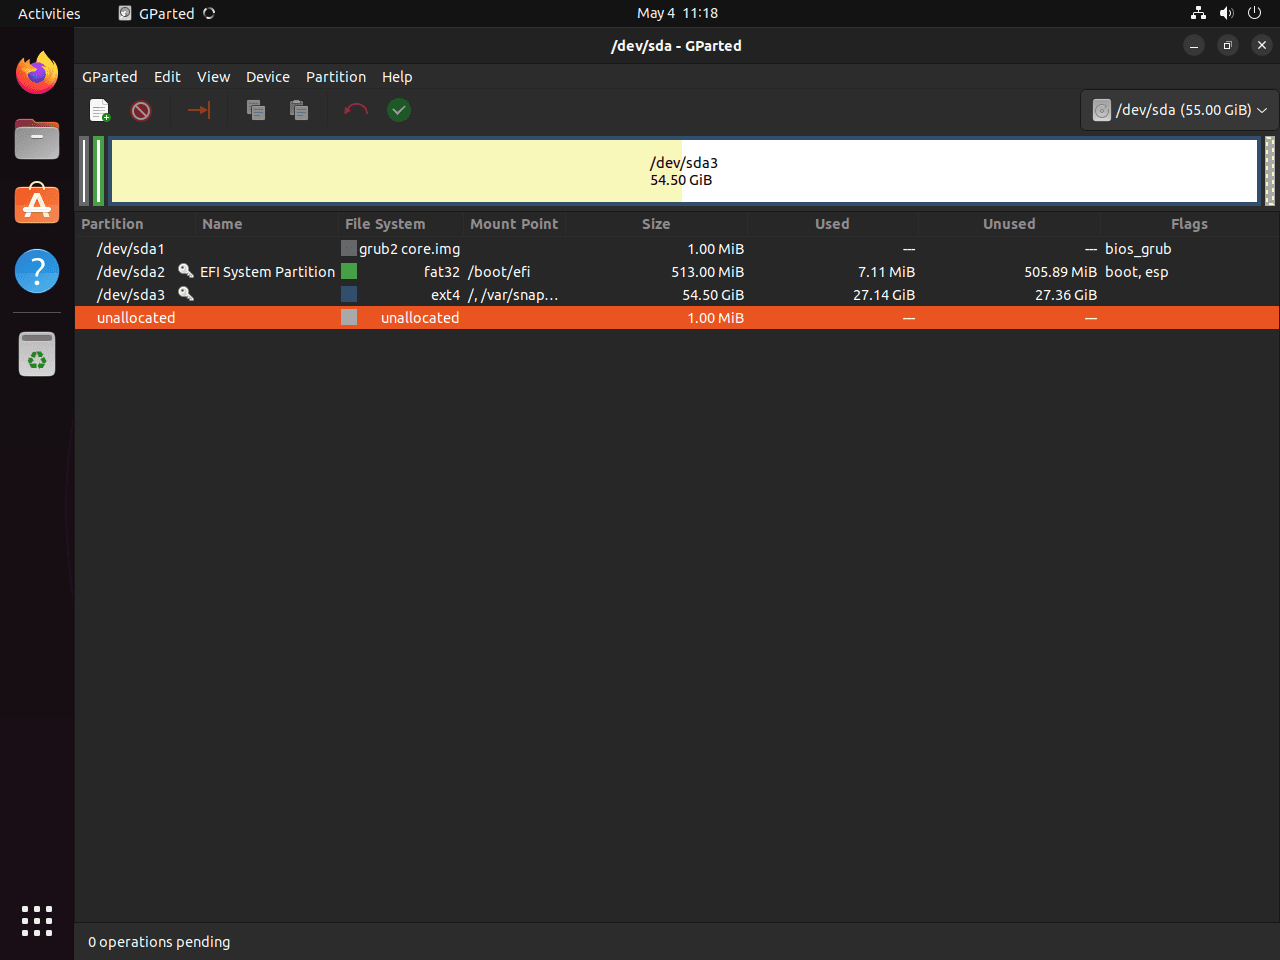
Launch GParted on Ubuntu
GParted requires root privileges to access and modify disk partitions. Both terminal and desktop launch methods prompt for authentication.
Back up important data before resizing, moving, deleting, or formatting partitions. GParted queues changes before applying them, but a mistaken target disk or interrupted operation can still make data unrecoverable.
Launch GParted from the Terminal
Start the graphical interface from a terminal when you want to see authentication or startup messages directly:
sudo gpartedAfter entering your password, the GParted graphical interface opens with full access to all disk operations.
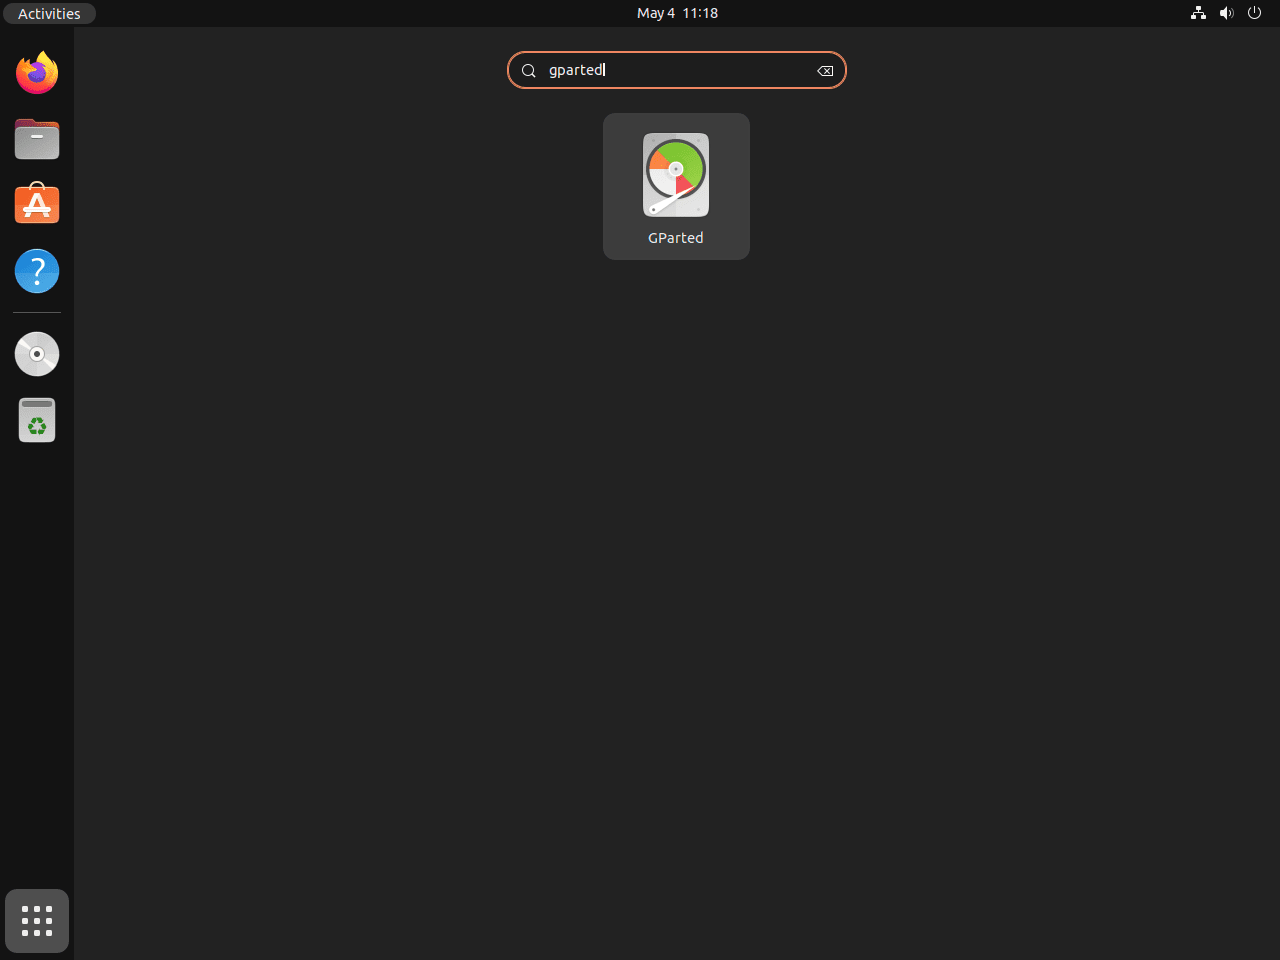
Launch GParted from the Applications Menu
GParted is also accessible through the Ubuntu desktop interface:
- Click Activities in the top-left corner of your screen.
- Type “GParted” in the search bar.
- Click the GParted icon to launch the application.
- Enter your password when prompted for authentication.
Use GParted Safely on Ubuntu
GParted is the right tool when you need partition layout changes such as resizing, moving, copying, or creating partitions. GNOME Disks, installed as gnome-disk-utility on many desktops, is better for simpler jobs such as quick formatting, checking SMART data, or creating disk images.
GParted cannot resize or move the Ubuntu root filesystem while that partition is mounted. To change the running system partition, boot from GParted Live or Ubuntu Desktop installation media and work from the live session; current Ubuntu Desktop 26.04, 24.04, and 22.04 ISOs include GParted. If a server, minimal, or custom live environment lacks the command, use GParted Live or install GParted temporarily in that live session before modifying the disk.
On Ubuntu Server or another headless install, GParted still needs a graphical session and administrator authentication. Use command-line tools such as parted, lsblk, and filesystem-specific utilities for server-side partition work, or boot a live desktop environment when you need the GParted interface. If your task is specifically the parted command, use the separate parted package; GParted is the graphical editor for desktop or live-session work.
Update GParted on Ubuntu
GParted updates automatically through standard Ubuntu system updates. To update only GParted without upgrading other packages:
sudo apt update && sudo apt install --only-upgrade gpartedConfirm the updated version is active:
apt-cache policy gpartedThe Installed line should match or exceed the expected version for your Ubuntu release and chosen package source.
Remove GParted from Ubuntu
If you no longer need GParted, remove the package first, then review any dependency cleanup APT proposes. For broader cleanup behavior, see how to remove packages on Ubuntu from the command line.
Remove the GParted Package
Remove GParted and purge its configuration files:
sudo apt remove --purge gpartedPreview orphaned dependency cleanup before running it:
sudo apt autoremove --dry-runIf the preview only lists packages you no longer need, run the cleanup:
sudo apt autoremoveRemove the xtradeb PPA (If Added)
If you added the xtradeb PPA, remove the pinning file, repository entry, and any trust file left by older PPA tooling, then refresh APT:
sudo rm -f /etc/apt/preferences.d/xtradeb-gparted
sudo add-apt-repository --remove ppa:xtradeb/apps -y
sudo rm -f /etc/apt/trusted.gpg.d/xtradeb-ubuntu-apps.gpg /etc/apt/trusted.gpg.d/xtradeb-ubuntu-apps.gpg~
sudo apt update
The separate remove a PPA from Ubuntu walkthrough covers repository file cleanup, package source checks, and recovery from stale PPA entries.
Verify GParted Removal
Confirm GParted is no longer installed:
dpkg-query -W -f='${db:Status-Abbrev} ${binary:Package}\n' gparted gparted-common 2>/dev/null | grep '^ii' || echo "GParted packages are not installed"Expected output:
GParted packages are not installed
If you also removed the xtradeb PPA, check the package source again:
apt-cache policy gpartedThe remaining candidate should come from your Ubuntu mirror and should no longer list ppa.launchpadcontent.net/xtradeb/apps.
Troubleshoot GParted Issues on Ubuntu
GParted Shows No Disks or Partitions
If GParted opens without usable disk access or shows no devices, it was likely launched without administrator privileges or without a working desktop authentication prompt.
Close GParted and relaunch it using sudo gparted from the terminal. If launching from the applications menu, enter your password when the authentication prompt appears, then check that connected drives appear in the device dropdown menu at the top-right of the GParted window.
Cannot Modify a Mounted GParted Partition
GParted cannot modify a mounted partition. If resize, move, or delete actions are unavailable, look for the key icon beside the partition label.
Right-click the partition and select Unmount when the option is available. After unmounting, the key icon disappears and resize or move operations become available.
For system partitions like your root filesystem (/), you cannot unmount them while Ubuntu is running. Boot from GParted Live or Ubuntu Desktop installation media, choose a live session, and launch GParted there to modify the inactive system disk. If GParted is missing from a custom live environment, install it temporarily in that session before changing partitions.
GParted Operations Queue Not Applying
GParted queues partition changes until you explicitly apply them. If you resize a partition but see no change after rebooting, you likely closed the application before applying the operations queue.
After making your desired changes, click the green checkmark button in the toolbar or choose Edit > Apply All Operations. Review the pending operations carefully before clicking Apply, because partition changes cannot be undone once they complete.
Conclusion
GParted is ready to manage partitions on Ubuntu through the default repository, with xtradeb available when you need a newer community build. Keep system-partition work on bootable media such as GParted Live, and set up Timeshift on Ubuntu before risky drive changes when rollback matters.

I don’t even know if you still check here. That would be good. For example, I would like a tutorial in this direction on how to change the download folder in Ubuntu.
Thanks for reaching out, ademir. Yes, the site is still actively maintained and updated.
A tutorial on changing the default download folder in Ubuntu is a good suggestion. The process typically involves adjusting settings in your file manager or browser, depending on which application you want to configure. I have added this topic to the content roadmap for a future guide that will cover both approaches.