Ubuntu 22.04 LTS systems still need a clean bridge to Noble before they can move farther forward. To upgrade Ubuntu 22.04 to 24.04 LTS, use Ubuntu’s release upgrader through Software Updater on a desktop or do-release-upgrade on a server, console, or SSH session.
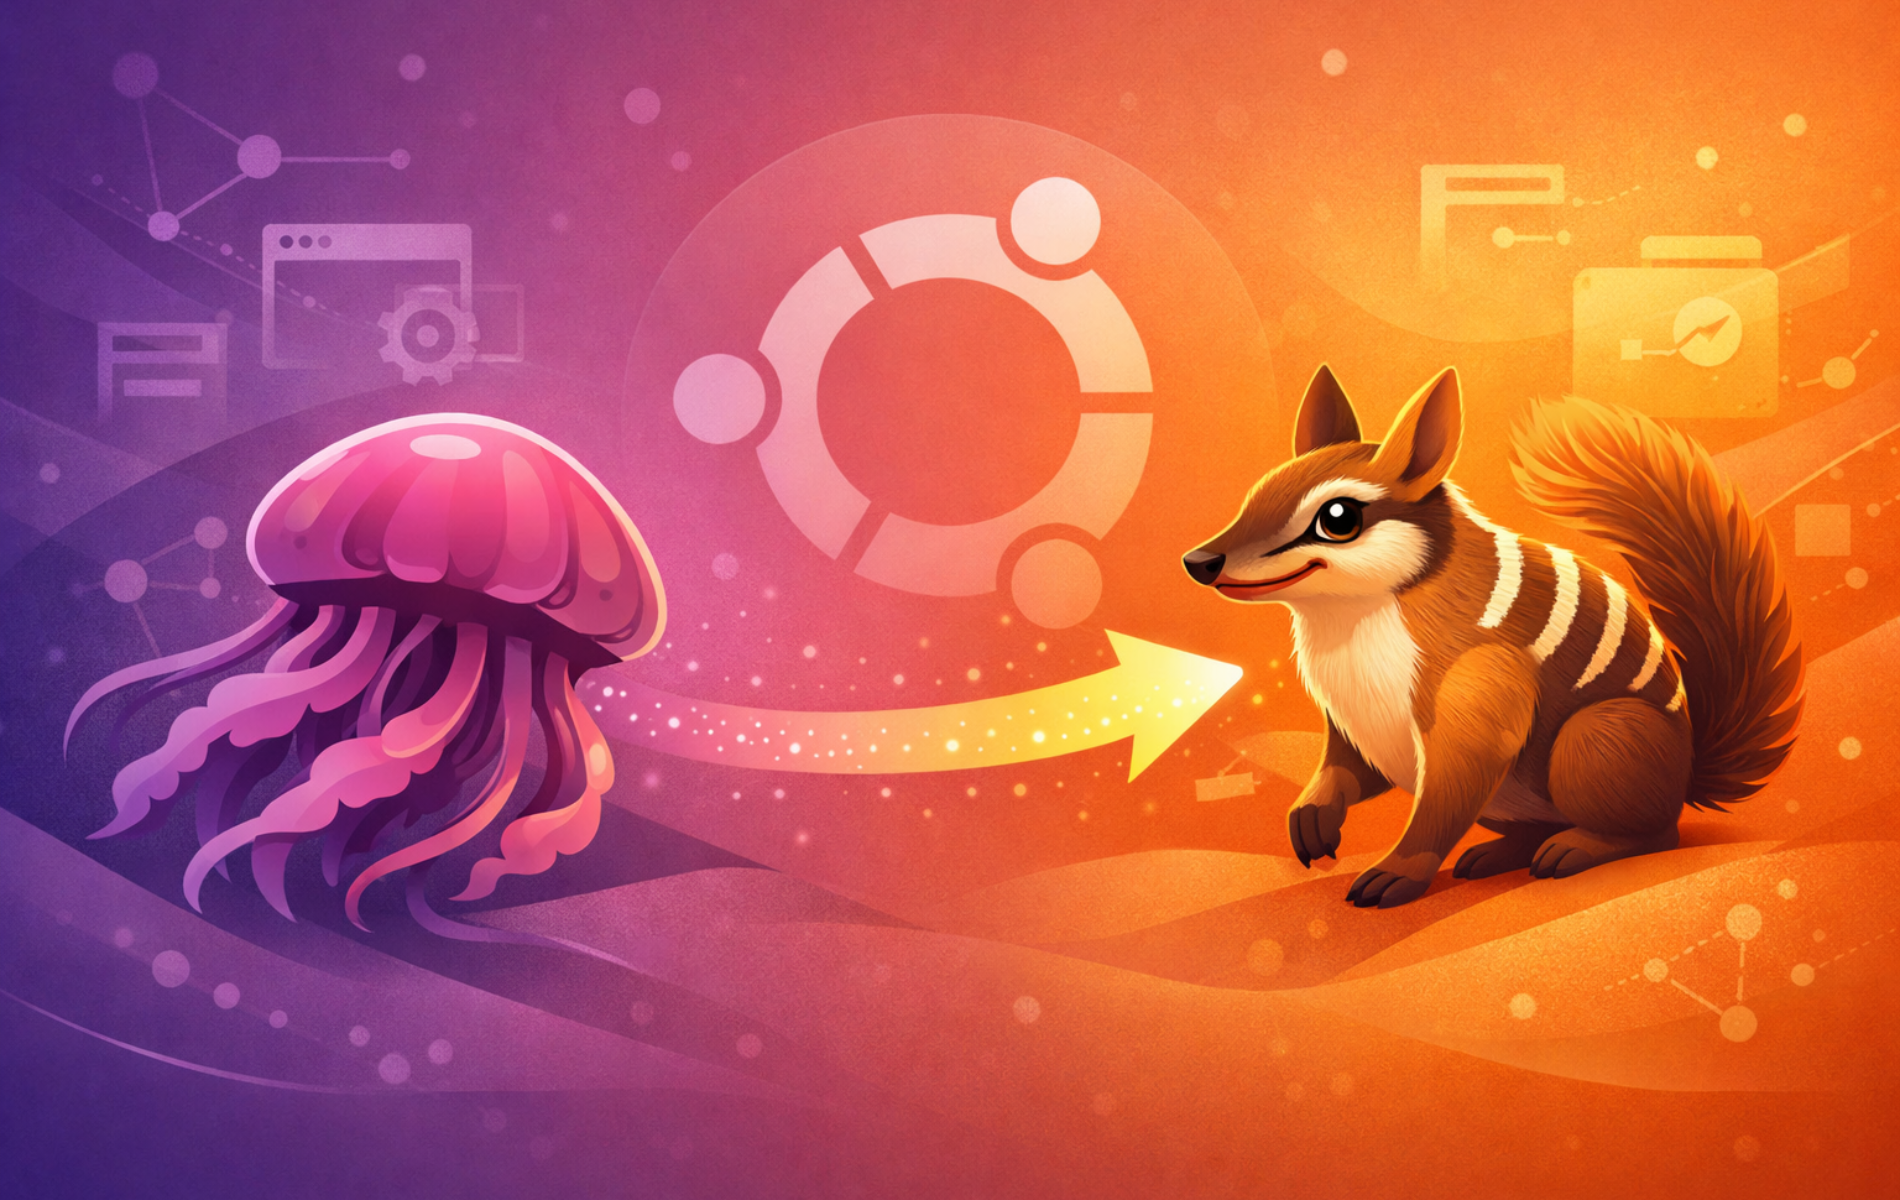
The supported LTS path is sequential: Ubuntu 22.04 LTS (Jammy Jellyfish) upgrades to Ubuntu 24.04 LTS (Noble Numbat). Ubuntu 20.04 users must upgrade to 22.04 first, and 24.04 can later move to 26.04 when that LTS upgrade is offered to the system. The workflow covers backups, package preparation, upgrade prompts, verification, and post-upgrade cleanup for desktop and server installations.
Upgrade Ubuntu 22.04 to 24.04 LTS
Start from a fully updated Ubuntu 22.04 LTS system. The focus here is the LTS-to-LTS route because that is the durable server and desktop upgrade path for Jammy systems.
Confirm the Supported Upgrade Path
Ubuntu release upgrades move through supported releases in order. Ubuntu 20.04 cannot skip directly to 24.04; use the Ubuntu 20.04 to 22.04 upgrade guide first, then return to this 22.04 to 24.04 workflow.
| Release | Codename | Role in this upgrade | Notes |
|---|---|---|---|
| Ubuntu 22.04 LTS | Jammy Jellyfish | Source release | Update this system fully before starting the release upgrade. |
| Ubuntu 24.04 LTS | Noble Numbat | Direct LTS target | Receives standard security maintenance until 31 May 2029. |
| Ubuntu 26.04 LTS | Resolute Raccoon | Future target after 24.04 | Ubuntu 22.04 systems must reach 24.04 before moving to 26.04. |
Compare Jammy and Noble Before Upgrading
The practical difference between Jammy and Noble is the supported base you run every day. Ubuntu 24.04 brings a newer kernel, newer desktop and server components, updated language runtimes, and changed security defaults while keeping the LTS release cadence. Jammy still has its own maintenance window, but Noble is the next required LTS step for systems that will later move toward Ubuntu 26.04.
Official Ubuntu flavors such as Kubuntu, Xubuntu, Lubuntu, Ubuntu MATE, and Ubuntu Studio follow the same package base and release-upgrade path. The terminal commands are the same, but graphical prompts and Settings screens can look different from the Ubuntu Desktop screenshots.
Back Up Your Data
Create a complete backup before starting. The upgrade process replaces packages, changes system configuration, and installs a new kernel. For desktop systems, Timeshift on Ubuntu can create a restorable system snapshot. For servers, copy critical directories to external storage or another host with rsync:
sudo rsync -aAXv --exclude={"/dev/*","/proc/*","/sys/*","/tmp/*","/run/*","/mnt/*","/media/*","/lost+found"} / /path/to/backup/Use a destination that is not on the root filesystem being upgraded. A backup stored under /home, /var, or another local directory can disappear with the same disk failure you are trying to protect against.
Verify System Requirements
Ubuntu 24.04 Desktop needs enough headroom for the running desktop and the temporary package download set. Use the Ubuntu community hardware recommendations as a practical baseline: 2 GHz dual-core CPU, 4 GB RAM for physical installs, 2 GB RAM for virtual machines, 25 GB storage, and a 1024×768 display. Canonical’s Ubuntu Server 24.04 requirements list 1.5 GB RAM and 5 GB storage as ISO-install minimums, with 3 GB RAM and 25 GB storage suggested for more useful server setups.
Check the Ubuntu community system requirements and Canonical’s Ubuntu Server system requirements when hardware is tight, especially on older laptops, small VPS plans, or virtual machines.
Ensure Stable Power and Network
Connect laptops to power before starting. The upgrade is interactive and can take from under an hour to several hours depending on mirror speed, package count, disk speed, and whether the system needs to replace large desktop or server components.
Check Disk Space
The release upgrader downloads new packages before it removes old ones, so leave several gigabytes free on the root filesystem. Check root disk usage first:
df -h /If space is tight, clear downloaded package archives and review unused packages before removing them:
sudo apt clean
sudo apt autoremove
Update Ubuntu 22.04 Before Upgrading
The release upgrader expects the current Ubuntu release to be fully updated. Refresh all enabled package sources, then install pending updates:
sudo apt update
sudo apt upgrade
Finish the current release’s package state with a full upgrade. The one-off phased-update option helps clear packages that would otherwise remain deferred and block do-release-upgrade:
sudo apt -o APT::Get::Always-Include-Phased-Updates=true full-upgradeRead the package summary before accepting. A full upgrade can install new dependencies or remove conflicting packages when that is required to complete the current-release update.
Check whether Ubuntu requested a reboot after the package updates:
if [ -f /run/reboot-required ]; then
    cat /run/reboot-required
else
    echo "No reboot required"
fi
Reboot before continuing if the file exists:
sudo rebootInstall the Upgrade Tool and Set LTS Prompt
The update-manager-core package provides do-release-upgrade on minimal systems. Desktop installs usually already include the needed upgrader, but installing the package is harmless when it is already present:
sudo apt install update-manager-coreFor LTS-to-LTS upgrades, confirm the release upgrader is configured for LTS releases:
grep -E '^Prompt=' /etc/update-manager/release-upgradesThe expected setting is:
Prompt=lts
If the file uses Prompt=normal or Prompt=never, switch it back to the LTS track before starting the 24.04 upgrade:
sudo sed -i 's/^Prompt=.*/Prompt=lts/' /etc/update-manager/release-upgradesReview the Ubuntu 24.04 LTS release notes before continuing. They list known upgrade prompts and release-specific issues that can affect servers, desktops, and official flavors.
Upgrade to Ubuntu 24.04 via Desktop GUI
The graphical method uses Ubuntu’s Software Updater application and is suitable for desktop systems where you have access to the display.
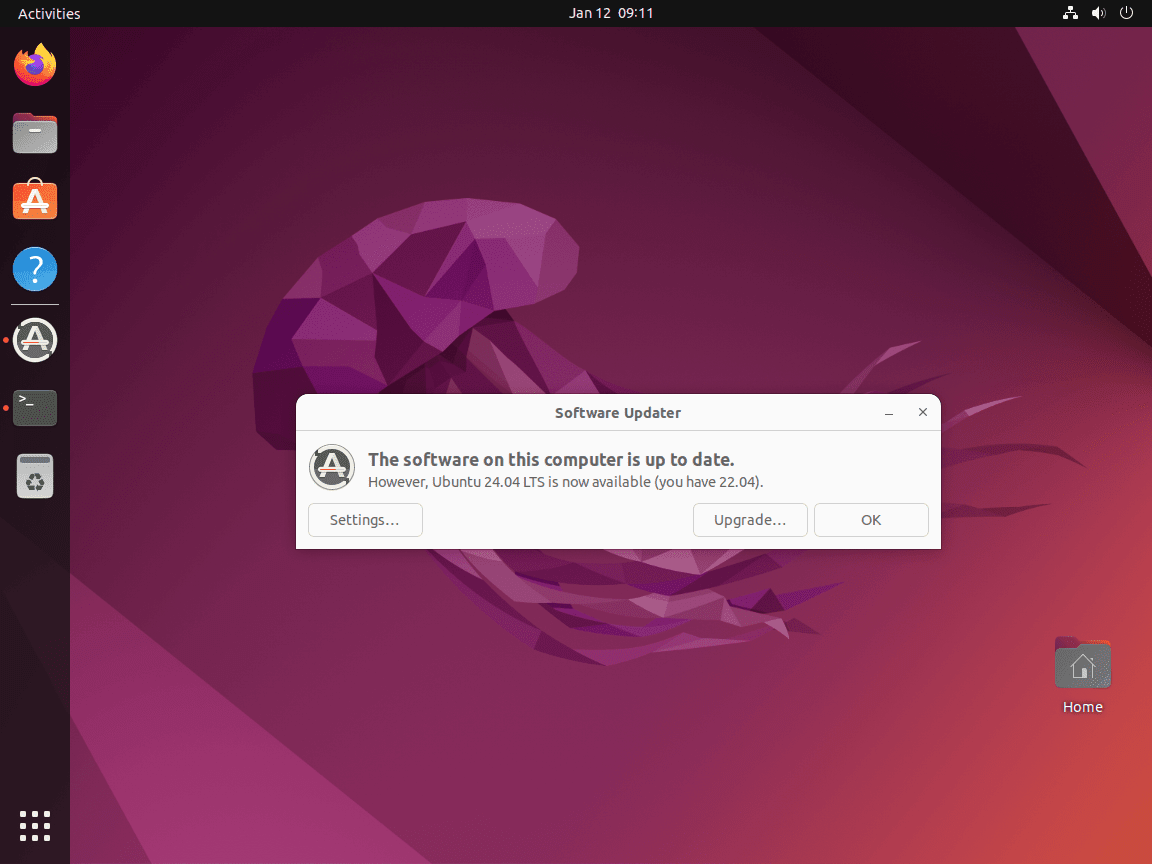
Launch Software Updater
Open Software Updater from the applications menu. If you prefer launching it from a terminal, run:
update-managerIf the upgrade to Ubuntu 24.04 is available, Software Updater shows a notification banner prompting you to upgrade.
If no upgrade notification appears on Ubuntu 22.04, run
update-manager -cto check for distribution upgrades. KeepPrompt=ltsfor this LTS-to-LTS path; do not switch to interim-release prompts unless you intentionally follow non-LTS releases.
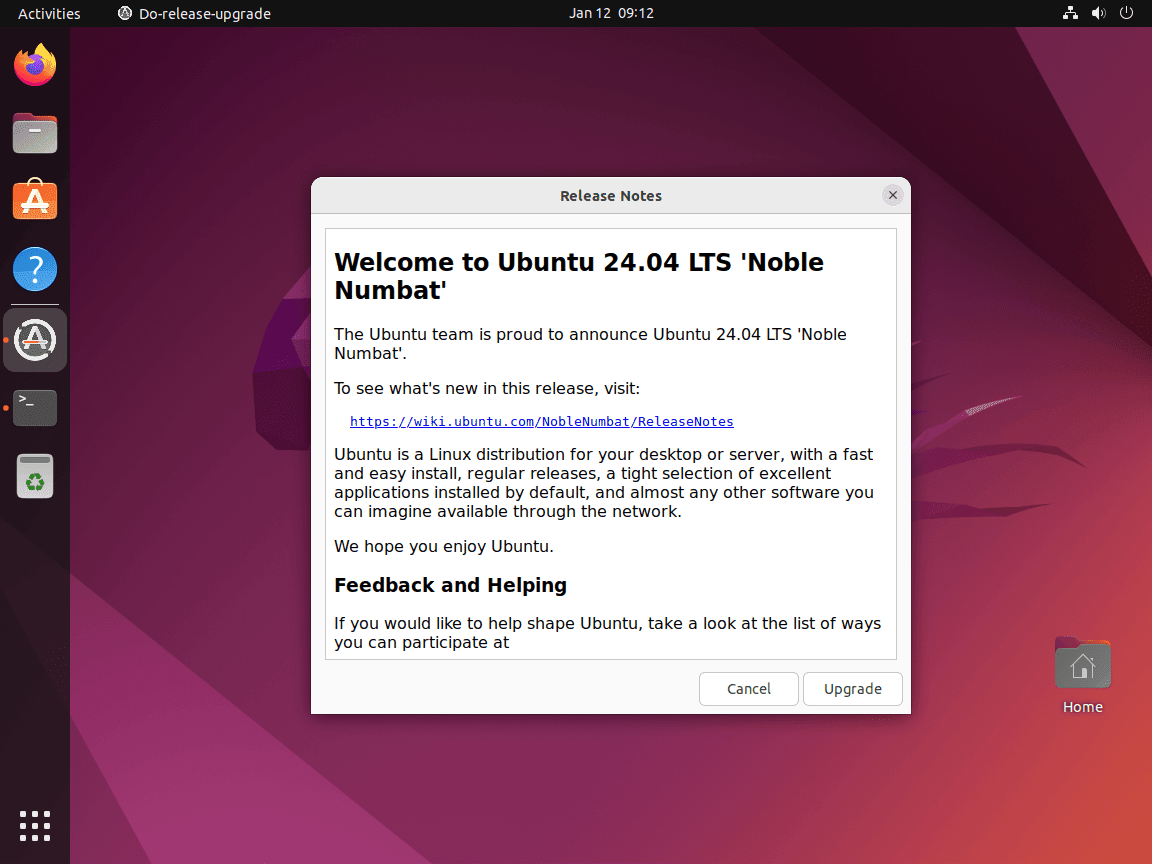
Start the Upgrade
When the upgrade prompt appears, click the “Upgrade…” button to begin. Software Updater downloads the upgrade tool and presents the release notes for Ubuntu 24.04.
Review Release Notes
Read through the release notes to understand what changes are included in Ubuntu 24.04. This information covers new features, known issues, and any deprecations that might affect your workflow. Click “Upgrade” to continue.
Confirm Upgrade Details
The upgrade tool displays a summary of changes: packages to be installed, upgraded, and removed. Review this list carefully, especially if you use third-party software that might be affected. Click “Start Upgrade” to proceed.
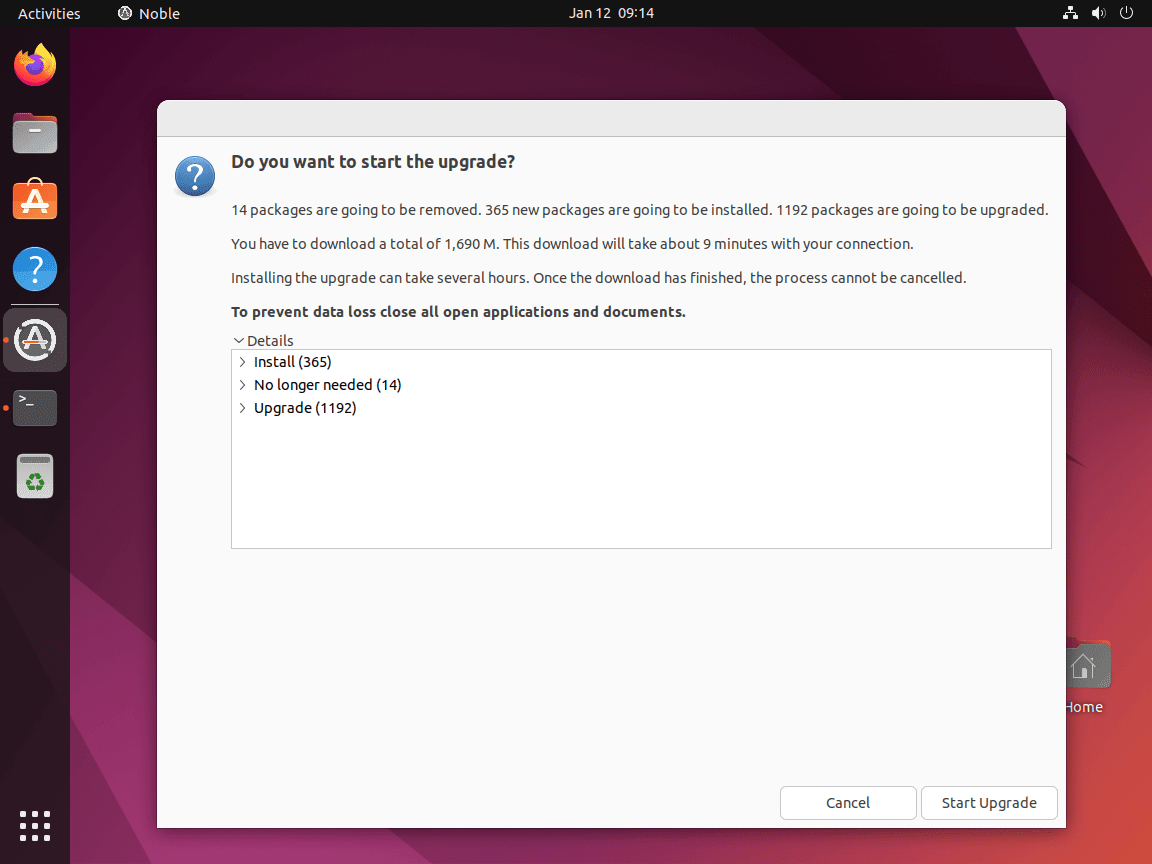
The upgrade typically takes 30 minutes to 2 hours depending on your internet connection speed and system performance. Do not interrupt the process.
Handle Configuration File Prompts
During the upgrade, prompts may appear asking whether to keep your current configuration files or replace them with new package-maintainer versions. The default is often to keep the local file. Review the diff when offered, especially for bootloader, SSH, web server, database, or monitoring configuration.
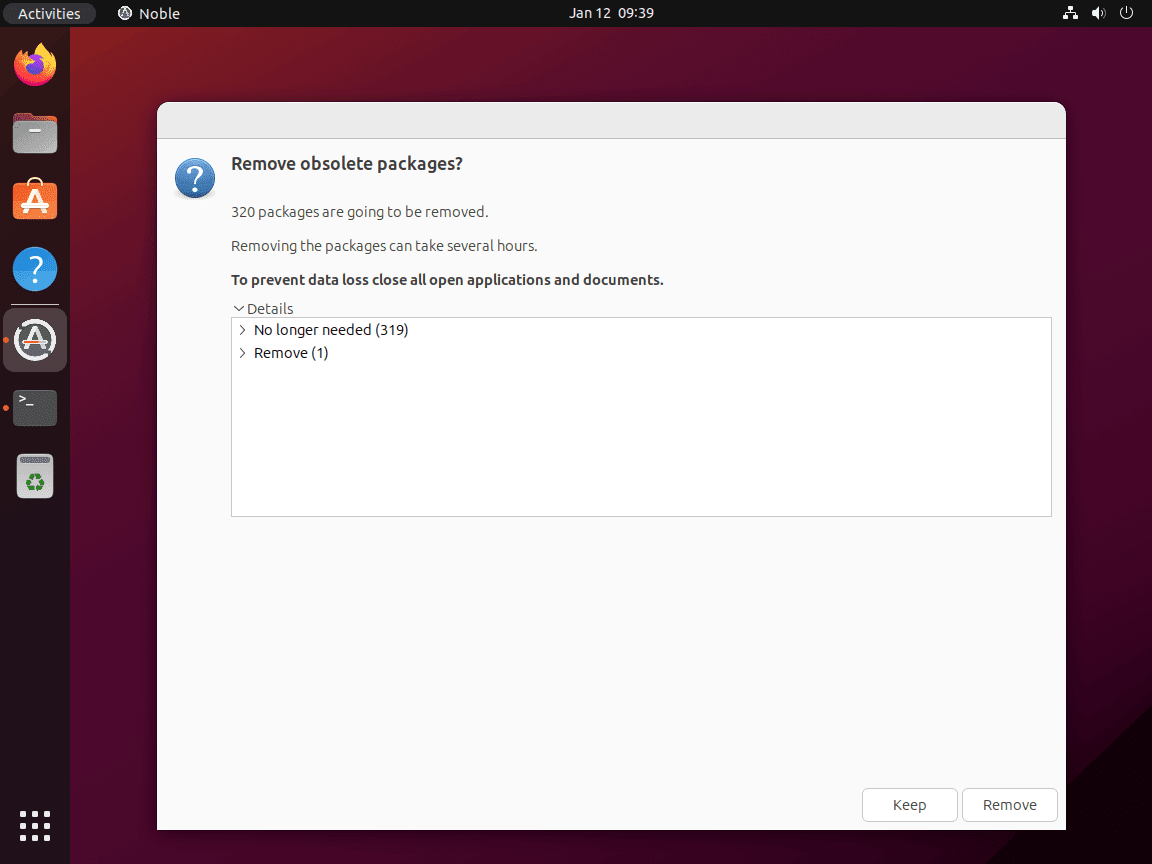
Remove Obsolete Packages
After the main upgrade completes, the tool offers to remove obsolete packages that are no longer needed. These are packages from the previous release that have no equivalent in Ubuntu 24.04 or are no longer required as dependencies. Removing them frees disk space and keeps your system clean.
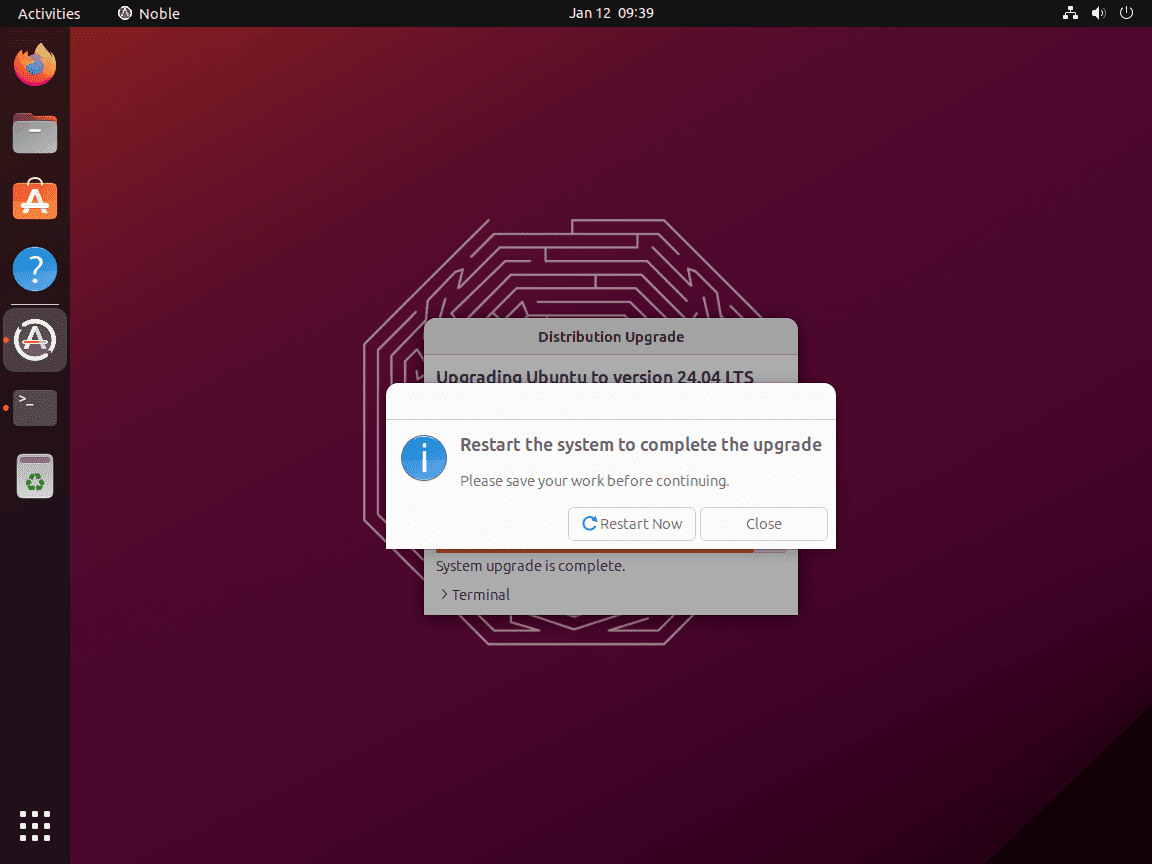
Restart to Complete the Upgrade
Click “Restart Now” to reboot into Ubuntu 24.04. The restart is required because the upgrade installs a new Linux kernel and updates core system services that cannot be replaced while running.
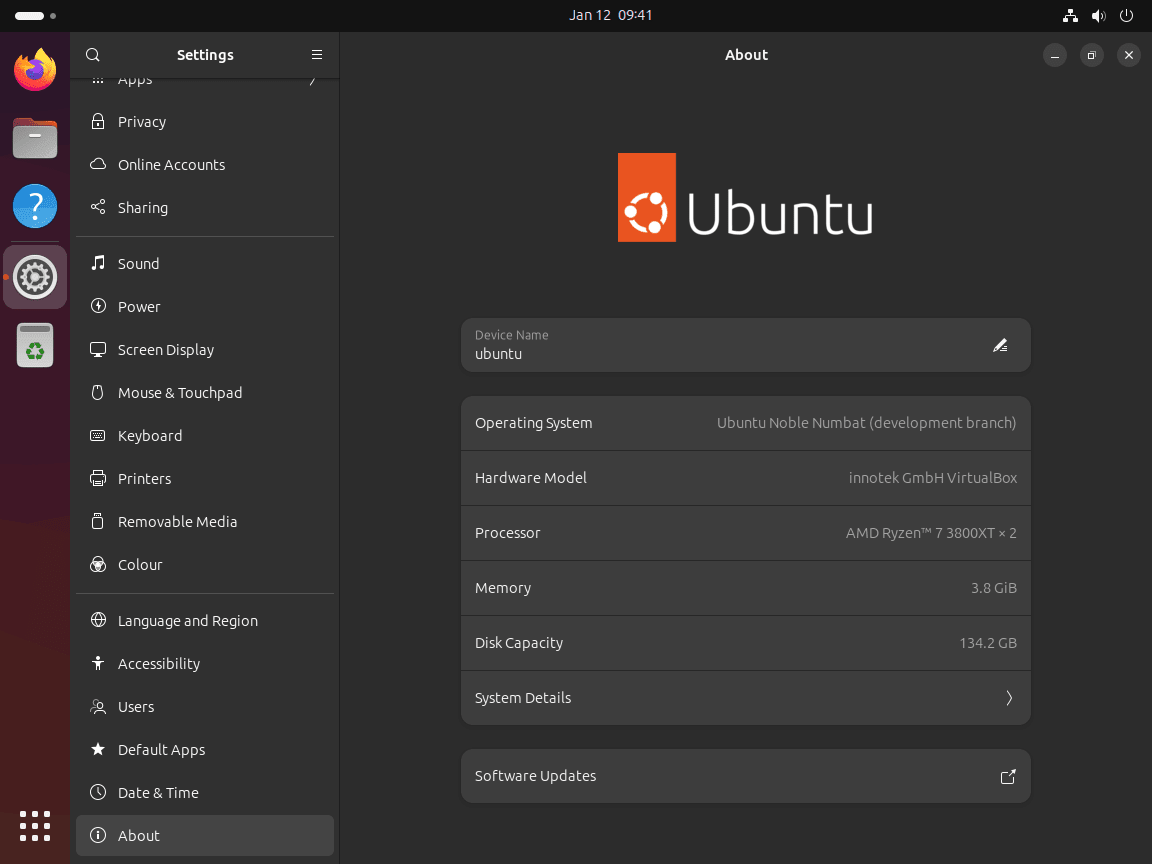
Verify the Desktop Upgrade
After rebooting, open Settings and navigate to the About section to confirm you are running Ubuntu 24.04 LTS Noble Numbat.
Upgrade to Ubuntu 24.04 via Command Line
The command-line method works on servers, cloud images, SSH sessions, local consoles, and desktops where you prefer the terminal. Canonical’s Ubuntu Server release-upgrade documentation recommends do-release-upgrade for server and cloud release upgrades because it handles release-specific package and configuration changes.
When upgrading a remote server over SSH, the upgrader can offer a fallback SSH daemon on TCP port 1022. If UFW, a cloud firewall, or a provider security group blocks that port, open it before starting and remove the temporary access after the upgrade.
If UFW is active on a remote server, allow the fallback SSH port temporarily:
sudo ufw allow 1022/tcpBefore starting from a remote host, confirm normal SSH access and firewall policy. If this is a new server or SSH was recently changed, use the enable SSH on Ubuntu guide to verify the package, service, and UFW rule first.
Start the Release Upgrade
Start the release upgrader:
sudo do-release-upgradeThe tool checks the supported release path, runs readiness checks, then displays a summary before making changes. For a stable Ubuntu 22.04 to 24.04 LTS upgrade, do not add -d or --devel-release; those flags belong to development-release testing, not production upgrades.
Confirm the Upgrade
The upgrader lists packages to be installed, upgraded, and removed. Review that summary before typing y. If the removal list includes software you still depend on, type d when details are offered, stop the upgrade if needed, and resolve the package source or dependency issue first.
The upgrade process downloads and installs packages. Stay connected and monitor the terminal for any prompts about configuration file changes.
Handle Configuration and Obsolete Package Prompts
Configuration-file prompts are normal when local files differ from the new package versions. The default is often to keep the local file, but review the diff when the file controls boot, SSH access, web services, databases, or monitoring. Near the end, the tool asks whether to remove obsolete packages. Removing them is usually appropriate unless you have a specific reason to keep an old package for rollback or investigation.
Restart the System
The upgrade tool prompts you to restart. Type y to reboot immediately, or run this command manually if you declined:
sudo rebootVerify the Command-Line Upgrade
After rebooting, confirm the release number and codename:
lsb_release -sr
lsb_release -sc
Expected output on a successfully upgraded Ubuntu 24.04 system:
24.04
noble
For more ways to confirm release metadata, use the Ubuntu version check guide.
Post-Upgrade Tasks
After the first successful boot into Ubuntu 24.04, validate package sources, run final updates, and remove temporary firewall access that was only needed during the upgrade.
Re-enable Third-Party Repositories
The upgrade process can disable third-party repositories and PPAs because they might not publish packages for Noble. List disabled source files first:
find /etc/apt/sources.list.d -maxdepth 1 -type f -name '*.distUpgrade' -printRestore only repositories that publish Ubuntu 24.04 packages. For a verified DEB822 source file, remove the .distUpgrade suffix and refresh package metadata:
sudo mv -i /etc/apt/sources.list.d/example.sources.distUpgrade /etc/apt/sources.list.d/example.sources
sudo apt update
If the disabled source is a legacy .list file, keep the same filename pattern and restore example.list.distUpgrade to example.list only after confirming Noble support. For PPAs that caused package conflicts, use the remove a PPA from Ubuntu guide instead of restoring the source blindly.
Update Remaining Packages
Run a final update after source cleanup:
sudo apt update
sudo apt upgrade
Configure Automatic Security Updates
Ubuntu 24.04 uses APT timers and unattended-upgrades for automatic security patching. Check the upgrade timer, or follow the unattended upgrades guide for Ubuntu for a full policy review:
systemctl is-enabled apt-daily-upgrade.timer
systemctl is-active apt-daily-upgrade.timer
When automatic upgrades are enabled and running, the expected status is:
enabled
active
If either value differs and you want unattended security updates, use the linked guide to review the package, timer, and allowed origins.
Review Firewall Rules
If you use UFW, verify your firewall rules are intact after the upgrade:
sudo ufw status verboseIf you opened TCP port 1022 only for the release upgrader’s fallback SSH session, remove that temporary UFW rule after the system is reachable on its normal SSH port:
sudo ufw delete allow 1022/tcpFor detailed firewall configuration, see the UFW firewall guide for Ubuntu.
Troubleshooting Common Upgrade Issues
If the upgrade encounters problems, these solutions address the most common issues.
No New Release Found
If do-release-upgrade reports “No new release found,” first confirm the system is actually on Ubuntu 22.04:
lsb_release -srExpected source release for this workflow:
22.04
When the source release is correct, the system is usually missing current-release updates or using the wrong prompt setting. Clear pending updates, including phased updates:
sudo apt update
sudo apt -o APT::Get::Always-Include-Phased-Updates=true full-upgrade
Then check your upgrade settings in /etc/update-manager/release-upgrades:
grep -E '^Prompt=' /etc/update-manager/release-upgradesThe Prompt line controls upgrade behavior:
Prompt=lts
After those checks pass, you can ask the upgrader to check availability without starting the upgrade:
sudo do-release-upgrade -cIt should report Ubuntu 24.04 LTS as available before you rerun sudo do-release-upgrade.
If the system still runs Ubuntu 20.04, upgrade to 22.04 first. If the system already runs Ubuntu 24.04 and you are looking for Ubuntu 26.04, LTS upgrades normally appear after the first 26.04 point release rather than immediately after the initial 26.04 release.
Held Packages Blocking Upgrade
Held packages can prevent the upgrade from starting. Check for held packages:
apt-mark showholdIf packages are listed, identify why they were held. Temporarily unhold only packages you are ready to upgrade:
sudo apt-mark unhold package-nameRe-hold packages after the upgrade only if you still need that pin:
sudo apt-mark hold package-nameThird-Party PPA Conflicts
PPAs that replace Ubuntu packages can leave dependency conflicts behind even after the source is disabled. If the upgrade fails with dependency errors mentioning PPA packages, remove the PPA source, refresh metadata, and bring packages back to a consistent state before retrying:
sudo add-apt-repository --remove ppa:owner/ppa-name
sudo apt update
sudo apt -o APT::Get::Always-Include-Phased-Updates=true full-upgrade
Retry the upgrade after APT is clean. Re-add a PPA only after confirming it publishes packages for Ubuntu 24.04.
Insufficient Disk Space
The upgrade downloads packages before removing old ones. If disk space errors appear, free space with these commands:
sudo apt clean
sudo apt autoremove --purge
sudo du -xh /var /usr /home 2>/dev/null | sort -h | tail -20
Upgrade Interrupted or Failed
If the upgrade was interrupted, attempt to resume it:
sudo dpkg --configure -a
sudo apt --fix-broken install
sudo do-release-upgrade
These commands configure any partially installed packages, fix broken dependencies, and restart the upgrade process. If the system is remote and SSH access is unstable, use the provider console or out-of-band access instead of repeatedly reconnecting to a half-configured SSH session.
System Unbootable After Upgrade
If the system fails to boot after upgrading, boot from the GRUB menu into an older kernel (under “Advanced options for Ubuntu”). Once booted, update GRUB and reinstall the kernel:
sudo update-grub
sudo apt install --reinstall linux-image-generic linux-headers-generic
Those package names fit the standard generic kernel. Cloud, hardware-vendor, or custom-kernel systems may use a different kernel meta-package. If you created a Timeshift backup, you can restore your previous system state from the GRUB boot menu.
Future Upgrade Path
Ubuntu 24.04 LTS receives standard security maintenance until 31 May 2029, with expanded coverage available through Ubuntu Pro. Ubuntu 26.04 LTS (Resolute Raccoon) is now released, but 24.04 remains the required bridge for Ubuntu 22.04 systems. LTS users normally receive the 24.04 to 26.04 upgrade offer after the first 26.04 point release; keep 24.04 patched with APT until that upgrade appears for your system.
Conclusion
Ubuntu 24.04 LTS is now running with Noble’s package base, kernel, and support window in place. Keep third-party repositories on Noble-compatible sources, confirm automatic updates and firewall rules, and use the version-check commands whenever you need to verify the release after future maintenance.

Formatting tips for your comment
You can use basic HTML to format your comment. Useful tags currently allowed in published comments:
<code>command</code>command<strong>bold</strong><em>italic</em><a href="https://example.com">link</a><blockquote>quote</blockquote>