UrBackup lets an Ubuntu server coordinate file and image backups from client machines through a browser dashboard. To install UrBackup on Ubuntu, use the Launchpad PPA recommended by the upstream UrBackup download page, then manage the server from the web interface on port 55414.
This article focuses on the Ubuntu server package for Ubuntu 26.04 LTS (Resolute Raccoon), Ubuntu 24.04 LTS (Noble Numbat), and Ubuntu 22.04 LTS (Jammy Jellyfish). UrBackup client deployment, Windows Group Policy rollout, and Docker deployments are separate workflows because they use different packages, policies, ports, and storage layouts.
Install UrBackup Server on Ubuntu
UrBackup Server is not packaged in Ubuntu’s default repositories. The official UrBackup download page recommends the uroni/urbackup Launchpad PPA for Ubuntu, and that PPA provides APT-managed server updates.
UrBackup recommends this PPA for Ubuntu, but the packages still come from Launchpad outside Ubuntu’s archive. Review the PPA owner, package versions, and generated APT source before using it on a production backup server.
| Ubuntu Release | PPA Candidate | APT Source Created | Install Notes |
|---|---|---|---|
| Ubuntu 26.04 LTS | 2.5.37.0-1ubuntu1~resolute | DEB822 .sources file | Recommended image-backup helpers include libguestfs-tools and qemu-utils |
| Ubuntu 24.04 LTS | 2.5.37.0-1ubuntu1~noble | DEB822 .sources file | Recommended image-backup helpers include libguestfs-tools and qemu-utils |
| Ubuntu 22.04 LTS | 2.5.37.0-1ubuntu1~jammy | Legacy .list file | Recommended image-backup helpers include libguestfs-tools and qemu-utils |
Update Ubuntu Before Installation
Start by refreshing APT metadata and applying available package updates. This reduces dependency conflicts before adding the UrBackup PPA.
sudo apt update
sudo apt upgrade
If this is a new Ubuntu system and your account cannot use
sudo, configure administrative access with the Ubuntu sudoers guide before continuing.
Install the Repository Helper
Install software-properties-common if your system does not already have add-apt-repository. Minimal Ubuntu installs often need this package before adding PPAs.
sudo apt install software-properties-commonAdd the UrBackup Launchpad PPA
Add the UrBackup PPA with add-apt-repository. On Ubuntu 26.04 and 24.04, the tool writes a DEB822 .sources file with the Launchpad signing key embedded in the source definition. On Ubuntu 22.04, it writes a legacy .list file and manages the matching trusted key.
sudo add-apt-repository ppa:uroni/urbackup -yAfter the command finishes, confirm that APT sees the UrBackup server package from the PPA:
apt-cache policy urbackup-serverOn Ubuntu 26.04, the candidate line should show the Resolute package. Ubuntu 24.04 and 22.04 show the same upstream server version with noble or jammy in the package suffix.
urbackup-server:
  Installed: (none)
  Candidate: 2.5.37.0-1ubuntu1~resolute
  Version table:
     2.5.37.0-1ubuntu1~resolute 500
        500 https://ppa.launchpadcontent.net/uroni/urbackup/ubuntu resolute/main amd64 Packages
Install UrBackup Server
Install the server package from the PPA. The default installation enables package recommendations, which brings in the image-backup helper stack used by UrBackup features that mount or inspect backup images.
sudo apt install urbackup-serverDuring installation, the package asks where UrBackup should store backup data. The current package default is /media/BACKUP/urbackup. Use a larger mounted disk or storage path, such as /mnt/backups, if your server has a dedicated backup volume.
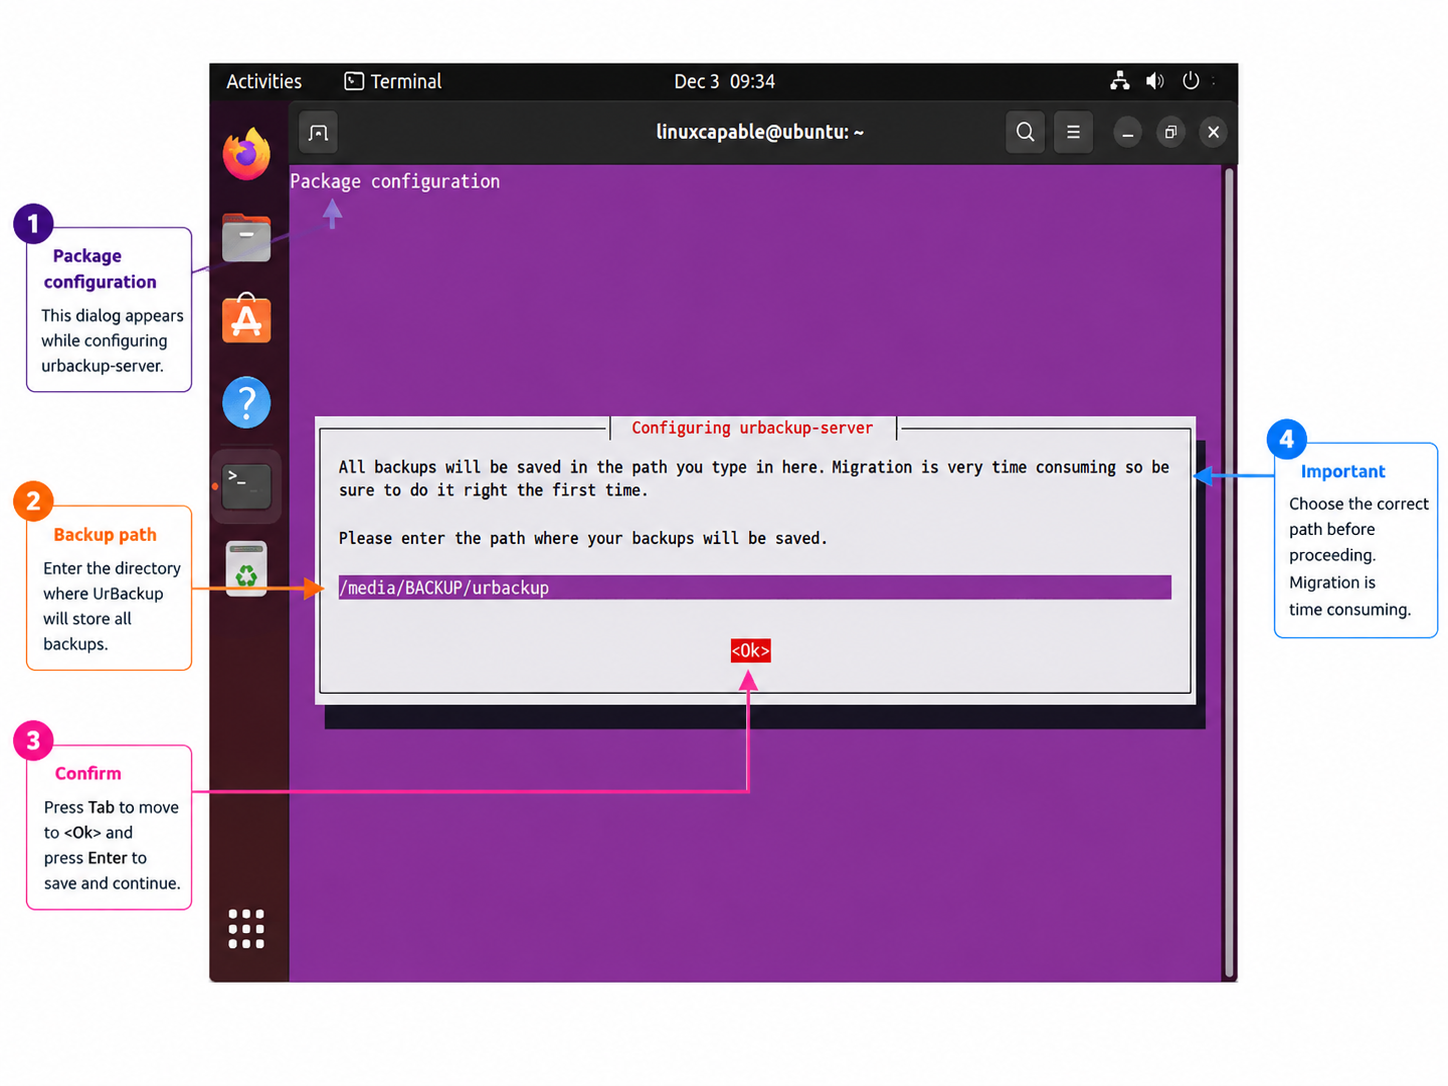
The server also creates state files under
/var/urbackup. Treat the backup storage path and the server state directory as separate cleanup targets when removing UrBackup later.
Verify the Installed Server Version
Check the installed UrBackup server binary before moving to configuration:
urbackupsrv --version || trueUrBackup Server v2.5.37.0
The binary prints the installed version, then may return a non-zero status after printing its license text. The || true guard keeps shell scripts from stopping when you only need the displayed version.
Configure the UrBackup Service
The Ubuntu package starts urbackupsrv automatically and enables it at boot. Confirm both states with systemctl:
systemctl is-enabled urbackupsrv
systemctl is-active urbackupsrv
enabled active
For a fuller status view, use the service status command:
systemctl status urbackupsrv --no-pagerurbackupsrv.service - LSB: Server for doing backups
Loaded: loaded (/etc/init.d/urbackupsrv; generated)
Active: active (running)
The package uses a generated systemd unit from the bundled SysV init script. That is normal for this PPA package.
Review UrBackup Listening Ports
UrBackup listens on all interfaces after installation. Review the listener state before opening firewall access beyond the server itself. The UrBackup administration manual lists incoming server TCP ports and an outgoing UDP discovery broadcast.
sudo ss -ltnup | grep urbackupThe output should include TCP listeners for ports 55413, 55414, and 55415. It can also show UDP discovery on 35623. Process IDs, file descriptors, and IPv6 addresses vary by system, so use the port list below as the stable reference.
| Port | Protocol | Purpose | Firewall Guidance |
|---|---|---|---|
55414 | TCP | HTTP web interface | Restrict to localhost, VPN, or trusted administrator subnets |
55415 | TCP | Internet client connections | Open only when remote clients must reach this server |
55413 | TCP | FastCGI web interface | Usually keep local unless your proxy design uses FastCGI |
35623 | UDP | Server discovery broadcast | Outgoing discovery traffic; no inbound UFW rule in typical setups |
Configure UFW Firewall Access
If you use UFW on Ubuntu, check the current firewall state first, then open only the ports your deployment needs. For a LAN-only server, restrict both the web interface and client access to the trusted subnet.
sudo ufw status verbosesudo ufw allow from 192.168.1.0/24 to any port 55414 proto tcp comment "UrBackup Web UI"
sudo ufw allow from 192.168.1.0/24 to any port 55415 proto tcp comment "UrBackup LAN Clients"Replace 192.168.1.0/24 with the trusted subnet that should administer UrBackup and connect local clients. If remote internet clients need to reach this server, add a separate rule for port 55415 after configuring UrBackup’s internet client settings.
sudo ufw allow 55415/tcp comment "UrBackup Internet Clients"Do not expose the raw 55414 listener to the public internet. Put the reverse proxy on the public HTTPS endpoint, then keep direct UrBackup dashboard access limited to localhost, a VPN, or trusted administrator networks.
Review the resulting rules:
sudo ufw status numberedThe rule list should show your trusted subnet for LAN rules. Rule numbers and ordering vary depending on existing UFW configuration.
Access the UrBackup Web Interface
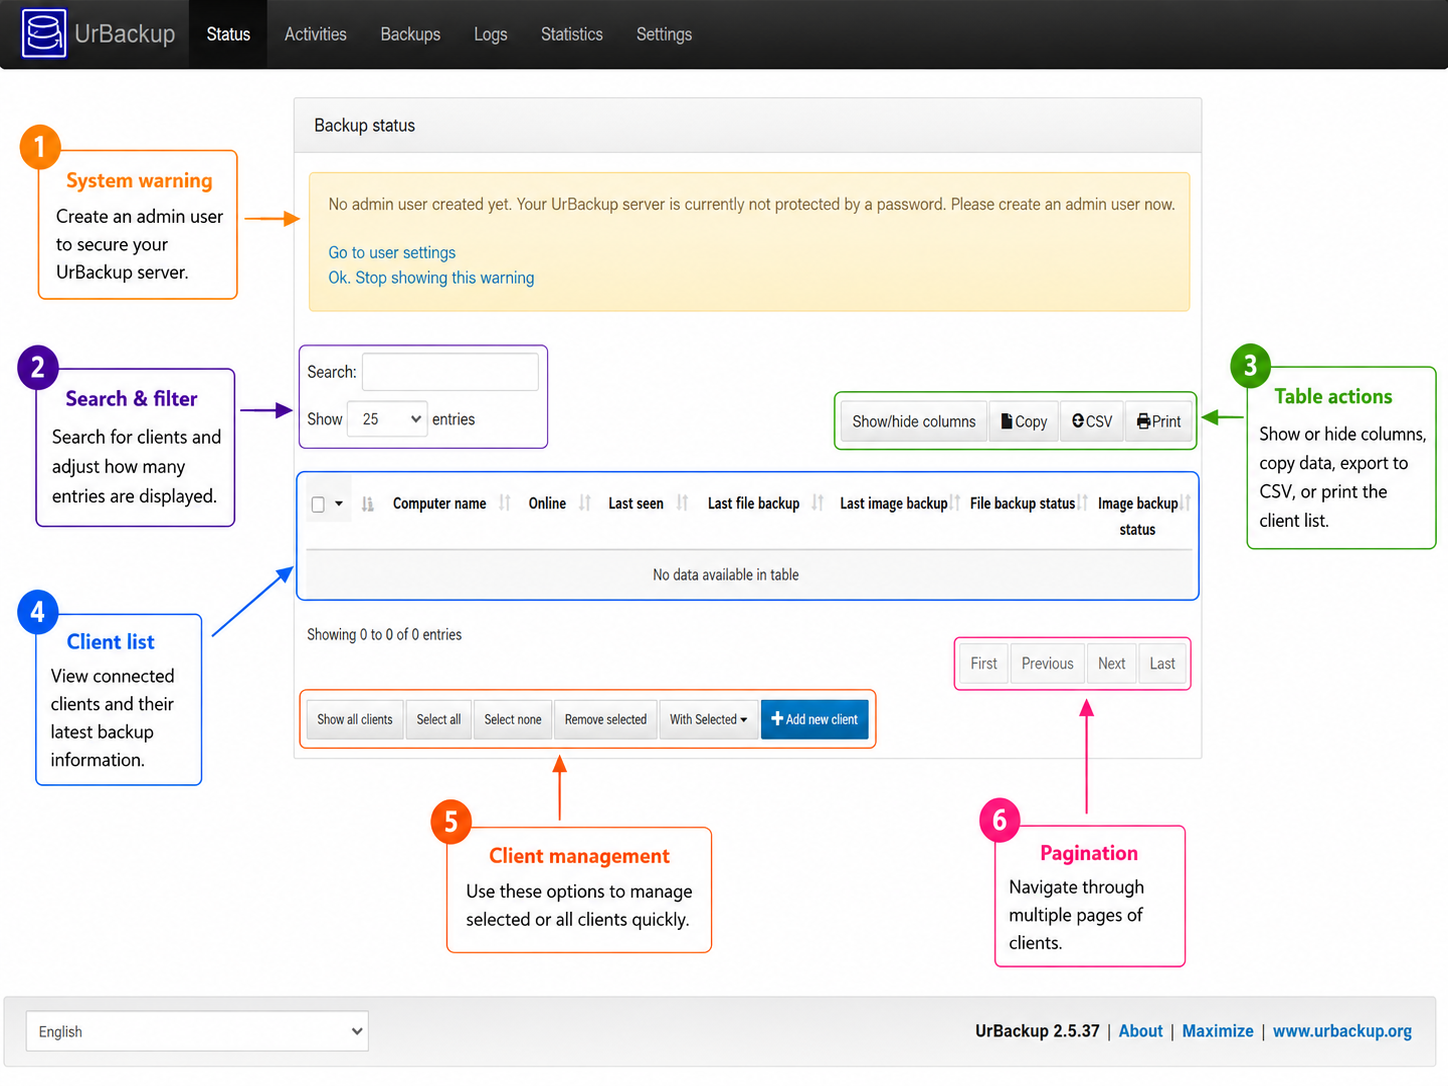
UrBackup’s default web interface listens on port 55414. On the server, use http://127.0.0.1:55414/. From another trusted LAN machine, use http://server-ip:55414/ and replace server-ip with the Ubuntu server’s address. Keep firewall restrictions in place before browsing from another machine.
On a fresh install, the dashboard shows the no-admin warning above the client table. Create the administrator login in the next step before adding clients or exposing the interface beyond the server.
Set an Administrator Login
Open the user settings page from the dashboard warning and create an administrator account. UrBackup’s manual warns that, until an admin account exists, anyone who can reach the interface can view backup information.
Review Initial Backup Settings
After the first login, review these settings before adding production clients:
- Backup storage path: Confirm the storage location points to a disk with enough capacity for retained backups.
- File backup interval: Set how often UrBackup checks protected paths for file changes.
- Image backup interval: Configure full image backup timing if clients support image backups.
- Client paths: If a client reports that no backup directories are configured, add default backup paths in the client settings or through the server-side client configuration.
- Email notifications: Configure SMTP alerts so failed backups are visible before a restore is needed.

Add Client Machines
The Ubuntu package installed above is the server. Machines that need protection still require an UrBackup client. Local clients can often discover the server on the LAN, while remote clients usually need the server address and port 55415 configured explicitly.
Windows Group Policy deployment is a client rollout task, not a server installation step. Use the client installer and your domain software-deployment policy if you need centralized Windows deployment.
Optional Reverse Proxy with Apache or Nginx
A reverse proxy is useful when you want a normal hostname, HTTPS certificates, and web-server access controls in front of the UrBackup dashboard. Use http://127.0.0.1:55414/ as the upstream target, then keep direct access to raw port 55414 blocked except from trusted administrator networks.
For dashboard access through the proxy, open public HTTP and HTTPS on the proxy host. Leave the UrBackup web interface restricted to loopback, VPN, or trusted administrator subnets.
sudo ufw allow 80/tcp comment "HTTP reverse proxy"
sudo ufw allow 443/tcp comment "HTTPS reverse proxy"
Nginx Reverse Proxy Example
Install Nginx if it is not already present, then add this virtual host as a starting point, replacing urbackup.example.com with your real hostname. The broader Nginx on Ubuntu and Nginx reverse proxy guides cover package setup and reusable proxy patterns.
sudo apt install nginx

sudo tee /etc/nginx/sites-available/urbackup.example.com.conf > /dev/null <<'EOF'
server {
    listen 80;
    listen [::]:80;
    server_name urbackup.example.com;

    access_log /var/log/nginx/urbackup.access.log;
    error_log /var/log/nginx/urbackup.error.log;

    location / {
        proxy_pass http://127.0.0.1:55414;
        proxy_http_version 1.1;
        proxy_set_header Host $host;
        proxy_set_header X-Real-IP $remote_addr;
        proxy_set_header X-Forwarded-For $proxy_add_x_forwarded_for;
        proxy_set_header X-Forwarded-Proto $scheme;
        proxy_read_timeout 3600;
    }
}
EOF

sudo ln -sfn /etc/nginx/sites-available/urbackup.example.com.conf /etc/nginx/sites-enabled/urbackup.example.com.conf
sudo nginx -t
sudo systemctl reload nginx
Apache Reverse Proxy Example
Install Apache if needed, enable the proxy modules, create a dedicated virtual host, then test the configuration before reloading Apache. The Apache on Ubuntu guide covers the base web-server setup.
sudo apt install apache2
sudo a2enmod proxy proxy_http

sudo tee /etc/apache2/sites-available/urbackup.example.com.conf > /dev/null <<'EOF'
<VirtualHost *:80>
    ServerName urbackup.example.com

    ProxyPreserveHost On
    ProxyPass "/" "http://127.0.0.1:55414/"
    ProxyPassReverse "/" "http://127.0.0.1:55414/"

    ErrorLog ${APACHE_LOG_DIR}/urbackup-error.log
    CustomLog ${APACHE_LOG_DIR}/urbackup-access.log combined
</VirtualHost>
EOF

sudo a2ensite urbackup.example.com.conf
sudo apache2ctl configtest
sudo systemctl reload apache2
Add HTTPS with Certbot
Keep the first virtual host on plain HTTP until certificate issuance succeeds. After DNS points to the server and port 80 is reachable, install Certbot with the matching web-server plugin and request a certificate for your hostname.
For Nginx, install the Nginx plugin and run the interactive issuance command:
sudo apt install certbot python3-certbot-nginx
sudo certbot --nginx -d urbackup.example.com
For Apache, install the Apache plugin instead:
sudo apt install certbot python3-certbot-apache
sudo certbot --apache -d urbackup.example.com
After Certbot issues the certificate, test renewal before relying on automatic renewals:
sudo certbot renew --dry-runFor Nginx-specific certificate setup, renewal checks, and HTTP-01 troubleshooting, use the Let’s Encrypt Nginx guide for Ubuntu.
Update UrBackup Server on Ubuntu
Because the server package comes from a PPA, normal APT-managed updates include UrBackup updates from that source. To update only UrBackup Server after refreshing package metadata, use --only-upgrade:
sudo apt update
sudo apt install --only-upgrade urbackup-server
After updating, recheck the installed version and service state:
urbackupsrv --version || true
systemctl is-active urbackupsrv
Troubleshoot UrBackup Server Issues
Service Fails to Start
If the service does not start, inspect recent journal entries first:
sudo journalctl -u urbackupsrv -n 50 --no-pagerThen check for port conflicts on the UrBackup listening ports:
sudo ss -tlnp | grep ':55413\|:55414\|:55415'If the backup storage directory has ownership problems after moving storage, restore ownership to the UrBackup service account. Replace the path if you selected a custom storage location during installation.
sudo chown -R urbackup:urbackup /media/BACKUP/urbackupFor storage problems, check free space on the backup filesystem:
df -h /media/BACKUP/urbackupWeb Interface Is Unreachable
If the dashboard does not open, confirm the server is listening on port 55414:
sudo ss -tlnp | grep ':55414'If the listener exists, check UFW, cloud security groups, router rules, and the URL format. The local URL is http://127.0.0.1:55414/; the LAN URL is http://server-ip:55414/. A blocked firewall path is safer than leaving the dashboard open to every network while troubleshooting.
Clients Do Not Connect
If clients do not connect, verify that the server accepts client connections on port 55415:
sudo ss -tlnp | grep ':55415'Then confirm the client has the correct server address, that firewalls allow TCP port 55415, and that backup paths are configured on the client or through server-side client settings. Client deployment through Windows Group Policy or custom installers belongs to the client rollout workflow, not the Ubuntu server package installation.
Remove UrBackup from Ubuntu
Removing the package stops the server software, but it does not automatically delete backup storage or server state. Review both paths before deleting anything from disk.
These steps remove the Ubuntu server package installed above. UrBackup clients on protected machines must be removed separately on those client systems.
Stop and Remove the Package
Stop the service, then purge the server package and package configuration files:
sudo systemctl stop urbackupsrv
sudo apt remove --purge urbackup-server
The package purge can print missing-file messages for old init-script names such as urbackup_srv. Recheck package state and service state if you need confirmation that the installed package is gone.
dpkg-query -W -f='${db:Status-Abbrev} ${binary:Package}\n' urbackup-server 2>/dev/null || true
systemctl is-active urbackupsrv || true
Review autoremovable packages before deleting them. This matters on reused servers because apt autoremove can include unrelated packages that were already marked as automatic.
sudo apt autoremove --dry-runIf the preview only lists UrBackup-related dependencies and other packages you no longer need, run the real cleanup:
sudo apt autoremoveRemove the PPA
Remove the Launchpad PPA so the system no longer receives packages from that source. On Ubuntu 26.04 and 24.04, add-apt-repository --remove removes the generated DEB822 source. On Ubuntu 22.04, it removes the legacy list entry.
sudo add-apt-repository --remove ppa:uroni/urbackup -y
sudo apt update
For broader cleanup options such as ppa-purge, manual source-file removal, or checking which packages came from a PPA, use the guide to remove a PPA from Ubuntu.
Remove Backup Data
The next commands permanently delete UrBackup backup data and server state. Copy any backups or configuration data you need to keep before removing these directories.
Remove the default backup storage directory only after confirming the backup data is no longer needed. If you selected a custom backup storage path during installation, remove that custom directory instead of /media/BACKUP/urbackup.
sudo rm -rf /media/BACKUP/urbackupIf you also want to remove local UrBackup server state, including generated database and update files, remove /var/urbackup separately:
sudo rm -rf /var/urbackupLeave /var/urbackup in place if you plan to reinstall the server and reuse the existing local state.
Conclusion
With UrBackup Server installed from the maintained Launchpad PPA, the service is ready for client backups through the web interface on port 55414. Before relying on the server, create an administrator login, confirm backup paths, and test a restore from at least one client machine.

Formatting tips for your comment
You can use basic HTML to format your comment. Useful tags currently allowed in published comments:
<code>command</code>command<strong>bold</strong><em>italic</em><a href="https://example.com">link</a><blockquote>quote</blockquote>