

For Java developers using Manjaro Linux, the upcoming release of OpenJDK 21 promises a range of features to enhance the Java development experience. This guide focuses on how to install OpenJDK 21 on Manjaro Linux, leveraging the Arch Linux User Repository (AUR) with CLI commands.
Key Features of OpenJDK 21:
- Structured Concurrency: Simplifies concurrent programming by treating related tasks as a single unit.
- Scoped Values: Allows for the sharing of immutable data across threads, offering an alternative to thread-local variables.
- Key Encapsulation Mechanism (KEM) API: Provides advanced encryption techniques for safeguarding symmetric keys.
- Virtual Threads: Introduces lightweight threads to reduce the complexity of high-throughput concurrent applications.
- Generational Z Garbage Collector (ZGC): Aims to improve application performance by segregating young and old objects.
- String Templates: Combines literal text with embedded expressions for specialized results.
Manjaro Linux, known for its speed and user-friendliness, is an excellent Java development platform. Stay tuned for the step-by-step guide on installing OpenJDK 21 on Manjaro Linux.
Section 1: Install OpenJDK 21 on Manjaro via AUR
Step 1: Update Your Manjaro System
Before installing OpenJDK 21, it is crucial to have your Manjaro system up to date. This ensures compatibility and eliminates potential conflicts with dependencies when using community-driven repositories such as the Arch User Repository (AUR). Running an updated system is a critical first step in any installation process.
Execute the following command in your terminal to sync the package database and upgrade all the packages:
sudo pacman -SyuThe time taken for this process can vary based on the number of updates and their sizes. If the Linux Kernel gets updated during this process, it’s highly recommended to reboot your system. This ensures stability and optimal performance.
Step 2: Enable AUR for OpenJDK 21 Installation on Manjaro
The Arch User Repository (AUR) is a treasure trove of community-maintained packages not found in the official repositories. Accessing the AUR is a prerequisite for installing OpenJDK 21.
Verify AUR Status on Your System
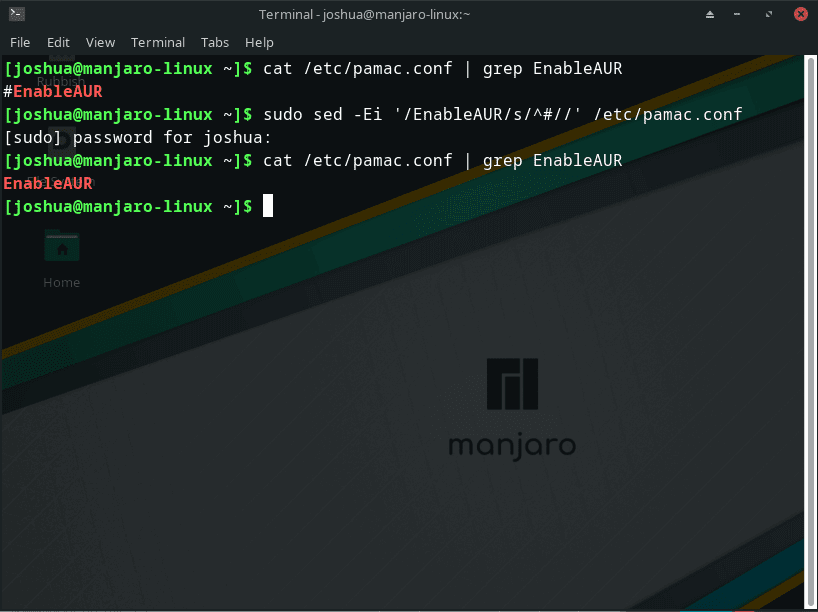
First, let’s check if AUR is already enabled. To do this, run the following command:
grep 'EnableAUR' /etc/pamac.confThis command checks the pamac.conf file for the EnableAUR entry. If AUR is enabled, you’ll see the EnableAUR entry without the # character at the start.
Enable AUR on Your Manjaro System for OpenJDK 21
In case AUR is not enabled, you can enable it with the following command:
sudo sed -Ei '/EnableAUR/s/^#//' /etc/pamac.confThis command uses sed to search for the EnableAUR entry in the pamac.conf file and remove the # character, effectively enabling the AUR.
Step 3: Install OpenJDK 21 from AUR on Manjaro
With your system updated and AUR enabled you are now ready to install OpenJDK 21. This is the key step, and installing OpenJDK 21 will provide your Manjaro system with the latest advancements in Java development.
Execute the following command to initiate the installation of OpenJDK 21:
sudo pamac install java-openjdk-ea-binOnce the installation is complete, verifying which version of OpenJDK is active is wise. Especially if you have previously installed versions of OpenJDK, it’s essential to ensure that OpenJDK 21 is the default.
Use the following command to check the active version of OpenJDK:
java --versionIf OpenJDK 21 doesn’t show up as the default version, but you see an earlier version like OpenJDK 20, don’t worry. The following section will guide you on efficiently switching between different OpenJDK versions on Manjaro Linux.

Section 2: Configure OpenJDK 21 as the Default Java Version on Manjaro
This section will focus on setting OpenJDK 21 as the default Java version on a Linux system. We will use the update-alternatives command, a vital tool for managing symbolic links that are used to set default commands or applications in Linux.
Step 1: Inspecting Available Java Versions on Manjaro
Let’s begin by checking which Java versions are installed on your system. This information is crucial as it lets us know the exact identifier to set OpenJDK 21 as the default version.
Execute the command below in your terminal:
sudo archlinux-java statusThis command lists all the Java environments installed on your system and highlights the currently active ones.

Step 2: Switching to OpenJDK 21 on Manjaro
Now that we understand our system’s Java environments, let’s proceed to set OpenJDK 21 as the default version.
Execute the following command:
sudo archlinux-java set java-21-openjdkIn this command, the archlinux-java set is used to change the default Java environment, and java-21-openjdk is the identifier for OpenJDK 21. If you wish to enable a different version, you can replace java-21-openjdk with the appropriate identifier from the list you obtained earlier.
Step 3: Verifying the Java version Change on Manjaro
To ensure the change succeeded, we must verify that OpenJDK 21 is now the default Java environment.
Run the following command to check the active Java version:
java -versionThis command will display the default Java version currently set as the default. Ensure that it reflects OpenJDK 21.

It’s essential to be cautious and verify that you are using the correct commands and identifiers when making changes to the default applications, as incorrect changes can lead to unexpected behavior in your system.
Conclusion and Final Thoughts
This guide explored installing OpenJDK 21 on Manjaro Linux, an essential component for running Java applications. We also looked at how to configure OpenJDK 21 as the default Java version on your system by managing symbolic links through the update-alternatives command.
For developers and system administrators, staying updated with the latest Java versions is essential to ensure optimal application performance and security. However, it would be best to exercise caution when changing the default applications on your system, as incorrect configurations can lead to unintended behaviors.
I recommend keeping abreast of OpenJDK’s official documentation and release notes to ensure you leverage the latest features and security updates. Additionally, consider building a practice environment for testing changes before implementing them in production.