Embracing the flexibility of Fedora Linux often involves customizing your desktop environment. When you install Deepin on Fedora Linux, you not only imbue your system with DDE’s celebrated aesthetics but also with a highly functional and customizable user experience.
Here’s why you might consider Deepin:
- Contemporary Design: Deepin boasts a sleek, modern interface that stands out next to GNOME’s classic aesthetic.
- Advanced Customization: It offers a suite of options for tailoring your desktop, from themes to widgets, more so than GNOME.
- Familiar Usability: Emulating the layout of traditional desktop environments, Deepin provides an intuitive user experience.
- Comprehensive Features: Despite its slightly higher resource footprint, Deepin’s extensive features justify its use, offering a cohesive and polished visual experience.
- Versatile Application Ecosystem: Comes with an array of custom applications that integrate seamlessly with the overall desktop look and feel.
Deepin Desktop Environment (DDE) is not just a visual refresh—it’s a robust workspace designed for both efficiency and elegance. Built on the Qt framework, its compatibility with multiple Linux distributions makes it a versatile player in open-source interfaces.
Let’s focus on the practical steps to enhance your Fedora Linux with the Deepin Desktop Environment, optimizing both form and function in your day-to-day computer use.
Install Deepin on Fedora via DNF
Step 1: Optimize DNF for Faster Package Downloads (Optional)
DNF is the default package manager for Fedora, designed to be both robust and flexible. However, sometimes downloading packages can be slow due to various factors, including network latency and mirror server speeds. Optimizing DNF to handle parallel downloads and select the fastest mirrors can enhance the speed significantly. While this optimization is optional, it is recommended for a more efficient installation experience.
To configure DNF for quicker package downloads, you can modify the DNF configuration file or use DNF plugins. For a step-by-step guide on this optimization, review the resource: How to Increase DNF Speed on Fedora Linux.
Step 2: Update Your Fedora System Before Deepin Installation
Ensuring your Fedora system is up to date is fundamental before installing a new desktop environment like Deepin. This is crucial for the compatibility and stability of your system, as it aligns all packages to their latest versions, including security patches and performance improvements.
Execute the following command in the terminal to update your system:
sudo dnf upgrade --refreshThis command will perform a system-wide update, refreshing repository metadata to ensure all subsequent installations are done with the most recent package versions.
Step 3: Install Deepin Desktop Environment on Fedora
Starting with Fedora 36, Deepin is available in the official Fedora repositories, streamlining the installation process. The inclusion in the repositories ensures that you are getting a version of Deepin that is tested and approved for Fedora.
To install the Deepin Desktop Environment, input this command:
sudo dnf group install "Deepin Desktop"This will initiate the download and installation of Deepin and its related dependencies. The duration of this process will depend on your internet connection and the performance of your hardware.
Step 4: Restart Your System
Once Deepin is installed, a system reboot is required to finalize the installation and to start the Deepin Desktop Environment. To restart your Fedora system, use the command:
sudo rebootExecuting this command in the terminal will reboot your machine, and upon logging back in, you can select Deepin from the session options on the login screen.
Logging into Deepin Desktop Environment on Fedora Linux
Step 1: Select Deepin at the Login Screen
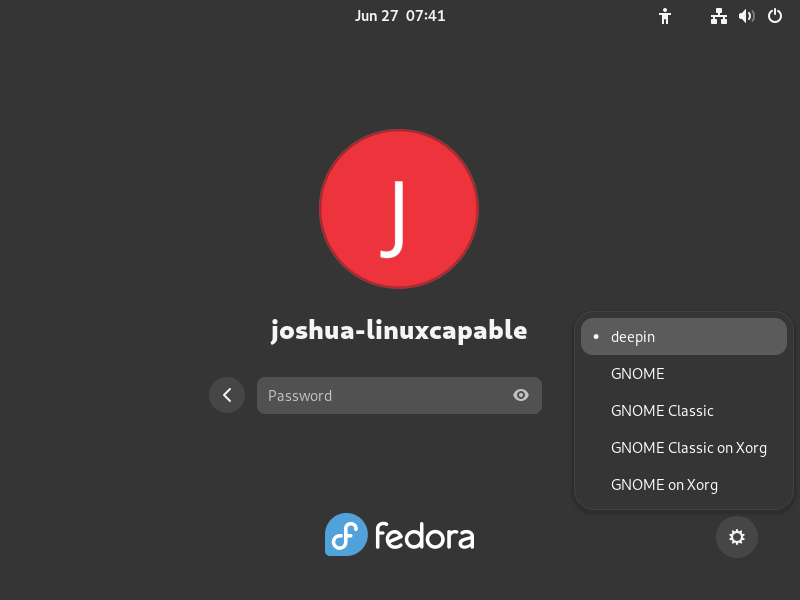
Once your Fedora system reboots after installing the Deepin Desktop Environment, the login screen will appear. Take a moment before you log in to switch your desktop session. Look for the cogwheel icon typically located at the bottom-right of the login screen.
Next, click on it and choose “Deepin” from the list to ensure you enter the Deepin environment instead of the default GNOME session.
Step 2: Choose the Display Mode (Virtual Environments Only)
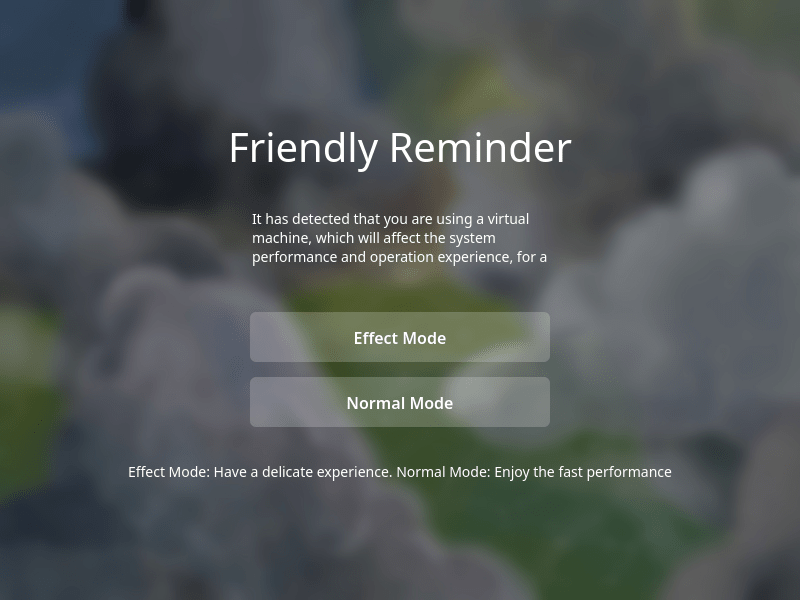
As you access Deepin for the first time, you’ll encounter a choice between ‘Normal Mode’ and ‘Effect Mode’ for your desktop view.
Normal Mode
- Normal Mode is tailored for optimal performance, especially on systems with lower specifications. It disables several of Deepin’s graphical effects and animations to deliver faster response times and reduce the load on your hardware, making it the preferred option for ensuring smoother system operation on less capable machines.
Effect Mode
- Contrastingly, Effect Mode unlocks Deepin’s full graphical potential, activating various visual effects and animations. This mode is resource-intensive but is recommended for users with newer hardware looking to take full advantage of Deepin’s immersive and aesthetically pleasing environment.
When deciding, consider that Normal Mode is suited for functionality with an emphasis on performance, while Effect Mode is ideal for experiencing the enriched visuals that Deepin offers. Select the mode that aligns with your hardware capabilities and preference for desktop appearance.
First-Time Tips with Deepin on Fedora Linux
Now that you have successfully installed Deepin Desktop on Fedora Linux, it’s essential to understand how to make the most of your new environment. Below are carefully curated tips for first-time users to enhance their Deepin experience.
General Tips for Deepin on Fedora
- Familiarize with the Launcher: Deepin uses a unique launcher that is different from GNOME. Access it by clicking on the launcher icon at the bottom of your screen. Spend some time exploring the categories and the settings available to you.
- Learn the Shortcuts: Keyboard shortcuts can greatly enhance your productivity. Press
Ctrl + Alt + Tto open a terminal or useSuper + Dto show the desktop. Discover more shortcuts in the settings to streamline your workflow. - System Settings Overview: Navigate to the system settings to adjust aspects like your display, power management, and default applications. It’s crucial to customize these settings to suit your needs for an optimized experience.
- Widget Management: Deepin comes with a suite of widgets that can be accessed with a right-click on the desktop. Explore these widgets to add functionality such as clocks, weather updates, and more.
Deepin Customizations Tips with Fedora
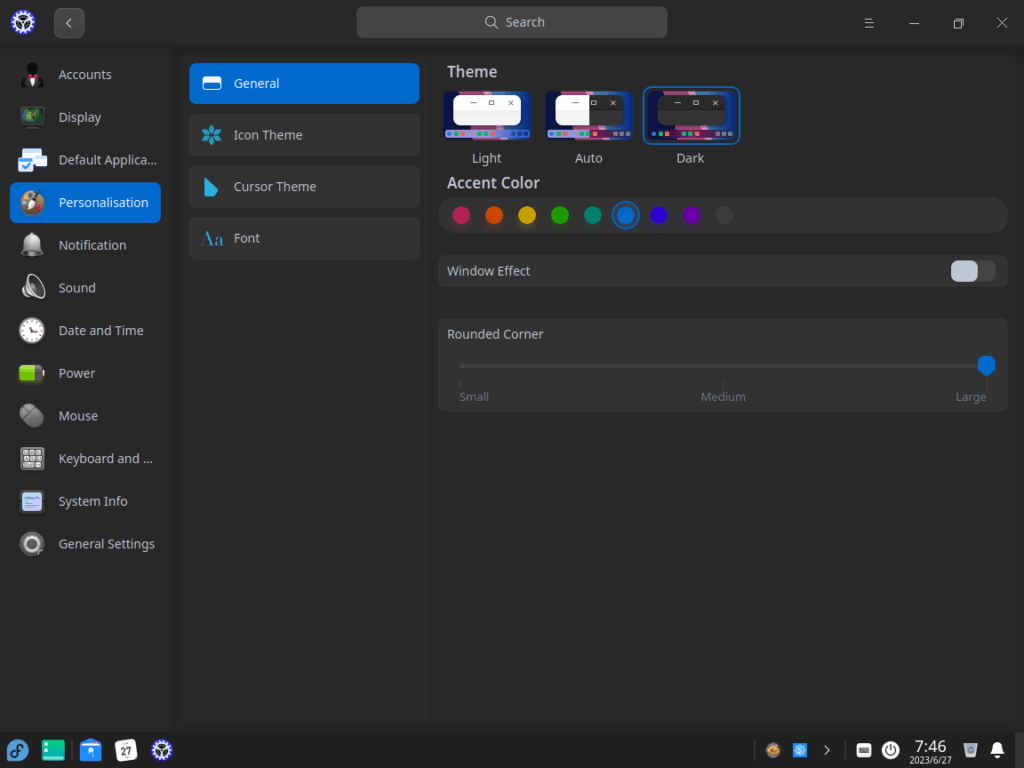
- Personalize Your Aesthetics: Customize your desktop appearance in the settings. Change your theme, icons, and fonts to match your style. Deepin is known for its elegant design, so take advantage of the various customization options.
deepin-settings- Adjust the Dock: The Deepin dock is where you can pin your favorite applications and access system functions. Right-click on the dock to adjust its size, position, and mode. You can have it resemble a traditional dock or a more modern taskbar.
- Manage Workspaces: Utilize multiple workspaces to organize your windows and applications. Add or remove workspaces from the multitasking view, accessible through the dock or with a swipe gesture on the touchpad.
Other Helpful Deepin Tips with Fedora
- File Management: Deepin File Manager is a powerful tool with an intuitive interface. Use it to organize files, connect to network locations, and even manage disk partitions.
- Connectivity Features: Set up your network connections and Bluetooth devices through the system settings. Deepin’s network manager is straightforward, allowing quick connections to Wi-Fi networks or VPNs.
- Accessibility Options: Explore Deepin’s accessibility features to tailor your experience if you have specific needs. Options for large text, high contrast, and screen magnification are available in the settings.
By following these tips, you will be well on your way to a productive and personalized experience with the Deepin Desktop on Fedora Linux. Remember to explore and experiment; there’s much to discover in Deepin that can enhance your daily computing tasks.
Managing Deepin on Fedora Linux
This section will cover how to manage your Deepin Desktop Environment on Fedora Linux efficiently. We will focus on updating and removing the Deepin Desktop Environment.
Update Deepin Desktop Environment on Fedora
Efficient management of your Deepin Desktop Environment on Fedora Linux is critical for maintaining system performance and ensuring a secure user experience. This guide dives into the procedures for updating and removing Deepin Desktop.
Step 1: Check for Updates
To maintain the security and efficiency of your Deepin desktop, it’s essential to check for updates regularly. This action can be performed using the DNF package manager in Fedora. Initiate the update check with the following command:
sudo dnf updateThis command lists all the packages due for an update. Reviewing these updates to understand what changes will occur is a good practice.
Step 2: Apply the Updates
Once updates are identified, it’s crucial to apply them to keep your system in optimal condition. Although sudo dnf upgrade is commonly used, the preferred command includes the --refresh option:
sudo dnf upgrade --refreshThe --refresh flag is significant because it ensures DNF uses the most current repository data, guaranteeing that your system receives the latest patches and features.
Remove Deepin Desktop Environment From Fedora
There might be situations where you need to remove the Deepin Desktop from your Fedora system. This could be due to various reasons like system resource allocation or preference.
Step 1: Uninstall Deepin
To remove the Deepin Desktop Environment, including all its components, the following command will perform the necessary actions:
sudo dnf group remove "Deepin Desktop"Ensure to double-check the group name “Deepin Desktop” for accuracy before executing the command to avoid removing unintended software.
Step 2: Reboot the System
Post-uninstallation, a system reboot is necessary to finalize the removal process. All traces of the Deepin Desktop will be cleared during the reboot. Use this command to restart your system safely:
sudo rebootA reboot will apply all changes and load the default Fedora desktop environment or any other environment you have installed.
Conclusion
We’ve outlined the essential steps for installing and managing the Deepin Desktop Environment on Fedora Linux, from system preparation with DNF to the installation process and post-installation management. To enhance your Deepin experience, regularly update your system and engage with the Deepin community for insights and customization tips. With this foundation, you can fully leverage the aesthetic and functional benefits of Deepin on your Fedora system.


