
Budgie gives Debian users a panel-based desktop with Raven notifications and GTK integration without replacing the whole login stack. To install Budgie Desktop on Debian, use the budgie-desktop package from Debian’s default repositories; it adds a Budgie session beside the current desktop and does not require switching display managers.
Install Budgie Desktop on Debian
The cross-release Budgie path is Debian’s budgie-desktop package. It is available on Debian 13 (Trixie), Debian 12 (Bookworm), and Debian 11 (Bullseye), with the package branch following each Debian release.
| Debian Release | Budgie Package Branch | Notes |
|---|---|---|
| Debian 13 (Trixie) | 10.9.x | Includes the newer Budgie session stack and also publishes a separate full-environment metapackage. |
| Debian 12 (Bookworm) | 10.7.x | Uses budgie-desktop for the normal desktop add-on install. |
| Debian 11 (Bullseye) | 10.5.x | Uses the same package name on Bullseye systems. |
Start from an installed Debian system. A Budgie-specific installer image is not required; install Debian first, then add the Budgie session with APT.
Refresh APT metadata before installing the desktop packages:
sudo apt updatePackage-management commands here use sudo. If your account cannot run administrative commands yet, add the user to sudoers on Debian before continuing.
Install Budgie from Debian’s repositories:
sudo apt install budgie-desktopAPT installs the core Budgie packages and recommended desktop integration packages, including budgie-core and budgie-desktop-view. On existing GNOME installs, the current display manager remains in place; Budgie appears as another session at the login screen.
Use the Debian 13 Full Environment Package Carefully
Debian 13 also provides budgie-desktop-environment, a broader metapackage that pulls a more complete Budgie-themed desktop stack. It is not available on Debian 12 or Debian 11, and it is a poor default for cross-release installs. With APT recommendations enabled, that transaction can include themes, backgrounds, nemo, and a LightDM greeter path: the metapackage depends on lightdm | x-display-manager, recommends slick-greeter, and slick-greeter depends on lightdm while recommending lightdm-settings. That behavior belongs to the Debian 13-only metapackage, not the cross-release budgie-desktop install.
Verify Budgie Desktop on Debian
Check that the main Budgie packages are installed. The status abbreviation should start with ii for each installed package:
dpkg-query -W -f='${db:Status-Abbrev} ${binary:Package}\n' budgie-desktop budgie-core budgie-desktop-viewii budgie-core ii budgie-desktop ii budgie-desktop-view
Confirm that Debian installed the Budgie session file used by graphical login managers:
ls /usr/share/xsessions | grep -E '^budgie-desktop\.desktop$'budgie-desktop.desktop
The session file is shipped by budgie-core. If the file exists, the login screen can offer Budgie after a logout or reboot.
Check the Current Display Manager
Budgie does not need a dedicated display manager. Use this read-only check if you want to confirm which login manager currently owns the graphical login screen:
cat /etc/X11/default-display-managerA GNOME-based Debian desktop usually prints /usr/sbin/gdm3. Systems using another login manager may print a different path, and that is fine as long as the manager shows the Budgie session.
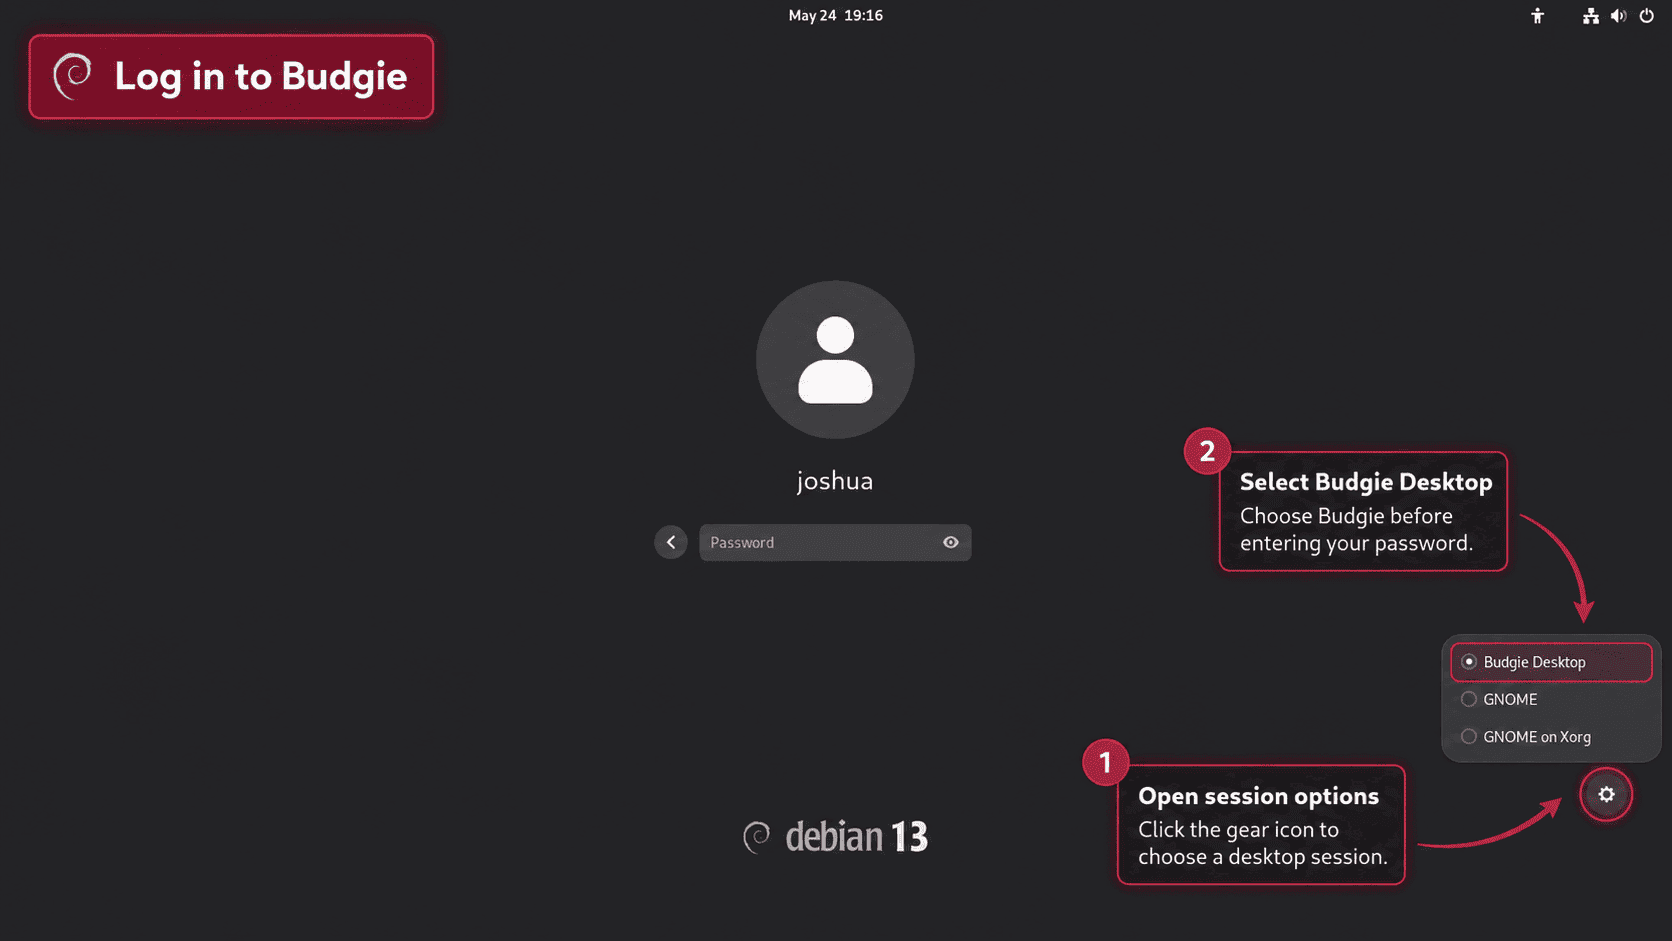
Log In to Budgie Desktop on Debian
Restart when the new session does not appear immediately after logging out, or when the system was running a minimal graphical stack before the install:
sudo rebootAt the login screen, open the session selector before entering your password and choose Budgie. GDM commonly shows the selector as a gear icon after selecting the user account; other display managers place the session menu in a different location.
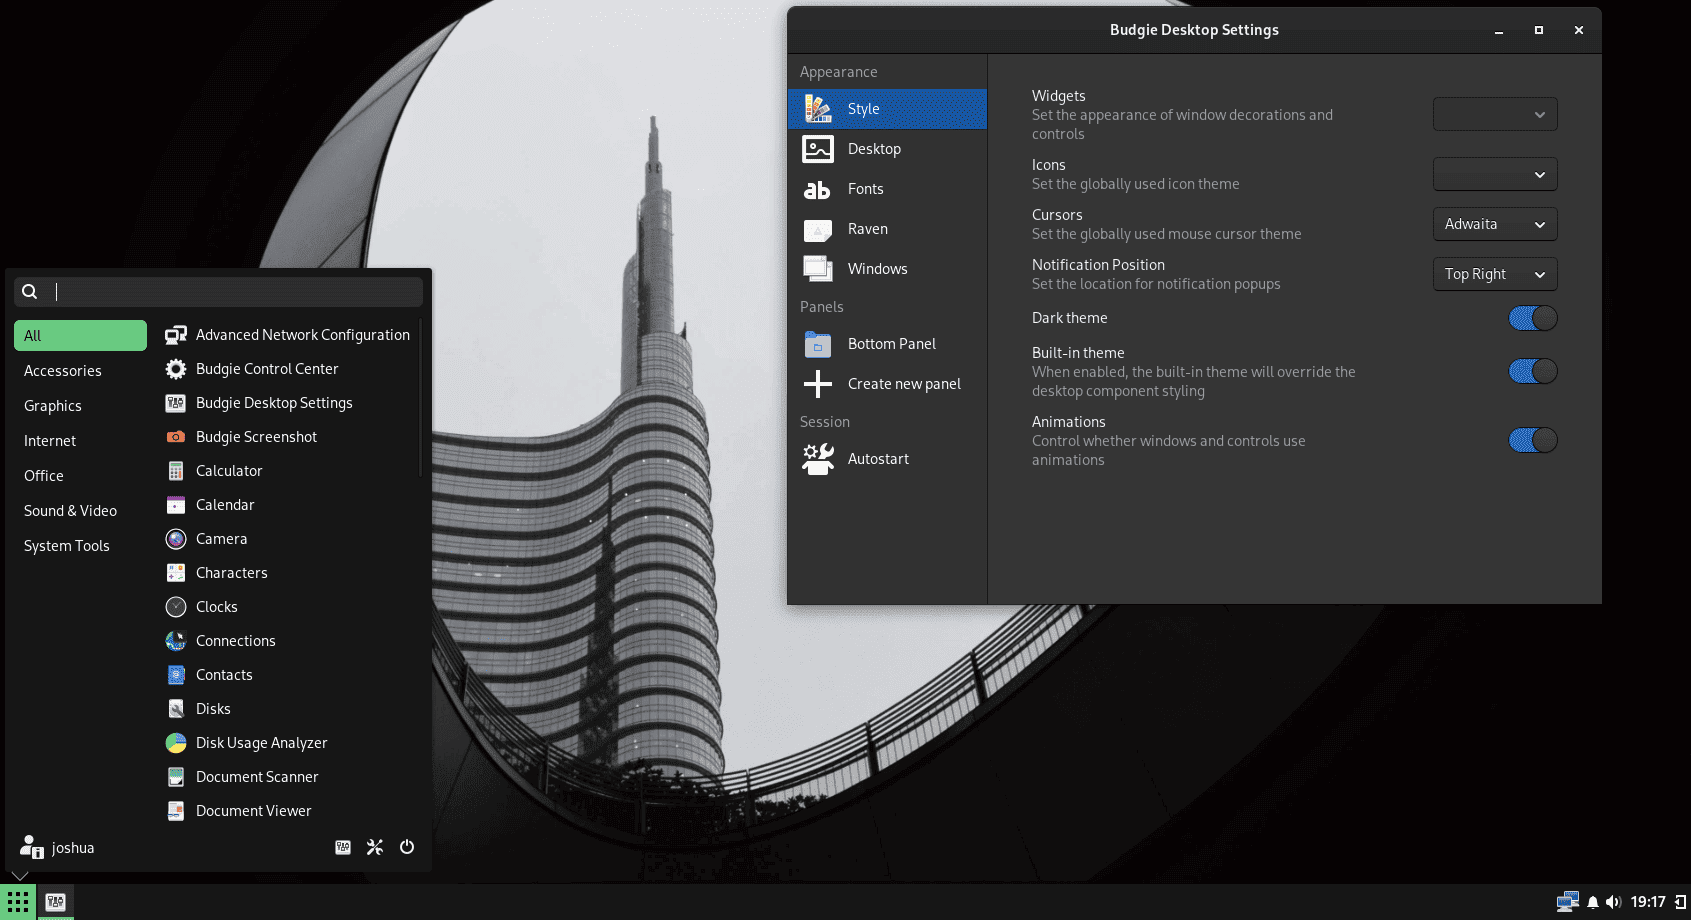
After login, open the Budgie menu or right-click the panel to reach Budgie Desktop Settings. That settings panel controls applets, panels, themes, windows, Raven behavior, and other session-specific options.
Install Optional Budgie Packages on Debian
Debian packages Budgie extras separately. Install only the applets you plan to use, because they add their own dependencies and some extras use the shared budgie-extras-daemon background service.
sudo apt install budgie-indicator-applet budgie-hotcorners-applet budgie-window-shuffler budgie-previews budgie-weathershow-appletbudgie-indicator-appletadds AppIndicator and Ayatana application icons to the Budgie panel, which helps applications that still expect an indicator-style tray.budgie-hotcorners-appletadds configurable screen-corner actions.budgie-window-shuffleradds keyboard-driven window tiling and arrangement.budgie-previewsadds taskbar window previews.budgie-weathershow-appletadds weather information to the panel.
Compare Budgie Optional Package Availability
The package set is not identical on every Debian release. Use the table before copying package names across systems; Yes means APT has a candidate package in that release, No means the package is not published there, and Transitional means the package exists mainly to move users to another package name.
| Package | Purpose | Debian 13 | Debian 12 | Debian 11 |
|---|---|---|---|---|
budgie-indicator-applet | AppIndicator and Ayatana application icons | Yes | Yes | Yes |
budgie-hotcorners-applet | Screen-corner actions | Yes | Yes | Yes |
budgie-window-shuffler | Keyboard and GUI window tiling | Yes | Yes | Yes |
budgie-previews | Taskbar window previews | Yes | Yes | Yes |
budgie-weathershow-applet | Panel weather and forecast | Yes | Yes | Yes |
budgie-app-launcher-applet | Alternative application launcher | Yes | Yes | Yes |
budgie-applications-menu-applet | Budgie applications menu | Yes | Yes | Yes |
budgie-appmenu-applet | Application menu panel plugin | Yes | Yes | Yes |
budgie-brightness-controller-applet | Screen brightness control | Yes | Yes | Yes |
budgie-clockworks-applet | Multiple time-zone clocks | Yes | Yes | Yes |
budgie-countdown-applet | Countdown timer | Yes | Yes | Yes |
budgie-dropby-applet | USB device popup helper | Yes | Yes | Yes |
budgie-fuzzyclock-applet | Fuzzy text clock | Yes | Yes | Yes |
budgie-kangaroo-applet | Quick file browsing | Yes | Yes | Yes |
budgie-keyboard-autoswitch-applet | Per-application keyboard layouts | Yes | Yes | Yes |
budgie-network-manager-applet | Network Manager panel integration | Yes | Yes | Yes |
budgie-quickchar | Special character picker | Yes | Yes | Yes |
budgie-quicknote-applet | Simple panel notes | Yes | Yes | Yes |
budgie-recentlyused-applet | Recently used files menu | Yes | Yes | Yes |
budgie-rotation-lock-applet | Screen rotation lock | Yes | Yes | Yes |
budgie-showtime-applet | Desktop date and time display | Yes | Yes | Yes |
budgie-takeabreak-applet | Break reminder prompts | Yes | Yes | Yes |
budgie-visualspace-applet | Workspace and window overview | Yes | Yes | Yes |
budgie-wallstreet | Scheduled wallpaper rotation | Yes | Yes | Yes |
budgie-workspace-stopwatch-applet | Workspace usage timer | Yes | Yes | Yes |
budgie-workspace-wallpaper-applet | Per-workspace wallpaper | Yes | Yes | Yes |
budgie-extras-common | Shared files for Budgie extras | Yes | Yes | Yes |
budgie-extras-daemon | Background helper for Budgie extras | Yes | Yes | Yes |
budgie-trash-applet | Trash panel access | Transitional | Yes | Yes |
budgie-previews-applet | Older transitional name for previews | No | Transitional | Transitional |
budgie-sntray-plugin | StatusNotifier tray plugin package | No | Yes | Yes |
budgie-window-mover-applet | Older workspace window mover | No | No | Yes |
budgie-workspace-overview-applet | Older workspace overview | No | No | Yes |
Prefer the current package names when more than one name exists. For example, use budgie-previews instead of the older budgie-previews-applet transitional package on Debian 12 and Debian 11.
Search the repository when you want to inspect the full Budgie package set available on the current machine:
apt-cache search '^budgie' | sortAfter installing applets, open Budgie Desktop Settings, select the panel you want to change, and add the new applets from the Applets view.
Update Budgie Desktop on Debian
Budgie updates through the same APT workflow as other Debian repository packages. Normal system upgrades update Budgie when Debian publishes a package update:
sudo apt update
sudo apt upgrade
For a targeted Budgie package refresh, upgrade only the installed Budgie packages:
sudo apt update
sudo apt install --only-upgrade budgie-desktop budgie-core budgie-desktop-view
Remove Budgie Desktop from Debian
Log out of Budgie and switch to another installed session before removing the packages. Package removal does not need a display-manager reconfiguration when your login manager already belongs to GNOME, KDE, Xfce, Cinnamon, LXQt, or another installed desktop.
Remove the main Budgie package first:
sudo apt remove --purge budgie-desktopIf you installed the optional applets from the example command, remove those packages as well. Extend the package list with any other optional Budgie packages you installed from the availability table:
sudo apt remove --purge budgie-indicator-applet budgie-hotcorners-applet budgie-window-shuffler budgie-previews budgie-weathershow-appletPreview automatic dependency cleanup before accepting it. This is important on reused desktops because APT can already have unrelated autoremovable packages from older work:
apt-get -s autoremoveIf the preview lists only Budgie packages and dependencies you no longer need, remove them:
sudo apt autoremove --purgeVerify that no core Budgie desktop packages remain installed:
dpkg-query -W -f='${db:Status-Abbrev} ${binary:Package}\n' budgie-desktop budgie-core budgie-desktop-view 2>/dev/null | grep '^ii' || echo "No Budgie desktop packages are installed."No Budgie desktop packages are installed.
Troubleshoot Budgie Desktop on Debian
Budgie Session Does Not Appear at Login
Start with the session file check. If the file is missing, the login manager has nothing to show in its session selector:
ls /usr/share/xsessions | grep -E '^budgie-desktop\.desktop$'Reinstall budgie-core when the session file is absent:
sudo apt install --reinstall budgie-coreLog out and check the session selector again. If the session still does not appear, reboot once so the display manager reloads the available X sessions.
Budgie Package Cannot Be Located
budgie-desktop is in Debian’s main repository for Debian 13, 12, and 11. If APT cannot locate it, refresh package metadata and inspect the candidate:
sudo apt update
apt-cache policy budgie-desktop
A missing candidate usually points to disabled or broken Debian base repositories rather than a Budgie-specific problem.
Blank Screen After Choosing Budgie
Check whether the problem is specific to Budgie or affects every graphical session. If GNOME, KDE, Xfce, or another session also fails, investigate graphics drivers before reinstalling Budgie packages.
sudo journalctl -b -p warning..alert | grep -Ei 'budgie|gnome-shell|gdm|mutter|magpie|drm|gpu|nvidia'Systems with proprietary NVIDIA hardware may need the packaged driver stack before graphical sessions behave correctly. Use the Debian NVIDIA driver guide when the logs point to Nouveau, missing firmware, or NVIDIA module failures.
Related Debian Desktop Guides
Compare Budgie with other Debian desktop options when you are still choosing a session style or resource profile:
- Install KDE Plasma on Debian for a highly configurable Qt-based desktop.
- Install Cinnamon on Debian for a traditional GTK desktop layout.
- Install XFCE on Debian for a lightweight GTK desktop with mature panel tooling.
- Install LXQt on Debian for a minimal Qt desktop with low resource use.
The official Budgie project site is useful for release notes and upstream development context, while Debian package pages show the exact package branch available for each Debian release.
- Buddies of Budgie publishes upstream project news and documentation.
- Budgie Desktop GitHub tracks source code and issue reports.
- Debian Budgie package search shows the package versions in Debian repositories.
Conclusion
Budgie is installed on Debian as a selectable desktop session while the existing login manager remains in place. Keep it lean with budgie-desktop, check optional package availability before adding extras, and use APT’s normal update and removal paths when you need to maintain or roll back the desktop.

Formatting tips for your comment
You can use basic HTML to format your comment. Useful tags currently allowed in published comments:
<code>command</code>command<strong>bold</strong><em>italic</em><a href="https://example.com">link</a><blockquote>quote</blockquote>