Brightness Controller is useful when Ubuntu’s built-in display controls do not give you enough software dimming control, especially on multi-monitor X11 desktops. The package is not available from Ubuntu’s default repositories, so installing Brightness Controller on Ubuntu uses the Brightness Controller Launchpad PPA for the Ubuntu releases it currently publishes.
Brightness Controller is a software dimmer. It changes display output through
xrandrwith a brightness scale from 0.01 to 1.0, so it can reduce brightness below the current hardware level but cannot increase brightness beyond the maximum set by your monitor, backlight, firmware, or desktop environment.
Install Brightness Controller on Ubuntu
The Brightness Controller PPA currently covers Ubuntu 24.04 LTS and 22.04 LTS. Ubuntu 26.04 LTS has no PPA package for this application, so the PPA setup must stop before writing a broken source on that release.
| Ubuntu Release | PPA Support | Package Candidate | Install Decision |
|---|---|---|---|
| Ubuntu 26.04 LTS | Not supported | No resolute package | Do not add the PPA on this release. |
| Ubuntu 24.04 LTS | Supported | 2.3.4-4~ubuntu24.04.1 | Use the PPA method. |
| Ubuntu 22.04 LTS | Supported | 2.3.4-4~ubuntu22.04.1 | Use the PPA method. |
The upstream Brightness Controller GitHub repository also documents a pip-based workflow, but the APT-managed PPA path keeps package updates and removal inside Ubuntu’s package manager. A pip install has different dependency, update, and removal ownership and should be treated as a separate upstream workflow.
Brightness Controller vs brightnessctl
brightnessctl is a separate command-line utility from Ubuntu Universe for kernel backlight devices. It does not install the Brightness Controller GUI, does not use the Brightness Controller PPA, and does not provide the same color-temperature sliders. Use Brightness Controller when you want the GUI software dimmer; use brightnessctl only when you specifically want terminal-based backlight control.
When Brightness Controller Is Not the Right Fix
If Ubuntu’s built-in brightness slider is missing, the laptop brightness keys do nothing, or the backlight level never changes at the hardware level, fix that backlight or graphics-driver problem first. Brightness Controller does not repair ACPI, i915, amdgpu, or vendor-laptop backlight controls; it applies a software dimming layer after the display is already active.
Update Ubuntu Packages
Refresh APT metadata and apply available package updates before adding the PPA. This reduces dependency conflicts when APT resolves the Qt and PyQt packages Brightness Controller needs.
sudo apt update && sudo apt upgradeThese commands use
sudofor package-manager tasks that require root privileges. If your account cannot run administrative commands yet, add a user to sudoers with the Ubuntu workflow in our sudoers guide for Ubuntu.
Add the Brightness Controller PPA
Add the PPA with a release guard so unsupported Ubuntu releases do not receive a stale or broken source file.
. /etc/os-release

case "${VERSION_CODENAME:-}" in
    noble|jammy)
        sudo add-apt-repository -y ppa:apandada1/brightness-controller
        ;;
    *)
        printf 'The Brightness Controller PPA currently supports Ubuntu 24.04 (noble) and 22.04 (jammy), not %s.\n' "${PRETTY_NAME:-this Ubuntu release}" >&2
        false
        ;;
esac
If the command prints the unsupported-release message, stop with this method. Do not point Ubuntu 26.04 at the older noble or jammy PPA suite because dependency and desktop-session behavior are not the same release target.
Verify the Brightness Controller Package Source
Refresh package metadata after adding the PPA, then confirm APT sees the Brightness Controller package from the Launchpad source.
sudo apt update
apt-cache policy brightness-controller
Relevant output on Ubuntu 24.04 includes the PPA candidate and the noble/main package source:
brightness-controller:
  Installed: (none)
  Candidate: 2.3.4-4~ubuntu24.04.1
  Version table:
     2.3.4-4~ubuntu24.04.1 500
        500 https://ppa.launchpadcontent.net/apandada1/brightness-controller/ubuntu noble/main amd64 Packages
Ubuntu 22.04 shows the same package branch with a 2.3.4-4~ubuntu22.04.1 candidate from jammy/main.
Install Brightness Controller with APT
Install the GUI package from the PPA. Review the transaction before accepting it, especially on clean Ubuntu 22.04 systems where the Qt and media dependency set can be larger than on newer desktops.
sudo apt install brightness-controllerVerify the Brightness Controller Installation
Confirm both the installed package version and the terminal launcher path.
dpkg-query -W -f='${binary:Package} ${Version}\n' brightness-controller
command -v brightness-controller
Example output from Ubuntu 24.04:
brightness-controller 2.3.4-4~ubuntu24.04.1
/usr/bin/brightness-controller
Check the desktop launcher fields if you want to confirm the application-menu entry before opening the GUI.
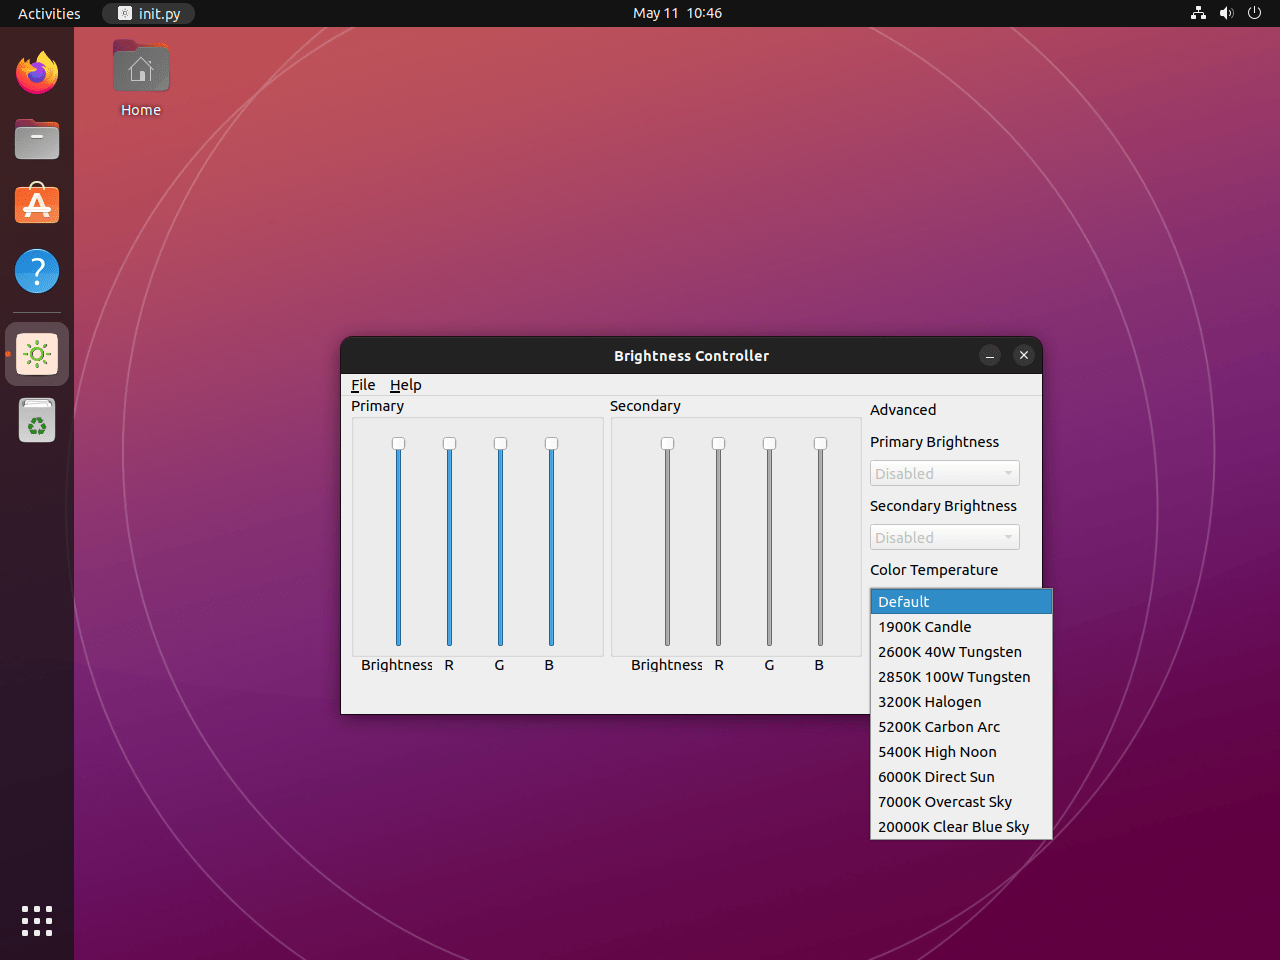
grep -E '^(Name|Exec|Icon)=' /usr/share/applications/brightness-controller.desktopName=Brightness Controller Icon=brightness-controller Exec=/usr/share/brightness-controller/init.py
Launch Brightness Controller on Ubuntu
Launch from Terminal
Start the application from a terminal when you want to see launch-time warnings or test troubleshooting environment variables.
brightness-controllerLaunch from the Applications Menu
Open the application grid, search for Brightness Controller, and select the launcher. The desktop entry installed by the package uses the brightness-controller icon and starts the Python launcher under /usr/share/brightness-controller/.
Manage Brightness Controller on Ubuntu
Update Brightness Controller
Brightness Controller receives updates through APT while the PPA remains enabled. Upgrade only the installed package when you do not want a broader system upgrade in the same transaction.
sudo apt update
sudo apt install --only-upgrade brightness-controller
Remove Brightness Controller
Remove the package first. The purge form clears package-owned system configuration if any exists, while user profile files under your home directory are not removed by APT.
sudo apt purge brightness-controllerReview the optional dependency cleanup before accepting it because older systems can have unrelated autoremovable packages from previous work.
sudo apt autoremoveRemove the Brightness Controller PPA
Package removal does not remove the PPA. Remove the source when you no longer need APT-managed Brightness Controller updates. For broader source-management cleanup, use the Ubuntu workflow for removing PPAs from Ubuntu.
sudo add-apt-repository --remove -y ppa:apandada1/brightness-controller
sudo apt update
Some systems leave the PPA signing key under /etc/apt/trusted.gpg.d/ after the source is removed. Remove that exact key file only after confirming no Brightness Controller PPA source remains.
apt_source_paths=()
[ -f /etc/apt/sources.list ] && apt_source_paths+=('/etc/apt/sources.list')
[ -d /etc/apt/sources.list.d ] && apt_source_paths+=('/etc/apt/sources.list.d')

if [ "${#apt_source_paths[@]}" -eq 0 ]; then
    sudo rm -f /etc/apt/trusted.gpg.d/apandada1-ubuntu-brightness-controller.gpg
else
    grep -R -q 'apandada1/brightness-controller' "${apt_source_paths[@]}"
    grep_status=$?

    case "$grep_status" in
        0)
            printf 'A Brightness Controller PPA source still exists; leave the signing key in place.\n' >&2
            ;;
        1)
            sudo rm -f /etc/apt/trusted.gpg.d/apandada1-ubuntu-brightness-controller.gpg
            ;;
        *)
            printf 'Could not verify all APT source files; inspect them before removing the signing key.\n' >&2
            ;;
    esac
fi
The guard checks only existing APT source paths, removes the key only when no matching PPA source is found, and leaves the key in place if the source-file search cannot be completed cleanly.
Confirm the package is no longer installed and no PPA candidate remains.
apt-cache policy brightness-controllerbrightness-controller: Installed: (none) Candidate: (none) Version table:
Troubleshoot Brightness Controller on Ubuntu
PPA Has No Package for Ubuntu 26.04
Ubuntu 26.04 uses the resolute codename, and the Brightness Controller PPA does not publish a resolute package. If APT reports that the repository does not have a release file, remove the PPA instead of changing the source to an older Ubuntu suite.
sudo add-apt-repository --remove -y ppa:apandada1/brightness-controller
sudo apt update
The upstream pip workflow may be an option for advanced users, but it is not equivalent to the PPA package and needs separate dependency, update, and cleanup handling.
Controls Do Not Change Brightness on Wayland
Brightness Controller depends on X11 and xrandr. On Wayland sessions, the window may open through Xwayland, but the sliders may not affect the real display outputs.
echo "$XDG_SESSION_TYPE"Expected output for a compatible X11 session:
x11
On Ubuntu 24.04 and 22.04, log out and select Ubuntu on Xorg from the login-screen gear menu before signing back in. The Ubuntu 26.04 release notes state that Ubuntu Desktop now runs only on the Wayland back end because GNOME Shell no longer runs as an X.org session, so the normal Xorg-session workaround is not available on Ubuntu 26.04 GNOME.
Brightness Settings Keep Resetting
Another display-control feature can overwrite Brightness Controller settings after login or when the session changes power state. Check Ubuntu’s built-in brightness controls, adaptive brightness, Night Light, Redshift, f.lux, monitor firmware controls, and any vendor laptop utility that also changes brightness or color temperature.
Disable the overlapping brightness or color-temperature feature, then reopen Brightness Controller and apply the setting again. The application cannot prevent another tool from changing the same display output later.
Controls Do Nothing on NVIDIA Hybrid Graphics
On laptops with NVIDIA Optimus or other hybrid graphics setups, the internal panel often connects to the integrated GPU while the NVIDIA GPU handles rendering or external displays. Brightness Controller can show EGL or DRI2 warnings in that state because its X11 display path does not match the active rendering path. If you need to install or repair the proprietary driver stack, use the Ubuntu workflow for installing NVIDIA drivers on Ubuntu.
Check the active PRIME mode when the prime-select command exists on your system.
prime-select queryIf the output is nvidia and the internal display does not respond, switch to on-demand mode and reboot so the integrated GPU handles display output directly.
sudo prime-select on-demand
sudo reboot
If the application still logs EGL or DRI2 errors after rebooting into an X11 session, start it with software rendering for that launch.
QT_XCB_GL_INTEGRATION=none brightness-controllerConclusion
Brightness Controller is installed from the Launchpad PPA on supported Ubuntu releases, with APT handling package updates and source cleanup available when the app is no longer needed. Keep its X11 and software-dimming limits in mind: it is best suited for reducing perceived brightness on Ubuntu 24.04 or 22.04 desktop sessions where xrandr can still control the display path.

Helped me a lot! Thank you!
Very nice write up. Program installed exactly as instructed.
Only problem – this tool doesn’t enable users to actually increase brightness, only decrease.
Spot on. Brightness Controller is a software-based dimmer that uses
xrandrto scale brightness between 1% and 100% of your display’s hardware maximum. It cannot increase brightness above what your panel natively outputs. The slider at 100% matches your monitor’s default brightness, and moving it down reduces the output from there.This is a limitation of
xrandr --brightness, which adjusts a software gamma multiplier (0.01-1.0) rather than controlling the backlight hardware directly. The article has been updated to clarify this. Thanks for flagging it.Thank you very much, here it worked correctly following the steps! helped a lot
I installed brightness-controller, and nothing happens when I adjust the controls. The software is referencing eDP-1.
When I start brightness-controller, I get the following on the console:
QSocketNotifier: Can only be used with threads started with QThread
libEGL warning: egl: failed to create dri2 screen
I am using an HP laptop with nVidia GeForce RTX graphics board running Ubuntu 24.04
Thanks for the detailed error output, Steve. The
libEGL warning: egl: failed to create dri2 screenerror indicates an NVIDIA Optimus (hybrid graphics) conflict. On your HP laptop with GeForce RTX, the internal display (eDP-1) is likely connected through Intel or AMD integrated graphics, while NVIDIA handles external displays and rendering.Brightness Controller uses X11/xrandr APIs, which can conflict with NVIDIA’s proprietary driver setup on hybrid graphics systems. First, verify your session type and graphics configuration:
If the session type shows
wayland, switch to “Ubuntu on Xorg” at the login screen. Ifprime-select queryshowsnvidia, try switching toon-demandmode:After rebooting, launch Brightness Controller again. The
on-demandmode lets the Intel/AMD iGPU handle display output while NVIDIA activates only when needed, which typically resolves xrandr/EGL conflicts. If the issue persists, you can also try forcing software rendering:This bypasses the OpenGL/EGL initialization that is failing. If that works, you can make it permanent by editing the desktop launcher. I have added a note about NVIDIA hybrid graphics compatibility to the article’s troubleshooting section.