Ubuntu already ships with the base apt and apt-get tools, so you do not normally install APT itself on Ubuntu. APT-Fast is an optional wrapper for readers who want APT’s dependency handling with parallel package downloads through aria2, which can help larger installs and upgrades finish sooner.
The apt-fast/stable Launchpad PPA publishes packages for Ubuntu 26.04, 24.04, and 22.04. The upstream apt-fast project on GitHub also documents manual install paths, but the PPA keeps Ubuntu installs, updates, and removal inside APT.
Install APT-Fast on Ubuntu
The install path is the same across all supported Ubuntu LTS releases, but the PPA source file format is not. On Ubuntu 26.04 and 24.04, add-apt-repository writes a .sources file, while Ubuntu 22.04 still writes a traditional .list file.
The apt-fast/stable PPA publishes
apt-fast 1.11.1for Ubuntu 26.04, 24.04, and 22.04. The package candidate ends inubuntu26.04.1,ubuntu24.04.1, orubuntu22.04.1depending on your release.
Update Ubuntu Package Lists Before Installing APT-Fast
Refresh APT first so the package index is current before you add the PPA.
sudo apt updateThese commands use
sudofor root privileges. If your account does not have sudo access yet, add a new user to sudoers on Ubuntu before continuing.
Install software-properties-common When add-apt-repository Is Missing
Most desktop installs already include add-apt-repository. Minimal, server, and cloud images sometimes need the helper package first, so this command only installs it when the binary is missing.
command -v add-apt-repository || sudo apt install -y software-properties-commonIf the command prints a path such as /usr/bin/add-apt-repository, you can move straight to the PPA step. When it installs software-properties-common, rerun the next command in the same terminal window.
Add the APT-Fast PPA on Ubuntu
Add the stable PPA and let Ubuntu refresh APT immediately. The --yes flag accepts the repository prompt automatically, and --update refreshes package metadata in the same step.
sudo add-apt-repository --yes --update ppa:apt-fast/stableUse a package-policy check before installing so you can confirm the PPA is the active source.
apt-cache policy apt-fastapt-fast:
Installed: (none)
Candidate: 1.11.1-1~ubuntu26.04.1
Version table:
1.11.1-1~ubuntu26.04.1 500
500 https://ppa.launchpadcontent.net/apt-fast/stable/ubuntu resolute/main amd64 Packages
On Ubuntu 24.04, the candidate ends in ubuntu24.04.1. On Ubuntu 22.04, it ends in ubuntu22.04.1, and the policy output can also list an i386 package line when the i386 architecture is enabled.
Install APT-Fast on Ubuntu
Install the wrapper with standard APT. In a normal terminal session, apt-fast also opens debconf prompts so you can pick the package manager, default connection count, and whether downloads should start before its own confirmation prompt.
sudo apt install apt-fastReading package lists... Building dependency tree... Reading state information... Solving dependencies... Installing: apt-fast Installing dependencies: aria2 libaria2-0
Ubuntu 24.04 and 22.04 show the older APT summary format with The following NEW packages will be installed. Depending on what is already present, Ubuntu may also add downloader libraries such as libssh2-1t64 on 24.04 or libc-ares2 on 22.04 alongside aria2.
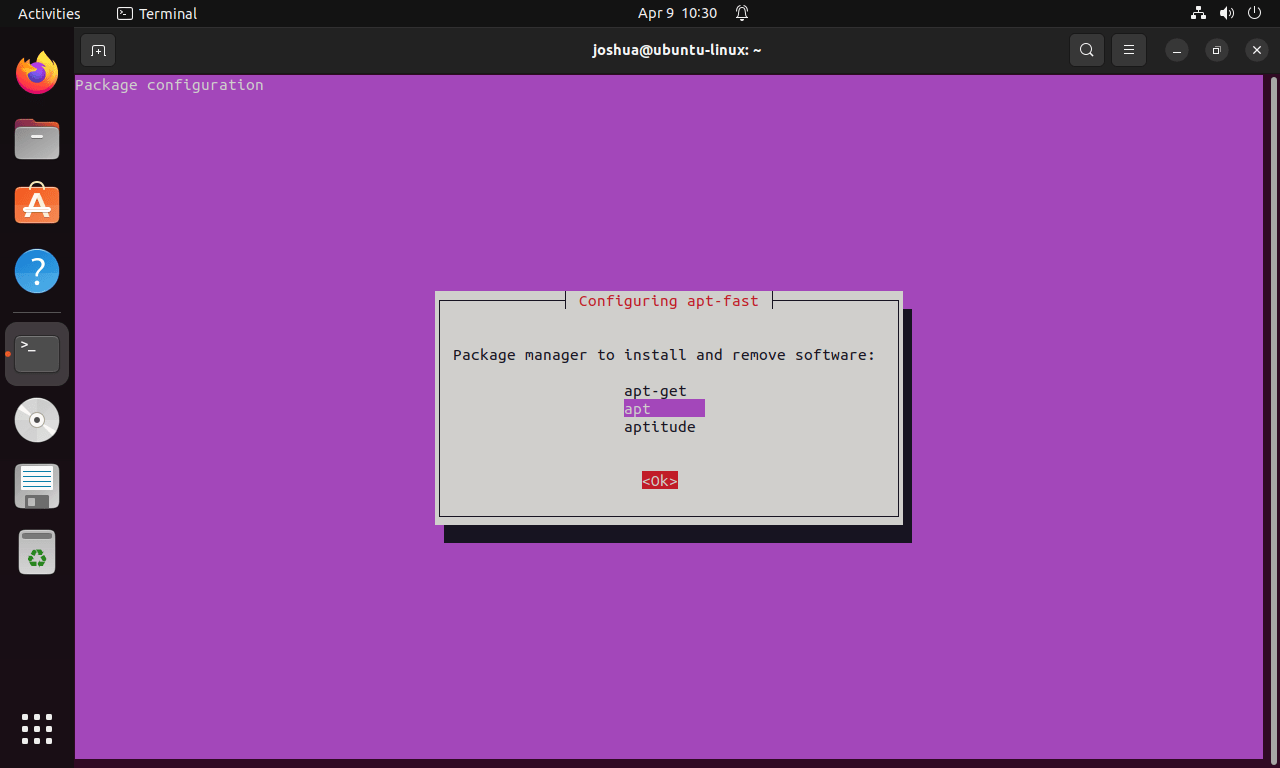
Choose the APT-Fast Package Manager on Ubuntu
The first debconf screen asks which package manager APT-Fast should wrap. For most Ubuntu users, apt is the practical choice because it matches the commands you already type interactively.
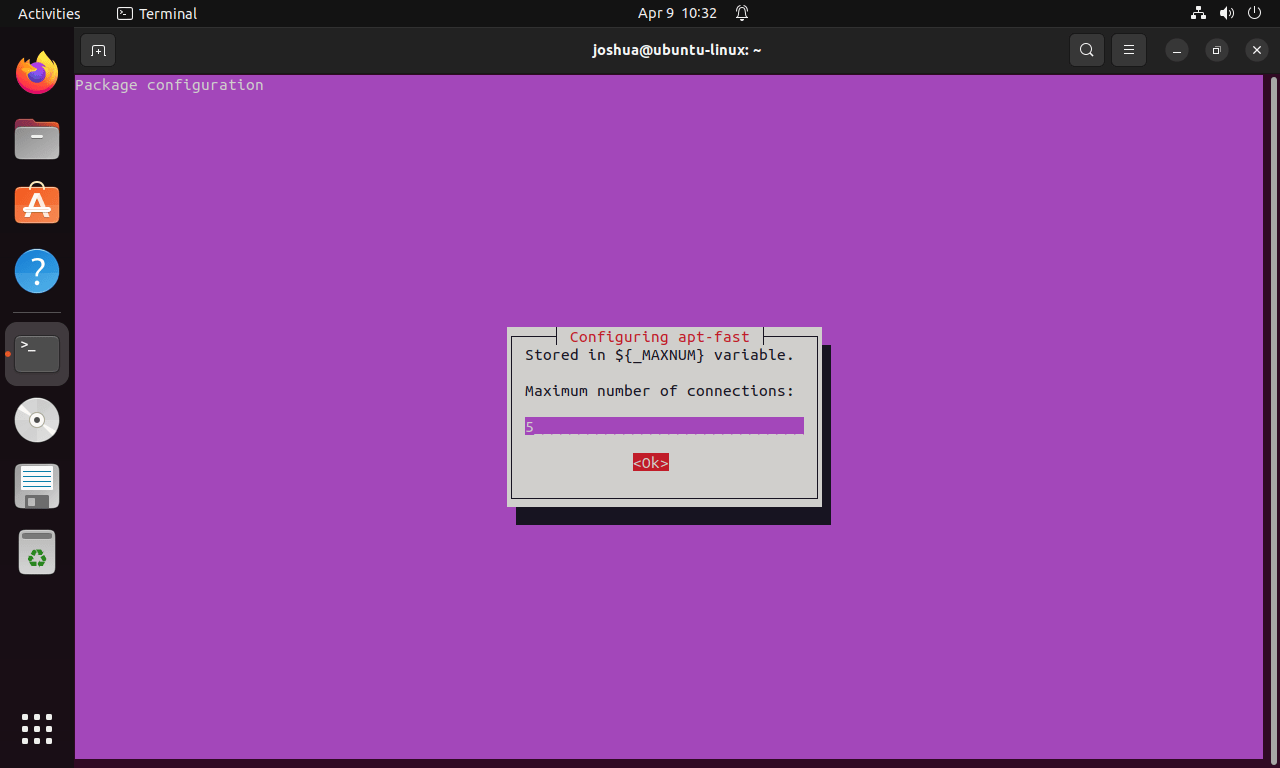
Set APT-Fast Connection Counts on Ubuntu
The default of five parallel connections is safe on almost every link. If you regularly download large package sets on a faster connection, raising that value to 10 or 16 usually helps more than jumping straight to 20.
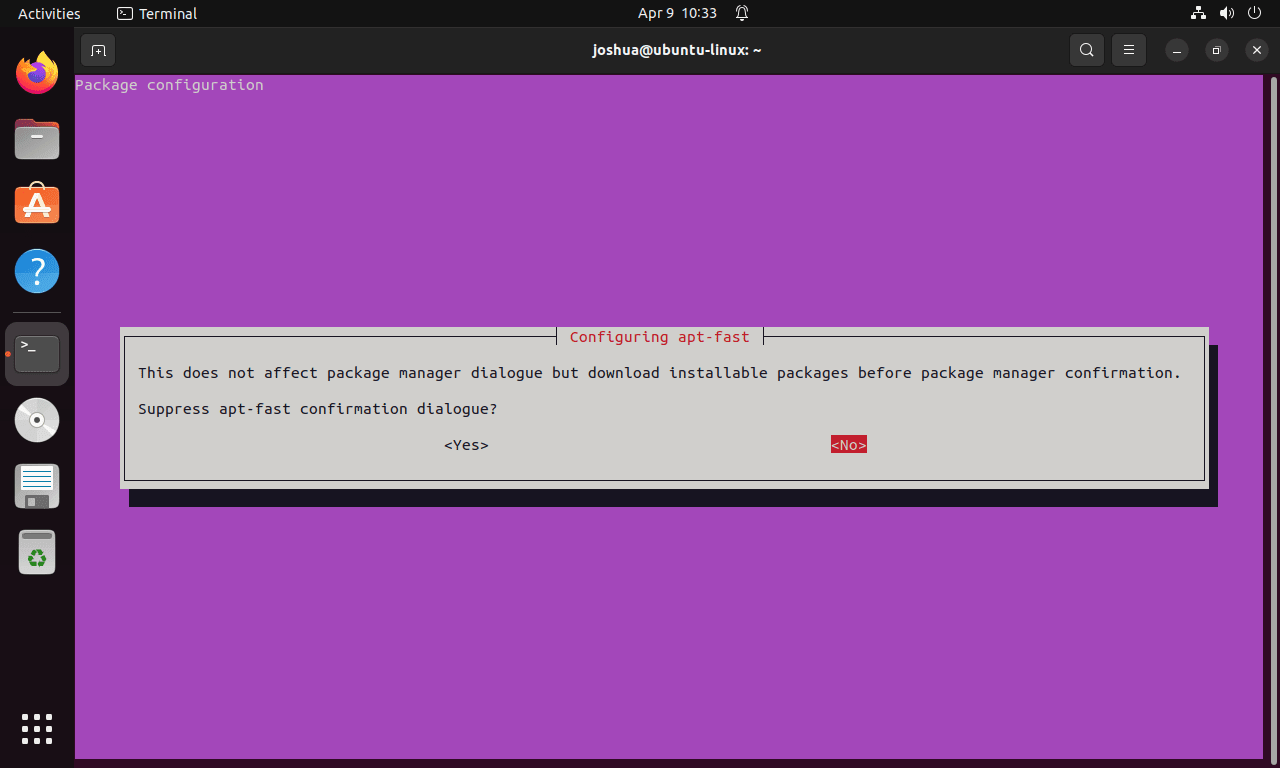
Choose APT-Fast Download Confirmation on Ubuntu
The last prompt controls whether APT-Fast asks for its own download confirmation before it starts pulling packages. Enabling that option sets DOWNLOADBEFORE in the config file, which skips the wrapper prompt but does not remove APT’s own install confirmation unless you also use -y.
Verify APT-Fast on Ubuntu
An installed-state check is clearer than apt-fast --version. APT-Fast 1.11.1 passes the version flag through to the underlying apt binary, so it does not tell you which apt-fast package revision is installed.
dpkg-query -W -f='${db:Status-Abbrev} ${binary:Package} ${Version}\n' apt-fast | grep '^ii'
command -v apt-fast
ii apt-fast 1.11.1-1~ubuntu26.04.1 /usr/bin/apt-fast
Ubuntu 24.04 and 22.04 report the same installed status and binary path, with the version suffix changing to match the release.
Configure APT-Fast on Ubuntu
The packaged install keeps everything in /etc/apt-fast.conf. There is no persistent /etc/apt-fast.list file in the packaged install, so mirror and downloader changes belong in the main config file.
Open the APT-Fast Configuration File on Ubuntu
Open the config in your preferred terminal editor. Nano is the simplest choice if you only need to adjust a few values.
sudo nano /etc/apt-fast.conf_APTMGR=apt-get
DOWNLOADBEFORE=
#MIRRORS=( 'none' )
_MAXNUM=5
_MAXCONPERSRV=10
_SPLITCON=8
_MINSPLITSZ=1M
_PIECEALGO=default
DLLIST='/tmp/apt-fast.list'
_DOWNLOADER='aria2c --no-conf -c -j ${_MAXNUM} -x ${_MAXCONPERSRV} -s ${_SPLITCON} --min-split-size=${_MINSPLITSZ} --stream-piece-selector=${_PIECEALGO} -i ${DLLIST} --connect-timeout=600 --timeout=600 -m0 --header "Accept: */*"'
The DLLIST line points to a temporary download list in /tmp, which is why the package does not ship a persistent mirror-list file under /etc.
Tune APT-Fast Connection Settings on Ubuntu
Increase the connection counts only when your mirror and internet link can keep up. A moderate jump usually helps more than aggressive values that overwhelm slower mirrors.
_MAXNUM=10
_MAXCONPERSRV=10
_SPLITCON=8
_MAXNUM controls total parallel connections, _MAXCONPERSRV limits how many hit one mirror at once, and _SPLITCON decides how many pieces a single file can be split into.
Choose aria2 or axel for APT-Fast on Ubuntu
APT-Fast installs with aria2 by default, and that remains the better choice for most Ubuntu systems. If you want the lighter axel downloader instead, install it first, then replace the downloader line in /etc/apt-fast.conf.
The optional
axelpackage comes from Ubuntu’s Universe component. If APT cannot find it, enable Universe and Multiverse on Ubuntu before switching away from aria2.
sudo apt install axel_DOWNLOADER='grep -E "^https?://" "${DLLIST}" | cut -f1 | xargs -n 1 -P ${_MAXNUM} axel -a -n ${_MAXCONPERSRV}'If you only want faster downloads and do not care which helper provides them, keep aria2. It is already installed as a dependency and matches the packaged default configuration.
Add Archive Mirrors to APT-Fast on Ubuntu
Mirror changes also live in /etc/apt-fast.conf, not in a separate list file. Add the base archive URLs you want APT-Fast to rotate through inside the MIRRORS=() array.
MIRRORS=( 'http://archive.ubuntu.com/ubuntu,http://us.archive.ubuntu.com/ubuntu' )Each quoted entry groups one set of equivalent Ubuntu archive URLs. Use the Ubuntu mirror list to pick closer mirrors for your region, then keep those URLs in the same comma-separated entry.
Use APT-Fast on Ubuntu
APT-Fast does not replace APT’s resolver or package database. It only speeds the download phase, so the normal APT workflow and flags still matter when you update packages, upgrade the system, or install software in batches. For the base package-management workflow, see how to update packages via the Ubuntu command line.
Run Common APT-Fast Commands on Ubuntu
| Task | Command | Notes |
|---|---|---|
| Refresh package metadata | sudo apt-fast update | Downloads repository metadata, then hands control back to APT. |
| Upgrade installed packages | sudo apt-fast upgrade | Useful when many packages need to be downloaded. |
| Handle dependency changes | sudo apt-fast full-upgrade | Use this when an in-release upgrade needs package additions or removals. |
| Install a package | sudo apt-fast install package-name | Speeds the download step for new installs. |
| Upgrade one package only | sudo apt-fast install --only-upgrade package-name | Keeps the change focused on one installed package. |
Know When Standard APT Is Better on Ubuntu
- Single small packages: The wrapper overhead is harder to justify when only one tiny package is being fetched.
- Troubleshooting: Standard
aptoutput is usually easier to read when you are fixing broken dependencies or stale package lists. - Automation: Ubuntu’s unattended security-upgrade workflow still centers on standard APT, so configure unattended upgrades on Ubuntu when automatic patching matters more than interactive download speed.
- Unstable mirrors: Parallel downloads help most when the mirror is already responsive. If mirrors are slow or inconsistent, standard APT can be the calmer choice.
Troubleshoot APT-Fast on Ubuntu
Most APT-Fast problems come from missing repository helpers, stale downloads, or a slow mirror selection. Start with the simplest check that matches the error you actually saw.
Fix missing add-apt-repository on Ubuntu
If Ubuntu reports add-apt-repository: command not found, install the helper package and rerun the PPA command.
sudo apt install -y software-properties-commonCheck Ubuntu archive mirrors for APT-Fast
Probe the Ubuntu archive metadata directly if downloads stall or one mirror feels consistently slow. This checks the live InRelease file for your current codename instead of a generic web root.
. /etc/os-release && wget -S --spider "http://archive.ubuntu.com/ubuntu/dists/$VERSION_CODENAME/InRelease"The leading . /etc/os-release reads your release metadata, and $VERSION_CODENAME expands to resolute, noble, or jammy automatically. If you want to test a regional mirror instead, replace archive.ubuntu.com with the mirror host you want to check.
Spider mode enabled. Check if remote file exists.
HTTP request sent, awaiting response...
  HTTP/1.1 200 OK
Clear stale package downloads for APT-Fast on Ubuntu
Clear the package cache and rebuild APT metadata if you hit hash mismatches or partially downloaded archives.
sudo apt clean
sudo apt update
sudo apt-fast install package-name
This removes cached package files, refreshes repository indexes, and then retries the install with a clean download set.
Reopen APT-Fast setup prompts on Ubuntu
Run the package reconfiguration tool if you want to revisit the package-manager choice, connection count, or download confirmation setting without reinstalling the package.
sudo dpkg-reconfigure apt-fastRemove APT-Fast from Ubuntu
Removal is straightforward because the packaged install does not create user data directories under ~/.config, ~/.cache, ~/.local/share, or ~/.var/app. The cleanup job is split into package removal, repository removal, and optional helper cleanup.
Purge the APT-Fast package on Ubuntu
Purge the wrapper first so Ubuntu removes the binary and its main config file.
sudo apt purge -y apt-fastRemoving apt-fast (1.11.1-1~ubuntu26.04.1)... Purging configuration files for apt-fast (1.11.1-1~ubuntu26.04.1)...
Then verify the package itself is gone before you remove the PPA.
dpkg-query -W -f='${db:Status-Abbrev} ${binary:Package}\n' apt-fast 2>/dev/null | grep '^ii' || echo apt-fast-purgedapt-fast-purged
Remove the APT-Fast PPA on Ubuntu
Remove the PPA after the package is purged so Ubuntu stops checking that third-party source on future updates.
sudo add-apt-repository --yes --remove ppa:apt-fast/stable
sudo apt update
Removing repository. Removing entry from /etc/apt/sources.list.d/apt-fast-ubuntu-stable-resolute.sources Reading package lists...
Ubuntu 24.04 removes apt-fast-ubuntu-stable-noble.sources. Ubuntu 22.04 removes apt-fast-ubuntu-stable-jammy.list, which is the older source-file format still used on that release.
Now confirm the source entry is gone and that APT no longer sees a live package candidate.
ls /etc/apt/sources.list.d | grep apt-fast || echo ppa-removed
apt-cache policy apt-fast | sed -n '1,8p'
ppa-removed
If the command prints only ppa-removed, Ubuntu no longer has a configured source for the package.
If you clean up several third-party repositories at once, remove a PPA from Ubuntu covers the broader cleanup workflow.
Remove optional APT-Fast download helpers on Ubuntu
Remove download helpers only if you do not use them anywhere else. aria2 is installed automatically with APT-Fast, while axel is only present if you chose it later.
sudo apt autoremove --dry-runContinue only if the preview lists packages you no longer need. Then run the cleanup without forcing the answer so you can review APT’s final prompt.
sudo apt autoremoveIf you installed axel only for APT-Fast, remove it separately.
sudo apt remove axelConclusion
APT-Fast is installed on Ubuntu and ready for the larger package downloads where parallel connections save real time. If you want the rest of your package workflow to stay tidy, configure unattended upgrades on Ubuntu for automatic security patches, and remove a PPA from Ubuntu when you no longer need third-party package sources.

Formatting tips for your comment
You can use basic HTML to format your comment. Useful tags currently allowed in published comments:
<code>command</code>command<strong>bold</strong><em>italic</em><a href="https://example.com">link</a><blockquote>quote</blockquote>