
Installing KDE Plasma on Ubuntu adds a customizable desktop beside GNOME without switching distributions. Ubuntu 26.04 is the release-matched path for Plasma 6 from the default repositories, while Ubuntu 24.04 and 22.04 stay on Plasma 5 branches that match their LTS package bases.
Use Ubuntu’s default repositories for the main install, then decide whether the optional Kubuntu Updates PPA is worth enabling for early KDE point updates. The removal workflow restores GDM and GNOME first, then removes Plasma and SDDM so the system returns to the normal Ubuntu desktop after a reboot.
Install KDE Plasma on Ubuntu
Confirm your release before choosing a package set, especially if you are checking whether Ubuntu 24.04 includes Plasma 6. For a complete release check, check your Ubuntu version before continuing.
lsb_release -ds
apt-cache policy plasma-desktop| Ubuntu release | Codename | Default Plasma branch | Package note |
|---|---|---|---|
| Ubuntu 26.04 LTS | resolute | Plasma 6.6.x | The default package set provides a Plasma Wayland session. |
| Ubuntu 24.04 LTS | noble | Plasma 5.27.x | Ubuntu 24.04 does not switch to Plasma 6 through the default repositories. |
| Ubuntu 22.04 LTS | jammy | Plasma 5.24.x | The package branch is older but still matches the 22.04 LTS archive. |
The exact patch version can change after normal Ubuntu updates. Use the apt-cache policy output on your own system as the final package source and version check. If no candidate appears, enable Ubuntu’s universe component and refresh APT metadata before continuing. If Plasma 6 is the requirement, use an Ubuntu release that packages Plasma 6 instead of forcing a newer desktop stack onto Ubuntu 24.04.
Choose a KDE Package Set
KDE Plasma is available through several Ubuntu meta packages. Choose the smallest package that matches the desktop you actually want, especially on virtual machines or systems with limited disk space.
| Package | Best use | What it installs |
|---|---|---|
kde-plasma-desktop | Minimal Plasma desktop | Plasma shell, KWin, System Settings, and core session components without a full KDE app set. |
kde-standard | Recommended daily desktop | Minimal Plasma plus common KDE applications such as Dolphin, Konsole, Gwenview, Discover, and KDE PIM/runtime components on current releases. |
kde-full | Complete KDE suite | A broader KDE application set, including more games, education packages, and extra desktop utilities. |
kde-standard is the most practical choice for a normal Ubuntu desktop because it installs the applications most Plasma users expect, but it is still a large desktop profile. Use kde-plasma-desktop when you want the smallest Plasma install first. kubuntu-desktop is a separate Kubuntu-branded meta package; it is not required when adding KDE Plasma to an existing Ubuntu installation.
Check for existing KDE meta packages if the system has had another Plasma or Kubuntu desktop profile installed before:
dpkg -l | grep -E '^ii[[:space:]]+(kde-plasma-desktop|kde-standard|kde-full|kubuntu-desktop)'If the command returns an installed package, do not install a second KDE profile over it. Continue with the display manager and verification sections, or remove the old profile first if you want a different package set.
Preview the package count and disk impact before changing the system:
sudo apt install -s kde-standardReplace kde-standard with kde-plasma-desktop or kde-full if you want to compare another profile. On Ubuntu Server or a minimal install, even the minimal Plasma package pulls in a full graphical stack, login manager, fonts, portals, and desktop services.
Enable Universe and Update Ubuntu
KDE Plasma packages for Ubuntu are in the universe component. Make sure the repository component is enabled, then apply pending Ubuntu updates before installing a second desktop environment.
sudo apt update
sudo apt install software-properties-common
sudo add-apt-repository --yes universe
sudo apt update
sudo apt upgrade
Review the upgrade list before confirming. Reboot first if the upgrade includes a new kernel, graphics driver, display manager, or systemd package.
Install KDE Standard
Install the balanced KDE Plasma profile with:
sudo apt install kde-standardAPT will ask for confirmation after showing the package list and download size. During the install, Ubuntu may also ask which display manager should handle the login screen.
Install the Minimal or Full Profile
Use the minimal profile if you want Plasma without extra KDE applications:
sudo apt install kde-plasma-desktopUse the full profile only when you want the complete KDE suite and have enough disk space for a much larger install:
sudo apt install kde-fullConfigure the SDDM Login Manager
KDE Plasma normally uses SDDM as its display manager. GDM3 can show Plasma sessions too, but SDDM is the better match for a Plasma-first login screen and is the choice Ubuntu prompts for during installation. In the terminal dialog, use the arrow keys or Tab to select the display manager, then press Enter.
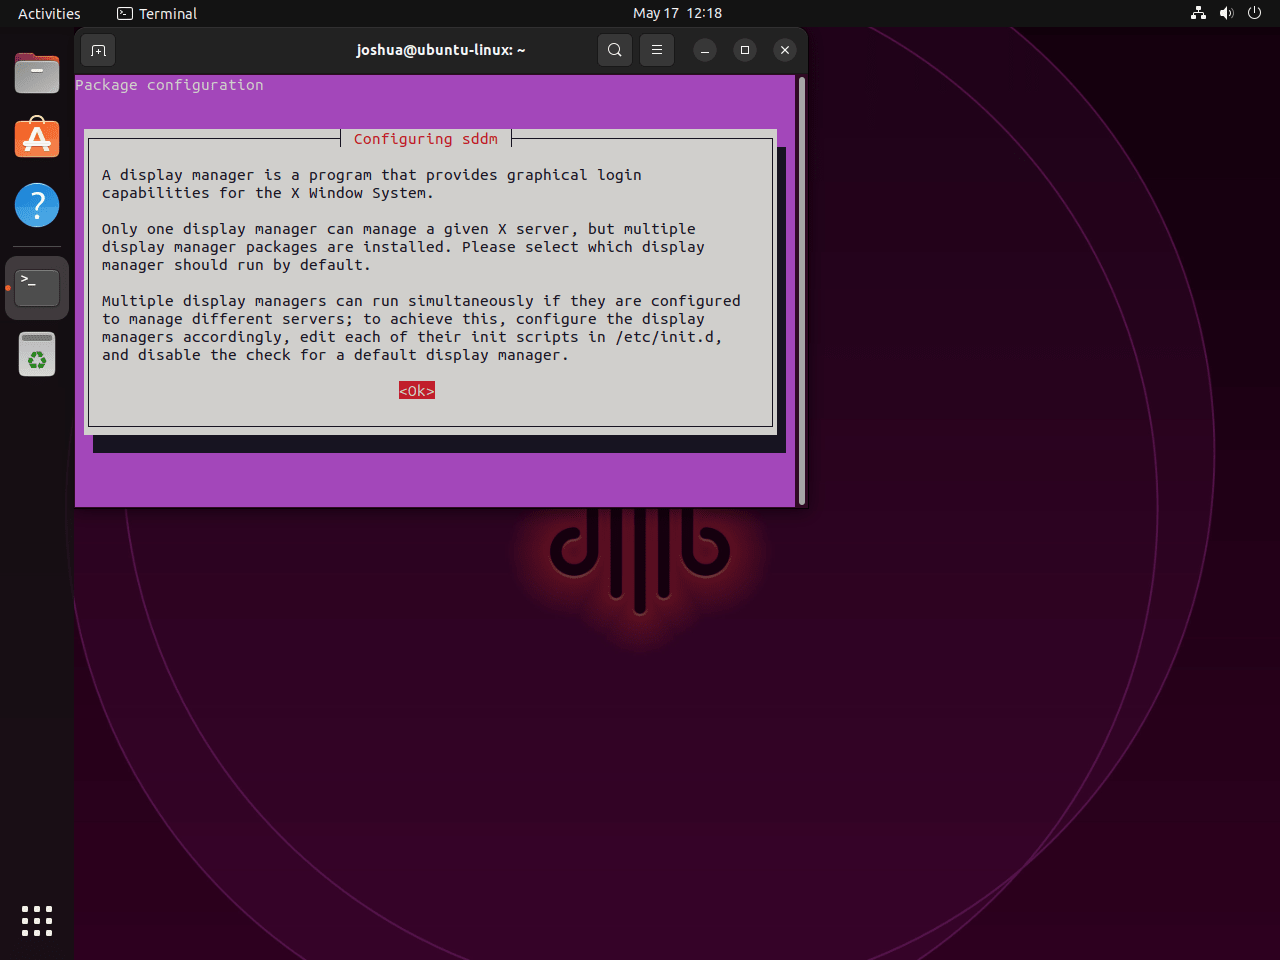
If you kept GDM3 during installation or need to switch later, reconfigure SDDM and select it in the prompt:
sudo dpkg-reconfigure sddmVerify the selected display manager:
cat /etc/X11/default-display-managerAn SDDM-based setup shows:
/usr/bin/sddm
Fix SDDM Virtual Keyboard Input
Some virtual machines show SDDM’s on-screen keyboard or fail to pass keyboard input cleanly at the login screen. Disable the virtual keyboard input method with a small SDDM configuration file:
sudo install -d /etc/sddm.conf.d
printf '%s\n' '[General]' 'InputMethod=' | sudo tee /etc/sddm.conf.d/virtualkbd.conf
Physical desktop and laptop installs usually do not need this file. It is harmless to keep if the login screen works normally.
Reboot and Start Plasma
Reboot after the package install and display manager selection finish:
sudo rebootAt the login screen, open the session menu before signing in. Depending on the Ubuntu release and installed session packages, the menu can show entries such as Plasma, Plasma (Wayland), or Plasma (X11). Ubuntu 26.04’s default Plasma package set uses the Wayland session path by default.
On Ubuntu Server or a minimal install, make sure the system boots to the graphical target:
sudo systemctl set-default graphical.target
sudo reboot
Verify KDE Plasma
After signing into Plasma, open Konsole and check the running Plasma shell version:
plasmashell --versionTypical default repository output on Ubuntu 26.04 is:
plasmashell 6.6.4
Typical default repository output on Ubuntu 24.04 is:
plasmashell 5.27.12
Typical default repository output on Ubuntu 22.04 is:
plasmashell 5.24.7
For a package-level check from a terminal or SSH session, verify the installed package and available session files:
dpkg-query -W plasma-desktop sddm
find /usr/share/xsessions /usr/share/wayland-sessions -maxdepth 1 -name '*plasma*.desktop' -print 2>/dev/null
Optional Kubuntu Updates PPA
The Kubuntu Updates PPA publishes early KDE point updates that may later move into Ubuntu’s regular update pockets. It is useful for testing or receiving selected KDE bugfixes sooner, but it normally stays within the Plasma branch shipped by your Ubuntu release. For example, Ubuntu 24.04 remains on Plasma 5.27 rather than moving to Plasma 6 through this PPA.
Check the candidate version before upgrading. A PPA series can exist for your Ubuntu release without offering a newer
plasma-desktopcandidate than Ubuntu’s own-updatespocket. If the policy output does not show a Kubuntu Updates PPA candidate forplasma-desktop, adding the PPA will not upgrade Plasma.
Install the repository helper if your system does not already have it:
sudo apt install software-properties-commonAdd the PPA and refresh package metadata:
sudo add-apt-repository ppa:kubuntu-ppa/ppa
sudo apt update
Compare the PPA candidate against the archive candidate:
apt-cache policy plasma-desktopIf the candidate version is the one you want, apply available upgrades:
sudo apt upgradeUse ppa-purge when you want to remove the PPA and downgrade any packages that came from it back to Ubuntu archive versions:
sudo apt install ppa-purge
sudo ppa-purge ppa:kubuntu-ppa/ppa
If you only added the PPA and did not install or upgrade packages from it, remove the source entry directly. For a broader cleanup workflow, see how to remove a PPA from Ubuntu.
sudo add-apt-repository --remove ppa:kubuntu-ppa/ppa
sudo apt update
Update KDE Plasma Packages
KDE Plasma packages installed from Ubuntu repositories update through APT with the rest of the system:
sudo apt update
sudo apt upgrade
Reboot after graphics stack, display manager, systemd, Qt, KDE Frameworks, or Plasma workspace upgrades. A fresh session avoids mixed old and new desktop components.
Troubleshoot KDE Plasma on Ubuntu
Plasma Session Is Missing
If the login screen does not show Plasma, check whether the session file exists:
find /usr/share/xsessions /usr/share/wayland-sessions -maxdepth 1 -name '*plasma*.desktop' -print 2>/dev/nullReinstall the core package if no Plasma session file appears:
sudo apt install --reinstall plasma-desktopSDDM Is Not the Active Login Manager
Install SDDM if needed, then select it as the display manager:
sudo apt install sddm
sudo dpkg-reconfigure sddm
cat /etc/X11/default-display-manager
The verification command should show /usr/bin/sddm. If it still shows /usr/sbin/gdm3, rerun the reconfigure step and choose SDDM in the dialog.
Black Screen After Plasma Login
Move the most common user-level Plasma and KWin configuration files out of the way, then sign in again:
mkdir -p ~/plasma-config-backup
[ -f ~/.config/plasma-org.kde.plasma.desktop-appletsrc ] && mv ~/.config/plasma-org.kde.plasma.desktop-appletsrc ~/plasma-config-backup/
[ -f ~/.config/kwinrc ] && mv ~/.config/kwinrc ~/plasma-config-backup/
Systems using proprietary NVIDIA drivers can also fail at the desktop handoff if the driver stack is incomplete or Nouveau is still active. Review the steps for installing NVIDIA drivers on Ubuntu if the issue follows a GPU driver change.
Keyboard Input Fails at SDDM
If typed input does not reach the SDDM password field, apply the virtual keyboard configuration and restart the display manager from a TTY or SSH session. Restarting SDDM ends active graphical sessions, so reboot instead if you are already signed into a desktop:
sudo install -d /etc/sddm.conf.d
printf '%s\n' '[General]' 'InputMethod=' | sudo tee /etc/sddm.conf.d/virtualkbd.conf
sudo systemctl restart sddm
Remove KDE Plasma and Restore GNOME
Desktop removal can affect shared packages. Read each APT prompt before confirming, keep backups of personal files, and avoid automatic
-yconfirmations during this workflow.
Restore the Ubuntu GNOME package set and GDM before removing Plasma. This works whether ubuntu-desktop was already installed or missing from a minimal installation.
sudo apt update
sudo apt install ubuntu-desktop gdm3
sudo dpkg-reconfigure gdm3
A reload warning can appear if SDDM is still running while GDM is selected. Confirm the selected display manager before removing Plasma:
cat /etc/X11/default-display-managerA restored GNOME login path shows:
/usr/sbin/gdm3
If your account keeps reopening Plasma after GDM is restored, set the saved session back to Ubuntu from the login screen. From a terminal, the same AccountsService setting can be adjusted with:
account_file="/var/lib/AccountsService/users/$USER"
sudo install -d /var/lib/AccountsService/users
if ! sudo test -f "$account_file"; then
    printf '%s\n' '[User]' 'Session=ubuntu' | sudo tee "$account_file"
elif sudo grep -q '^Session=' "$account_file"; then
    sudo sed -i 's/^Session=.*/Session=ubuntu/' "$account_file"
elif sudo grep -q '^\[User\]' "$account_file"; then
    sudo sed -i '/^\[User\]/a Session=ubuntu' "$account_file"
else
    printf '%s\n' '[User]' 'Session=ubuntu' | sudo tee -a "$account_file"
fi
Remove the Kubuntu Updates PPA first if it was used. ppa-purge downgrades PPA packages to Ubuntu archive versions before the Plasma packages are removed.
sudo apt install ppa-purge
sudo ppa-purge ppa:kubuntu-ppa/ppa
Purge the KDE meta packages, Plasma desktop package, Kubuntu desktop meta package if present, and SDDM:
sudo apt purge kde-standard kde-plasma-desktop kde-full plasma-desktop kubuntu-desktop sddmClean up orphaned dependencies, but inspect the list before confirming. APT can include unrelated autoremovable packages such as older kernels or tools that were not installed by KDE.
sudo apt autoremove --purgeCheck for remaining KDE, Plasma, SDDM, and common KDE application packages:
dpkg -l | grep -E '^ii[[:space:]]+(kde|plasma|sddm|akonadi|baloo|dolphin|konsole|kate|okular|gwenview|ark|kmail|korganizer|kaddressbook)'For a complete KDE desktop cleanup, print the remaining package names, review them, then let APT show the final removal plan before confirming:
leftovers=$(dpkg -l | awk '$1=="ii" && $2 ~ /^(kde|plasma|sddm|akonadi|baloo|dolphin|konsole|kate|okular|gwenview|ark|kmail|korganizer|kaddressbook)/ {print $2}')
printf '%s\n' "$leftovers"
if [ -n "$leftovers" ]; then
    sudo apt purge $leftovers
    sudo apt autoremove --purge
fi
Remove user-level Plasma configuration only if you do not want to keep panel layouts, widgets, KWin rules, or KDE application settings for a future reinstall:
find ~/.config ~/.local/share -maxdepth 1 \( -iname '*kde*' -o -iname '*plasma*' -o -iname '*kwin*' \) -print
rm -rf -- ~/.config/kde* ~/.config/plasma* ~/.config/kwin* ~/.local/share/kded* ~/.local/share/plasma*
Reboot after package and configuration cleanup:
sudo rebootAfter signing into Ubuntu, verify GDM and GNOME are active:
cat /etc/X11/default-display-manager
pgrep -a gnome-shell
A restored Ubuntu desktop shows /usr/sbin/gdm3 and a running gnome-shell process after login. Some releases include --mode=ubuntu in the command line. The leftover package check should return no output after a complete Plasma cleanup.
Official KDE Resources
Use the upstream KDE and Kubuntu resources for release notes, Plasma documentation, community information, and PPA status:
- KDE Plasma Desktop – Official Plasma homepage with feature highlights and release information.
- KDE Community Wiki – Development resources, packaging notes, and community documentation.
- KDE UserBase Plasma Documentation – User-focused Plasma configuration and desktop documentation.
- Kubuntu Updates PPA – Launchpad page for supported Ubuntu series and published KDE update packages.
Conclusion
KDE Plasma can run beside GNOME on Ubuntu when you choose the right meta package, set the display manager deliberately, and verify the active session after reboot. Use the default repositories for the stable release-matched desktop, add the Kubuntu Updates PPA only when its candidate packages make sense, and keep the GNOME restoration steps available before removing Plasma. If Plasma feels too heavy for your hardware, consider installing XFCE on Ubuntu instead.

Formatting tips for your comment
You can use basic HTML to format your comment. Useful tags currently allowed in published comments:
<code>command</code>command<strong>bold</strong><em>italic</em><a href="https://example.com">link</a><blockquote>quote</blockquote>