
Encrypted chats are easier to manage from a full keyboard, especially once Signal Desktop is linked to the phone you already use every day. To install Signal on Ubuntu, use Signal’s official APT repository for the vendor-managed desktop package, or choose Flathub or Snapcraft when those package formats match the way you already manage GUI apps.
Signal’s Linux download page targets 64-bit Debian-based distributions, and the official repository works on Ubuntu 26.04, 24.04, and 22.04 on amd64 systems. First launch still requires Signal on Android or iOS so you can scan the QR code and link the desktop client to your phone.
Install Signal Desktop on Ubuntu
Three working installation methods are worth considering on Ubuntu, and each one targets a different update and packaging workflow.
| Method | Source | Channel | Updates | Best Fit |
|---|---|---|---|---|
| Official APT repository | Signal Linux download page | Official amd64 APT repository | apt | Most Ubuntu users who want Signal’s vendor package |
| Flatpak | Flathub | Community-maintained Flathub build | flatpak update | Users already managing desktop apps through Flathub |
| Snap | Snapcraft | Snapcrafters community build | snap refresh | Users already standardizing on snaps |
The official Signal APT repository works on Ubuntu 26.04, 24.04, and 22.04 on amd64 systems. Signal still publishes that Debian-family source under the
xenialsuite name, and that is expected; do not replace it with your Ubuntu codename.
- Use the official APT repository if you want Signal’s vendor package and the standard
signal-desktoplauncher in your PATH. - Use Flatpak if you want Signal managed outside APT and you already manage other desktop apps through Flathub.
- Use Snap only if you already prefer snap-based desktop apps and you are comfortable with a community-maintained package.
The package name for the graphical desktop client is signal-desktop. This guide does not install the separate signal-cli command-line client.
Install Signal Desktop through one method only. The APT package and Snap both provide a
signal-desktoplauncher, while Flatpak adds its own desktop entry. Keeping multiple package formats installed at the same time makes updates, launchers, and troubleshooting harder than they need to be.
Install Signal Desktop from the Official Signal APT Repository
Signal’s own repository is the preferred Ubuntu option for the GUI client. It uses a vendor DEB822 source and APT-managed updates instead of an Ubuntu PPA or a standalone .deb download.
Refresh your package lists first so APT starts from current Ubuntu metadata.
sudo apt update && sudo apt upgrade -yThese commands use
sudofor tasks that need root privileges. If your account is not in the sudoers file yet, follow the guide to add a new user to sudoers on Ubuntu before continuing.
Standard Ubuntu desktops often already include the signing tools, but minimal and customized installs may not include curl. Install the small prerequisite set now so the download and key conversion commands work unchanged. If you need a quick primer on the transfer flags used here, see our curl command guide.
sudo apt install curl gnupg -yThe next two commands import Signal’s signing key and download the prebuilt DEB822 source file that Signal now publishes for Debian-based Linux systems.
curl -fsSL https://updates.signal.org/desktop/apt/keys.asc | sudo gpg --dearmor --yes -o /usr/share/keyrings/signal-desktop-keyring.gpgsudo curl -fsSLo /etc/apt/sources.list.d/signal-desktop.sources https://updates.signal.org/static/desktop/apt/signal-desktop.sourcesThe downloaded
signal-desktop.sourcesfile already includes the correct keyring path and the expectedxenialsuite entry, so there is no reason to hand-write a separate source file.
Refresh APT again so Ubuntu picks up the new Signal source.
sudo apt updateRelevant output includes Signal repository fetch lines like these.
Get: https://updates.signal.org/desktop/apt xenial InRelease
Get: https://updates.signal.org/desktop/apt xenial/main amd64 Packages
Now confirm that APT sees a Signal Desktop package candidate from Signal’s repository.
apt-cache policy signal-desktopYou should see the Signal package candidate and the repository URL in the version table.
signal-desktop:
  Installed: (none)
  Candidate: 8.x.x
  Version table:
     8.x.x 500
        500 https://updates.signal.org/desktop/apt xenial/main amd64 Packages
Install Signal Desktop once the package candidate looks correct.
sudo apt install signal-desktop -yThe package installs Signal under /opt/Signal and registers /usr/bin/signal-desktop through update-alternatives. Use dpkg-query to confirm the installed version without trying to open the GUI from a headless shell.
dpkg-query -W signal-desktopRelevant output includes:
signal-desktop 8.x.x
Install Signal Desktop from Flathub with Flatpak
Flatpak keeps Signal separate from APT and is a good fit if you already use Flathub for desktop apps. The current Flathub package is community maintained, unverified on Flathub, and uses broad desktop permissions such as network, audio, Wayland/X11, and device access for calls and normal desktop integration.
Flatpak is not pre-installed on Ubuntu. Install it with
sudo apt install flatpakand restart your session before continuing. On stripped-down systems,flatpakcomes from Ubuntu’suniversecomponent, so you may need Universe enabled first. For the full setup flow, use our guide to install Flatpak on Ubuntu.
Add Flathub as a system remote if it is not already configured.
sudo flatpak remote-add --if-not-exists flathub https://dl.flathub.org/repo/flathub.flatpakrepoVerify that Flathub is available at system scope before installing the app.
flatpak remotesExpected output:
flathub system
Install Signal Desktop from Flathub once the remote is ready. Do not add permission overrides for a standard install unless you have a specific local policy to enforce.
sudo flatpak install flathub org.signal.Signal -yVerify the installed app metadata with flatpak info.
flatpak info org.signal.SignalRelevant output includes stable metadata fields like these:
Signal Desktop - Private messenger

          ID: org.signal.Signal
         Ref: app/org.signal.Signal/x86_64/stable
        Arch: x86_64
      Branch: stable
     Version: 8.x.x
      Origin: flathub
Installation: system
Install Signal Desktop from Snapcraft
Snap is a convenience alternative if you already use snapd on Ubuntu and want Signal updated through the same snap workflow as your other apps.
The Snap package is maintained by Snapcrafters, not by Signal Foundation. Check the Snapcraft channel before choosing it when release freshness matters, because the community snap can trail Signal’s own repository.
Ubuntu desktop installs usually have snapd, but minimal and customized images may need it first.
sudo apt install snapd -yCheck the current Snapcraft listing before installing so you can confirm the publisher and stable channel.
snap info signal-desktopRelevant output includes:
name:      signal-desktop
publisher: Snapcrafters*
channels:
  latest/stable: 8.x.x
Install the Signal Desktop snap from Snapcraft.
sudo snap install signal-desktopUse snap list to confirm the installed revision and publisher.
snap list signal-desktopRelevant output includes:
Name            Version  Rev  Tracking       Publisher      Notes
signal-desktop  8.x.x    REV  latest/stable  snapcrafters*  -
Launch Signal Desktop on Ubuntu
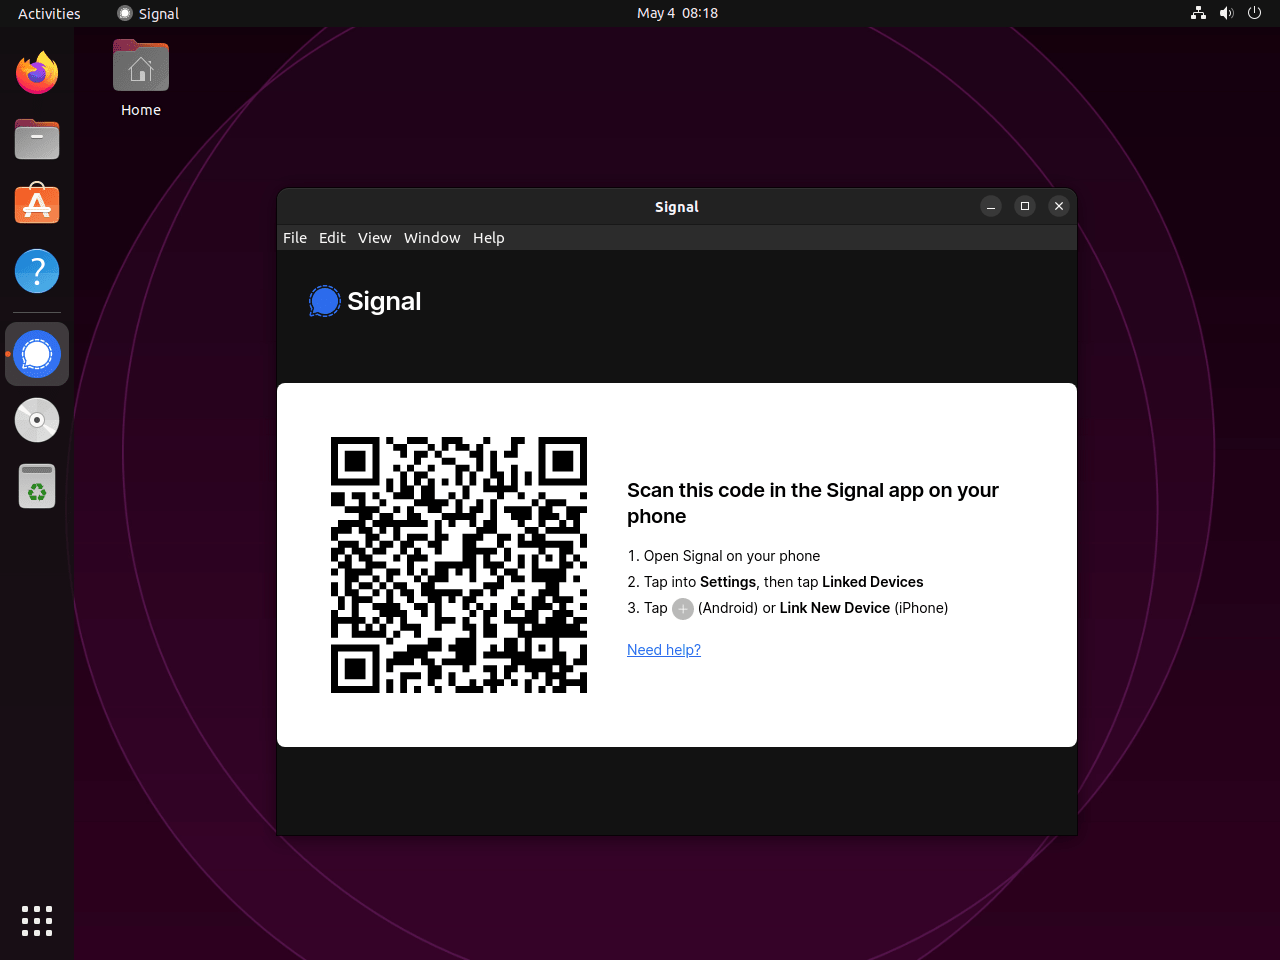
Signal Desktop installs from the terminal, but it still needs an active graphical session to open. If you try to launch it over plain SSH, you will see a missing X server or $DISPLAY error instead of the QR-code linking screen.
Open Signal Desktop from the Applications Menu
Search for Signal in Activities or your desktop app launcher and start it like any other Ubuntu application. First launch shows the QR code you scan from the Signal app on your phone.
Launch Signal Desktop from a Terminal Session
Use the command that matches the package format you installed. Run these inside your Ubuntu desktop session, not from a headless SSH shell.
Official APT repository:
signal-desktopFlatpak:
flatpak run org.signal.SignalSnap:
snap run signal-desktopUpdate or Remove Signal Desktop on Ubuntu
Update Signal Desktop
Keep the update command aligned with the package format you chose for the install.
Official APT repository:
sudo apt update && sudo apt install --only-upgrade signal-desktop -yFlatpak:
sudo flatpak update org.signal.Signal -ySnap:
sudo snap refresh signal-desktopRemove Signal Desktop
Use the removal path that matches the method you originally installed.
Remove the Official APT Installation
Remove the package first, then delete the Signal repository file and key only if you added Signal’s official APT source.
sudo apt remove signal-desktopIf you want to review orphaned dependencies afterward, run a dry-run cleanup and continue only if the package list is safe for your system.
sudo apt autoremove --dry-runIf the dry run only lists packages you intend to remove, run the cleanup without --dry-run.
sudo apt autoremoveIf you used the official Signal repository, remove its source file and key and refresh APT afterward. Skip this source cleanup if you also installed signal-desktop-beta or another Signal package that still depends on the same repository.
sudo rm -f /etc/apt/sources.list.d/signal-desktop.sources /usr/share/keyrings/signal-desktop-keyring.gpg
sudo apt update
Confirm that the package is gone and that the removed repository no longer provides a candidate.
dpkg -l signal-desktop | grep '^ii' || echo "not installed"
apt-cache policy signal-desktop
Relevant output includes:
not installed
signal-desktop:
  Installed: (none)
  Candidate: (none)
  Version table:
     8.x.x -1
        100 /var/lib/dpkg/status
Remove the Flatpak Installation
Remove the app first. Keep unused runtime cleanup separate so Flatpak can show what else would be removed before you confirm.
sudo flatpak remove org.signal.SignalAfter the app is gone, run unused-runtime cleanup only if you want Flatpak to review shared runtimes and extensions that no installed app still needs.
sudo flatpak uninstall --unusedVerify that the Flatpak app reference is gone.
flatpak list --app --columns=application | grep -Fx org.signal.Signal || echo "NOT_INSTALLED"Expected output:
NOT_INSTALLED
Remove the Snap Installation
Remove the snap package, then review any automatic snapshot only if you want a full reset.
sudo snap remove signal-desktopSnap can save an automatic snapshot during removal. List saved snapshots, then forget only the Signal snapshot set if you want to delete that saved state too.
sudo snap saved | grep signal-desktop || echo "no Signal snapshot"Use the Set value from the Signal row only if you want to remove that recovery snapshot.
sudo snap forget <ID>Verify that the snap package is gone.
snap list signal-desktop 2>/dev/null || echo "not installed"Expected output:
not installed
Delete Local Signal Data if You Are Relinking or Starting Over
If you only want to unlink this desktop client, Signal’s unlinking steps use File > Settings > Privacy > Delete Data on Linux, or the Linked devices screen on your phone. That removes the desktop link while keeping your mobile Signal account registered.
The next commands permanently delete local Signal message history and app settings stored on this Ubuntu account. Export anything you want to keep before removing these directories.
Check which Signal data directories actually exist before deleting anything. If this command prints nothing, there is no remaining Signal data directory under your home folder for that package format.
find "$HOME" -maxdepth 3 \( -path "$HOME/.config/Signal" -o -path "$HOME/.var/app/org.signal.Signal" -o -path "$HOME/snap/signal-desktop" \) -print 2>/dev/nullDelete only the directories that the check above actually prints.
Official APT repository:
rm -rf ~/.config/SignalFlatpak:
rm -rf ~/.var/app/org.signal.SignalSnap:
rm -rf ~/snap/signal-desktopTroubleshoot Signal Desktop on Ubuntu
Ubuntu Cannot Find the signal-desktop Package
If APT returns the error below, Signal’s repository is missing or you have not refreshed package metadata after adding it.
E: Unable to locate package signal-desktop
Check whether Ubuntu can see the Signal source file and keyring.
test -s /etc/apt/sources.list.d/signal-desktop.sources || echo "source file missing"
test -s /usr/share/keyrings/signal-desktop-keyring.gpg || echo "keyring missing"
If either file is missing, install the small prerequisite set, restore the official key and source file, then refresh APT again.
sudo apt install curl gnupg -yRecreate the Signal keyring and DEB822 source file.
curl -fsSL https://updates.signal.org/desktop/apt/keys.asc | sudo gpg --dearmor --yes -o /usr/share/keyrings/signal-desktop-keyring.gpg
sudo curl -fsSLo /etc/apt/sources.list.d/signal-desktop.sources https://updates.signal.org/static/desktop/apt/signal-desktop.sources
sudo apt update
Confirm that the package candidate is now visible.
apt-cache policy signal-desktopApt Update Reports a Signed-By Conflict for the Signal Repository
This error appears when the old Extrepo source file and the manual Signal source file both point to the same repository.
E: Conflicting values set for option Signed-By regarding source https://updates.signal.org/desktop/apt/ xenial: /var/lib/extrepo/keys/signal.asc != /usr/share/keyrings/signal-desktop-keyring.gpg
E: The list of sources could not be read.
List the Signal-related source files so you can see whether both methods are enabled at the same time.
ls /etc/apt/sources.list.d | grep -i signalRelevant output includes:
extrepo_signal.sources
signal-desktop.sources
Keep one method only, remove the source file you are not using, and refresh APT again. If you followed the official repository method in this article, remove the Extrepo source file.
sudo rm -f /etc/apt/sources.list.d/extrepo_signal.sources
sudo apt update
Conclusion
Signal Desktop is installed on Ubuntu through Signal’s official APT repository, Flathub, or the Snap package, and the final setup step is linking it to your phone from the QR screen. If you plan to manage more desktop apps through Flathub, install Flatpak on Ubuntu next. When you want a cleaner package cleanup workflow later, review how to remove packages on Ubuntu from the command line.

Formatting tips for your comment
You can use basic HTML to format your comment. Useful tags currently allowed in published comments:
<code>command</code>command<strong>bold</strong><em>italic</em><a href="https://example.com">link</a><blockquote>quote</blockquote>