
Blender is a leading open-source 3D creation suite offering various modeling, animation, rendering, and more features. Whether you’re using Linux Mint 21 or the older stable release of Linux Mint 20, installing Blender can significantly enhance your creative capabilities.
Key Features of Blender for Linux Mint Users
- Comprehensive Toolset: Blender is a one-stop shop for all things 3D, from modeling and animation to rendering and compositing. This eliminates the need for multiple specialized software.
- Rendering Flexibility: With support for both real-time (Eevee) and high-end production (Cycles) render engines, Blender offers artists a versatile platform for their projects.
- VR Support: Blender includes VR rendering capabilities, allowing for immersive scene inspection.
- Customization and Scripting: The software’s open architecture allows extensive customization, and Python scripting is available for automation and testing.
- Community-Driven: Being open-source, Blender benefits from a global community that contributes to its development, ensuring it stays up-to-date and feature-rich.
Given Blender’s robust features and flexibility, it’s no wonder the software is a popular choice among Linux Mint users. This guide will provide concise, step-by-step instructions on how to install Blender on Linux Mint 21 or Linux Mint 20. Whether you prefer using APT or Flatpak, this guide covers you for a smooth installation process.
Install Blender via APT on Linux Mint 21 or 20
Step 1: System Update Before Blender Installation on Ubuntu
Commence by refreshing the package database and upgrading your Linux Mint system. This critical first step ensures that all existing software on your system is current, preventing potential compatibility issues during the forthcoming installation process. Execute the command below to initiate this process:
sudo apt update && sudo apt upgradeStep 2: Install Blender via APT Command on Linux Mint
Your initial option involves leveraging the APT package manager with the default repository of Linux Mint, which houses Blender. This method is inherently uncomplicated and swift. However, one should note that the Blender version offered in the default repository may not always be the most recent. This latency occurs as updates are primarily geared toward resolving urgent security concerns. To incorporate Blender using this technique, implement the command stated below:
sudo apt install blenderFor those seeking an alternative method for a much up-to-date version, check out section 2.
Install Blender via Flatpak and Flathub on Linux Mint 21 or 20
In this secondary installation method section, we shall elucidate an alternative method of introducing Blender into your Linux Mint environment using Flatpak. Flatpak is a universal packaging standard for Linux software, akin to Snap. It brings many benefits, such as simplified distribution, sandboxing for enhanced security, and the capability to operate multiple versions of a single application concurrently.
Step 1: Enable Flathub for Blender on Linux Mint
Before introducing Blender through Flatpak, you must enable the Flathub repository. Flathub serves as the central hub for obtaining Flatpak applications. To enable Flathub, execute the command mentioned below in your terminal:
sudo flatpak remote-add --if-not-exists flathub https://flathub.org/repo/flathub.flatpakrepoThis command appends the Flathub repository to your Flatpak configuration. This ensures you have access to various applications, including Blender.
Step 2: Install Blender via Flatpak on Linux Mint
With Flathub now an active part of your Flatpak environment, you are equipped to install Blender using the flatpak install command. Input the following command in your terminal:
flatpak install flathub org.blender.Blender -yThis command retrieves and installs Blender directly from the Flathub repository, providing you with the most current version of the application.
Initializing Blender on Linux Mint 21 or 20
Now that we have Blender successfully installed on your Linux Mint system, you can initiate the application in various ways. This section will present diverse techniques to start Blender, ensuring you can access the application quickly and conveniently.
Step 1: Initiating Blender via Terminal on Linux Mint
If you want to start Blender directly from the terminal, input the following command:
blenderFor those who have installed Blender using Flatpak, you’ll need to use a distinct command to launch Blender from the terminal:
flatpak run org.blender.BlenderAlthough these terminal commands allow you to launch Blender, alternative ways to access the application might be more convenient.
Step 2: Launching Blender from the Desktop Environment on Linux Mint
A more practical and user-friendly way to launch Blender is through your desktop environment. You can do this by navigating the following path in your system:
Taskbar > Graphics > Blender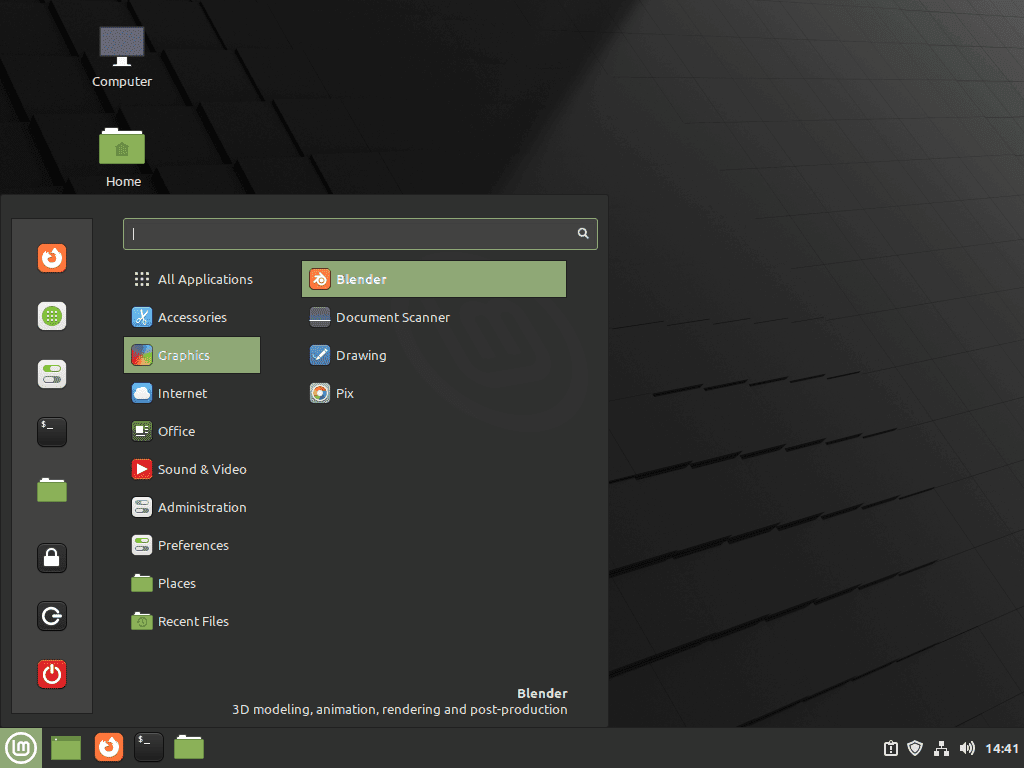
First-Time Tips for Blender on Linux Mint 21 or 20
Embarking on your journey with Blender on Linux Mint can be an exhilarating experience, with a world of creative possibilities to explore. Here are some helpful tips to assist you in starting this adventure on the right foot. These tips cater to Linux-specific Blender usage and should provide some valuable insights for beginners and even seasoned Blender users.
Customize Blender Workspace with Linux Mint
Blender offers a highly customizable interface to tailor to your needs and preferences. You can rearrange panels, create new ones, and even save your configurations as workspaces. Make use of this feature to create an environment that enhances your workflow.
# To save a workspace
File > Defaults > Save Startup File
Enable Auto Save on Blender with Linux Mint
Blender has an auto-save feature that could be a lifesaver, especially when on a big project. This feature is disabled by default in Blender, but enabling it is straightforward.
# Enable auto-save
Edit > Preferences > Save & Load > Auto Save
Make Use of Blender’s Command Line Options with Linux Mint
As a Linux user, you might find utilizing Blender’s robust command-line options efficient. These can be particularly useful for rendering animations or managing files. To view a list of all command-line options, just type blender --help in your terminal.
blender --helpInstall Blender Add-ons on Linux Mint
Blender supports a wide range of add-ons, which can extend the software’s functionality significantly. From modeling tools to import/export utilities, there’s likely an add-on for whatever you need. You can install add-ons through the Blender interface itself.
# Install Add-ons
Edit > Preferences > Add-ons > Install...
Learn Blender Shortcuts on Linux Mint
Blender has a plethora of keyboard shortcuts that can help speed up your workflow dramatically. For example, pressing Shift + A in the 3D view will bring up the add menu. You can find a complete list of Blender’s shortcuts under Help > Keymap.
# View Keymap
Help > Keymap
Remember, Blender is a powerful tool with many features, so don’t be discouraged if things initially seem complicated. It’s all about learning and experimenting. As you gain experience, you’ll become more comfortable and proficient with the software.
Blender Management Commands on Linux Mint 21 or 20
Update Blender on Linux Mint
To ensure the smooth running of Blender and to access the latest features and fixes, it’s crucial to keep the application updated. The process of updating your Blender installation will depend on the method you used to install the software in the first place.
APT Update Method for Blender on Linux Mint
For those who’ve installed Blender using the APT package manager, updating your Blender installation will be a two-step process. This process involves updating your system first and upgrading the specific packages. You can execute the following commands to accomplish this:
sudo apt upgrade
sudo apt upgrade
Flatpak Update Method for Blender on Linux Mint
If you’ve installed Blender using the Flatpak method, the process to update it simplifies to running a single command in your terminal:
flatpak updateRemove Blender From Linux Mint
If a need arises to uninstall Blender from your Linux Mint system, you can accomplish this using the appropriate command that aligns with the method used to install Blender.
APT Remove Method for Blender on Linux Mint
To successfully uninstall Blender, which was installed using the APT package manager, you can implement the command:
sudo apt remove blenderFlatpak Remove Method for Blender on Linux Mint
To remove a Flatpak installation of Blender, use the following command in your terminal. Note that this command will also delete any associated data:
flatpak uninstall --delete-data org.blender.BlenderFinal Thoughts
To reflect on our journey, we have successfully navigated installing, launching, updating, and uninstalling Blender on Linux Mint. Each step has been broken down into detailed sections, with explicit commands, to cater to experienced users and novices alike. This comprehensive guide has aimed to provide clarity and inspire confidence in your interactions with Blender, one of the most potent open-source 3D creation suites.