
In the vast landscape of web browsers, Ungoogled Chromium stands out as a prime choice for those prioritizing privacy and data security. This variant of the widely-used Chromium browser eliminates all Google service integrations, thus offering enhanced privacy controls while maintaining high-performance standards. This article will guide you through installing Ungoogled Chromium on Manjaro Linux via the AUR, with options to compile from source or utilize a prebuilt binary – the latter being recommended for most users due to its efficiency.
To further understand Ungoogled Chromium, consider the following distinctions from its Chromium counterpart:
- It shares Chromium’s code base for up-to-date web standards.
- Privacy enhancements remove Google service integrations for superior data security.
- It provides enhanced control over the browsing experience, with options to disable background requests to Google’s servers.
- It allows greater customization options for a personalized browsing experience.
- Unlike Chromium, it does not rely on the Chrome Web Store for extensions, although manual installation is possible.
Turning to the installation on Manjaro Linux, we’ll leverage the Arch User Repository (AUR), a powerful, community-driven resource. Here’s an overview of the two installation methods to be detailed:
- Compiling from Source: A more technical and time-intensive method that allows a customized installation.
- Using Prebuilt Binaries: A user-friendly and efficient option, sidestepping the compilation process.
In essence, Ungoogled Chromium provides an ideal browsing solution for those valuing privacy without compromising on performance. Following this guide will help you confidently install this browser on Manjaro Linux, adapting to your specific needs. Stay tuned for the step-by-step walkthrough.
Section 1: Install Ungoogled Chromium via AUR
Step 1: Update Your Manjaro System
Before proceeding with the installation of Ungoogled Chromium, it’s imperative to ensure that your Manjaro system is up to date. Running an updated system mitigates compatibility issues, especially when utilizing the Arch User Repository (AUR).
Execute the following command in your terminal to update the package database and upgrade all packages:
sudo pacman -SyuThis process might take some time, depending on the number of updates required. In case the Linux Kernel is updated during this process, it is prudent to reboot your system to ensure stability as you proceed.
Step 2: Configuring AUR for Ungoogled Chromium Installation
The Arch User Repository (AUR) is a community-driven repository containing a wealth of packages not available in the official repositories. To install Ungoogled Chromium via AUR, we need to make sure it is enabled on your system.
Verifying AUR Status on Your System
Let’s ascertain if AUR is already enabled on your system. Execute this command:
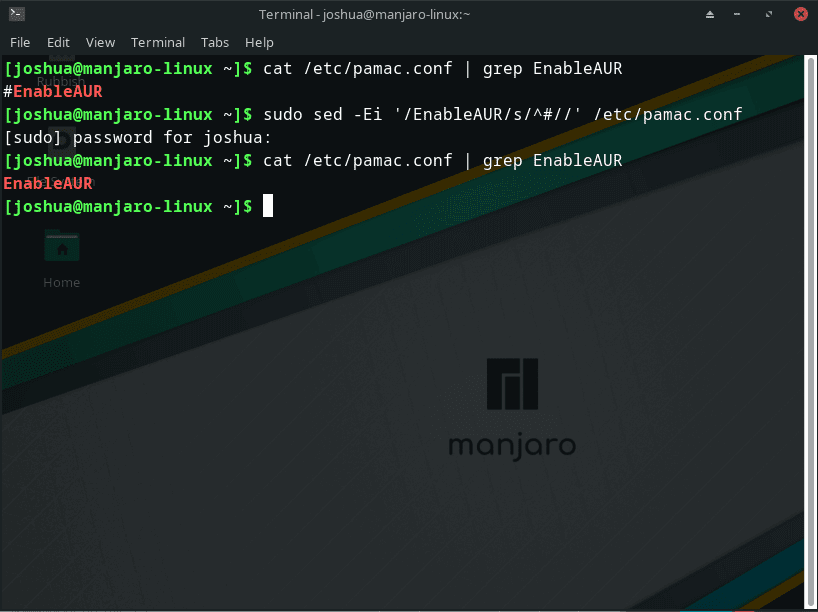
grep 'EnableAUR' /etc/pamac.confThis command inspects the pamac.conf file for the EnableAUR entry. If AUR is enabled, the output will show the EnableAUR entry without the # character at the beginning of the line.
Activating AUR on Your Manjaro System
If AUR is not enabled, activate it by running this command:
sudo sed -Ei '/EnableAUR/s/^#//' /etc/pamac.confThis sed command searches for the EnableAUR entry in the pamac.conf file and removes the # character at the beginning, thus enabling AUR.
Step 3: Installing Ungoogled Chromium on Manjaro
At this stage, you can opt to install Ungoogled Chromium either by using a pre-built binary or by compiling it from source. The former is recommended for most users due to its efficiency.
Option 1: Install Ungoogled Chromium Browser Binary (Recommended)
Execute the following command to install the Ungoogled Chromium pre-built binary:
sudo pamac install ungoogled-chromium-binThis method is expedient and should conclude within minutes.
Option 2: Compile Ungoogled Chromium Browser from Source
Alternatively, you can compile Ungoogled Chromium from source by running this command:
sudo pamac build ungoogled-chromiumPlease note that this method is more time-consuming and resource-intensive compared to using pre-built binaries.
Section 2: Launch Ungoogled Chromium on Manjaro Linux
Launching Ungoogled Chromium through Terminal
Ungoogled Chromium, like other browsers, can be initiated directly from the terminal. This method is often favored by users who prefer keyboard-driven navigation. To launch Ungoogled Chromium from the terminal, execute the following command:
ungoogled-chromiumUpon execution, Ungoogled Chromium will open, and you’ll be able to start browsing while relishing the added privacy and control that this browser affords.
Launching Ungoogled Chromium through Graphical User Interface
For those who favor navigating through the graphical interface, launching Ungoogled Chromium is a straightforward process.
On the taskbar, navigate to the Internet category. From there, select Chromium to launch the Ungoogled Chromium browser. This method is intuitive and especially handy if you prefer using a mouse for navigation.
Example of launching Ungoogled Chromium application icon on Manjaro Linux:

Section 3: Tips for Getting Started with Ungoogled Chromium on Manjaro Linux
Tip 1: Managing Cookies and Site Data
In Ungoogled Chromium, the default setting is to clear cookies and site data every time you close all windows. This means you will have to log in to websites every time you open the browser. If you prefer to stay logged in to websites between browsing sessions, you can disable this setting. Navigate to chrome://settings/cookies and adjust the setting “Clear cookies and site data when you close all windows” according to your preference.
Tip 2: Installing Extensions
While Ungoogled Chromium does not support installing extensions or themes from the Chrome Webstore via the Webstore interface, you can still install them using the URL used by the Webstore to download CRX files. This can be done by creating a new entry in chrome://settings/searchEngines, using the template CRX URL as the search URL. Then, set chrome://flags/#extension-mime-request-handling to “Download as regular file.”
Tip 3: Enabling Widevine CDM
Some websites require the Widevine Content Decryption Module (CDM) to play protected content. To install Widevine CDM on Linux, download the latest Google Chrome for Linux (.deb file), extract ./opt/google/chrome/WidevineCdm from data.tar.xz, and move WidevineCdm to /usr/lib/chromium.
Tip 4: Enabling Namespace Sandbox
If you want to get the Namespace Sandbox to work on Linux, you need to enable the kernel option unprivileged_userns_clone.
Tip 5: Troubleshooting Microphone Issues
If your microphone is not working with Ungoogled Chromium, check your preferences or the master preferences for "audio_capture_enabled": false. This was the default in Debian/Ubuntu up to and including 81.0.4044.138. If your application uses the built-in Google Speech API, which is disabled in Ungoogled Chromium, you may see an error message from Chromium.
Tip 6: Enabling Chromecasting
To enable Chromecasting, navigate to chrome://flags/#cast-media-route-provider and set the flag to Enabled. Then relaunch the browser as the page indicates.
Tip 7: FIDO U2F Security Keys and Google Sign-In
As of the time of writing, Google’s sign-in relies on an internal googleLegacyAppIdSupport extension. Ungoogled Chromium breaks this extension, which makes sign-in not possible at the moment. This is expected to change once Google moves to native WebAuthn.
Tip 8: Fixing the Spell Checker
If you’re having trouble with the spell checker, you can manually download and install dictionary files. The files are available at https://chromium.googlesource.com/chromium/deps/hunspell_dictionaries/+/master. You need to find the .bdic file you want, download it, and then decode it using base64. The decoded file should be placed in the ~/.config/chromium/Dictionaries/ directory. After that, you can toggle spell check in chrome://settings/languages, or restart the browser for the dictionaries to take effect.

Section 4: Managing Ungoogled Chromium on Manjaro Linux
Updating Ungoogled Chromium
Keeping your Ungoogled Chromium browser up-to-date is crucial for ensuring you have the latest features and security patches. On Manjaro Linux, you can check for updates and upgrade your installed packages using the pamac package manager.
To check for updates, you can use the following command:
sudo pamac checkupdates -aThis command will check all repositories, including AUR (Arch User Repository), for available updates.
Once you have checked for updates, you can upgrade all your installed packages, including Ungoogled Chromium, with the following command:
sudo pamac upgrade -aThis command will upgrade all packages that have available updates.
Uninstalling Ungoogled Chromium
There might come a time when you need to uninstall Ungoogled Chromium from your Manjaro Linux system. The uninstallation process will depend on how you installed Ungoogled Chromium in the first place.
If you installed Ungoogled Chromium as a binary package, you can uninstall it using the following command:
pamac remove ungoogled-chromium-binThis command will remove the binary installation of Ungoogled Chromium from your system.
If you built Ungoogled Chromium from source, you can uninstall it using the following command:
pamac remove ungoogled-chromiumThis command will remove the built version of Ungoogled Chromium from your system.
Conclusion
In this article, we’ve walked through the process of installing, managing, and using Ungoogled Chromium on Manjaro Linux. We’ve covered how to install the browser, tips for first-time users, and how to update or uninstall the software. By following these steps, you can enjoy a browsing experience that prioritizes privacy and control, free from Google’s services and tracking. Remember, the key to a smooth experience with Ungoogled Chromium is understanding its unique features and how to manage them effectively.
Additional Useful Links
For further information and resources, consider visiting the following official sources:
- Ungoogled Chromium Wiki: This is the official wiki for Ungoogled Chromium, providing a wealth of information and guides on various topics related to the browser.
- Ungoogled Chromium Binary on AUR: This is the Arch User Repository (AUR) page for the binary version of Ungoogled Chromium. It’s a useful resource for those looking to install the binary version of the browser on Manjaro Linux.
- Ungoogled Chromium on AUR: This is the AUR page for the source version of Ungoogled Chromium. It’s a great resource for those interested in building the browser from the source.
- Ungoogled Chromium on GitHub: This is the official GitHub repository for Ungoogled Chromium. It’s a valuable resource for those interested in the development and source code of the browser.
- Ungoogled Software: This is the official website for Ungoogled Software, the team behind Ungoogled Chromium. It provides information about the project and its philosophy.