This guide will demonstrate how to install PHP on 22.04 or 20.04 LTS releases utilizing the command-line terminal with a third-party PPA maintained by Ondřej Surý.
PHP, a cornerstone in web development, powers a significant portion of the internet, from blogs to the most robust websites. Originating in 1994, PHP has evolved through numerous iterations, offering flexibility, dynamic content management, and a comprehensive ecosystem that supports a wide range of databases and frameworks. Its ease of use for new developers and its powerful features for seasoned professionals make PHP a versatile choice for developing web applications.
- Versatile and Dynamic: PHP scripts can run on almost any operating system and server.
- Rich Ecosystem: A vast array of frameworks, tools, and libraries enhances productivity and functionality.
- Broad Database Connectivity: PHP offers extensive support for database management systems, enabling dynamic content integration with ease.
- Active Community: A robust community provides extensive documentation, forums, and third-party resources.
Let’s delve into the specifics of setting up PHP on your system, ensuring a seamless development environment.
Import the PHP PPA on Ubuntu
We’ll begin our journey by introducing Ondřej Surý’s PHP PPA into our system. This well-regarded PPA provides the most up-to-date PHP versions for Debian and Ubuntu distributions, allowing us to access PHP’s latest features and security updates.
Update Ubuntu Before PHP Installation
First and foremost, ensure that you update all packages on your Ubuntu system. Updating packages secures your system and facilitates the successful installation of new packages.
Use the following commands to refresh your package list and upgrade any outdated packages:
sudo apt update
sudo apt upgrade
With the sudo apt update command, we ask the system to refresh its local package index. This index is a database of available packages from the repositories defined in the /etc/apt/sources.list file and in the /etc/apt/sources.list.d directory.
If there are updates available, the sudo apt upgrade command will handle the upgrade process. This ensures that your system is running the most recent versions of its software, enhancing security and stability.
Install Initial Packages for PHP PPA on Ubuntu
Next, we’ll install additional packages to incorporate Ondřej’s PHP PPA into our system. These packages are essential for secure package downloading and management.
Execute the following command to install these packages:
sudo apt install ca-certificates apt-transport-https software-properties-common lsb-release -yThe ca-certificates package provides the necessary certificates to verify secure websites, while apt-transport-https allows the Advanced Package Tool (APT) to retrieve packages over ‘https’ protocol. The software-properties-common package offers some practical utilities for managing the software repository sources, and lsb-release provides specific LSB (Linux Standard Base) information about your Linux distribution.
Integrating the PHP PPA
With the necessary packages, we’re ready to integrate Ondřej Surý’s PHP PPA into our system. We’ll use this PHP repository to install the latest PHP versions, often more recent than those available in Ubuntu’s default APT repository.
Let’s go ahead and import the repository with the following command:
sudo add-apt-repository ppa:ondrej/php -yAfter adding the PPA, we must update the package cache to recognize this new source. This can be achieved by running the sudo apt update command again:
sudo apt updateYour system should recognize the newly added PPA, and you will likely notice some packages requiring updates. Execute the sudo apt upgrade command to update these packages.
sudo apt upgradeAnd that’s it! You’ve successfully integrated Ondřej Surý’s PHP PPA into your Ubuntu system, paving the way for installing the latest PHP versions. Next, the following sections will demonstrate how to install PHP with some known web applications.
Install PHP 8.3, 8.2, or 8.1 via APT Command on Ubuntu
Having successfully integrated Ondřej Surý’s PHP PPA into our system, we’re ready to install PHP. You can use PHP as an Apache module, with PHP-FPM on an Apache HTTP server, or with Nginx. We’ll detail each scenario.
Option 1: Install PHP as an Apache Module
PHP operates as a module within the Apache HTTP server in this scenario. Installing only the PHP version you need for a clean and manageable environment is recommended.
Use the commands below to install PHP 8.3, 8.2, and 8.1 as Apache modules.
sudo apt install php8.3 libapache2-mod-php8.3
sudo apt install php8.2 libapache2-mod-php8.2
sudo apt install php8.1 libapache2-mod-php8.1
Following the installation, you’ll need to restart your Apache server so that it can load the newly installed PHP module:
sudo systemctl restart apache2Option 2: Install Apache with PHP-FPM
PHP-FPM (FastCGI Process Manager) is an alternative PHP FastCGI implementation with additional features useful for sites of any size, notably busier ones.
Here are the commands to install PHP and PHP-FPM 8.3, 8.2 or 8.1 with Apache:
sudo apt install php8.3-fpm libapache2-mod-fcgid
sudo apt install php8.2-fpm libapache2-mod-fcgid
sudo apt install php8.1-fpm libapache2-mod-fcgid
Apache doesn’t enable PHP-FPM by default; thus, you must enable it using the following command:
sudo a2enmod proxy_fcgi setenvif
sudo a2enconf php{version}-fpm
Remember to replace {version} with your desired PHP version. For instance, if you’re using PHP 8.2, the command would be:
sudo a2enmod proxy_fcgi setenvif
sudo a2enconf php8.2-fpm
To effect these changes, restart the Apache web server:
sudo systemctl restart apache2Option 3: Install PHP Support for Nginx on Ubuntu
Unlike other web servers like Apache, Nginx doesn’t have built-in support for processing PHP files. Therefore, you must install PHP-FPM (FastCGI Process Manager) to handle PHP files with Nginx.
Here are the commands to install PHP 8.3, 8.2, or 8.1 PHP-FPM for Nginx support:
sudo apt install php8.3 php8.3-fpm php8.3-cli
sudo apt install php8.2 php8.2-fpm php8.2-cli
sudo apt install php8.1 php8.1-fpm php8.1-cli
After installation, the PHP-FPM service should automatically start running. In case it does not manually initiate the service with the following command:
sudo systemctl start php{version}-fpmRemember to replace {version} with your desired PHP version.
Configuring Nginx Server Block for PHP-FPM
To enable Nginx to process PHP files, it’s necessary to modify your Nginx server block configuration file. You’ll need to add the following segment to all server blocks that handle PHP files, specifically in the location block that matches the ~ .php$ pattern:
location ~ .php$ {
    include snippets/fastcgi-php.conf;
    fastcgi_pass unix:/var/run/php/php{version}-fpm.sock;
}
As before, ensure to replace {version} with your specific PHP version.
You can validate the syntax of your modified Nginx configuration using the following command:
sudo nginx -tThis command verifies the syntax of the configuration files and highlights any errors found. A successful output will look like this:
nginx: the configuration file /etc/nginx/nginx.conf syntax is ok
nginx: configuration file /etc/nginx/nginx.conf test is successful
Once you’ve confirmed the syntax is correct, restart the Nginx service to apply the changes:
sudo systemctl restart nginxAs a final note, always ensure you check the version of PHP installed on your system. Use the following command to do this:
php --versionThis command displays your system’s current PHP version, allowing you to confirm that your installation or upgrade was successful.
Create a PHP Test File on Ubuntu
Now, we move on to a crucial step: verifying the PHP installation. Achieve this by creating and executing a simple PHP test file in the Ubuntu Linux terminal. Here’s how.
Create a PHP Test File
Initiate the process by creating a new file named test.php in your desired directory. This can be done with the touch command:
touch test.phpEditing the Test File
After creating the file, add some PHP code. Open the file with a text editor; this example uses Nano, but you can replace it with your preferred text editor like Vim or gedit:
nano test.phpYou will input a simple PHP code to display a message in the text editor. This will confirm if PHP is functioning correctly on your system. Here’s the code:
<?php
   echo "PHP is working!";
?>
After entering the code, save the file by pressing CTRL + O. You can then exit the editor by pressing CTRL + X.
Executing PHP Test File on Ubuntu
Now, it’s time to see if PHP is working as expected. Run the test file using the following command:
php test.phpOnce correctly installed and configured, PHP will display the phrase “PHP is working!” in your terminal, verifying a successful installation ready for use. Although this example uses Nano, you can opt for other text editors based on your preference.
Switch PHP Alternative Versions on Ubuntu
In this section, we will explore how to switch between different versions of PHP installed on your Ubuntu system. This process is achieved by using the update-alternatives command in the terminal, which allows you to set a preferred PHP version for your system. This flexibility can be crucial if you work on projects requiring different PHP versions.
Check the Current PHP Version on Ubuntu
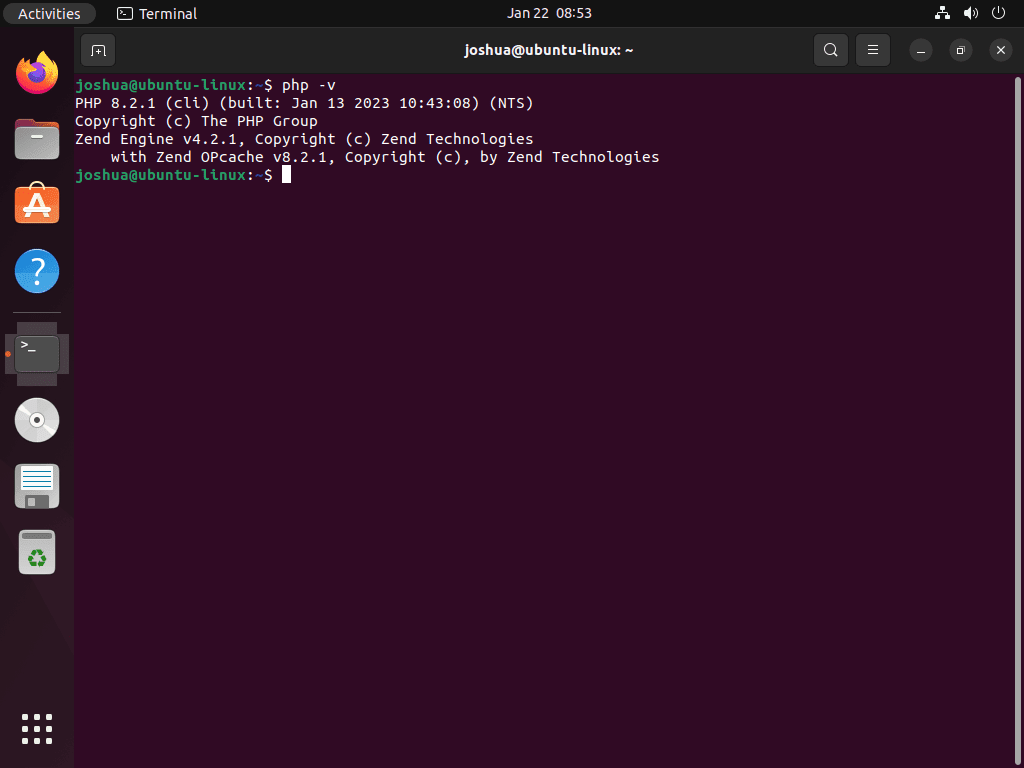
Before switching PHP versions, knowing which PHP version your system is currently utilizing is essential. Run this command to display the active PHP version:
php -vList Available PHP Versions
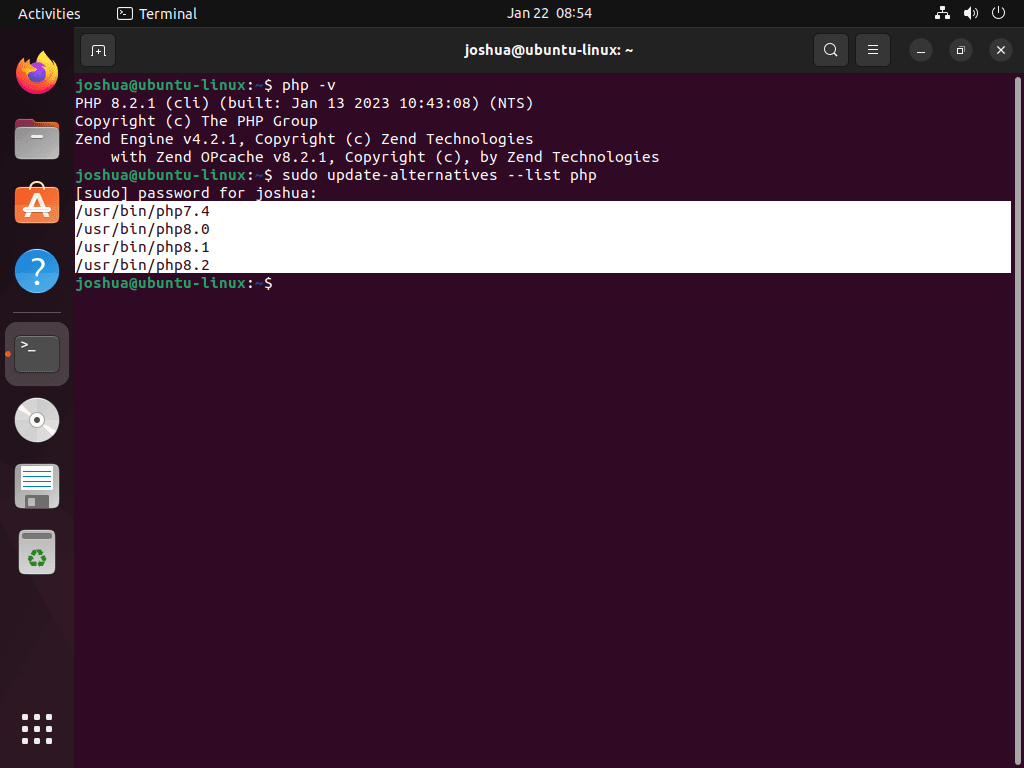
To identify the PHP versions available for use on your system, execute the following command:
sudo update-alternatives --list phpThis command will provide a list of all installed PHP versions, offering a variety of choices to suit your requirements.
Switching PHP Versions
After determining the available PHP versions, you can set your preferred version using the update-alternatives command. Replace {version} with the PHP version you intend to switch to:
sudo update-alternatives --set php /usr/bin/php{version}For instance, if you want to switch to PHP 8.3, the command should look like this:
sudo update-alternatives --set php /usr/bin/php8.3Upon executing this command, your terminal will display a message similar to the following:
update-alternatives: using /usr/bin/php8.3 to provide /usr/bin/php (php) in manual mode
This output confirms that your system is now using PHP 8.3
Verify the PHP Version Switch
After switching, verify that the active PHP version has indeed changed. Use the same command as before:
php -vAs per the earlier example, the output should now display PHP version 8.3
If you’re using PHP-FPM, changes to the PHP version might necessitate adjustments to your Nginx server blocks. Knowing how to switch between different PHP versions is a powerful tool in your programming arsenal, allowing for greater adaptability to project-specific needs.
Concluding Thoughts
In this guide, we walked through the steps to install PHP on Ubuntu 22.04 or 20.04 LTS using a command-line approach with Ondřej Surý’s PPA. It’s a straightforward process that opens up a world of web development opportunities on your Linux system. My final piece of advice? Keep your PHP installation updated to benefit from the latest features and security improvements. And don’t forget to explore the rich PHP ecosystem for tools and frameworks that can make your development journey smoother. Thanks for following along, and happy coding!


