
A web application firewall becomes useful when it blocks bad requests before they reach WordPress, phpMyAdmin, APIs, or other code running behind Apache. You can install ModSecurity with Apache on Ubuntu through the default repositories, then add the OWASP Core Rule Set (CRS) for SQL injection, cross-site scripting, command injection, and other common attack patterns.
This Apache-focused workflow covers Ubuntu 26.04 (resolute), Ubuntu 24.04 (noble), and Ubuntu 22.04 (jammy). It uses Ubuntu’s packaged ModSecurity and CRS path first, then shows the optional Digitalwave repository and GitHub CRS 4.x path for readers who need newer rule files or a newer ModSecurity 2 module.
These commands do not configure ModSecurity for Nginx. Ubuntu’s Nginx connector uses a different package and configuration path, commonly involving
libnginx-mod-http-modsecurity, so treat Nginx searches and theowasp/modsecurity-crs:apachecontainer image as separate workflows from this Apache package guide.
Install ModSecurity with Apache on Ubuntu
Start by refreshing APT metadata and applying available package updates:
sudo apt update
sudo apt upgrade
These commands use
sudofor tasks that need root privileges. If your account is not configured for sudo yet, add an administrator account first with the guide on how to add a new user to sudoers on Ubuntu.
Install Apache, the ModSecurity Apache module, and the packaged OWASP CRS files in one step:
sudo apt install apache2 libapache2-mod-security2 modsecurity-crsThe install enables the Apache security2 module automatically. If you need a fuller Apache baseline before adding a WAF, use the separate Apache installation guide for Ubuntu first.
Older Apache references may call the module mod_security or mod_security2. On Ubuntu, install the libapache2-mod-security2 package and verify Apache reports the loaded module as security2_module.
Check the installed package revisions:
dpkg-query -W apache2 libapache2-mod-security2 modsecurity-crsRelevant output on Ubuntu 26.04 includes:
apache2                    2.4.66-2ubuntu2
libapache2-mod-security2  2.9.12-2build1
modsecurity-crs           3.3.8-1
Confirm that Apache loaded the ModSecurity module:
sudo apachectl -M | grep securityExpected output:
security2_module (shared)
If the module is missing, enable it and restart Apache:
sudo a2enmod security2
sudo systemctl restart apache2
Configure ModSecurity Blocking Mode
Ubuntu ships the recommended ModSecurity configuration as a sample file. Copy it into the active configuration path:
sudo cp /etc/modsecurity/modsecurity.conf-recommended /etc/modsecurity/modsecurity.confThe sample file starts in DetectionOnly mode, which logs matched rules without blocking traffic. To turn on active blocking immediately, replace the rule engine line:
sudo sed -i 's/^SecRuleEngine DetectionOnly/SecRuleEngine On/' /etc/modsecurity/modsecurity.confFor production sites with existing traffic, consider leaving
SecRuleEngine DetectionOnlyin place for a short observation period, then switch toOnafter you review false positives in/var/log/apache2/modsec_audit.log.
Check the final setting:
grep '^SecRuleEngine' /etc/modsecurity/modsecurity.confSecRuleEngine On
The default audit log parts are enough for basic testing, but adding matched rule data makes troubleshooting easier. Edit the configuration file:
sudo nano /etc/modsecurity/modsecurity.confFind SecAuditLogParts and use this value:
SecAuditLogParts ABCEFHJKZTest Apache syntax and restart the service:
sudo apachectl configtest
sudo systemctl restart apache2
Syntax OK
Verify ModSecurity and OWASP CRS Blocking
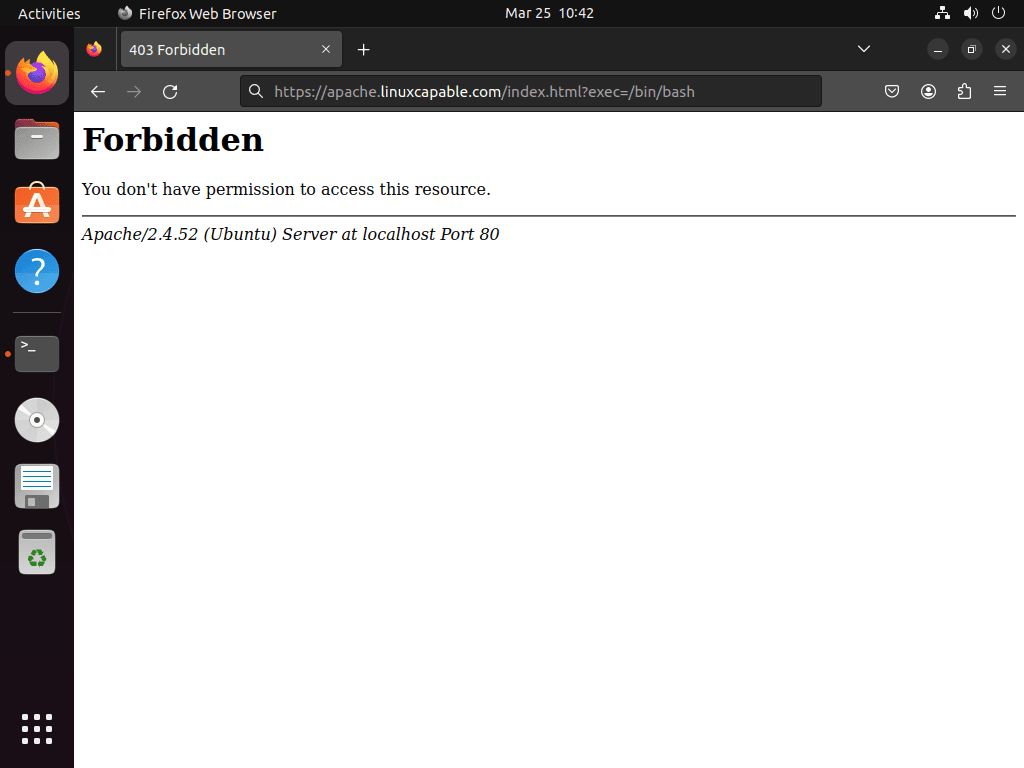
Send a local request that should trigger a CRS command-injection rule:
curl -I "http://localhost/?exec=/bin/bash"Relevant headers should show a 403 Forbidden response:
HTTP/1.1 403 Forbidden
Content-Type: text/html; charset=iso-8859-1
If the same test returns 200 OK, check that SecRuleEngine is set to On, Apache has restarted, and the CRS include file is loaded through /usr/share/modsecurity-crs/owasp-crs.load.
Compare ModSecurity and CRS Package Versions
Ubuntu’s default repositories provide a working Apache WAF path on all three supported LTS releases, but the exact package versions differ:
| Ubuntu Release | Default Apache Module | Default CRS Package | CRS 4.x From GitHub |
|---|---|---|---|
| Ubuntu 26.04 (resolute) | libapache2-mod-security2 2.9.12-2build1 | modsecurity-crs 3.3.8-1 | Compatible with default ModSecurity |
| Ubuntu 24.04 (noble) | libapache2-mod-security2 2.9.7-1build3 | modsecurity-crs 3.3.5-2 | Compatible with default ModSecurity |
| Ubuntu 22.04 (jammy) | libapache2-mod-security2 2.9.5-1 | modsecurity-crs 3.3.2-1 | Requires a newer ModSecurity 2 package first |
Use the packaged CRS path when you want APT-managed updates and the least maintenance. Use the GitHub CRS 4.x path only when you specifically need the newest CRS branch and are comfortable maintaining the rule files outside APT.
Use Digitalwave ModSecurity Packages on Ubuntu 22.04 or 24.04
The Digitalwave repository is an optional third-party source for newer ModSecurity packages. It is most useful on Ubuntu 22.04 when you want CRS 4.x, because Ubuntu 22.04’s default ModSecurity 2.9.5 package lacks the @within operator used by CRS 4.x.
Digitalwave currently publishes Apache module packages for Ubuntu 24.04 (noble) and 22.04 (jammy) backports. Its Ubuntu 26.04 (resolute) metadata does not currently provide
libapache2-mod-security2, and Ubuntu 26.04 already has a CRS 4.x-compatible default Apache module.
Install the tools needed for the repository key and source file:
sudo apt install ca-certificates curl gpgImport the repository signing key. The --yes flag makes reruns overwrite the local keyring without an interactive prompt:
curl -fsSL https://modsecurity.digitalwave.hu/archive.key | sudo gpg --dearmor --yes -o /usr/share/keyrings/digitalwave-modsecurity.gpgCreate the DEB822 source file. The command limits the source to the verified jammy-backports or noble-backports suite and writes the file with tee because normal shell redirection would not inherit sudo:
. /etc/os-release

case "$VERSION_CODENAME" in
    jammy|noble) ;;
    *)
        echo "Digitalwave Apache packages are documented here only for Ubuntu 24.04 (noble) and 22.04 (jammy)."
        exit 1
        ;;
esac

if [ "$(dpkg --print-architecture)" != "amd64" ]; then
    echo "This Digitalwave repository example is limited to amd64 packages."
    exit 1
fi

printf '%s\n' \
'Types: deb' \
'URIs: https://modsecurity.digitalwave.hu/ubuntu/' \
"Suites: ${VERSION_CODENAME}-backports" \
'Components: main' \
'Architectures: amd64' \
'Signed-By: /usr/share/keyrings/digitalwave-modsecurity.gpg' \
| sudo tee /etc/apt/sources.list.d/digitalwave-modsecurity.sources > /dev/null
Pin the Digitalwave ModSecurity packages above the Ubuntu archive packages:
printf '%s\n' \
'Package: libapache2-mod-security2 libapache2-modsecurity modsecurity-crs libmodsecurity3 libmodsecurity-dev' \
'Pin: origin modsecurity.digitalwave.hu' \
'Pin-Priority: 900' \
| sudo tee /etc/apt/preferences.d/99modsecurity > /dev/null
Refresh APT metadata and install the newer packages:
sudo apt update
sudo apt install libapache2-mod-security2 modsecurity-crs
Verify that the Digitalwave candidate wins:
apt-cache policy libapache2-mod-security2 modsecurity-crsRelevant output on Ubuntu 22.04 includes:
libapache2-mod-security2:
  Installed: 2.9.14~pre-20260428-ubuntu0.22.04.5
  Candidate: 2.9.14~pre-20260428-ubuntu0.22.04.5
     2.9.14~pre-20260428-ubuntu0.22.04.5 900
        500 https://modsecurity.digitalwave.hu/ubuntu jammy-backports/main amd64 Packages
modsecurity-crs:
  Installed: 3.3.9-20260329-ubuntu0.22.04.5
  Candidate: 3.3.9-20260329-ubuntu0.22.04.5
Run the Apache syntax check again after the package change:
sudo apachectl configtest
sudo systemctl restart apache2
Install OWASP CRS 4.x from GitHub
The GitHub path replaces the packaged CRS include with a manually managed CRS 4.x tree under /etc/apache2/modsec. Use it on Ubuntu 26.04 or 24.04 with the default ModSecurity package, or on Ubuntu 22.04 only after installing a newer ModSecurity package such as the Digitalwave package above.
Install curl and jq. The version lookup uses jq so the command parses GitHub’s JSON response instead of scraping it as plain text; the curl command guide covers the download flags if you want more detail.
sudo apt install curl jqResolve the latest stable CRS release:
CRS_VERSION=$(curl -fsSL https://api.github.com/repos/coreruleset/coreruleset/releases/latest | jq -r '.tag_name')

if [ -z "$CRS_VERSION" ] || [ "$CRS_VERSION" = "null" ]; then
    echo "Could not determine the latest CRS release."
    exit 1
fi

echo "$CRS_VERSION"
v4.x.x
Download and extract that release into /etc/apache2/modsec:
TMP_DIR=$(mktemp -d)
curl -fL "https://github.com/coreruleset/coreruleset/archive/refs/tags/${CRS_VERSION}.tar.gz" -o "$TMP_DIR/crs.tar.gz"

sudo rm -rf /etc/apache2/modsec
sudo install -d -m 0755 /etc/apache2/modsec
sudo tar xzf "$TMP_DIR/crs.tar.gz" -C /etc/apache2/modsec --strip-components=1
rm -rf "$TMP_DIR"
Create the active CRS setup file and exclusion files from the upstream examples:
sudo cp /etc/apache2/modsec/crs-setup.conf.example /etc/apache2/modsec/crs-setup.conf
sudo cp /etc/apache2/modsec/rules/REQUEST-900-EXCLUSION-RULES-BEFORE-CRS.conf.example /etc/apache2/modsec/rules/REQUEST-900-EXCLUSION-RULES-BEFORE-CRS.conf
sudo cp /etc/apache2/modsec/rules/RESPONSE-999-EXCLUSION-RULES-AFTER-CRS.conf.example /etc/apache2/modsec/rules/RESPONSE-999-EXCLUSION-RULES-AFTER-CRS.conf
Back up the packaged Apache module include file, then replace it with a GitHub CRS include path:
sudo cp /etc/apache2/mods-available/security2.conf /etc/apache2/mods-available/security2.conf.bak

sudo tee /etc/apache2/mods-available/security2.conf > /dev/null <<'EOF'
<IfModule security2_module>
    SecDataDir /var/cache/modsecurity
    IncludeOptional /etc/modsecurity/*.conf
    Include /etc/apache2/modsec/crs-setup.conf
    Include /etc/apache2/modsec/rules/*.conf
</IfModule>
EOF
Test and reload Apache:
sudo apachectl configtest
sudo systemctl restart apache2
Syntax OK
Run the same blocking probe again:
curl -I "http://localhost/?exec=/bin/bash"HTTP/1.1 403 Forbidden Content-Type: text/html; charset=iso-8859-1
Tune OWASP CRS Configuration
The CRS setup file location depends on the install method. Packaged CRS uses /etc/modsecurity/crs/crs-setup.conf, while the GitHub CRS path above uses /etc/apache2/modsec/crs-setup.conf.
For packaged CRS, edit this file:
sudo nano /etc/modsecurity/crs/crs-setup.confFor GitHub CRS, edit this file instead:
sudo nano /etc/apache2/modsec/crs-setup.confUnderstand Anomaly Scoring Mode
CRS uses anomaly scoring mode by default. A single rule match adds points to the request score, and the blocking evaluation denies the request when the score reaches the configured threshold. This is less brittle than blocking every single rule match immediately.
- Inbound anomaly threshold: the default value is 5, which blocks suspicious requests at 5 or more points.
- Outbound anomaly threshold: the default value is 4, which blocks suspicious responses at 4 or more points.
Higher thresholds reduce false positives but allow more suspicious traffic through. Lower thresholds block more aggressively and usually require more tuning.
Choose a CRS Paranoia Level
Paranoia levels control how aggressive the CRS rule set becomes:
- Paranoia Level 1: default coverage with the lowest false-positive risk for most sites.
- Paranoia Level 2: stronger inspection that may require tuning on complex applications.
- Paranoia Level 3: strict detection for high-security deployments where false positives are expected.
- Paranoia Level 4: maximum rule coverage for specialized use cases, not a normal first setting.
Start at level 1. Raise the level only after you have reviewed audit logs and added exclusions for legitimate traffic that your application needs.
Enable Application-Specific CRS Exclusions
CRS includes optional exclusions for applications such as WordPress, phpMyAdmin, Drupal, Nextcloud, phpBB, DokuWiki, cPanel, and XenForo. In crs-setup.conf, enable only the exclusions that match software actually running behind Apache.
SecAction \
 "id:900130,\
  phase:1,\
  nolog,\
  pass,\
  t:none,\
  setvar:tx.crs_exclusions_wordpress=1,\
  setvar:tx.crs_exclusions_phpmyadmin=1"
Create Custom CRS Rule Exclusions
Use the before-CRS exclusion file for most local allow rules. Packaged CRS and GitHub CRS use different paths:
For packaged CRS, edit this file:
sudo nano /etc/modsecurity/crs/REQUEST-900-EXCLUSION-RULES-BEFORE-CRS.confFor GitHub CRS, edit this file instead:
sudo nano /etc/apache2/modsec/rules/REQUEST-900-EXCLUSION-RULES-BEFORE-CRS.confTo disable a rule range for a specific URL prefix, add an exclusion like this:
SecRule REQUEST_URI "@beginsWith /admin/api/" "id:1000,phase:1,pass,nolog,ctl:ruleRemoveById=941000-942999"To disable inspection for a trusted management IP address, use @ipMatch:
SecRule REMOTE_ADDR "@ipMatch 192.168.1.100" "id:1001,phase:1,allow,nolog,ctl:ruleEngine=off"For a whole trusted subnet:
SecRule REMOTE_ADDR "@ipMatch 10.0.0.0/8" "id:1002,phase:1,allow,nolog,ctl:ruleEngine=off"To disable a specific rule globally, use its rule ID:
SecRuleRemoveById 942100Use the audit log to find the rule ID that caused a false positive. The grep command guide is useful when you need to filter larger ModSecurity logs repeatedly:
sudo grep "$(date +%d/%b/%Y)" /var/log/apache2/modsec_audit.log | grep -A 10 "403"Look for the [id "942100"] pattern or a similar rule ID in the matching audit entry, then add the narrowest exclusion that fixes the legitimate request.
Configure ModSecurity Audit Log Rotation
ModSecurity audit logs can grow quickly after active blocking is enabled. Create a dedicated logrotate file:
sudo nano /etc/logrotate.d/modsecurityAdd this configuration:
/var/log/apache2/modsec_audit.log {
    rotate 14
    daily
    missingok
    compress
    delaycompress
    notifempty
    create 640 root adm
}
The file keeps 14 daily logs, compresses old entries, skips empty rotations, and recreates the audit log with permissions readable by root and the adm group.
Update OWASP CRS from GitHub
If you installed CRS from Ubuntu or Digitalwave packages, update it with APT. Use this helper only for the manual GitHub CRS 4.x tree under /etc/apache2/modsec.
sudo tee /usr/local/bin/update-owasp-crs > /dev/null <<'SCRIPT'
#!/usr/bin/env bash
set -euo pipefail

if [ "$(id -u)" -ne 0 ]; then
    echo "Run this command with sudo: sudo update-owasp-crs"
    exit 1
fi

CRS_DIR="/etc/apache2/modsec"
BACKUP_ROOT="/etc/apache2"

if ! command -v curl >/dev/null || ! command -v jq >/dev/null; then
    echo "Missing curl or jq. Install them with: sudo apt install curl jq"
    exit 1
fi

LATEST_VERSION=$(curl -fsSL https://api.github.com/repos/coreruleset/coreruleset/releases/latest | jq -r '.tag_name')
if [ -z "$LATEST_VERSION" ] || [ "$LATEST_VERSION" = "null" ]; then
    echo "Could not determine the latest CRS release from GitHub."
    exit 1
fi
LATEST_CLEAN=${LATEST_VERSION#v}

CURRENT_VERSION=""
if [ -f "$CRS_DIR/CHANGES.md" ]; then
    CURRENT_VERSION=$(grep -m1 '^## Version ' "$CRS_DIR/CHANGES.md" | awk '{print $3}' || true)
fi

echo "Current CRS version: ${CURRENT_VERSION:-not installed}"
echo "Latest CRS version: ${LATEST_VERSION}"

if [ "$CURRENT_VERSION" = "$LATEST_CLEAN" ]; then
    echo "CRS is already up to date."
    exit 0
fi

TMP_DIR=$(mktemp -d)
PRESERVE_DIR=$(mktemp -d)
trap 'rm -rf "$TMP_DIR" "$PRESERVE_DIR"' EXIT

if [ -f "$CRS_DIR/crs-setup.conf" ]; then
    install -D -m 0644 "$CRS_DIR/crs-setup.conf" "$PRESERVE_DIR/crs-setup.conf"
fi

for relpath in \
    rules/REQUEST-900-EXCLUSION-RULES-BEFORE-CRS.conf \
    rules/RESPONSE-999-EXCLUSION-RULES-AFTER-CRS.conf; do
    if [ -f "$CRS_DIR/$relpath" ]; then
        install -D -m 0644 "$CRS_DIR/$relpath" "$PRESERVE_DIR/$relpath"
    fi
done

echo "Downloading CRS ${LATEST_VERSION}..."
curl -fL "https://github.com/coreruleset/coreruleset/archive/refs/tags/${LATEST_VERSION}.tar.gz" -o "$TMP_DIR/crs.tar.gz"

echo "Installing CRS ${LATEST_VERSION}..."
if [ -d "$CRS_DIR" ]; then
    BACKUP_DIR="${BACKUP_ROOT}/modsec-backup-$(date +%Y%m%d-%H%M%S)"
    cp -a "$CRS_DIR" "$BACKUP_DIR"
    echo "Backup saved to $BACKUP_DIR"
fi

rm -rf "$CRS_DIR"
install -d -m 0755 "$CRS_DIR"
tar xzf "$TMP_DIR/crs.tar.gz" -C "$CRS_DIR" --strip-components=1

if [ -f "$PRESERVE_DIR/crs-setup.conf" ]; then
    cp "$PRESERVE_DIR/crs-setup.conf" "$CRS_DIR/crs-setup.conf"
else
    cp "$CRS_DIR/crs-setup.conf.example" "$CRS_DIR/crs-setup.conf"
fi

for relpath in \
    rules/REQUEST-900-EXCLUSION-RULES-BEFORE-CRS.conf \
    rules/RESPONSE-999-EXCLUSION-RULES-AFTER-CRS.conf; do
    if [ -f "$PRESERVE_DIR/$relpath" ]; then
        cp "$PRESERVE_DIR/$relpath" "$CRS_DIR/$relpath"
    else
        cp "$CRS_DIR/${relpath}.example" "$CRS_DIR/$relpath"
    fi
done

apachectl configtest
systemctl reload apache2

echo "CRS updated successfully to ${LATEST_VERSION}."
SCRIPT
sudo chmod +x /usr/local/bin/update-owasp-crs
Run the helper:
sudo update-owasp-crsWhen the installed release already matches GitHub’s latest release, the output looks like this:
Current CRS version: 4.x.x
Latest CRS version: v4.x.x
CRS is already up to date.
When an update is available, the helper backs up the existing CRS directory, preserves your main setup and exclusion files, downloads the new release, tests Apache, and reloads the service only after the syntax check passes.
Troubleshoot ModSecurity with Apache
Apache Fails After a ModSecurity Change
Start with the Apache syntax check:
sudo apachectl configtestCommon causes include duplicate CRS includes, missing files in security2.conf, or an exclusion rule that reuses an existing rule ID. Check which ModSecurity and CRS files Apache includes:
sudo apachectl -t -D DUMP_INCLUDES | grep -E "modsecurity|modsec|crs"Then inspect the latest Apache errors. The tail command examples are useful when you need to watch log files during repeated config tests:
sudo tail -n 50 /var/log/apache2/error.logModSecurity Does Not Block the Test Request
Verify the rule engine first:
grep '^SecRuleEngine' /etc/modsecurity/modsecurity.confSecRuleEngine On
If the file still says DetectionOnly, switch it to On, run sudo apachectl configtest, and restart Apache. If the value is already correct, confirm that the CRS include path is present in the include dump command from the previous section.
Legitimate Requests Are Blocked
Find the matching rule ID in the audit log:
sudo grep "$(date +%d/%b/%Y)" /var/log/apache2/modsec_audit.log | grep -A 10 "403"Prefer a narrow exclusion for the affected URI, parameter, or trusted management IP instead of disabling a broad rule group globally. Keep broad exclusions temporary until you understand the exact rule and request pattern.
CRS 4.x Shows Unknown Operator on Ubuntu 22.04
Ubuntu 22.04’s default libapache2-mod-security2 package is ModSecurity 2.9.5. CRS 4.x can fail with this error because it requires a newer operator set:
Unknown operator: @within
Use the packaged CRS 3.x path on Ubuntu 22.04, or install a newer ModSecurity 2 package first before switching to GitHub CRS 4.x.
Remove ModSecurity from Ubuntu
Disable the Apache module and restart Apache first:
sudo a2dismod security2
sudo systemctl restart apache2
Remove the Ubuntu packages:
sudo apt remove --purge libapache2-mod-security2 modsecurity-crsThe next command permanently deletes local ModSecurity configuration, manual GitHub CRS files, log rotation settings, and the optional updater. Back up custom exclusions first if you need to keep them, and do not remove
/etc/modsecurityif another ModSecurity connector still uses it.
sudo rm -rf /etc/modsecurity
sudo rm -rf /etc/apache2/modsec
sudo rm -f /etc/logrotate.d/modsecurity
sudo rm -f /usr/local/bin/update-owasp-crs
If you added the Digitalwave repository, remove its source, pin, and keyring, then refresh APT metadata:
sudo rm -f /etc/apt/sources.list.d/digitalwave-modsecurity.sources
sudo rm -f /etc/apt/preferences.d/99modsecurity
sudo rm -f /usr/share/keyrings/digitalwave-modsecurity.gpg
sudo apt update
Preview dependency cleanup before removing anything else:
sudo apt autoremove --dry-runIf the preview only lists packages you no longer need, run:
sudo apt autoremoveVerify the Apache module is gone. This command should return no output:
sudo apachectl -M | grep securityAdditional Security Recommendations
ModSecurity adds application-layer inspection, but it is not a replacement for basic server hardening. Restrict exposed ports with the UFW firewall guide for Ubuntu, serve production sites over HTTPS, and use the Fail2Ban installation guide to slow repeated authentication or probing attempts.
Conclusion
ModSecurity is active in Apache with OWASP CRS rules loaded and a local 403 test confirming that malicious request patterns are blocked. Keep packaged CRS installs current through APT, maintain GitHub CRS installs with the updater, and review audit logs before tightening paranoia levels or adding broad exclusions.

Formatting tips for your comment
You can use basic HTML to format your comment. Useful tags currently allowed in published comments:
<code>command</code>command<strong>bold</strong><em>italic</em><a href="https://example.com">link</a><blockquote>quote</blockquote>