

Darktable is a versatile and open-source photography workflow application and raw developer, providing a powerful suite of tools for photographers. As a virtual lighttable and darkroom, it enables users to manage their digital negatives in a database and view them through a zoomable lighttable. The guide below will demonstrate how to install Darktable on Linux Mint 21 or 20, a process that is straightforward and accessible for photographers of all skill levels.
Key Features of Darktable:
- Non-Destructive Editing: Changes are recorded in a database, leaving the original images untouched.
- RAW Processing: Darktable supports a wide range of raw file formats, offering high-quality output.
- Tethered Shooting: Allows for controlling the camera from the computer, useful for studio photography.
- Color Management: Ensures consistent color reproduction across different devices.
- Advanced Export Options: Offers diverse file formats and quality settings for exporting images.
- Customizable Interface: Tailor the workspace to suit individual workflow needs.
In the following sections, you will find detailed steps to install Darktable on your Linux Mint system. This process involves downloading the appropriate package, ensuring system compatibility, and executing a series of commands to complete the installation. By the end of this guide, you will have Darktable ready to use, unlocking new possibilities in your digital photography workflow.
Install Darktable on Linux Mint 21 or 20 via APT
Step 1: Update Linux Mint Before Darktable Installation
Before installing Darktable, it’s essential to update your Linux Mint system to ensure all existing packages are up to date. This step helps avoid conflicts and ensures smooth installation.
Run the following command in the terminal to update your system:
sudo apt update && sudo apt upgradeStep 2: Install Darktable via APT Command
The first installation option uses the default APT package manager, the easiest and quickest method for Darktable installation. The APT package manager is native to Debian-based systems, including Linux Mint, and allows you to install, update, and remove software packages.
Run the following command in the terminal to install Darktable:
sudo apt install darktableInstall Darktable on Linux Mint 21 or 20 via Flatpak with Flathub
The second installation option is using the Flatpak package manager. Flatpak comes pre-installed on Linux Mint unless you removed it. This package manager is an alternative to APT and Snap, designed for distributing sandboxed applications across different distributions.
Step 1: Enable Flatpak For Darktable Installation
First, enable Flatpak by adding the Flathub repository. Flathub is the largest collection of Flatpak applications, providing access to a wide range of software.
Run the following command in the terminal to enable Flatpak and Flathub:
sudo flatpak remote-add --if-not-exists flathub https://flathub.org/repo/flathub.flatpakrepoStep 2: Install Darktable via Flatpak Command
Now that Flatpak and Flathub are enabled, you can install Darktable using the following command:
flatpak install flathub org.darktable.Darktable -yThis command tells Flatpak to install the Darktable package from the Flathub repository. The -y option confirms the installation automatically, streamlining the process.
Launch Darktable on Linux Mint 21 or 20
Now that you have successfully installed Darktable on your Linux Mint system, several ways exist to launch the application.
CLI Commands to Launch Darktable
The first method involves using the terminal to launch Darktable directly. This option is useful if you want to start the application immediately.
For APT users, type the following command in your terminal:
darktableFor Flatpak users, use this command instead:
flatpak run org.darktable.DarktableWhile these commands launch Darktable, relying solely on the terminal is not always the most practical solution.
GUI Method to Launch Darktable
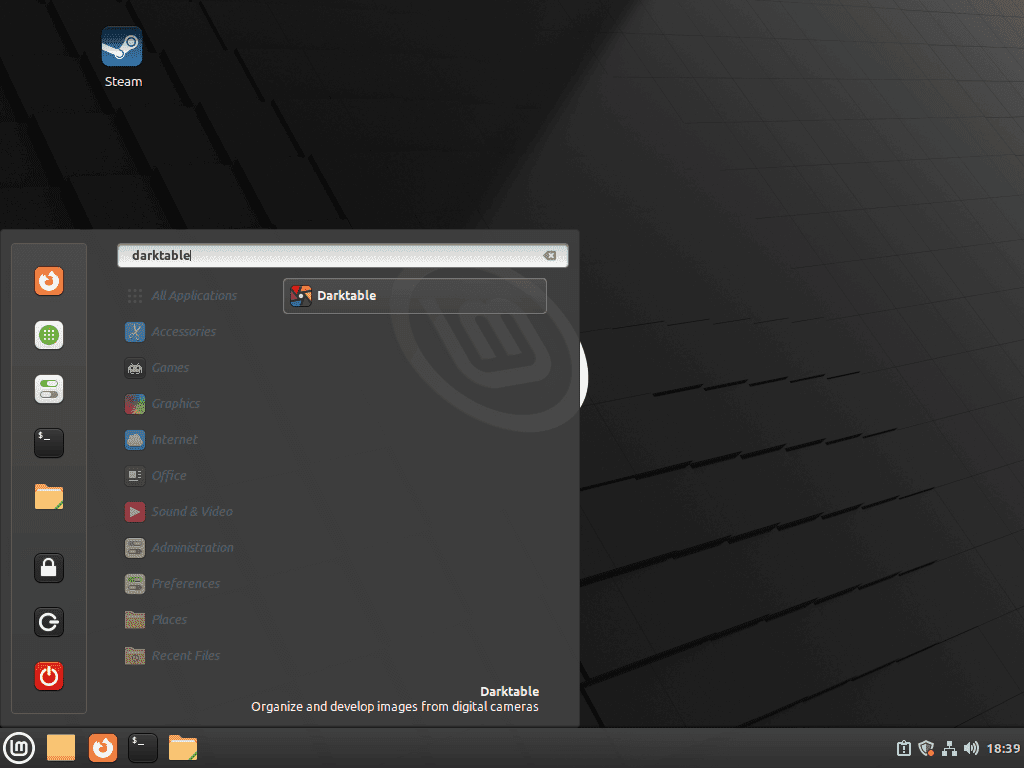
A more convenient way to launch Darktable is through the application menu, which allows you to access the software without using the terminal.
To open Darktable from the application menu:
- Click on the Menu button located in the bottom-left corner of your screen.
- Type “Darktable” in the search bar.
- Click on the Darktable icon to launch the application.
First-Time Tips for Darktable on Linux Mint 21 or 20
This section will provide some general tips, customization options, and other helpful information to help you get started with Darktable on Linux Mint.
General Darktable Tips on Linux Mint
- Keyboard shortcuts: Darktable has numerous keyboard shortcuts to speed up your workflow. To view the full list of shortcuts, press H when inside Darktable. You can customize these shortcuts by navigating to Settings (gear icon) > Shortcuts.
- Presets: Save time by using built-in presets for various processing modules. To access presets, click on the hamburger menu (three horizontal lines) in the top-right corner of each module. You can also create your own custom presets by adjusting the module settings and clicking on the + button next to the hamburger menu.
- Styles: Apply a consistent look to multiple images using Styles. You can create, import, and export styles in the Lighttable view under the Styles panel.
- Importing images: Import your photos into Darktable by clicking on the Import button in the Lighttable view. You can choose to import a single image, a folder, or even import images from a camera directly.
Darktable Customizations on Linux Mint
- User Interface (UI) themes: Customize Darktable’s appearance by selecting a theme that suits your taste. Navigate to Settings (gear icon) > General > Themes and choose from the available options.
- Changing the language: To change the interface language, go to Settings (gear icon) > General > Language and select your preferred language from the dropdown menu.
- Tethered shooting: Connect your camera to your Linux Mint computer and control it directly from Darktable. This feature allows you to capture images, adjust settings, and import photos automatically. To access tethered shooting, switch to the Tethering view in Darktable.
Other Darktable Tips on Linux Mint
- Backup your database: Protect your edits and metadata by regularly backing up the Darktable database. By default, the database is located in
~/.config/darktable/. To create a backup, simply copy thelibrary.dbanddata.dbfiles to a safe location. - Optimize performance: If you’re experiencing performance issues, you can adjust the number of processor cores Darktable uses for certain tasks. Go to Settings (gear icon) > Core options > Performance and set the CPU and OpenCL options according to your hardware capabilities.
- Geotagging: Add geographical information to your images using the Map view in Darktable. You can manually place images on the map or import GPS coordinates from a file.

Managing Darktable on Linux Mint 21 or 20
This section will cover how to update and uninstall Darktable on Linux Mint, depending on your installation method (APT or Flatpak). We’ll provide step-by-step instructions to ensure you understand the process.
Update Darktable on Linux Mint
It’s essential to keep Darktable up to date to benefit from the latest features, bug fixes, and performance improvements. Depending on the method you used to install the software, follow the appropriate steps below to update Darktable.
APT Update Method for Darktable
If you installed Darktable using the APT package manager, run the following command in the terminal to update both your system and the Darktable application:
sudo apt upgrade && sudo apt upgradeFlatpak Update Method for Darktable
If you installed Darktable using Flatpak, execute the following command in the terminal to update all Flatpak applications:
flatpak updateRemove (Uninstall) Darktable From Linux Mint
If you no longer require Darktable, you can uninstall it by following the steps below. Make sure to use the command that corresponds to your original installation method (APT or Flatpak).
APT Remove Method for Darktable
To uninstall Darktable using the APT package manager, execute the following command in the terminal:
sudo apt remove darktableFlatpak Remove Method for Darktable
To uninstall Darktable using Flatpak, run the following command in the terminal:
flatpak uninstall --delete-data org.darktable.DarktableConclusion: Installing Darktable on Linux Mint
In conclusion, installing Darktable on Linux Mint provides a powerful and versatile solution for managing and processing your digital photos. With two installation methods (APT and Flatpak), you can choose the approach that best suits your preferences and system requirements. Once installed, Darktable offers a wealth of features and customization options to optimize your digital photography workflow.