

MakeMKV converts DVDs and Blu-ray discs into MKV files while preserving all video tracks, audio streams, subtitles, and chapter information. You can install MakeMKV on Ubuntu through a PPA, Flatpak, or Snap, and each method provides the same core ripping functionality. Whether you need to back up a personal disc collection, feed a media server like Plex on Ubuntu or Jellyfin on Ubuntu, or archive aging discs before they degrade, MakeMKV handles the conversion without re-encoding.
Install MakeMKV on Ubuntu
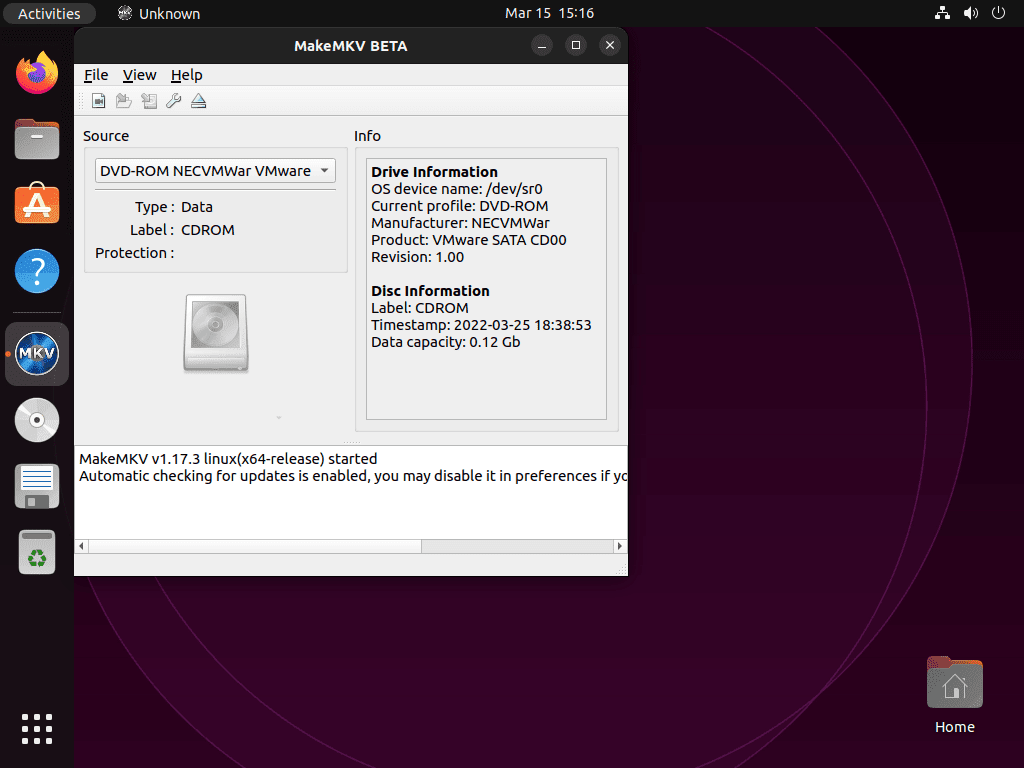
MakeMKV can be installed through three channels on Ubuntu. Each method offers different trade-offs between update speed, system integration, and sandboxing.
| Method | Channel | Version | Updates | Best For |
|---|---|---|---|---|
| APT PPA | MakeMKV PPA | Latest beta | Automatic via apt upgrade | Direct system integration |
| Flatpak | Flathub | Latest beta | Automatic via flatpak update | Sandboxed applications |
| Snap | Snapcraft | Latest beta | Automatic background updates | Snap ecosystem users |
Most users should choose the APT PPA method because it integrates directly with the system package manager, receives updates through regular apt upgrade runs, and requires no additional frameworks.
This guide supports Ubuntu 26.04 LTS, 24.04 LTS, and 22.04 LTS. The MakeMKV PPA provides packages for all three releases, and every command shown works identically across versions.
Method 1: Install MakeMKV via APT PPA on Ubuntu
Update Ubuntu System Packages
Refresh your package index and apply any pending upgrades before adding new software:
sudo apt update && sudo apt upgradeThis guide uses
sudofor commands that need root privileges. If your user is not in the sudoers file yet, run the commands as root or follow the guide on how to add and manage sudo users on Ubuntu.
Add the MakeMKV PPA
A PPA (Personal Package Archive) is a third-party repository hosted on Launchpad that provides packages not included in Ubuntu’s default repositories. Import the MakeMKV beta PPA to access the latest packages:
sudo add-apt-repository ppa:heyarje/makemkv-beta -yRefresh the package cache so APT picks up packages from the new repository:
sudo apt updateInstall the MakeMKV Packages
MakeMKV ships as two packages: makemkv-oss contains the open-source libraries (libavcodec, libdriveio), and makemkv-bin contains the proprietary decryption engine. Both are required:
sudo apt install makemkv-oss makemkv-binVerify the installed version matches the PPA release:
apt-cache policy makemkv-binExpected output:
makemkv-bin:
  Installed: 1.18.3-1~resolute
  Candidate: 1.18.3-1~resolute
  Version table:
 *** 1.18.3-1~resolute 500
        500 https://ppa.launchpadcontent.net/heyarje/makemkv-beta/ubuntu resolute/main amd64 Packages
        100 /var/lib/dpkg/status
Register the MakeMKV Beta Key
MakeMKV requires a registration key for full Blu-ray functionality. During the beta period, a free key is available that must be renewed every one to two months.
The beta key changes periodically. Always get the current key from the official MakeMKV beta key forum thread rather than copying outdated keys from other tutorials. After launching MakeMKV, go to Help > Register and paste the current key.
Method 2: Install MakeMKV via Flatpak on Ubuntu
Flatpak must be installed before proceeding. If you do not have Flatpak set up, follow our guide to install Flatpak on Ubuntu first.
With Flatpak configured, install MakeMKV from Flathub:
flatpak install flathub com.makemkv.MakeMKV -yVerify the installation:
flatpak list | grep -i makemkvExpected output:
MakeMKV com.makemkv.MakeMKV 1.18.3 stable flathub system
The Flatpak version runs in a sandbox, which limits direct hardware access. If MakeMKV cannot detect your optical drive, see the troubleshooting section below.
Method 3: Install MakeMKV via Snap on Ubuntu
Snap provides automatic background updates and is pre-installed on most Ubuntu systems. If Snap was previously removed, reinstall it:
sudo apt install snapd -yInstall MakeMKV from the Snap Store:
sudo snap install makemkvVerify the installation:
snap list makemkvExpected output:
Name      Version    Rev    Tracking       Publisher        Notes
makemkv   1.18.3     681    latest/stable  lucyllewy*       -
Launch MakeMKV on Ubuntu
MakeMKV Terminal Launch Commands
The terminal command depends on how MakeMKV was installed. For APT installations:
makemkvFor Flatpak installations:
flatpak run com.makemkv.MakeMKVFor Snap installations:
snap run makemkvLaunch MakeMKV from Ubuntu Desktop
All three methods register a desktop entry. Open the Activities overview, type MakeMKV in the search bar, and click the icon to launch the application.
Manage MakeMKV on Ubuntu
Update MakeMKV on Ubuntu
For APT installations, MakeMKV updates arrive through your regular system upgrade:
sudo apt update && sudo apt upgradeWhen a new version is available, the upgrade output includes the MakeMKV packages:
The following packages will be upgraded:
  makemkv-bin makemkv-oss
2 upgraded, 0 newly installed, 0 to remove and 0 not upgraded.
For Flatpak installations:
flatpak update com.makemkv.MakeMKVSnap installations update automatically in the background. To trigger a manual refresh:
sudo snap refresh makemkvRemove MakeMKV from Ubuntu
For APT installations, remove both packages and clean up unused dependencies:
sudo apt remove makemkv-oss makemkv-bin
sudo apt autoremove
Remove the PPA repository so APT stops checking it for updates:
sudo add-apt-repository --remove ppa:heyarje/makemkv-beta -y
sudo apt update
Confirm the package is no longer available:
apt-cache policy makemkv-binEmpty output confirms both the package and PPA were fully removed.
For Flatpak installations, uninstall the application and remove its data directory:
flatpak uninstall com.makemkv.MakeMKV -yThe following command permanently deletes Flatpak-stored MakeMKV data including settings and cached files. Skip this step if you plan to reinstall later.
rm -rf ~/.var/app/com.makemkv.MakeMKVFor Snap installations:
sudo snap remove makemkvRemove MakeMKV Configuration Files
MakeMKV stores settings and your registration key in a hidden directory under your home folder. Remove it only after confirming you no longer need the configuration:
The following command permanently deletes your MakeMKV settings, including your registration key and conversion preferences. If you plan to reinstall later, keep this directory intact.
rm -rf ~/.MakeMKVTroubleshoot MakeMKV on Ubuntu
MakeMKV Optical Drive Not Detected
If MakeMKV does not detect your DVD or Blu-ray drive, the issue is usually a missing group membership. Optical devices on Ubuntu are owned by the cdrom group, and your user account must belong to it. Check the device permissions first:
ls -la /dev/sr0brw-rw----+ 1 root cdrom 11, 0 Dec 7 10:00 /dev/sr0
The cdrom group shown in the output above must include your user. Add yourself to the group:
sudo usermod -aG cdrom $USERThe $USER variable automatically resolves to your current username. Log out and log back in for the group change to take effect, then confirm membership:
groupsThe output should now include cdrom in your list of groups.
MakeMKV Flatpak Optical Drive Access
Flatpak sandboxing may block MakeMKV from accessing your optical drive even when the cdrom group membership is correct. Grant device access to the Flatpak application:
sudo flatpak override --device=all com.makemkv.MakeMKVRestart MakeMKV after applying the override. This grants the sandboxed application access to all device nodes, including /dev/sr0.
MakeMKV Beta Key Expired or Missing
If MakeMKV displays a registration error, limited functionality warning, or refuses to process Blu-ray discs, your beta key has likely expired. Visit the official beta key thread to get the current key, then enter it via Help > Register in the application menu. DVD ripping works without a key; only Blu-ray functionality requires it.
Frequently Asked Questions About MakeMKV on Ubuntu
Yes. MakeMKV runs on Ubuntu 26.04, 24.04, and 22.04 LTS through three installation methods: the APT PPA for native system packages, Flatpak from Flathub for sandboxed installs, or Snap from the Snap Store. All three methods provide the same core ripping and streaming functionality.
MakeMKV is free to use during the beta period for both DVD and Blu-ray conversion. A beta registration key is required for Blu-ray functionality and must be renewed every one to two months from the official MakeMKV forum. DVD ripping works without a key.
The makemkv-oss package contains the open-source components including libavcodec and libdriveio, while makemkv-bin contains the proprietary binary that handles disc decryption. Both packages must be installed together for full functionality when using the APT PPA method.
The APT PPA method is recommended for most users because it integrates directly with Ubuntu’s package manager, receives updates through standard apt upgrade commands, and provides native hardware access without sandboxing restrictions. Flatpak is a good alternative if you prefer application isolation, while Snap suits users already relying on the Snap ecosystem.
Yes. MakeMKV includes a command-line tool called makemkvcon that supports disc scanning, title listing, and full MKV ripping from a terminal session. Run makemkvcon info disc:0 to list available titles and makemkvcon mkv disc:0 all /output/path to rip all titles. This is useful for headless servers or automated ripping scripts.
Conclusion
With MakeMKV installed on Ubuntu, you can convert your DVD and Blu-ray discs into MKV files with all original tracks, chapters, and subtitles preserved. To play your ripped files, install VLC media player on Ubuntu. For re-encoding to smaller file sizes or device-specific formats, HandBrake on Ubuntu pairs well with MakeMKV in a rip-then-encode workflow. For additional resources on configuration and updates, visit the MakeMKV official website.

After the installation, you’ll need a registration key to use MakeMKV. The current beta key can be found in this forum post.
https://forum.makemkv.com/forum/viewtopic.php?t=1053
I spent a whole day on this guide but it doesn’t work for me with LinuxMInt 22.1 -> they changed something with the lib-folders …
Interesting: installing (and register) MakeMKV from the repository and VLC as Flatpak adding “MakeMKV plugin for VLC” seams to work. Maybe you can give us a hint which way is finally the best for other UBUNTU (or Debian) based distributions? Thank you!
Thanks for sharing your experience, gilbert. Linux Mint sometimes structures library paths differently than Ubuntu, which can cause issues with Ubuntu PPAs. Your solution using Flatpak is actually the safest approach for Linux Mint users because Flatpak bundles all dependencies and avoids system library conflicts entirely.
For Ubuntu-based distributions like Linux Mint, Flatpak is generally the best choice for third-party applications. The PPA method works reliably on Ubuntu itself, but Mint’s customizations can introduce compatibility issues. Snap is another option that works well across distributions, though Flatpak typically has better desktop integration on Mint.
The combination you found (repository MakeMKV plus Flatpak VLC with the plugin) works because the core MakeMKV libraries installed system-wide, while VLC’s Flatpak runtime provides its own isolated plugin environment. If you encounter any issues with that setup, try installing MakeMKV via Flatpak as well for complete isolation.