For quick cuts, title overlays, and multi-track edits, OpenShot keeps Ubuntu video editing lighter than a full production suite. You can install OpenShot on Ubuntu as openshot-qt from Ubuntu’s Universe repository, switch to the OpenShot stable PPA for the current 3.5.x packages, or use the Flathub build when you prefer Flatpak’s app and runtime update model.
Ubuntu 26.04 already ships OpenShot 3.4.x, while Ubuntu 24.04 and 22.04 still carry older branches. OpenShot’s official download page also provides a 64-bit Linux AppImage, but managed package sources keep updates and removal more predictable on Ubuntu.
Install OpenShot on Ubuntu
The Ubuntu package is the easiest place to start, especially on Ubuntu 26.04. Switch to the stable PPA when you want the newest OpenShot branch through APT-managed updates, and use Flatpak when you want Flathub packaging despite the older build and broader desktop permissions.
| Method | Channel | Branch | Updates | Best For |
|---|---|---|---|---|
| Ubuntu repository | Ubuntu Universe | 26.04: 3.4.x; 24.04: 3.1.x; 22.04: 2.5.x | APT updates | Lowest maintenance and no external source |
| OpenShot stable PPA | Launchpad PPA | Current 3.5.x packages | APT-managed updates | Newest stable branch through APT |
| Flatpak | Flathub (unverified listing) | Flathub stable build, currently 3.3.0 | Flatpak updates | Flathub app/runtime workflow, not strict isolation |
OpenShot does not currently have a matching openshot package in the Snap Store. If you specifically need a direct download, use the official 64-bit AppImage from OpenShot; otherwise, the managed APT and Flatpak paths here are easier to update and remove.
Update Ubuntu Before Installing OpenShot
Refresh the package index first so APT sees the current Ubuntu or PPA metadata.
sudo apt updateThese commands use
sudofor package management tasks. If your account does not have sudo access yet, follow the guide to add a new user to sudoers on Ubuntu Linux or run the commands from a root shell.
Install OpenShot from Ubuntu Repositories
The Ubuntu package is the lowest-maintenance option, and on Ubuntu 26.04 it already tracks OpenShot 3.4.x. Ubuntu installs the package as openshot-qt, while the desktop launcher appears as OpenShot Video Editor.
The package comes from Ubuntu’s Universe component. Standard desktop installs usually have Universe enabled already, but minimal or customized systems can follow the guide to enable Universe and Multiverse repositories on Ubuntu if APT cannot locate openshot-qt.
sudo apt install -y openshot-qtThe -y flag accepts the APT confirmation prompt automatically. After the install finishes, verify the package source and branch with:
apt-cache policy openshot-qtRelevant output on Ubuntu 26.04 includes the Universe candidate and source line:
openshot-qt:
  Candidate: 3.4.0+dfsg1-2
  Version table:
     3.4.0+dfsg1-2 500
        500 http://au.archive.ubuntu.com/ubuntu resolute/universe amd64 Packages
Ubuntu 24.04 reports 3.1.1+dfsg1-1 from the default repository, and Ubuntu 22.04 reports 2.5.1+dfsg1-2ubuntu0.1. If you want the current 3.5.x OpenShot branch on any supported Ubuntu LTS release, move to the stable PPA.
Install OpenShot from the OpenShot Stable PPA
The stable PPA tracks OpenShot’s official Debian-based packages and currently publishes OpenShot 3.5.x builds for Ubuntu 26.04, 24.04, and 22.04. Use this method when version freshness matters more than staying only on Ubuntu’s archive package.
sudo add-apt-repository ppa:openshot.developers/ppa -yUpdate APT after adding the PPA so Ubuntu pulls the new package index.
sudo apt updateInstall the PPA build once the new source appears.
sudo apt install -y openshot-qtCheck the candidate package again to confirm APT is preferring the PPA. Relevant output on Ubuntu 24.04 uses a ~ubuntu24.04.1 suffix; Ubuntu 26.04 and 22.04 show the same 3.5.x branch with their own version suffixes.
apt-cache policy openshot-qtopenshot-qt:
Candidate: 3.5.1+dfsg2+1791+202604080516~ubuntu24.04.1
Version table:
3.5.1+dfsg2+1791+202604080516~ubuntu24.04.1 500
500 https://ppa.launchpadcontent.net/openshot.developers/ppa/ubuntu noble/main amd64 Packages
3.1.1+dfsg1-1 500
500 http://au.archive.ubuntu.com/ubuntu noble/universe amd64 Packages
Ubuntu 22.04 shows the same 3.5.x package family with a ~ubuntu22.04.1 suffix, and Ubuntu 26.04 uses a ~ubuntu26.04.1 suffix. OpenShot also publishes ppa:openshot.developers/libopenshot-daily for testers, but that branch can change between commits and is not a good default install path.
Install OpenShot via Flatpak
The Flathub build works across supported Ubuntu LTS releases once Flatpak is configured, but it is not the strictest isolation choice. Flathub currently labels the listing as unverified and potentially unsafe, and the manifest grants broad host filesystem access.
Ubuntu does not install Flatpak on a standard setup. If you need it first, follow the guide to install Flatpak on Ubuntu Linux and come back once
flatpakis available.
Add Flathub as a system remote if it is not already present.
sudo flatpak remote-add --if-not-exists flathub https://dl.flathub.org/repo/flathub.flatpakrepoThe --if-not-exists flag skips the add step when Flathub is already configured, so the command is safe on systems that already use Flatpak. Confirm the remote scope before installing the app:
flatpak remotes --columns=name,optionsflathub system
Install OpenShot from Flathub once the remote is available.
sudo flatpak install -y flathub org.openshot.OpenShotThe Flatpak app ID is org.openshot.OpenShot. Verify the installed build with:
flatpak info org.openshot.OpenShotRelevant output includes these stable fields:
          ID: org.openshot.OpenShot
         Ref: app/org.openshot.OpenShot/x86_64/stable
        Arch: x86_64
      Branch: stable
     Version: 3.3.0
      Origin: flathub
That version check matters because Flathub currently lags behind Ubuntu 26.04 and the stable PPA. If you want the newest OpenShot release more than the Flathub packaging model, use the stable PPA or the official AppImage.
Compare OpenShot Versions on Ubuntu
OpenShot version differences are large enough across Ubuntu LTS releases that the default package choice can change what you see in the editor. Ubuntu 26.04 carries a recent 3.4.x package, while the stable PPA currently moves all supported Ubuntu LTS releases to 3.5.x.
| Ubuntu Release | Default OpenShot | Stable PPA | Best Fit |
|---|---|---|---|
| Ubuntu 26.04 | 3.4.x | 3.5.x | Stay with the Ubuntu package for low maintenance; use the PPA or AppImage for the newest branch |
| Ubuntu 24.04 | 3.1.x | 3.5.x | Use the stable PPA if newer editor features matter |
| Ubuntu 22.04 | 2.5.x | 3.5.x | Use the stable PPA or AppImage for a current OpenShot branch |
Flathub sits outside that Ubuntu release matrix, but its current OpenShot build is still 3.3.0. That makes Flatpak a Flathub packaging choice, not the fastest route to the newest upstream release or the strongest sandbox boundary.
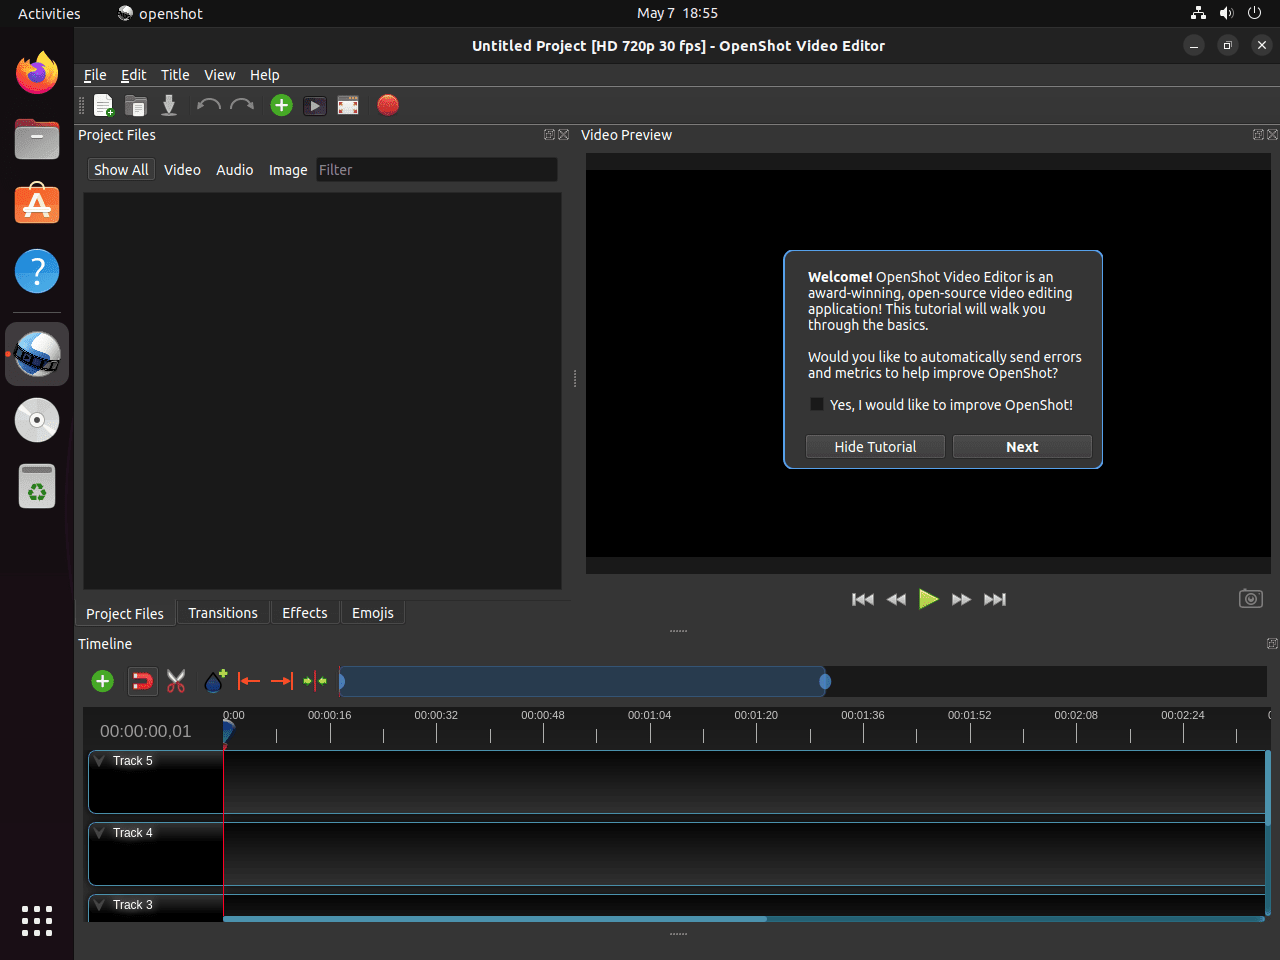
Launch OpenShot on Ubuntu
OpenShot launches the same way after a repository install or a stable PPA install because both methods provide the same desktop entry and binary name. The first launch also creates ~/.openshot_qt, which stores your settings and recovery data.
Launch OpenShot from the Ubuntu Desktop
Open the Activities overview or your applications menu, search for OpenShot Video Editor, and start it from the Graphics or Sound & Video category, depending on your desktop environment.
After the first launch, the Effects tab is where feature-specific work starts. OpenShot’s user guide documents Chroma Key (Greenscreen) as the effect that replaces a selected color with transparency, so Ubuntu users looking for green-screen work should check the effect list before changing install methods.
Launch OpenShot from Terminal
Use the terminal launcher when you want to start the editor directly or watch startup messages.
APT or stable PPA install:
openshot-qtFlatpak install:
flatpak run org.openshot.OpenShotUpdate or Remove OpenShot on Ubuntu
Use the same package channel for updates and removal that you used for installation. Keeping the maintenance path consistent avoids stale sources and makes cleanup much easier later.
Update OpenShot on Ubuntu
APT and stable PPA installs update through the normal package manager. Use --only-upgrade to upgrade OpenShot without installing unrelated packages.
sudo apt update && sudo apt install --only-upgrade openshot-qtUpdate the Flatpak build through the same system-scope remote you used for installation.
sudo flatpak update -y org.openshot.OpenShotRemove the APT Version of OpenShot on Ubuntu
Remove the Ubuntu or PPA package first.
sudo apt remove openshot-qtReview orphaned dependencies separately before removing them, because autoremove can include packages from earlier system history.
sudo apt autoremove --dry-runIf the preview only lists packages you no longer need, run the cleanup without the dry-run flag.
sudo apt autoremoveConfirm the package is no longer installed.
dpkg -l openshot-qt | grep '^ii' || echo "openshot-qt is not installed"openshot-qt is not installed
If you installed the stable PPA and no longer want it on the system, remove that source after the package is gone. Ubuntu 22.04 can leave the PPA key file behind, so the cleanup also removes the OpenShot-specific trust file when it exists.
sudo add-apt-repository --remove ppa:openshot.developers/ppa -y
sudo rm -f /etc/apt/trusted.gpg.d/openshot_developers-ubuntu-ppa.gpg /etc/apt/trusted.gpg.d/openshot_developers-ubuntu-ppa.gpg~
sudo apt update
Confirm the removed PPA no longer provides the live candidate.
apt-cache policy openshot-qtopenshot-qt:
Candidate: 3.4.0+dfsg1-2
Version table:
3.4.0+dfsg1-2 500
500 http://au.archive.ubuntu.com/ubuntu resolute/universe amd64 Packages
Removing the package does not clear OpenShot’s user data. Check for saved settings, logs, and recovery files before deleting anything from your home directory.
List the common native OpenShot data directories first:
ls -ld ~/.openshot_qt ~/.local/share/openshot 2>/dev/null || echo "No native OpenShot user-data directories found"The next command permanently deletes OpenShot preferences, logs, and recovery files for your user account. Keep a backup first if you need old project recovery data or editor settings.
Delete the directories only if you want a full reset.
rm -rf ~/.openshot_qt ~/.local/share/openshotRemove the Flatpak Version of OpenShot on Ubuntu
Remove the Flatpak app with the same system scope you used during installation.
sudo flatpak remove -y --delete-data org.openshot.OpenShotConfirm the Flatpak app record is gone:
flatpak list --app --columns=application | grep -Fx org.openshot.OpenShot || echo "org.openshot.OpenShot is not installed"org.openshot.OpenShot is not installed
Even with
--delete-data, OpenShot can still leave per-user files behind after the first launch. Check the common Flatpak and shared OpenShot paths before removing them manually.
ls -ld ~/.var/app/org.openshot.OpenShot ~/.openshot_qt 2>/dev/null || echo "No Flatpak OpenShot user-data directories found"The next command permanently deletes OpenShot’s Flatpak profile and shared settings for your user account. Export or back up any data you still need before continuing.
rm -rf ~/.var/app/org.openshot.OpenShot ~/.openshot_qtTroubleshoot OpenShot on Ubuntu
Most OpenShot problems on Ubuntu come down to stale local settings, limited disk space during exports, or expecting one packaging method to behave like another. Start with these checks before you reinstall the editor.
Reset OpenShot Settings on Ubuntu
If OpenShot hangs at launch or keeps reusing broken preferences, inspect the settings directory first. Relevant files often include:
find ~/.openshot_qt -maxdepth 1 -type f -printf '%f\n' 2>/dev/null | sort.lock libopenshot.log openshot.settings
Remove the saved settings file and let the next launch build a fresh one.
rm -f ~/.openshot_qt/openshot.settingsFix OpenShot Export Problems on Ubuntu
When exports fail, start with free space before you blame codecs or GPU settings. Large projects create preview files and temporary render data quickly.
df -h "$HOME"Example output with enough free space looks like:
Filesystem      Size  Used Avail Use% Mounted on
/dev/sda2       123G   12G  106G  10% /
If free space is tight, clear preview caches or export to a larger volume. When storage is fine but a preset still fails, retry with a common H.264 MP4 preset and use install FFmpeg on Ubuntu Linux if you want a wider codec toolchain for testing clips outside OpenShot.
Conclusion
OpenShot is installed on Ubuntu with an update path that matches your release and your tolerance for change. If you also record footage, install OBS Studio on Ubuntu next; for batch transcoding from a GUI, install Videomass on Ubuntu and keep the heavier conversions outside the editor.

Tried Method 1, option 2: from stable PPA. But I get the error: “wrong version of libopenshot detected”. Seems not so stable…
Thanks for reporting this, Al. The “wrong version of libopenshot detected” error typically occurs when OpenShot’s Python bindings expect a different library version than what’s installed. The article now includes a troubleshooting section that addresses this issue.
First, check the actual error details:
Then reinstall OpenShot with all dependencies to resolve version mismatches:
If the issue persists after reinstalling, the stable PPA may have a temporary packaging issue. In that case, you can switch back to the Ubuntu repository version (which uses older but thoroughly tested library versions) or wait for the PPA maintainers to resolve the dependency conflict.