Broken Word layouts, shifted page breaks, and missing Arial or Times New Roman usually mean Ubuntu is substituting Liberation or DejaVu fonts for Microsoft’s originals. To install Microsoft fonts on Ubuntu, use the ttf-mscorefonts-installer package from Ubuntu’s multiverse component, accept the Microsoft license prompt, and refresh the font cache so LibreOffice, browsers, and other desktop applications can see the new typefaces.
The classic Microsoft Core Fonts package is the standard repository path on Ubuntu for Arial, Times New Roman, Verdana, Georgia, Courier New, and related fonts. An optional extraction path can add older Office ClearType fonts such as Calibri, Cambria, Candara, and Consolas. That optional method does not provide Aptos, the current Microsoft 365 default font, so use a licensed Microsoft 365 or Office source if a workflow specifically requires Aptos.
Install Microsoft Core Fonts on Ubuntu
The ttf-mscorefonts-installer package is available for Ubuntu 26.04, 24.04, and 22.04 in the multiverse repository component. Standard desktop installs often already have multiverse enabled, but minimal or customized systems may need the Universe and Multiverse repositories enabled on Ubuntu before APT can find the package.
Refresh your APT metadata before installing the package:
sudo apt updateIf your account cannot run
sudoyet, configure administrator access first. The Ubuntu sudoers walkthrough explains how to add a user to sudoers on Ubuntu.
Install the Microsoft Core Fonts package:
sudo apt install ttf-mscorefonts-installerThe same package can also be installed with sudo apt-get install ttf-mscorefonts-installer if you prefer apt-get. Some users install ubuntu-restricted-extras instead, but that larger package group pulls in multimedia codecs and other extras. Use ttf-mscorefonts-installer when you only need the fonts.
The installer needs an active internet connection. During package configuration, it downloads the original font executables from SourceForge and extracts the TrueType files locally.
Accept the Microsoft Fonts EULA
During installation, the package configuration interface displays Microsoft’s End User License Agreement. Press the Tab key to highlight Ok, then press Enter.
The second prompt asks whether you accept the license terms. You must select Yes to install and use the Microsoft fonts. Selecting No cancels the installation.
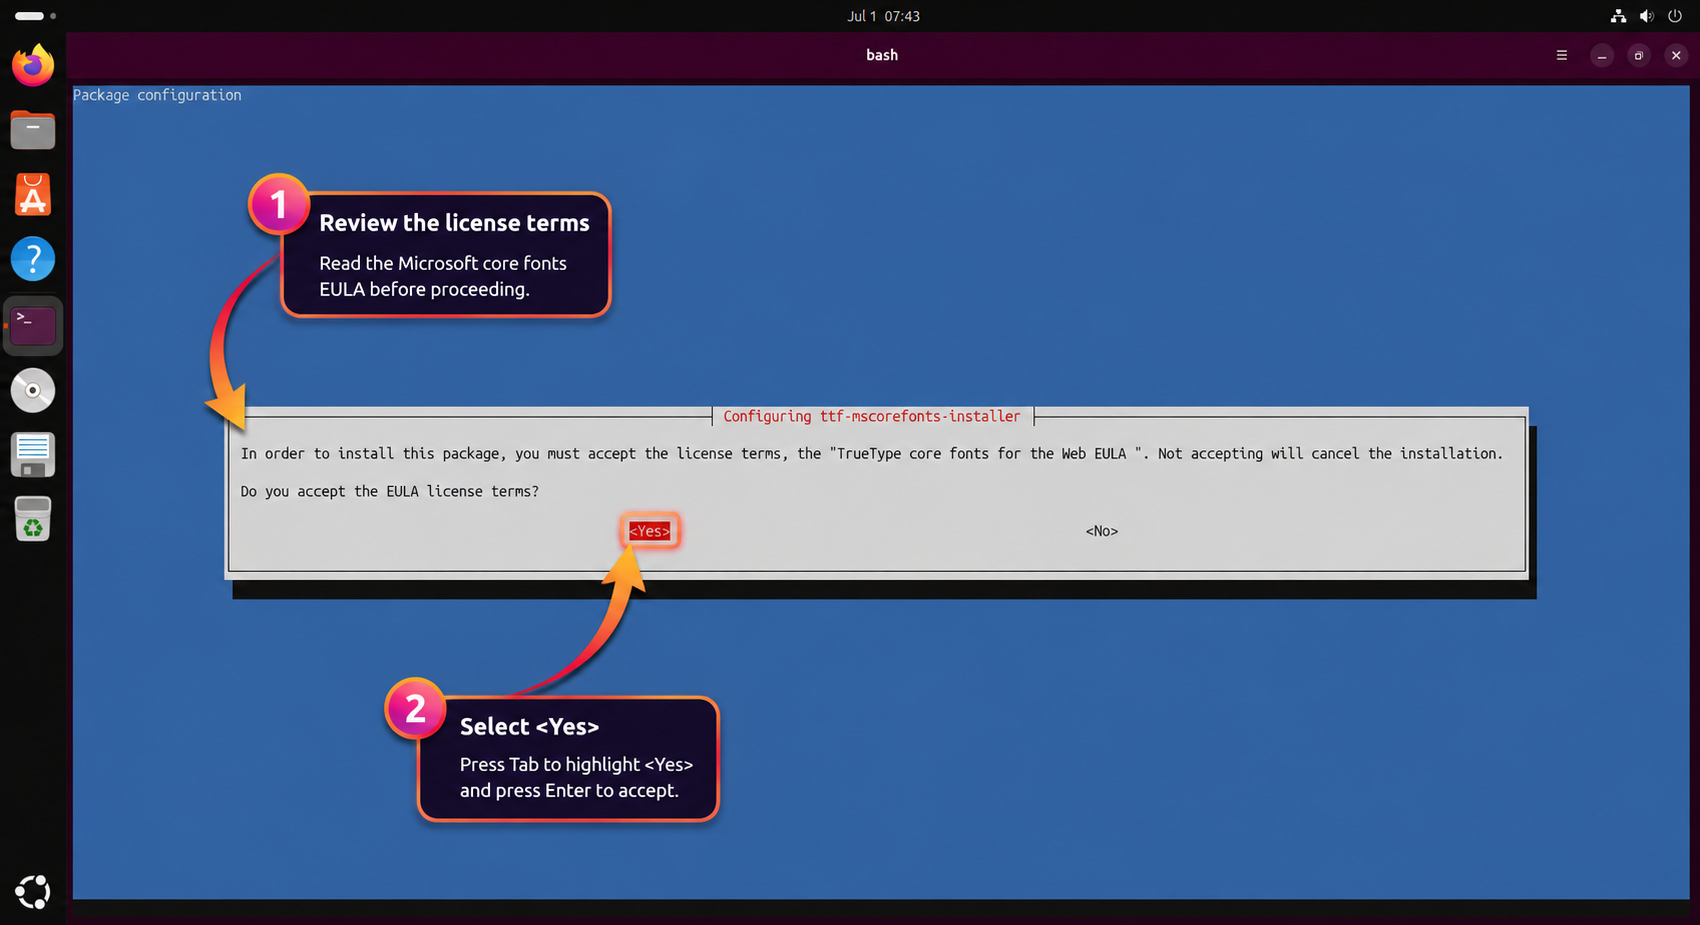
Press Tab until Yes is highlighted, then press Enter. After the package downloads and extracts the fonts, a successful run ends with a completion line similar to this:
All fonts downloaded and installed.
Rebuild the Ubuntu Font Cache
The installer normally triggers fontconfig automatically. If an application was open during installation or still cannot see the new fonts, rebuild the cache manually:
sudo fc-cache -fvThe -f option forces a rescan, and -v prints the directories being processed. Close and reopen applications that were already running before checking their font menus.
Fonts Included in ttf-mscorefonts-installer
The package installs Microsoft’s Core Fonts for the Web collection. These fonts remain common in older Office files, business templates, PDFs, and web layouts:
- Andale Mono: a monospace font for technical documents and code samples
- Arial, including Arial Black and bold or italic variants: a common sans-serif business-document font
- Comic Sans MS: an informal sans-serif font
- Courier New: a monospace font often used in code, forms, and fixed-width layouts
- Georgia: a serif font designed for screen readability
- Impact: a heavy display font used for headings and short labels
- Times New Roman: a standard serif font for academic papers, contracts, and formal documents
- Trebuchet MS: a sans-serif font often found in presentations and older web designs
- Verdana: a sans-serif font designed for clear on-screen reading
- Webdings: a symbol font used in older documents and decorative layouts
This package does not install Calibri, Cambria, Consolas, Aptos, Wingdings, or other newer Microsoft Office fonts. Webdings is included, but Wingdings requires a separate licensed font source. Use the optional ClearType method only when you need the older Office 2007-era fonts that were bundled with PowerPoint Viewer.
Verify Microsoft Fonts on Ubuntu
Use fc-match to check individual font names, then use fc-list with the grep command to confirm the installed fonts resolve to Microsoft files rather than Ubuntu’s fallback families:
fc-match Arial
fc-match "Times New Roman"
fc-list | grep -iE "Arial.ttf|Times_New_Roman.ttf|Verdana.ttf"
Relevant output includes the Microsoft font names and the /usr/share/fonts/truetype/msttcorefonts/ path:
Arial.ttf: "Arial" "Regular"
Times_New_Roman.ttf: "Times New Roman" "Regular"
/usr/share/fonts/truetype/msttcorefonts/Arial.ttf: Arial:style=Regular
/usr/share/fonts/truetype/msttcorefonts/Times_New_Roman.ttf: Times New Roman:style=Regular
/usr/share/fonts/truetype/msttcorefonts/Verdana.ttf: Verdana:style=Regular
If fc-match Arial returns LiberationSans-Regular.ttf instead, the Microsoft package is not installed or the font cache has not updated yet. Rebuild the cache, close the affected application, and reopen it.
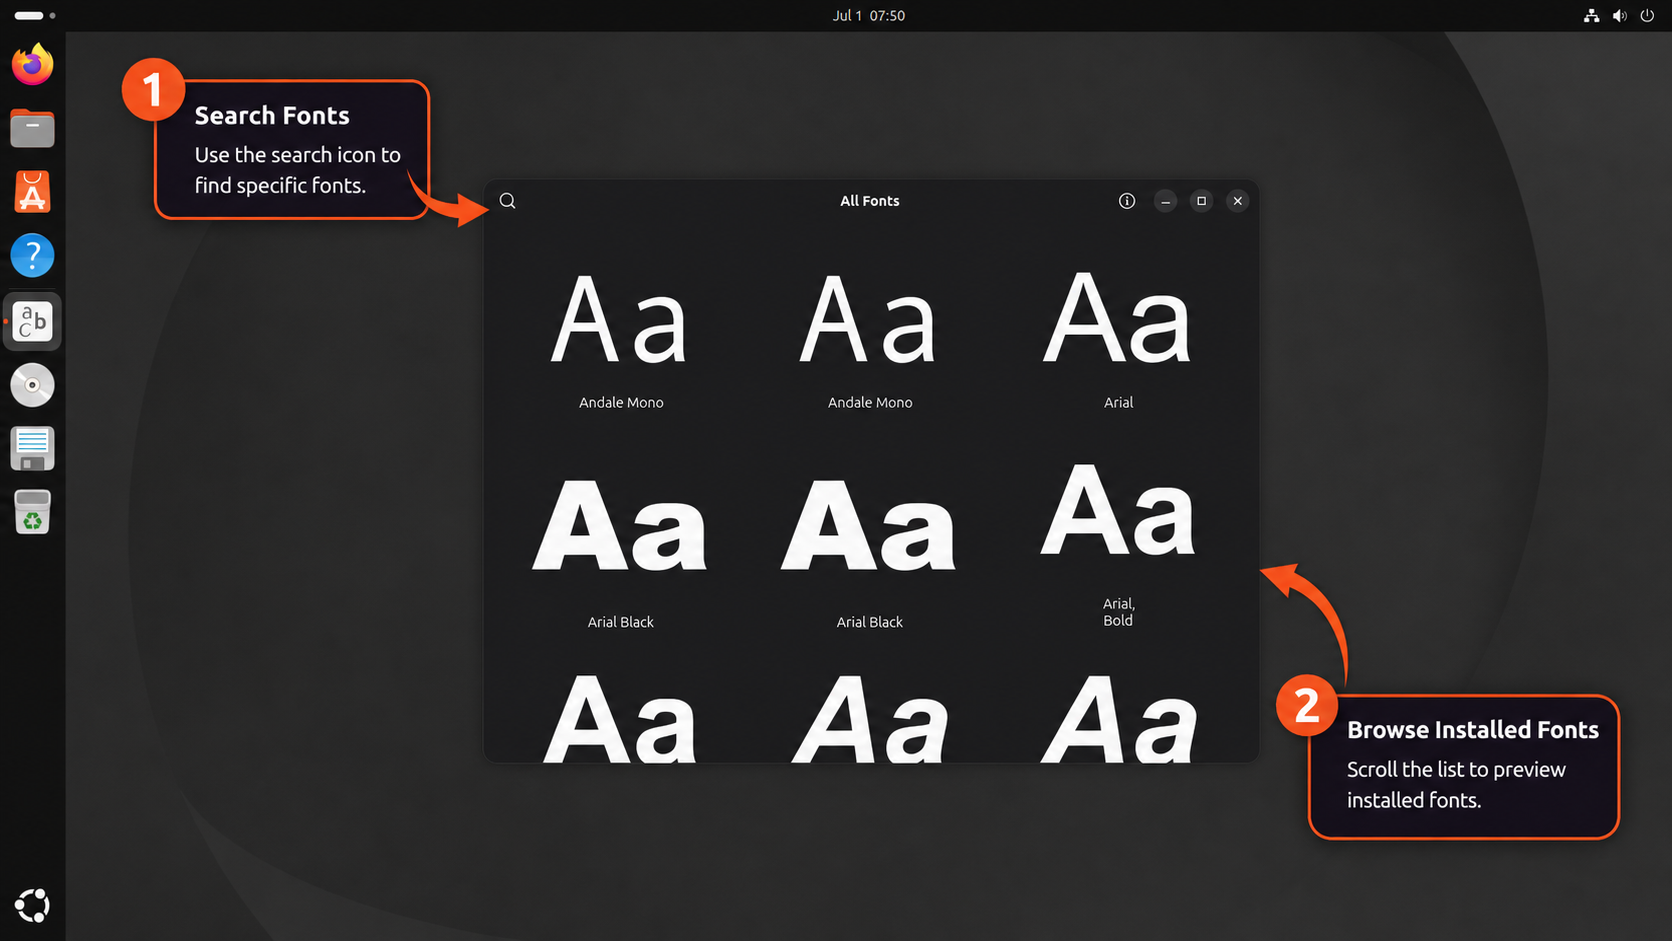
Verify Microsoft Fonts in the Fonts App
You can also verify the fonts from Ubuntu’s graphical font viewer. Open the application menu, search for Fonts, and launch the Fonts application.
Search for Arial, Times New Roman, or Verdana. If the font appears with its regular, bold, italic, and bold italic variants, the package installed correctly.
Test Microsoft Fonts in LibreOffice Writer
For document compatibility work, test the fonts directly in LibreOffice Writer:
- Open LibreOffice Writer from the application menu, or launch it with
libreoffice --writer. - Type sample text such as Testing Microsoft Fonts on Ubuntu.
- Select the text with your mouse.
- Open the font dropdown in the toolbar.
- Choose Arial, Times New Roman, or another installed Microsoft font.
- Confirm the selected text changes to the chosen font.
If the font appears in the dropdown and applies to the selected text, LibreOffice can use the installed Microsoft typefaces. Documents created or edited with these fonts will keep closer spacing and pagination when shared with Windows users.
Why Ubuntu Uses Font Substitutes by Default
Ubuntu ships open-source font families such as Liberation, DejaVu, Noto, and Ubuntu because they can be redistributed freely. Some of them are metric-compatible with Microsoft’s fonts, which means letters occupy similar widths and line heights, but they are not identical designs.
| Microsoft Font | Common Ubuntu Substitute | Compatibility Notes |
|---|---|---|
| Arial | Liberation Sans | Metric-compatible but visually different |
| Times New Roman | Liberation Serif | Metric-compatible for many document layouts |
| Courier New | Liberation Mono | Metric-compatible monospace substitute |
| Georgia | DejaVu Serif | Similar role, not a pixel match |
| Verdana | DejaVu Sans | Similar role, not a pixel match |
For casual use, those substitutes are usually enough. For resumes, client documents, print-ready PDFs, and Office templates where page breaks or line lengths matter, installing the original Microsoft fonts reduces layout drift.
Install Older Office ClearType Fonts on Ubuntu
The core fonts package does not include Calibri, Cambria, Candara, Constantia, Corbel, or Consolas. These older Office ClearType fonts were bundled with Microsoft’s discontinued PowerPoint Viewer, which is now archived. Use this optional method only when you specifically need those fonts for document compatibility.
Archive.org is not an official Microsoft download source. The checksum below verifies the archived file against the hash used for this guide; it is not a Microsoft-published signature. The fonts remain Microsoft property, so confirm your licensing obligations before deploying them in commercial, legal, or enterprise workflows.
Fonts Included in PowerPoint Viewer
The PowerPoint Viewer archive includes the Office 2007-era ClearType collection:
- Calibri: the former Microsoft Office default document font
- Cambria: a serif font used for body text and headings
- Consolas: a monospace font often used in code blocks and terminals
- Candara: a humanist sans-serif font
- Constantia: a serif font designed for screen and print reading
- Corbel: a sans-serif font for body text and interface-style layouts
It does not include Aptos. If a current Microsoft 365 document depends on Aptos, this archive will not satisfy that requirement.
Download and Extract ClearType Fonts
Install cabextract, the utility used to unpack Microsoft cabinet archives:
sudo apt install cabextractCreate a disposable working directory, download the archived PowerPoint Viewer installer with wget, and verify the file hash before extracting anything. Keep the same terminal session open until the cleanup step so $workdir still points to the temporary directory.
workdir=$(mktemp -d)
cd "$workdir"
wget -q "https://archive.org/download/PowerPointViewer_201801/PowerPointViewer.exe"

EXPECTED="249473568eba7a1e4f95498acba594e0f42e6581add4dead70c1dfb908a09423"
ACTUAL=$(sha256sum PowerPointViewer.exe | cut -d' ' -f1)

if [ "$ACTUAL" = "$EXPECTED" ]; then
    echo "Checksum verified successfully"
else
    echo "Checksum verification failed"
    rm -rf "$workdir"
    exit 1
fi
Extract the embedded cabinet archive, then extract its contents:
cabextract -q PowerPointViewer.exe -F ppviewer.cab
cabextract -q ppviewer.cab
You may see a warning about extra bytes at the end of ppviewer.cab. That warning does not necessarily mean extraction failed; continue only if the font files verify in the next step.
Create a user font directory and move the extracted TrueType files into it. The find command uses -exec and case-insensitive matching here, which works across Ubuntu 26.04, 24.04, and 22.04 even when cabextract handles uppercase patterns differently.
mkdir -p ~/.local/share/fonts/microsoft
find . -maxdepth 1 -type f \( -iname "*.ttf" -o -iname "*.ttc" \) -exec mv {} ~/.local/share/fonts/microsoft/ \;
fc-cache -f
Leave the temporary directory before removing the saved working directory so your shell does not stay inside a deleted path:
cd ~
rm -rf -- "$workdir"
Verify the Calibri font family resolves from your user font directory:
fc-match Calibri
fc-list | grep -i calibri | head -n 5
Expected output includes Calibri files under your home directory:
CALIBRI.TTF: "Calibri" "Regular"
/home/username/.local/share/fonts/microsoft/CALIBRIB.TTF: Calibri:style=Bold
/home/username/.local/share/fonts/microsoft/CALIBRI.TTF: Calibri:style=Regular
/home/username/.local/share/fonts/microsoft/CALIBRIZ.TTF: Calibri:style=Bold Italic
/home/username/.local/share/fonts/microsoft/CALIBRII.TTF: Calibri:style=Italic
Remove ClearType Fonts
To remove the optional ClearType fonts, delete the user font directory and refresh the cache:
Deleting
~/.local/share/fonts/microsoftpermanently removes everything in that directory. If you manually added other fonts there, move them elsewhere first.
rm -rf ~/.local/share/fonts/microsoft
fc-cache -f
Troubleshoot Microsoft Fonts on Ubuntu
The most common failures involve a disabled multiverse repository, EULA navigation, interrupted downloads, or applications keeping an old font cache.
Package Has No Installation Candidate
If APT reports Package 'ttf-mscorefonts-installer' has no installation candidate or Unable to locate package ttf-mscorefonts-installer, enable multiverse and refresh package metadata:
sudo add-apt-repository multiverse
sudo apt update
sudo apt install ttf-mscorefonts-installer
If add-apt-repository is missing or your sources are heavily customized, use the dedicated Ubuntu Universe and Multiverse guide to repair the repository configuration before retrying the font install.
SourceForge Font Download Failures
The package downloads several small executables from SourceForge during configuration. If a mirror times out or your connection drops, rerun the package configuration after confirming internet access:
sudo dpkg-reconfigure ttf-mscorefonts-installerAccept the EULA again when prompted. The command restarts the font download and extraction process without changing the rest of your system.
EULA Navigation Problems
If the EULA screen appears stuck, the terminal is usually waiting for keyboard navigation. Press Tab to move focus to Ok or Yes, then press Enter. If you accidentally cancel the prompt, rerun sudo dpkg-reconfigure ttf-mscorefonts-installer.
Fonts Not Appearing in Applications
Applications that were open during installation may keep an old font list. Rebuild the cache, then restart the affected application:
sudo fc-cache -fvIf the font still does not appear, log out and back in so your desktop session reloads its font list.
Remove Microsoft Fonts from Ubuntu
Remove the classic Microsoft Core Fonts package with APT:
sudo apt remove ttf-mscorefonts-installerThe package removal script deletes the downloaded font files from /usr/share/fonts/truetype/msttcorefonts/. Refresh the font cache afterward:
sudo fc-cache -fVerify Arial now falls back to Ubuntu’s substitute font:
fc-match ArialLiberationSans-Regular.ttf: "Liberation Sans" "Regular"
If APT says cabextract or another dependency is no longer required, you can remove orphaned packages after reviewing the package list:
sudo apt autoremoveConclusion
Ubuntu can use Microsoft’s classic TrueType fonts once ttf-mscorefonts-installer downloads them, accepts the license, and updates the font cache. The core package covers the main Arial, Times New Roman, Verdana, Georgia, Courier New, and Trebuchet MS compatibility cases. For older Office files that depend on Calibri, Cambria, or Consolas, the optional PowerPoint Viewer extraction adds those fonts to your user font directory, while Aptos remains outside both methods and needs a licensed Microsoft source.

Gives error on Ubuntu 24.04:
ttf-mscorefonts-installer: processing…
ttf-mscorefonts-installer: downloading http://downloads.sourceforge.net/corefont
s/andale32.exe
Ign:1 http://downloads.sourceforge.net/corefonts/andale32.exe
Ign:1 http://downloads.sourceforge.net/corefonts/andale32.exe
Ign:1 http://downloads.sourceforge.net/corefonts/andale32.exe
Err:1 http://downloads.sourceforge.net/corefonts/andale32.exe
Could not connect to cyfuture.dl.sourceforge.net:80 (49.50.119.27), connection
timed out
E: Failed to fetch http://cyfuture.dl.sourceforge.net/project/corefonts/the%20fo
nts/final/andale32.exe?viasf=1 Could not connect to cyfuture.dl.sourceforge.net
:80 (49.50.119.27), connection timed out
E: Download Failed
Processing triggers for fontconfig (2.15.0-1.1ubuntu2) …
Good catch, 4D. That log shows a SourceForge mirror timeout, not an Ubuntu 24.04 package syntax problem. I have updated the troubleshooting section so this failure is clearer.
Retry the package configurator first:
Then check that Arial resolves to the Microsoft font file:
If SourceForge still times out, wait and retry or try another network. Avoid manually moving downloaded font files into a system directory unless you can verify the source and licensing for each file.