Git is a foundational tool in software development, offering robust version control capabilities. This guide focuses on how to install Git on Linux Mint 21 or the older release of Linux Mint 20. We’ll cover multiple installation methods, including the default apt repository, the Ubuntu-git maintainers PPA, and manual installation from a downloaded archive.
Why Choose Git? Key Features at a Glance
- Distributed Version Control: Git allows each developer to have a local copy of the entire project history, enabling efficient collaboration and offline work.
- Branching and Merging: Git excels in its branching capabilities, making it easy to work on different features or fixes simultaneously without affecting the main code.
- Security: Git uses cryptographic hashing to ensure data integrity, making unauthorized changes to the repository easily detectable.
- Speed: Known for its high performance, Git can efficiently handle large codebases.
- Open Source: Git is free to use and has a vibrant community contributing to its ongoing development.
Given its comprehensive feature set and widespread adoption, Git is many developers’ go-to version control system. Stay tuned for the step-by-step guide on installing Git on Linux Mint 21 or Linux Mint 20.
Section 1: Update Linux Mint Before GIT Installation
Before starting the installation process, it’s essential to update your Linux Mint system to ensure all packages are current and avoid any conflicts during the installation.
Run the following command to update the package lists:
sudo apt updateUpgrade any outdated packages by running the following:
sudo apt upgradeSection 2: Install Git with APT on Linux Mint 21 or 20
Method 1: Install Git with the Default Linux Mint Repository
The easiest way to install Git is using the default repository provided by Linux Mint. This method is recommended for most users.
Check if Git is already installed by running the following:
git --versionIf no output is returned, proceed to the next step.
Install Git using the following command:
sudo apt install gitVerify the installation by checking the Git version:
git --versionMethod 2: Install Git from Ubuntu Git Maintainers PPA on Linux Mint 21 or 20
For users who prefer the latest stable version of Git, the Ubuntu Git Maintainers PPA can be used. Linux Mint is based on the LTS version of Ubuntu, ensuring compatibility with your system.
Option 1: Import Ubuntu Git Maintainers PPA – Stable Branch on Linux Mint
Add the stable branch of the Ubuntu Git Maintainers PPA by running:
sudo add-apt-repository ppa:git-core/ppa -yOption 2: Import Ubuntu Git Maintainers PPA – RC Branch on Linux Mint
Alternatively, you can add the release candidate branch, which might contain a more recent version of Git. We recommend the stable branch for most users, but you can add both PPAs if desired.
Add the release candidate branch by running:
sudo add-apt-repository ppa:git-core/candidate -yAfter importing the desired repository, proceed with the following steps:
Update the package lists with the new PPA:
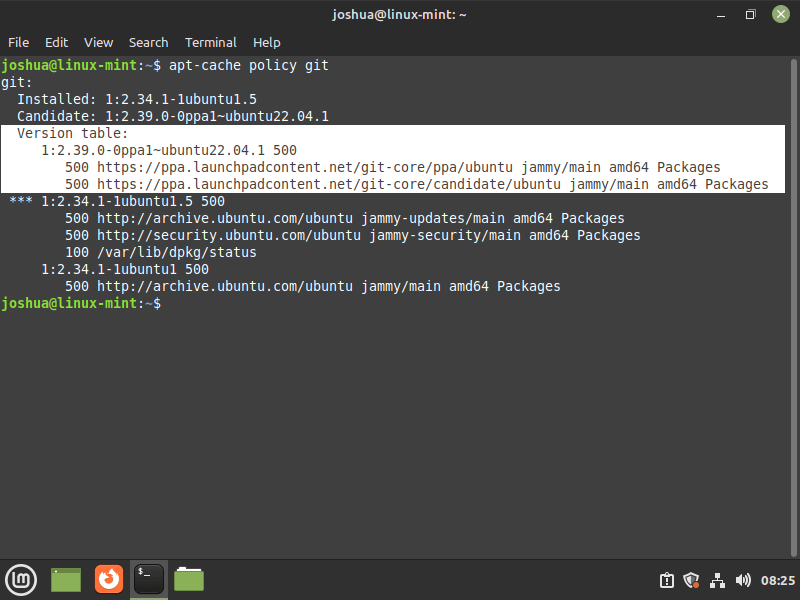
sudo apt updateCheck the available Git versions using the policy command:
apt-cache policy gitThis command will show the available Git versions from the different repositories. Don’t worry about the specific version numbers for now.
Now install Git using the following command:
sudo apt install git -yThis command works for both users with and without Git installed.
Verify the installation by checking the Git version:
git --versionSection 2: Install GIT via source on Linux Mint 21 or 20
This section will guide you through installing Git by compiling it from the source. This method might be preferred by users who want more control over the installation process or need specific features that may not be available in the packaged versions.
Step 1: Install GIT Build Dependencies on Linux Mint
Before compiling Git, you need to install the necessary build dependencies. Run the following command to install them:
sudo apt install make libssl-dev libghc-zlib-dev libcurl4-gnutls-dev libexpat1-dev gettext unzip -yStep 2: Download Git Source Code on Linux Mint
Visit the Git release page for the latest stable release or the master zip archive, then use the wget command to download the desired archive. Replace {version} with the version number you want to download:
wget https://github.com/git/git/archive/refs/tags/{version}.zipAlternatively, you can download the latest development version (master) with the following command:
wget https://github.com/git/git/archive/refs/heads/master.zip -O git.zipThe master version may be unstable and contain bugs. The stable release or the PPA method is recommended for a more straightforward installation process.
Section 3: Extract and Compile Git Source Code on Linux Mint
Start by extracting the downloaded archive using the unzip command. Make sure to replace {version} with the actual version number you downloaded:
sudo unzip {version}After executing this command, you will have the extracted Git source code in a new directory.
Now, navigate to the extracted directory using the cd command. This will change the current working directory to the Git source code folder:
cd git-{version}In this step, you will compile and install Git using two separate make commands. The first make command is responsible for compiling the source code with the specified prefix, ensuring that all necessary files are generated:
sudo make prefix=/usr/local allBy specifying the prefix as /usr/local, you are telling the build system to install Git into the /usr/local directory once the compilation is complete. The all option ensures that all components are built.
After completing the compilation, you will proceed to the installation stage. Run the following command to install Git:
sudo make prefix=/usr/local installThis command will install Git into the /usr/local directory, as specified by the prefix option. The installation process will copy the necessary files and set up the correct permissions, allowing you to use Git on your system.
Verify the installation and build once you have installed Git from the source.
git --versionSection 4: Basic Git Commands for Linux Mint 21 or 20
This section will go through some common Git commands and daily operations that users frequently perform.
Configure Git User Information
After installing Git, you must set up standard settings, such as names and email addresses, mainly for Git commit messages. This can be done quickly by following these steps:
Set your name, which will be used globally:
git config --global user.name "YOUR NAME"Set your email address (it can be a fake one if you prefer):
git config --global user.email "YOUR EMAIL"Create a Git Repository
To create a new directory specifically for Git, follow these steps:
Create a new directory:
mkdir example-directory -pNavigate to the new directory:
cd example-directory -pInitialize the Git repository, which makes a hidden .git directory to store configurations, history, etc.:
git initYou will see a terminal output indicating the directory initialization status. You can also view the contents of the .git directory using the following command:
ls -a .gitVerify Git Configuration
To check the current Git configuration, use the git config --list command:
git config --listGit stores its configuration details in the ~/.gitconfig file. To review what’s stored in this file, use the cat command:
cat ~/.gitconfigStore Git Credentials
If you want to store your authentication details, you can enable the credential helper cache with this command:
git config --global credential.helper cacheFor better security, it’s recommended to cache your credentials for a limited time only. For example, if you plan to use Git for a few hours, set the cache to expire after 5 hours:
git config --global credential.helper "cache --timeout=18000"After 5 hours, the credentials will be deleted, increasing the security of your Git setup.
Check Git Repository Status
To view the status of a Git repository, use the git status command:
git statusConnect to a Remote Git Repository
To sync and download/upload changes with a remote Git repository, you must link your local repository to the remote one. This can be done using the git remote command:
git remote add origin remote-repository-linkCommit and Push Changes
When you’ve completed changes in your local Git repository and want to sync them with the remote repository, use the git commit command:
git commit -m "git message changelog"The -m "git message changelog" part is the message that appears in the changelog.
To push (send) the changes to the remote repository and sync both versions, use the git push command:
git push origin masterPull Changes from Remote Repository
To pull (get) changes from the remote repository and sync both versions, use the git pull command:
git pull origin masterSection 4: Additional Commands & Tips for GIT on Linux Mint 21 or 20
How to Update GIT on Linux Mint
Since you installed Git using the APT package manager, updates to Git will be included with your standard system packages. To update and upgrade Git, run the following:
sudo apt update && sudo apt upgradeHow to Remove (Uninstall) Git from Linux Mint
If you no longer want Git installed on your system, follow these steps to remove the software:
For users who installed Git using the APT package manager, run the following command:
sudo apt remove gitFor users who installed Git from the PPA, use the following commands to remove it:
sudo add-apt-repository --remove ppa:git-core/ppa -y
sudo add-apt-repository --remove ppa:git-core/candidate -y
Conclusion
Setting up Git on Linux Mint is a simple process with various installation options available to cater to your needs. This guide provides clear steps to help you quickly install Git on your Linux Mint system. Whether you prefer using the APT package manager, PPA repositories, or compiling from source, each method is efficient and effective. Once installed, Git allows you to manage your code repositories and collaborate with others easily.


