Remote support on Rocky Linux is easier to maintain when AnyDesk updates through DNF instead of a one-off RPM download. To install AnyDesk on Rocky Linux, add the official AnyDesk RPM repository, confirm the package source, and let DNF handle future updates.
AnyDesk’s official Linux download page lists RPM, DEB, and tar.gz builds for amd64 and arm64. On Rocky Linux x86_64, the managed RPM repository is easier to maintain than a one-off RPM download because DNF can refresh and upgrade the package later.
The AnyDesk package source currently resolves on Rocky Linux 10, 9, and 8 for
x86_64. AnyDesk’s Linux support notes list RHEL 8 rather than Rocky Linux for official support, so treat this as a package-compatible Rocky workflow. Display-server support is separate: Wayland can initiate outgoing sessions, but incoming remote-control sessions need Xorg.
Install AnyDesk on Rocky Linux
Check Architecture and Update Rocky Linux
Confirm the system architecture before adding the repository. The repository used in this section serves the AnyDesk RPM package for x86_64.
uname -mExpected output:
x86_64
If the output is aarch64, use the official AnyDesk download page instead of the repository commands in this section. AnyDesk labels that architecture as arm64 on its download table and publishes direct RPM files for it, but the repository workflow documented here is for x86_64.
Refresh Rocky Linux before installing a third-party desktop package:
sudo dnf upgrade --refreshRun the DNF commands from an account with sudo privileges. If sudo is not configured yet, switch to an administrator account before continuing rather than running the repository setup as an unprivileged user.
Add the AnyDesk RPM Repository
Import the AnyDesk RPM signing key first. DNF uses this key to validate the package signature during installation.
sudo rpm --import https://keys.anydesk.com/repos/RPM-GPG-KEYCheck that the expected AnyDesk key is present in the RPM key database. The key ID should print as a8772835.
rpm -q gpg-pubkey --qf '%{VERSION}\n' | grep -i '^a8772835$'Expected output:
a8772835
For more filtering examples, the grep command examples explain the pattern used in the key check.
Create the repository file under /etc/yum.repos.d/ using the AnyDesk RPM repository source. The version-neutral RHEL path is intentional: the upstream $releasever RHEL URL resolves for Rocky Linux 9 and 8, but the matching Rocky Linux 10 path currently returns 404. The repository keeps RPM package signature checking enabled with gpgcheck=1. Metadata signature checking stays disabled because Rocky Linux 9 and 8 can fail with repo_gpgcheck=1; do not replace package signature checking with --nogpgcheck.
sudo tee /etc/yum.repos.d/anydesk.repo >/dev/null <<'EOF'
[anydesk]
name=AnyDesk RHEL - stable
baseurl=https://rpm.anydesk.com/rhel/x86_64/
enabled=1
gpgcheck=1
repo_gpgcheck=0
gpgkey=https://keys.anydesk.com/repos/RPM-GPG-KEY
EOF
Confirm the AnyDesk Package Source
Refresh only the AnyDesk repository first. This catches URL, key, and metadata problems before the package transaction starts.
sudo dnf makecache --refresh --disablerepo='*' --enablerepo=anydeskExpected output:
Metadata cache created.
Confirm that DNF sees the anydesk package from the repository you just added:
dnf repoquery --disablerepo='*' --enablerepo=anydesk --available --qf '%{name} %{arch} %{repoid}' anydeskExpected output:
anydesk x86_64 anydesk
Install AnyDesk with DNF
Install the package after the repository and source checks pass:
sudo dnf install anydeskRelevant output includes:
Installing:
 anydesk           x86_64           8.0.2-1             anydesk            15 M

Installed:
  anydesk-8.0.2-1.x86_64

Complete!
The version number may be newer when AnyDesk updates its repository.
Verify the AnyDesk Package and Service
The current AnyDesk RPM does not expose a useful anydesk --version result from a non-graphical shell, so use RPM for the installed package version:
rpm -q anydeskExpected output:
anydesk-8.0.2-1.x86_64
AnyDesk also installs and enables anydesk.service, which supports background connectivity and unattended-access features configured inside the application.
systemctl is-active anydesk
systemctl is-enabled anydesk
Expected output:
active
enabled
Launch AnyDesk on Rocky Linux
AnyDesk needs an active graphical session for normal desktop use. In GNOME, open the application from the launcher search:
Activities > Show Applications > AnyDesk
You can also start the graphical client from a terminal inside the desktop session:
anydesk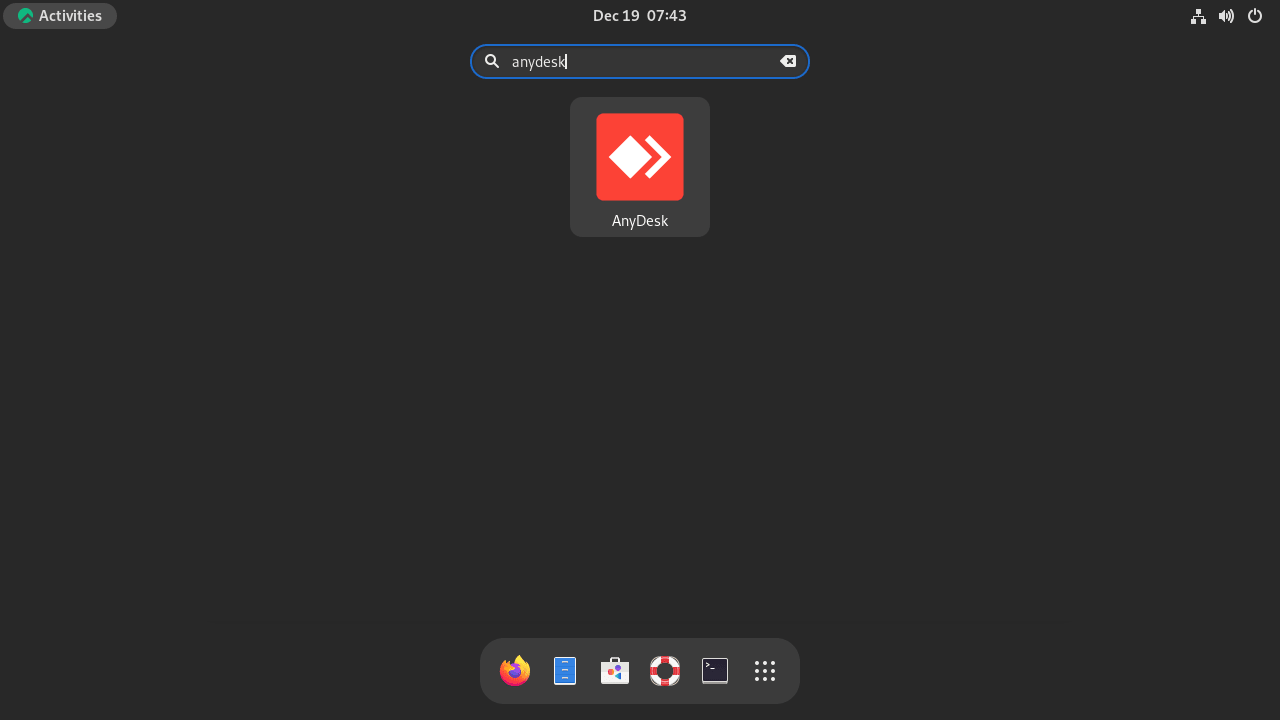
Use AnyDesk Command Line Options
AnyDesk documents Linux command line options for tasks such as retrieving the local AnyDesk ID or opening a remote session from a terminal. Options that depend on the running client may return no output from a non-graphical SSH shell, so run them from the desktop session after AnyDesk has registered the client.
anydesk --get-idTo start a connection by ID, pass the remote address to the client:
anydesk 123456789Replace 123456789 with the actual remote AnyDesk ID. AnyDesk’s Linux command line documentation lists the current supported options.
Back Up AnyDesk ID and Settings on Rocky Linux
AnyDesk’s official backup notes list /etc/anydesk/ for installed Linux clients and ~/.anydesk/ for user-local or uninstalled clients. Back up these folders before reinstalling Rocky Linux, cloning a system image, or deleting configuration if you need to keep the same AnyDesk ID, alias, unattended-access settings, or session history.
if sudo test -d /etc/anydesk; then
    sudo tar -czf "$HOME/anydesk-system-config-backup.tar.gz" -C /etc anydesk
    sudo chown "$USER:$(id -gn)" "$HOME/anydesk-system-config-backup.tar.gz"
    chmod 600 "$HOME/anydesk-system-config-backup.tar.gz"
fi

if test -d "$HOME/.anydesk"; then
    tar -czf "$HOME/anydesk-user-config-backup.tar.gz" -C "$HOME" .anydesk
    chmod 600 "$HOME/anydesk-user-config-backup.tar.gz"
fi
The commands are quiet when they succeed and restrict each archive to the current user account. If neither directory exists yet, AnyDesk has not created a local identity or user configuration for that account.
Update AnyDesk on Rocky Linux
DNF owns updates after the repository install. To check only the AnyDesk package and apply an available update, run:
sudo dnf upgrade anydesk --refreshFor normal workstation maintenance, sudo dnf upgrade --refresh also includes AnyDesk when a newer package is available. If DNF downloads feel slow, review the local guide to increase DNF speed on Rocky Linux.
Remove AnyDesk from Rocky Linux
Remove the AnyDesk package first. DNF stops the service and removes the package-owned desktop launcher, icons, and service files during the transaction.
sudo dnf remove anydeskThen remove the repository file and refresh DNF’s enabled-repository view:
sudo rm -f /etc/yum.repos.d/anydesk.repo
sudo dnf clean metadata
Verify the package and repository are gone:
rpm -q anydesk
dnf repolist --enabled | grep -i anydesk || echo "AnyDesk repository is not enabled"
Expected output after removal:
package anydesk is not installed
AnyDesk repository is not enabled
Remove AnyDesk Configuration and Identity Files
AnyDesk creates system and user configuration after the service or desktop client starts. These files can include the local AnyDesk identity, logs, cached device data, and unattended-access state.
The cleanup command permanently removes AnyDesk identity and configuration data. Use the backup section first if you plan to reinstall AnyDesk and keep the same local identity, alias, session history, or unattended-access setup.
rm -rf ~/.anydesk
sudo rm -rf /etc/anydesk /var/log/anydesk.trace /var/lib/gdm/.anydesk
Remove the AnyDesk Signing Key
Remove the imported signing key only after the AnyDesk package and repository are gone. Leave it in place if another AnyDesk repository or package still uses it.
readarray -t anydesk_keys < <(rpm -q gpg-pubkey --qf '%{NAME}-%{VERSION}-%{RELEASE}\n' | grep -i '^gpg-pubkey-a8772835-' || true)

if ((${#anydesk_keys[@]})); then
    sudo rpm -e "${anydesk_keys[@]}"
else
    echo "AnyDesk signing key is not installed"
fi
Troubleshoot AnyDesk on Rocky Linux
Repository Metadata Signature Errors
If a repository file uses repo_gpgcheck=1, DNF can stop at a metadata signature error such as Bad GPG signature or Signing key not found, even though the RPM package signing key is valid. The repo file keeps package signature checks enabled while disabling only repository metadata signature checks.
repomd.xml GPG signature verification error: Bad GPG signature
Check the repository file and keep repo_gpgcheck=0 with gpgcheck=1:
grep -E '^(baseurl|gpgcheck|repo_gpgcheck|gpgkey)=' /etc/yum.repos.d/anydesk.repoExpected output:
baseurl=https://rpm.anydesk.com/rhel/x86_64/
gpgcheck=1
repo_gpgcheck=0
gpgkey=https://keys.anydesk.com/repos/RPM-GPG-KEY
Refresh the repository metadata after correcting the file:
sudo dnf clean metadata --disablerepo='*' --enablerepo=anydesk
sudo dnf makecache --refresh --disablerepo='*' --enablerepo=anydesk
AnyDesk Service Is Not Active
If the desktop client opens but unattended access or incoming connection features do not work, check the service state:
systemctl is-active anydesk
systemctl is-enabled anydesk
If either check does not report active and enabled, enable and start the service:
sudo systemctl enable --now anydeskAnyDesk Cannot Connect Through the Network
If AnyDesk opens but sessions fail to connect, check network filtering before changing Rocky Linux firewalld rules. AnyDesk’s firewall documentation lists TCP ports 80, 443, and 6568 for remote connectivity, plus UDP ports 50001 through 50003 for local discovery. Organization-managed firewalls, TLS inspection, deep packet inspection, or blocked outbound access to *.net.anydesk.com can break sessions even when anydesk.service is active.
Wayland Limits Incoming AnyDesk Sessions
AnyDesk’s Linux support notes state that Wayland supports outgoing sessions only and that incoming sessions require Xorg. Check the current desktop session type from a terminal inside the graphical login:
echo "$XDG_SESSION_TYPE"Expected output on an Xorg session:
x11
If the output is wayland, use AnyDesk for outgoing sessions or switch to an Xorg session where your Rocky Linux desktop still provides one. Rocky Linux 10 GNOME users should treat incoming AnyDesk control as limited unless their desktop environment provides a supported Xorg session.
Conclusion
AnyDesk is installed on Rocky Linux from the vendor RPM repository, with DNF handling package updates and anydesk.service running in the background. Before relying on unattended access, confirm the desktop session matches AnyDesk’s Linux support limits so outgoing and incoming sessions behave as expected.

Formatting tips for your comment
You can use basic HTML to format your comment. Useful tags currently allowed in published comments:
<code>command</code>command<strong>bold</strong><em>italic</em><a href="https://example.com">link</a><blockquote>quote</blockquote>