Older laptops, small virtual machines, and Ubuntu Server installs often need a desktop that starts quickly without the heavier GNOME shell. You can install Xfce on Ubuntu from the standard Ubuntu repositories, then choose the Xfce session at the login screen while keeping GNOME available on systems that already have it.
Ubuntu 26.04, 24.04, and 22.04 all provide Xfce packages through the Universe component. The package set you choose matters: xfce4 gives the core desktop, xfce4-goodies adds common plugins and helper apps, and the Xubuntu meta-packages install a broader Xubuntu-style desktop with more defaults, artwork, and applications.
Install Xfce on Ubuntu
Choose an Xfce Package Set
Most existing Ubuntu Desktop users should install xfce4 with xfce4-goodies. Ubuntu packages the desktop as xfce4, not xfce. Add xfce4-goodies for the panel plugins and helper apps many desktop users expect, including the terminal, task manager, screenshots, archive integration, and common desktop utilities without replacing the whole Ubuntu desktop stack.
| Package Set | What It Adds | Best Fit | Release Notes |
|---|---|---|---|
xfce4 + xfce4-goodies | Core Xfce desktop plus common panel plugins and apps | Most Ubuntu Desktop users who want Xfce beside GNOME | Available on Ubuntu 26.04, 24.04, and 22.04 |
xfce4 only | Core session, panel, window manager, file manager, and settings | Minimal desktops where you want to choose extras yourself | Smallest Xfce package path, but fewer plugins and helper apps |
xubuntu-desktop-minimal or xubuntu-core | Xubuntu defaults, LightDM, artwork, and a tighter app set than full Xubuntu | Ubuntu Server or minimal installs that should behave more like Xubuntu | Use xubuntu-desktop-minimal on 26.04 and 24.04. On 22.04, use xubuntu-core. |
xubuntu-desktop | Full Xubuntu package set with extra desktop apps, themes, and utilities | Users who want the complete Xubuntu experience on an existing Ubuntu install | Large transaction; it can change desktop defaults and package choices |
APT plans
xubuntu-desktopas a hundreds-of-packages transaction on all supported releases. On Ubuntu 24.04, the full Xubuntu install can also removepipewire-alsaandpipewire-audio. Use the smaller Xfce or Xubuntu minimal path unless you deliberately want that broader desktop conversion.
Check Xfce Package Availability
Check the Ubuntu archive candidate before installing, especially on minimal systems where Universe may be disabled:
apt-cache policy xfce4 xfce4-goodies xubuntu-desktop-minimal xubuntu-core xubuntu-desktopRelevant Ubuntu 26.04 lines include the Xfce 4.20 package rows from resolute/universe:
xfce4:
  Installed: (none)
  Candidate: 4.20.1
  Version table:
     4.20.1 500
        500 http://archive.ubuntu.com/ubuntu resolute/universe amd64 Packages
xfce4-goodies:
  Installed: (none)
  Candidate: 4.20.0build1
  Version table:
     4.20.0build1 500
        500 http://archive.ubuntu.com/ubuntu resolute/universe amd64 Packages
Ubuntu 24.04 currently shows Xfce 4.18 packages, while Ubuntu 22.04 shows Xfce 4.16 packages. On Ubuntu 22.04, check xubuntu-core for the minimal Xubuntu path because xubuntu-desktop-minimal is not used there. If the candidate is (none) for a package that should exist on your release, enable the Ubuntu Universe component first; the separate guide to enable Universe and Multiverse on Ubuntu covers that prerequisite.
Refresh APT Metadata
Refresh package metadata before the install:
sudo apt updateThese commands use sudo because installing desktop packages changes system-managed files and services.
Install Xfce with Goodies
Install the balanced Xfce package set with APT:
sudo apt install xfce4 xfce4-goodiesThe exact transaction depends on your current desktop. On systems without Xfce already installed, this path can add roughly 138 packages on Ubuntu 26.04, 175 packages on Ubuntu 24.04, and 89 packages on Ubuntu 22.04. On Ubuntu 26.04 and 24.04, the recommended package set also adds LightDM packages.
When APT asks for the default display manager, choose gdm3 to keep the normal Ubuntu GNOME login screen or lightdm for a lighter Xubuntu-style login screen. You can change that choice later with dpkg-reconfigure.
Install Xfce on Ubuntu Server or Minimal Images
Ubuntu Server uses the same Xfce package names on 26.04, 24.04, and 22.04, but a basic server or minimal image does not start with a graphical login manager. If you are adding Xfce for local console use, include LightDM explicitly so the system has a display manager for the new session:
sudo apt install xfce4 xfce4-goodies lightdmIf the system still boots to a text login after installation, set the graphical target and enable LightDM:
sudo systemctl set-default graphical.target
sudo systemctl enable lightdm
Installing Xfce on Ubuntu Server creates a local graphical desktop. It does not by itself provide remote desktop access, and a reboot can disconnect an SSH session. Keep console access available before changing display-manager or boot-target settings on a remote host.
Install a Xubuntu Package Set Instead
Use the Xubuntu meta-packages when you want Xubuntu defaults rather than only the Xfce desktop environment. On Ubuntu 26.04 and 24.04, xubuntu-core is a transitional package to xubuntu-desktop-minimal, so install the current minimal Xubuntu package set directly:
sudo apt install xubuntu-desktop-minimalUbuntu 22.04 uses xubuntu-core for the comparable smaller Xubuntu package set:
sudo apt install xubuntu-coreInstall the full Xubuntu desktop only when you want the larger application set as well:
sudo apt install xubuntu-desktopVerify the Xfce Session
Confirm that the Xfce session package installed the session file and core desktop components:
ls /usr/share/xsessions/xfce.desktop
dpkg-query -W -f='${db:Status-Abbrev} ${binary:Package} ${Version}\n' xfce4-session xfdesktop4 xfwm4
A successful check prints the session file path and ii rows for xfce4-session, xfdesktop4, and xfwm4. Ubuntu 26.04 reports Xfce 4.20 packages, Ubuntu 24.04 reports Xfce 4.18 packages, and Ubuntu 22.04 reports Xfce 4.16 packages.
Ubuntu 26.04’s Xfce 4.20 packages also install /usr/share/wayland-sessions/xfce-wayland.desktop. Treat that as a separate Xfce session choice; the standard Xfce Session entry remains the compatibility-first option for most users.
sudo rebootLog In to Xfce on Ubuntu
At the login screen, select your user first, then open the session menu before entering your password. On GDM, use the gear icon and choose Xfce Session. On LightDM, use the session selector near the password field and choose the Xfce entry.
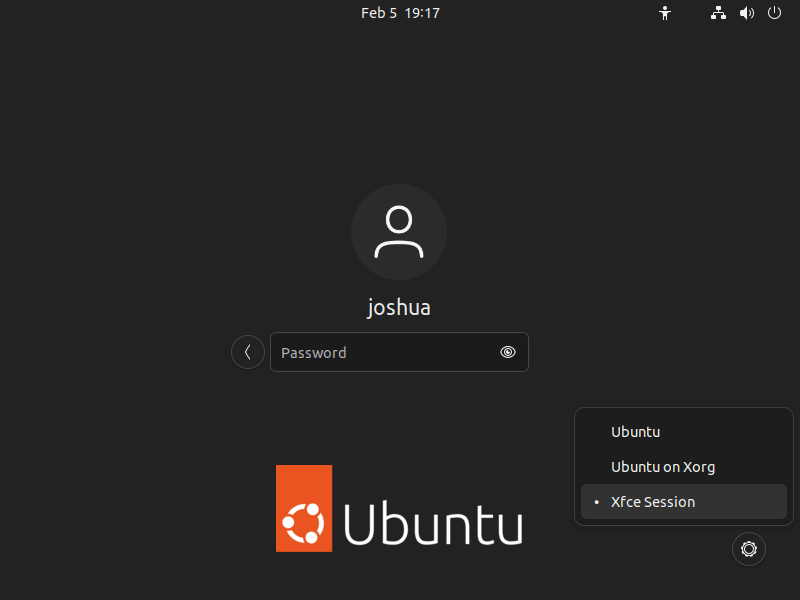
Ubuntu 26.04 changes are easy to misread at the login screen. The Ubuntu Desktop session itself is Wayland-only because GNOME no longer provides a GNOME Xorg session in that release, as noted in the Ubuntu 26.04 LTS release notes. That does not mean X11 support is gone from the archive: the Xfce packages install their own Xfce session file and, on 26.04, the required Xorg packages for that session path.
Manage Xfce on Ubuntu
Check the Active Display Manager
Check which display manager is configured before changing it:
cat /etc/X11/default-display-managerGDM remains the normal choice when you are keeping Ubuntu GNOME alongside Xfce. LightDM is lighter and common in Xubuntu-style installs, but switching display managers changes the login screen for every desktop session on the system.
If both GDM and LightDM are installed, reconfigure the display manager package you want to use:
sudo dpkg-reconfigure gdm3Use this command instead on a LightDM-only system:
sudo dpkg-reconfigure lightdmUpdate Xfce Packages
Xfce updates arrive through Ubuntu’s normal APT upgrade workflow:
sudo apt update
sudo apt upgrade
The same APT workflow updates the xfce4, xfce4-goodies, and Xubuntu meta-package paths because all of them come from Ubuntu repositories.
Remove Xfce from Ubuntu
Choose the removal command that matches the package set you installed. If GNOME should remain available, check the Ubuntu desktop and GDM packages before removing Xfce or rebooting:
for pkg in ubuntu-desktop gdm3; do
    status=$(dpkg-query -W -f='${db:Status-Abbrev} ${binary:Package}\n' "$pkg" 2>/dev/null || true)
    case "$status" in
        ii*) printf '%s\n' "$status" ;;
        *) printf 'missing %s\n' "$pkg" ;;
    esac
done
Each package should show an ii state. If the check prints missing for either package and you want to keep GNOME as a fallback desktop, install it before continuing:
sudo apt install ubuntu-desktop gdm3The removal examples include sudo apt autoremove --purge as a separate confirmation step. Review its package list before confirming because APT can also remove older dependencies that were already marked as no longer needed.
Remove the balanced Xfce package set with:
sudo apt purge xfce4 xfce4-goodies
sudo apt autoremove --purge
On Ubuntu 26.04 or 24.04, remove Xubuntu meta-packages with:
sudo apt purge xubuntu-desktop xubuntu-desktop-minimal xubuntu-core
sudo apt autoremove --purge
On Ubuntu 22.04, use the package names available on that release:
sudo apt purge xubuntu-desktop xubuntu-core
sudo apt autoremove --purge
Set GDM as the display manager again when returning to a GNOME-first Ubuntu desktop:
sudo dpkg-reconfigure gdm3
sudo reboot
Do not remove the only graphical desktop from a remote system unless you have console access or a confirmed remote-management path. Package removal does not delete your personal Xfce settings.
Xfce user settings usually live under ~/.config/xfce4/ and ~/.cache/xfce4/. Back up or remove those directories only when you are sure you no longer need the layout, panel, or session settings. Use the mv command to rename those directories with a timestamp so you can restore them if needed:
mv "$HOME/.config/xfce4" "$HOME/.config/xfce4.backup.$(date +%Y%m%d%H%M%S)" 2>/dev/null || true
mv "$HOME/.cache/xfce4" "$HOME/.cache/xfce4.backup.$(date +%Y%m%d%H%M%S)" 2>/dev/null || true
Troubleshoot Xfce on Ubuntu
Xfce Session Is Missing from the Login Screen
A missing session entry usually means xfce4-session is absent or its desktop file was not installed. Check the package state and session file:
dpkg-query -W -f='${db:Status-Abbrev} ${binary:Package}\n' xfce4-session
ls /usr/share/xsessions/xfce.desktop
Reinstall the session package when either check fails:
sudo apt install --reinstall xfce4-sessionLog out completely after reinstalling the session package, then check the login screen again.
Xfce Failed to Start Session
The message failed to start session usually means the login manager found the Xfce entry but one of the core session packages is missing or only partially installed. Check the session, panel, desktop, and window manager package states together:
dpkg-query -W -f='${db:Status-Abbrev} ${binary:Package}\n' xfce4-session xfce4-panel xfdesktop4 xfwm4Each row should begin with ii. If a package is missing or not fully installed, reinstall the set:
sudo apt install --reinstall xfce4-session xfce4-panel xfdesktop4 xfwm4Log out and select Xfce Session again. If the same error returns, inspect the current boot logs before making display-manager changes.
Ubuntu 26.04 Shows No GNOME Xorg Session
Ubuntu 26.04 no longer needs a GNOME Xorg entry for Xfce to work. The Xfce package installs /usr/share/xsessions/xfce.desktop for the Xfce login option. Xwayland can still support many X11 applications inside the default Ubuntu GNOME Wayland session, while the Xfce session uses its own desktop entry.
System Boots to a Text Login
A server or minimal image can install Xfce packages without switching the default boot target. Check the current target and display-manager service:
systemctl get-default
systemctl status lightdm --no-pager
Install or re-enable LightDM when the service is missing or disabled:
sudo apt install lightdm
sudo systemctl set-default graphical.target
sudo systemctl enable lightdm
sudo reboot
Black Screen or Login Loop After Selecting Xfce
Rename the user-level Xfce settings from a virtual terminal, then try a clean session. Press Ctrl+Alt+F3, sign in, and run:
timestamp=$(date +%Y%m%d%H%M%S)
[ -d "$HOME/.config/xfce4" ] && mv "$HOME/.config/xfce4" "$HOME/.config/xfce4.backup.$timestamp"
[ -d "$HOME/.cache/xfce4" ] && mv "$HOME/.cache/xfce4" "$HOME/.cache/xfce4.backup.$timestamp"
sudo reboot
If the login still fails, inspect recent Xfce and display-manager messages. The grep command filters matching lines, and the tail command keeps the output short:
sudo journalctl -b --no-pager | grep -Ei 'xfce4|xfwm4|xfdesktop|lightdm|gdm' | tail -n 20Xfce Documentation and Community
Use the upstream Xfce resources for desktop-specific settings, plugin behavior, and project news:
- Xfce official website for release announcements and project information.
- Xfce documentation for desktop, panel, session, and application references.
- Xfce forum for community troubleshooting and usage questions.
Related Ubuntu Desktop Guides
Other Ubuntu desktop environment options include KDE Plasma on Ubuntu, GNOME Flashback on Ubuntu, LXQt on Ubuntu, and Unity Desktop on Ubuntu.
Conclusion
Xfce is available on Ubuntu with a session file, core desktop packages, update path, and method-specific removal commands. Use xfce4 xfce4-goodies for a balanced desktop beside GNOME, or choose a Xubuntu meta-package when you want Xubuntu defaults and are comfortable with a larger package transaction.

Formatting tips for your comment
You can use basic HTML to format your comment. Useful tags currently allowed in published comments:
<code>command</code>command<strong>bold</strong><em>italic</em><a href="https://example.com">link</a><blockquote>quote</blockquote>