
Fedora does not package JetBrains PyCharm in its default DNF repositories, and JetBrains’ Linux download is a tar archive rather than an RPM. To install PyCharm on Fedora Linux without adding snapd or an unofficial wrapper repository, use JetBrains’ standalone archive, place it under /opt, and add a stable pycharm launcher for terminal and desktop use.
The standalone workflow follows JetBrains’ official Linux tarball path for x86_64 and ARM64 systems. JetBrains also documents Toolbox App and Snap installs in the official PyCharm installation guide; use those upstream paths if you want JetBrains’ GUI manager or automatic Snap refreshes instead of a manually managed /opt install.
Install PyCharm on Fedora
This method installs the current unified PyCharm product from JetBrains release metadata. JetBrains’ documentation lists separate Linux tarballs for x86_64 and ARM64 processors, and the helper created here selects the correct archive for your Fedora architecture.
| Fedora Architecture | JetBrains Platform Key | Downloaded Archive | Install Owner |
|---|---|---|---|
x86_64 | linux | pycharm-<version>.tar.gz | Standalone files under /opt |
aarch64 or arm64 | linuxARM64 | pycharm-<version>-aarch64.tar.gz | Standalone files under /opt |
The current PyCharm product keeps core IDE features free and starts a Pro trial for paid features when you launch the IDE. You do not need to install a separate Java package because JetBrains Runtime is bundled with the PyCharm archive.
Update Fedora and Install Download Tools
Refresh Fedora before installing a large desktop application, then make sure the commands used by the installer helper are present.
sudo dnf upgrade --refresh
sudo dnf install curl python3 tar gzip coreutils grep sed desktop-file-utils
These commands use
sudofor root-owned package and system directory changes. If your account cannot usesudoyet, configure administrator access first with the guide to add a user to sudoers on Fedora.
Optional, but useful on older or customized Fedora desktops: confirm that your system glibc is new enough for current JetBrains IDE builds.
getconf GNU_LIBC_VERSIONCurrent Fedora releases meet the glibc baseline for PyCharm, but JetBrains’ published system requirements remain the source for vendor-support wording. If the command prints a version older than glibc 2.28, use a newer Fedora release before installing the current PyCharm build.
Create the PyCharm Update Helper
A standalone tarball does not create a DNF package, so updates repeat the same download, checksum, extraction, launcher, and desktop-entry work. Install a small update-pycharm helper once, then use the same command for the first install and future updates. The setup block refuses to overwrite an existing helper with the same name unless it already looks like the PyCharm helper from this workflow.
if [ -e /usr/local/bin/update-pycharm ] && ! grep -q 'download_dir="$HOME/Downloads/pycharm"' /usr/local/bin/update-pycharm 2>/dev/null; then
    printf 'Existing /usr/local/bin/update-pycharm is not this PyCharm helper. Move it before continuing.\n' >&2
else
    sudo tee /usr/local/bin/update-pycharm >/dev/null <<'EOF'
#!/usr/bin/env bash
set -euo pipefail

download_dir="$HOME/Downloads/pycharm"
metadata_file="$download_dir/pycharm-download.env"
install_link="/opt/pycharm"
launcher="/usr/local/bin/pycharm"
desktop_file="/usr/share/applications/jetbrains-pycharm.desktop"

require_cmd() {
    if ! command -v "$1" >/dev/null 2>&1; then
        printf 'Missing required command: %s\n' "$1" >&2
        exit 1
    fi
}

for cmd in curl python3 tar sha256sum sudo grep sed readlink desktop-file-validate update-desktop-database; do
    require_cmd "$cmd"
done

guard_existing_paths() {
    if [ -e "$install_link" ] && [ ! -L "$install_link" ]; then
        printf 'Refusing to replace existing non-symlink path: %s\n' "$install_link" >&2
        exit 1
    fi

    if [ -L "$install_link" ]; then
        link_target=$(readlink -f "$install_link" 2>/dev/null || true)
        raw_target=$(readlink "$install_link" 2>/dev/null || true)
        checked_target=${link_target:-$raw_target}
        case "$checked_target" in
            /opt/pycharm-* | pycharm-*) ;;
            *)
                printf 'Refusing to replace unexpected PyCharm symlink target: %s -> %s\n' "$install_link" "${checked_target:-unknown}" >&2
                exit 1
                ;;
        esac
    fi

    if [ -e "$launcher" ] || [ -L "$launcher" ]; then
        if ! grep -qx 'exec /opt/pycharm/bin/pycharm "$@"' "$launcher" 2>/dev/null; then
            printf 'Refusing to replace existing launcher: %s\n' "$launcher" >&2
            exit 1
        fi
    fi

    if [ -e "$desktop_file" ] || [ -L "$desktop_file" ]; then
        if ! grep -qx 'Exec=/opt/pycharm/bin/pycharm %f' "$desktop_file" 2>/dev/null; then
            printf 'Refusing to replace existing desktop entry: %s\n' "$desktop_file" >&2
            exit 1
        fi
    fi
}

mkdir -p "$download_dir"

python3 - >"$metadata_file" <<'PY'
import json
import platform
import shlex
import urllib.request

api_url = "https://data.services.jetbrains.com/products/releases?code=PCP&latest=true&type=release"
with urllib.request.urlopen(api_url, timeout=60) as response:
    data = json.load(response)

release = data["PCP"][0]
machine = platform.machine().lower()
platform_key = {
    "x86_64": "linux",
    "amd64": "linux",
    "aarch64": "linuxARM64",
    "arm64": "linuxARM64",
}.get(machine)

if not platform_key:
    raise SystemExit(f"Unsupported architecture: {machine}")

download = release["downloads"][platform_key]
archive = download["link"].rsplit("/", 1)[-1]

for key, value in {
    "pycharm_version": release["version"],
    "pycharm_platform": platform_key,
    "download_url": download["link"],
    "checksum_url": download["checksumLink"],
    "archive": archive,
}.items():
    print(f"{key}={shlex.quote(value)}")
PY

declare pycharm_version pycharm_platform download_url checksum_url archive
# shellcheck source=/dev/null
. "$metadata_file"

printf 'Using PyCharm %s for %s\n' "$pycharm_version" "$pycharm_platform"

guard_existing_paths

cd "$download_dir"
curl -fL --retry 3 -o "$archive" "$download_url"
curl -fL --retry 3 -o "$archive.sha256" "$checksum_url"
sha256sum -c "$archive.sha256"

top_dir=$(tar -tzf "$archive" | sed -n '1s#/.*##p')
case "$top_dir" in
    pycharm-*) ;;
    *)
        printf 'Unexpected archive layout: %s\n' "$top_dir" >&2
        exit 1
        ;;
esac

new_target="/opt/$top_dir"
old_target=""
if [ -e "$install_link" ] || [ -L "$install_link" ]; then
    old_target=$(readlink -f "$install_link" 2>/dev/null || true)
fi

sudo tar -xzf "$archive" -C /opt/
if [ ! -x "$new_target/bin/pycharm" ] || [ ! -f "$new_target/bin/pycharm.svg" ]; then
    printf 'Extracted archive is missing expected PyCharm files under: %s\n' "$new_target" >&2
    exit 1
fi

sudo ln -sfn "$new_target" "$install_link"

sudo tee "$launcher" >/dev/null <<'WRAPPER'
#!/usr/bin/env bash
exec /opt/pycharm/bin/pycharm "$@"
WRAPPER
sudo chmod 755 "$launcher"

sudo tee "$desktop_file" >/dev/null <<'DESKTOP'
[Desktop Entry]
Version=1.0
Type=Application
Name=PyCharm
Comment=Python IDE by JetBrains
Exec=/opt/pycharm/bin/pycharm %f
Icon=/opt/pycharm/bin/pycharm.svg
Terminal=false
StartupNotify=true
StartupWMClass=jetbrains-pycharm
Categories=Development;IDE;
MimeType=text/x-python;inode/directory;
DESKTOP

desktop-file-validate "$desktop_file"
sudo update-desktop-database /usr/share/applications

if [ -n "$old_target" ] && [ "$old_target" != "$new_target" ]; then
    printf 'Previous PyCharm directory remains at: %s\n' "$old_target"
fi

pycharm --version
EOF

    sudo chmod 755 /usr/local/bin/update-pycharm
fi
The helper writes only the managed PyCharm paths created by this workflow: /opt/pycharm, /usr/local/bin/pycharm, /usr/local/bin/update-pycharm, and /usr/share/applications/jetbrains-pycharm.desktop. It stops before overwriting an unrelated launcher, desktop entry, or non-symlink /opt/pycharm path.
Install PyCharm with the Helper
Run the helper as your normal desktop user. It downloads the current JetBrains tarball into ~/Downloads/pycharm, verifies the SHA256 file from JetBrains, extracts the archive into /opt, and creates the launcher paths.
update-pycharmRelevant output should show the resolved version, a successful checksum result, and the installed PyCharm build. The exact version changes when JetBrains publishes a newer release.
Using PyCharm 2026.1.2 for linux
pycharm-2026.1.2.tar.gz: OK
PyCharm 2026.1.2
Build #PY-261.24374.152
Verify the command path and the active install directory after the helper finishes.
command -v pycharm
readlink -f /opt/pycharm
A successful install returns the wrapper in /usr/local/bin and a versioned directory under /opt.
/usr/local/bin/pycharm
/opt/pycharm-2026.1.2
Launch PyCharm on Fedora
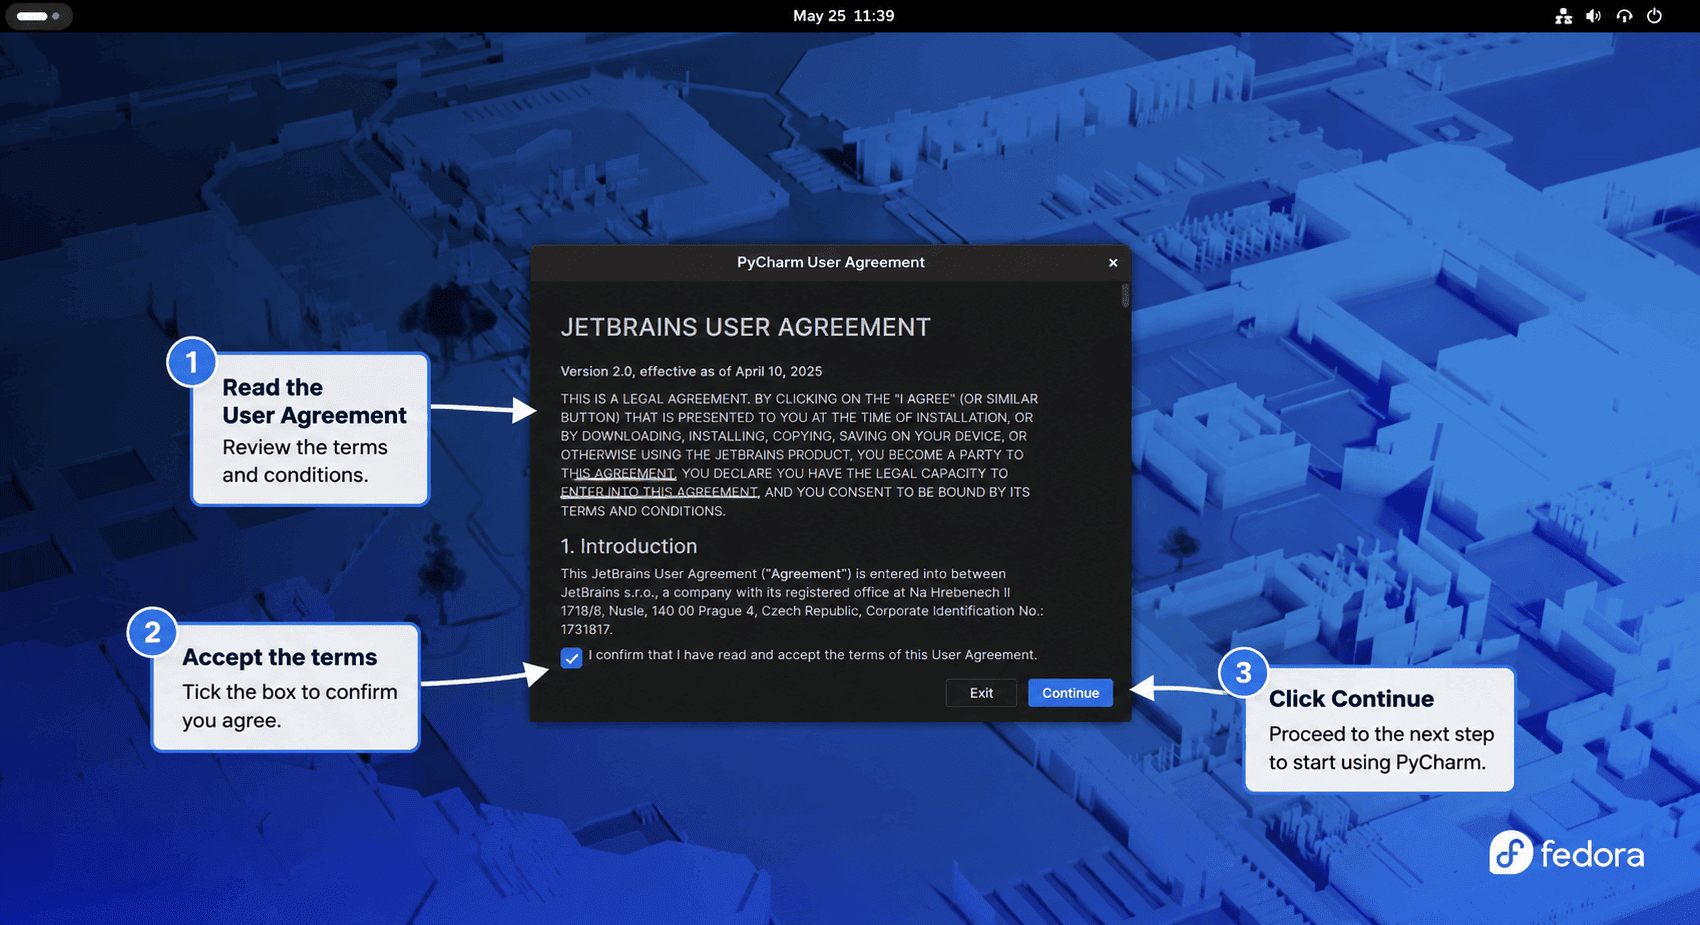
Start PyCharm from a terminal attached to your desktop session or from Fedora’s application search. The first launch opens JetBrains’ setup flow, where you accept the license terms, choose settings, and sign in only if you need subscription-backed features.
Launch PyCharm from the Terminal
The terminal launcher uses the wrapper created in /usr/local/bin. Closing the terminal can also close the foreground IDE process, so launch from Activities for normal desktop use.
pycharmIf an older shell session does not see the command immediately, refresh the shell’s command cache or open a new terminal.
hash -r
command -v pycharm
Launch PyCharm from Activities
Open Activities, search for PyCharm, and select the JetBrains PyCharm launcher. If the icon does not appear right away, sign out and back in so GNOME reloads desktop-entry caches for the current session.

Configure PyCharm for Python Projects
PyCharm is installed, but each project still needs the correct Python interpreter. Fedora Workstation includes Python for system tooling, and development projects usually work best with an interpreter or virtual environment selected inside PyCharm’s project settings. If your Fedora system needs Python package tooling first, use the Fedora walkthrough to install Python on Fedora before creating project environments.
To check the interpreter path that PyCharm should see from your desktop account, run:
command -v python3
python3 --version
Use that path, or a project virtual environment path, when PyCharm asks for the interpreter during first-run project setup.
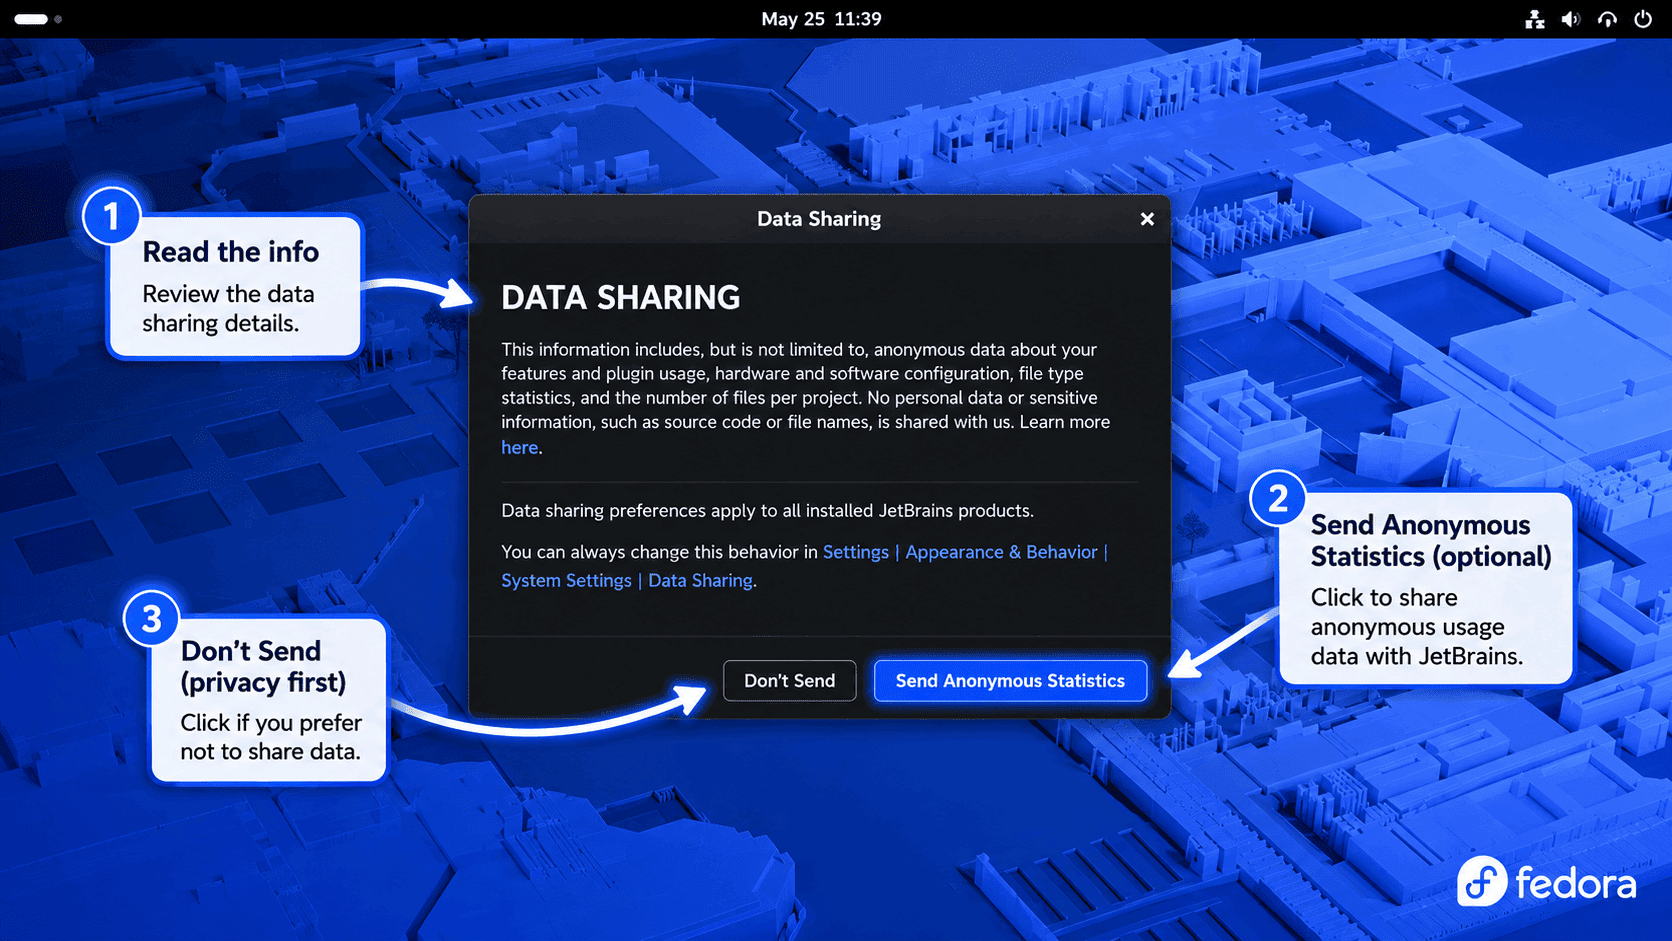
After accepting the agreement, PyCharm asks whether JetBrains can receive anonymous usage statistics. Choose the privacy option that fits your preference or organization policy; either choice continues the first-run setup.
Once those first-run choices are saved, PyCharm opens the welcome screen. Use this screen to create a new project, open an existing project directory, or clone a repository before selecting the interpreter or virtual environment for that project.

Update PyCharm on Fedora
Close PyCharm before replacing the active files under /opt. Then run the same helper used for the first install.
update-pycharmIf JetBrains publishes a newer build, the helper updates the /opt/pycharm symlink to the new versioned directory and leaves the previous directory in place as a short-term rollback option. Confirm the active version after the update.
pycharm --version
readlink -f /opt/pycharm
After the new version opens successfully, review old PyCharm directories and remove only the versioned paths you no longer want.
active_pycharm=$(readlink -f /opt/pycharm)
find /opt -maxdepth 1 -type d -name 'pycharm-*' ! -samefile "$active_pycharm" -print
Remove a specific old directory only after checking the printed path.
The next command permanently deletes the versioned PyCharm directory you name. Keep the active path printed by
readlink -f /opt/pycharmand any rollback version you still need.
old_pycharm=/opt/pycharm-OLD_VERSION
case "$old_pycharm" in
    /opt/pycharm-*) sudo rm -rf -- "$old_pycharm" ;;
    *) printf 'Refusing unexpected path: %s\n' "$old_pycharm" >&2 ;;
esac
Remove PyCharm from Fedora
Remove PyCharm by deleting the wrapper, update helper, desktop entry, symlink, and active versioned directory created by this workflow. This does not delete your projects, but optional user-data cleanup later in this section removes IDE settings, plugins, and caches.
The removal block deletes only the managed PyCharm installation under
/optand wrapper files that match this workflow. It skips paths that appear to belong to another JetBrains install.
remove_if_matching() {
    path=$1
    pattern=$2
    label=$3

    if [ -e "$path" ] || [ -L "$path" ]; then
        if grep -qx "$pattern" "$path" 2>/dev/null; then
            sudo rm -f "$path"
        else
            printf 'Skipping unmanaged %s: %s\n' "$label" "$path" >&2
        fi
    fi
}

remove_if_matching /usr/local/bin/pycharm 'exec /opt/pycharm/bin/pycharm "$@"' launcher
remove_if_matching /usr/local/bin/update-pycharm "download_dir=\"\$HOME/Downloads/pycharm\"" update-helper
remove_if_matching /usr/share/applications/jetbrains-pycharm.desktop 'Exec=/opt/pycharm/bin/pycharm %f' desktop-entry

if [ -L /opt/pycharm ]; then
    active_pycharm=$(readlink -f /opt/pycharm 2>/dev/null || true)
    raw_target=$(readlink /opt/pycharm 2>/dev/null || true)
    checked_target=${active_pycharm:-$raw_target}

    case "$checked_target" in
        /opt/pycharm-* | pycharm-*)
            sudo rm -f /opt/pycharm
            if [ -n "$active_pycharm" ]; then
                sudo rm -rf "$active_pycharm"
            fi
            ;;
        *)
            printf 'Skipping unmanaged symlink: /opt/pycharm -> %s\n' "${checked_target:-unknown}" >&2
            ;;
    esac
elif [ -e /opt/pycharm ]; then
    printf 'Skipping unmanaged non-symlink path: /opt/pycharm\n' >&2
fi

sudo update-desktop-database /usr/share/applications
hash -r
Verify that the managed system paths are gone. If the command check still prints a path, it belongs to another install source that the guarded removal skipped.
command -v pycharm || echo "pycharm command removed"
test ! -e /opt/pycharm && echo "/opt/pycharm removed"
test ! -e /usr/share/applications/jetbrains-pycharm.desktop && echo "desktop entry removed"
If older version directories remain from previous updates, print them first and remove only the exact paths you do not need.
find /opt -maxdepth 1 -type d -name 'pycharm-*' -printThe helper also keeps downloaded archives and checksum files under ~/Downloads/pycharm. Remove that cache if you no longer need a local copy of the installer files.
rm -rf "$HOME/Downloads/pycharm"Per-user JetBrains directories can contain settings, plugin downloads, local indexes, and cached project state. Review matching paths before deleting them.
find "$HOME/.config/JetBrains" "$HOME/.cache/JetBrains" "$HOME/.local/share/JetBrains" -maxdepth 1 -type d -name 'PyCharm*' -print 2>/dev/nullThe next cleanup deletes local PyCharm settings, plugins, caches, and IDE state for the current Fedora account. Back up anything you want to keep before running it.
rm -rf "$HOME"/.config/JetBrains/PyCharm*
rm -rf "$HOME"/.cache/JetBrains/PyCharm*
rm -rf "$HOME"/.local/share/JetBrains/PyCharm*
Troubleshoot PyCharm on Fedora
Fix Existing PyCharm Path Conflicts
If update-pycharm prints Refusing to replace, one of the managed paths already exists and does not look like a file created by this workflow. Inspect the path before deleting or moving anything.
ls -ld /opt/pycharm /usr/local/bin/pycharm /usr/local/bin/update-pycharm /usr/share/applications/jetbrains-pycharm.desktop 2>/dev/nullIf the path belongs to an older manual PyCharm install that you no longer need, back it up or remove that exact path, then rerun update-pycharm. Do not delete paths managed by JetBrains Toolbox App, Snap, or another package source.
Fix Missing Commands in the Update Helper
If update-pycharm stops with Missing required command, install the Fedora packages that provide the helper’s download, archive, checksum, and desktop-entry tools, then rerun the helper.
sudo dnf install curl python3 tar gzip coreutils grep sed desktop-file-utils
update-pycharm
Fix Unsupported Architecture Errors
The helper supports the Linux tarballs JetBrains publishes for x86_64 and aarch64/arm64. If it prints an unsupported architecture error, check what Fedora reports before trying another package format.
uname -mFor unsupported hardware, use JetBrains’ download page or Toolbox documentation to confirm whether a supported Linux build exists for that platform.
Fix PyCharm Checksum Failures
A checksum failure usually means the archive was partially downloaded, a proxy altered the file, or JetBrains changed the release while files were being fetched. Delete the cached archive and checksum, then rerun the helper so both files come from the same release.
rm -f "$HOME/Downloads/pycharm"/pycharm-*.tar.gz
rm -f "$HOME/Downloads/pycharm"/pycharm-*.tar.gz.sha256
update-pycharm
Fix a Missing PyCharm Activities Icon
If the terminal launcher works but Fedora’s application search does not show PyCharm, validate the desktop file and refresh the desktop database.
desktop-file-validate /usr/share/applications/jetbrains-pycharm.desktop
sudo update-desktop-database /usr/share/applications
No output from desktop-file-validate means the desktop entry is valid. Sign out and back in if GNOME still shows the old menu state.
Use Snap or Toolbox Instead
JetBrains recommends Toolbox App when you manage several JetBrains IDEs or want GUI-managed updates and rollbacks. JetBrains also publishes an official PyCharm snap, but Fedora needs snapd setup first; use the Fedora guide to install Snap on Fedora, then follow JetBrains’ PyCharm snap instructions from the official documentation.
Conclusion
PyCharm is ready on Fedora through JetBrains’ standalone Linux archive, with a repeatable update-pycharm command, a stable terminal launcher, and a desktop entry for Activities. From here, install Git on Fedora for version control, install Docker on Fedora for containerized projects, or enable SSH on Fedora for remote development workflows.

Formatting tips for your comment
You can use basic HTML to format your comment. Useful tags currently allowed in published comments:
<code>command</code>command<strong>bold</strong><em>italic</em><a href="https://example.com">link</a><blockquote>quote</blockquote>