Rocky Linux starts NVIDIA cards on the open-source Nouveau driver, which is enough for basic display output but not for CUDA workloads, nvidia-smi monitoring, or the full NVIDIA settings stack. To install NVIDIA drivers on Rocky Linux, use NVIDIA’s CUDA repository and choose the driver flavor that matches your GPU generation.
This workflow covers Rocky Linux 10, 9, and 8 on x86_64 hardware. Rocky Linux 10 installs standard RPM packages from the CUDA repository, while Rocky Linux 9 and 8 still use NVIDIA’s DNF module streams for driver selection.
NVIDIA’s CUDA repository currently publishes separate RHEL 10, 9, and 8 x86_64 repositories that map cleanly to Rocky Linux 10, 9, and 8. Do not mix the version-labeled driver commands, because Rocky Linux 10 uses normal packages and Rocky Linux 9 or 8 uses module streams.
Install NVIDIA Drivers on Rocky Linux
Start by choosing the driver flavor, then prepare Rocky Linux, add NVIDIA’s repository, install the driver, reboot, and verify the loaded module with nvidia-smi.
Choose Your NVIDIA Driver Option for Rocky Linux
NVIDIA provides both proprietary drivers and open kernel modules in the CUDA repository. The best choice depends on GPU generation and whether you need the open kernel module stack.
| Feature | Proprietary drivers | Open kernel modules |
|---|---|---|
| Kernel module type | Closed-source NVIDIA kernel modules | Open-source kernel modules with NVIDIA user-space libraries |
| GPU architecture support | Maxwell, Pascal, Volta, Turing, and later | Turing and newer only (required for Blackwell and later) |
| Feature coverage | Full feature set and widest compatibility | May have limitations on some features or workloads |
| Recommended for | Most desktops, workstations, and mixed-GPU systems | Turing-and-newer systems that require open modules |
Recommended for older or mixed hardware: Install the proprietary drivers for Maxwell, Pascal, and Volta GPUs, or when you need the widest fallback coverage. Use the open kernel modules for Turing, Ampere, Ada, Hopper, Blackwell, and newer GPUs when your hardware supports them.
NVIDIA’s open kernel module transition makes the open flavor the forward path for supported newer GPUs. Blackwell and newer GPUs require open modules, while Maxwell, Pascal, and Volta GPUs are not compatible with them.
If you are not sure which architecture your GPU uses, capture the PCI ID with lspci -nn and compare it against NVIDIA’s open kernel module compatibility list (the table includes PCI Device IDs for supported GPUs) before choosing a flavor.
Prepare Your System for NVIDIA Driver Installation
Update Rocky Linux Packages
Update your existing packages to avoid conflicts from outdated libraries or kernel mismatches. Refresh the repository metadata and upgrade installed packages:
sudo dnf upgrade --refreshCommands that start with
sudoneed an administrator account. DNF shows the package transaction before it changes the system, so review the update list before confirming the prompt.
If this process updates the kernel, reboot your system before continuing. The NVIDIA driver installer needs kernel headers that match your running kernel, so a reboot ensures consistency.
Confirm x86_64 Architecture
The repository commands in this article use NVIDIA’s x86_64 RHEL package path. Confirm the system architecture before adding the CUDA repository:
uname -mExpected output:
x86_64
If the command prints a different architecture, check NVIDIA’s CUDA installation documentation for the matching repository path before continuing.
Identify Your Graphics Card
Confirm that your system has an NVIDIA GPU and note the model and PCI ID for driver compatibility. The lspci command lists all PCI devices, and grep filters for VGA or 3D controllers (see our grep command guide if you want more filtering options):
lspci -nn | grep -E "VGA|3D"For example, this output shows an NVIDIA GeForce GTX 1650:
03:00.0 VGA compatible controller: NVIDIA Corporation TU117 [GeForce GTX 1650] [10DE:1F82] (rev a1)
If your GPU is not supported by the current branch, use NVIDIA’s legacy GPU list and the NVIDIA Unix driver archive to identify the correct driver branch for your hardware.
If lspci is missing, install the pciutils package first:
sudo dnf install pciutils -yThe -y flag automatically answers yes to prompts. Remove it if you want to review the package list before installing.
Check Secure Boot Status
Check your Secure Boot status. Secure Boot can prevent unsigned kernel modules from loading, which affects NVIDIA driver installation. Use the mokutil command to check:
mokutil --sb-stateIf the command is missing, install mokutil first:
sudo dnf install mokutil -yIf you installed mokutil just now, run the Secure Boot check again:
mokutil --sb-stateWhen Secure Boot is enabled, you will see:
SecureBoot enabled
Alternatively, when Secure Boot is disabled:
SecureBoot disabled
With Secure Boot enabled, the NVIDIA module may need a Machine Owner Key (MOK) enrollment after installation if the kernel rejects it. The troubleshooting steps include the enrollment command and reboot handoff.
Install EPEL and Enable Required Repositories
The driver workflow needs two repository pieces before NVIDIA packages can resolve cleanly. dnf-plugins-core provides dnf config-manager, and EPEL provides dkms for the DKMS-based module packages used in this article.
sudo dnf install dnf-plugins-core epel-release -yFor more details on EPEL configuration and available packages, see our EPEL installation guide for Rocky Linux.
Keep EPEL enabled after installation so DKMS updates arrive alongside kernel updates. CRB on Rocky Linux 10 and 9, or PowerTools on Rocky Linux 8, can stay disabled unless DNF reports a missing dependency during the dependency install.
Add the NVIDIA CUDA Repository
NVIDIA maintains official RPM repositories for RHEL-compatible distributions, and the CUDA Installation Guide for Linux documents the same repository layout. Use rpm -E %rhel so Rocky Linux selects the matching RHEL major version automatically:
rhel_major=$(rpm -E %rhel)
sudo dnf config-manager --add-repo "https://developer.download.nvidia.com/compute/cuda/repos/rhel${rhel_major}/x86_64/cuda-rhel${rhel_major}.repo"
The downloaded repo file enables package signature checks and points DNF at NVIDIA’s repository signing key. Import the key URL from the repo file before installing driver packages:
rhel_major=$(rpm -E %rhel)
nvidia_gpg_key=$(awk -F= '/^gpgkey=/{print $2; exit}' "/etc/yum.repos.d/cuda-rhel${rhel_major}.repo")
sudo rpm --import "$nvidia_gpg_key"
DNF validates NVIDIA packages against this key during installation and upgrades.
Install Build Dependencies
With the repositories configured, install the running-kernel development files and build tools. The driver paths below use DKMS-backed packages, so kernel-devel, dkms, gcc, and make must be present before the module can build for your active kernel:
sudo dnf install kernel-headers kernel-devel gcc make dkms acpid libglvnd-glx libglvnd-opengl libglvnd-devel pkgconf-pkg-config -yThis command installs the main build and graphics dependencies:
kernel-devel– Matching build tree under/usr/src/kernels/for DKMS module buildskernel-headers– User-space kernel headers used by some build toolinggccandmake– Build toolchain for compilationdkms– Dynamic Kernel Module Support, which rebuilds NVIDIA modules after kernel updatesacpid– Power management daemon for GPU power eventslibglvnd-*– Vendor-neutral OpenGL dispatch librarypkgconf-pkg-config– Provides thepkg-configcommand used by build scripts
If DNF reports missing dependencies, enable the matching development repository for your Rocky Linux release and rerun the dependency command:
Rocky Linux 10:
sudo dnf config-manager --set-enabled crbRocky Linux 9:
sudo dnf config-manager --set-enabled crbRocky Linux 8:
sudo dnf config-manager --set-enabled powertoolsFor detailed information about kernel headers on Rocky Linux, see our kernel headers installation guide.
Install NVIDIA Drivers
Now you can install the NVIDIA drivers. Rocky Linux 9 and 8 use DNF module streams from the CUDA repository, while Rocky Linux 10 installs the driver as standard packages.
Rocky Linux 9 and 8: Module Installation
Rocky Linux 9 and 8 use DNF module streams to manage NVIDIA driver branches. The latest-dkms stream installs the newest proprietary branch with DKMS support for automatic module rebuilding:
sudo dnf module install nvidia-driver:latest-dkms -yYou can view all available driver streams, including legacy branches for older GPUs:
sudo dnf module list nvidia-driverRelevant output includes moving latest streams and branch-specific streams. Newer branch numbers can replace 595 over time:
Name          Stream        Profiles                 Summary
nvidia-driver latest-dkms   default [d], fm, ks      Nvidia driver for latest-dkms branch
nvidia-driver open-dkms [d] default [d], fm, ks      Nvidia driver for open-dkms branch
nvidia-driver 595-dkms      default [d], fm, ks      Nvidia driver for 595-dkms branch
nvidia-driver 595-open      default [d], fm, ks      Nvidia driver for 595-open branch
To use the open kernel modules on Rocky Linux 9 or 8, install the open-dkms stream instead:
sudo dnf module install nvidia-driver:open-dkms -yOpen kernel modules only support Turing-and-newer GPUs. Maxwell, Pascal, and Volta GPUs require the proprietary modules. If you need to switch back, reset the module stream first, then install
nvidia-driver:latest-dkms.
Rocky Linux 10: Proprietary DKMS Packages
On Rocky Linux 10, install the proprietary stack as regular packages. This is the safest option for Maxwell, Pascal, or Volta GPUs and for mixed-GPU systems:
sudo dnf install kmod-nvidia-latest-dkms nvidia-driver nvidia-driver-libs nvidia-driver-cuda -yThis command installs the proprietary NVIDIA driver along with the CUDA integration libraries that provide nvidia-smi. Driver versions change frequently, so use the verification step to confirm the exact version installed.
Rocky Linux 10: Open Kernel Modules (Turing and Newer)
If you need the open kernel modules and your GPU is Turing or newer, install the nvidia-open meta package. This is required for Blackwell-class GPUs and aligns with NVIDIA’s default open-module choice starting with the R560 driver series.
sudo dnf install nvidia-open -yThe nvidia-open meta package installs the open DKMS kernel package and NVIDIA user-space libraries. If nvidia-smi is missing after installation, install the CUDA integration package as well:
sudo dnf install nvidia-driver-cuda -yReboot to Load the Driver
Once the installation completes, reboot your system to load the NVIDIA kernel module and initialize the GPU:
sudo rebootVerify the Installation
Once your system reboots, confirm that the NVIDIA driver loaded correctly by running the nvidia-smi utility:
nvidia-smiA successful run prints a table with the driver version, CUDA runtime compatibility, GPU model, memory usage, and running processes. Driver and CUDA version numbers change frequently, so treat the version fields as installed-state proof rather than fixed article values.
nvidia-smi comes from the NVIDIA driver stack, not the full CUDA Toolkit. Install the optional toolkit only when you need development tools such as nvcc.
Check the Installed NVIDIA Kernel Module Flavor
If you need to confirm whether the proprietary or open DKMS package is installed, query the package names directly:
rpm -q kmod-nvidia-latest-dkms nvidia-open kmod-nvidia-open-dkmsInstalled packages print their version. Packages that do not match your selected driver flavor print a package NAME is not installed message, which is normal when you installed only one flavor.
Rocky Linux 9 and 8 module profiles usually install NVIDIA Settings with the driver. On Rocky Linux 10, or if the command is missing, install it explicitly:
sudo dnf install nvidia-settings -yThen launch the NVIDIA X Server Settings application for graphical configuration:
nvidia-settingsThis utility displays detailed GPU information, allows display configuration, and provides access to performance settings.
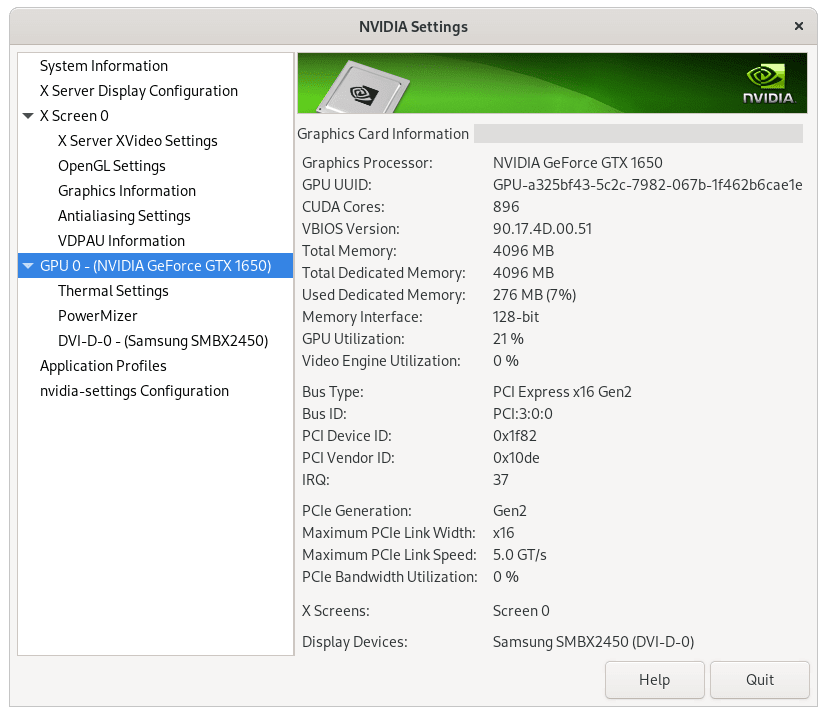
Rocky Linux 10 ships GNOME as Wayland-only. The
xorg-x11-server-Xorgandgnome-session-xsessionpackages are not available in the default repositories, so a GNOME Xorg session is not an option on Rocky 10.
Update NVIDIA Drivers on Rocky Linux
NVIDIA releases driver updates regularly with bug fixes, security patches, and new GPU support. To update your drivers, use the standard DNF upgrade command:
sudo dnf upgrade --refreshThis command upgrades all packages including NVIDIA drivers when new versions become available in the repository. After updating, reboot to load the new kernel module.
On Rocky Linux 9 and 8, upgrades stay within your selected module stream. If you need a different branch, switch streams with the module list in the install section and reinstall the desired stream.
You can check your currently installed driver version with:
nvidia-smi --query-gpu=driver_version --format=csv,noheaderThe command prints one driver branch number, such as the current branch installed from NVIDIA’s repository.
Troubleshoot NVIDIA Drivers on Rocky Linux
Most NVIDIA driver failures on Rocky Linux come down to one of four checks: Nouveau is still loaded, the NVIDIA module did not build for the active kernel, Secure Boot rejected the module, or the installed branch does not support the GPU.
Nouveau Driver Conflicts
The open-source Nouveau driver ships with Rocky Linux and loads automatically for NVIDIA GPUs. Because it conflicts with the proprietary NVIDIA driver, you must block it from loading.
Check if Nouveau is currently loaded:
lsmod | grep -i nouveau || echo "nouveau not loaded"Any output line beginning with nouveau means the Nouveau module is active.
If you see nouveau not loaded, the module is already inactive and you can skip to the next section. Otherwise, create configuration files to block it from loading:
printf '%s\n' 'blacklist nouveau' | sudo tee /etc/modprobe.d/blacklist-nouveau.conf > /dev/null
sudo mkdir -p /etc/dracut.conf.d
printf '%s\n' 'omit_drivers+=" nouveau "' | sudo tee /etc/dracut.conf.d/blacklist-nouveau.conf > /dev/null
Regenerate the initramfs to apply the block configuration:
sudo dracut --regenerate-all --force
sudo depmod -a
Then reboot and verify that Nouveau no longer loads:
sudo rebootAfter rebooting, run the check again. When you see nouveau not loaded, the block configuration is working correctly:
lsmod | grep -i nouveau || echo "nouveau not loaded"nouveau not loaded
Secure Boot Preventing Driver Loading
When Secure Boot is enabled, the NVIDIA kernel module may fail to load because the firmware does not trust the module-signing key. A manual module load can print this error:
sudo modprobe nvidiamodprobe: ERROR: could not insert 'nvidia': Key was rejected by service
Check whether the NVIDIA module loaded:
lsmod | grep nvidiaWhen the output is empty and Secure Boot is enabled, import the Machine Owner Key (MOK) that DKMS uses to sign the module. Verify the DKMS public key exists first:
ls -la /var/lib/dkms/mok.pubIf the file is missing, generate the key pair with DKMS. Current EPEL DKMS packages include the generate_mok action:
sudo dkms generate_mokWhen the key exists, ls prints the file path under /var/lib/dkms/. Use the path shown on your system if DKMS prints a different certificate location.
Then import the key into the MOK database:
sudo mokutil --import /var/lib/dkms/mok.pubThe command prompts you to create a one-time password. Remember this password because you will need it during the next step.
Reboot your system:
sudo rebootDuring boot, the MOK Manager utility appears. Select “Enroll MOK”, then “Continue”, then “Yes”. Enter the password you created earlier, and select “Reboot”.
Once the system boots, verify that the NVIDIA module loaded correctly:
lsmod | grep nvidiaWhen the driver loads successfully, the output includes module names such as nvidia, nvidia_modeset, and nvidia_drm.
nvidia-smi Has Failed Because It Could Not Communicate with the NVIDIA Driver
This error usually means the NVIDIA user-space tools installed, but the kernel module is not loaded for the active kernel:
nvidia-smiNVIDIA-SMI has failed because it couldn't communicate with the NVIDIA driver. Make sure that the latest NVIDIA driver is installed and running.
First check whether any NVIDIA modules are loaded:
lsmod | grep -i nvidia || echo "nvidia modules not loaded"nvidia modules not loaded
If the modules are missing, try loading the main module manually:
sudo modprobe nvidiaIf modprobe reports Key was rejected by service, return to the Secure Boot MOK steps. If it reports that the module is missing, reinstall the matching kernel-devel package for the running kernel and rerun the driver install. If it loads cleanly, run nvidia-smi again.
Check recent kernel messages when the module still refuses to load. The tail command guide explains how to adjust the output length if you need more lines:
sudo journalctl -k -b -o cat | grep -i nvidia | tail -20nvidia-smi Shows “No devices were found”
When nvidia-smi can talk to the driver but reports no devices, the driver branch may not support the card, the GPU may be disabled in firmware, or the system may not be exposing the device to Linux.
nvidia-smiNo devices were found
Check kernel messages for NVIDIA hardware detection errors:
sudo journalctl -k -b -o cat | grep -i nvidia | tail -20NVRM: No NVIDIA GPU found.
If the system reports “No NVIDIA GPU found” but lspci still lists the card, verify that your GPU is supported by the driver branch you installed. Older cards may require a legacy branch from NVIDIA’s legacy GPU list and the Unix driver archive.
After fixing the branch or hardware-detection issue, rerun nvidia-smi. The standard GPU table confirms that the driver can see the card.
MOK Key Lost After Windows Update (Dual Boot)
On dual-boot systems, Windows updates can reset firmware settings and clear an enrolled MOK key. When this happens, the NVIDIA driver may stop loading and nvidia-smi will fail.
nvidia-smiNVIDIA-SMI has failed because it couldn't communicate with the NVIDIA driver.
Confirm the NVIDIA module is not loading:
lsmod | grep -i nvidia || echo "nvidia modules not loaded"nvidia modules not loaded
Re-import the DKMS MOK key:
sudo mokutil --import /var/lib/dkms/mok.pubSet a one-time password, reboot, and complete the MOK enrollment in the UEFI interface. After rebooting, verify the driver is active:
nvidia-smiThe GPU table from nvidia-smi confirms the MOK enrollment survived the next boot.
Remove NVIDIA Drivers on Rocky Linux
To remove the NVIDIA drivers and revert to the open-source Nouveau driver, use the matching command set for your Rocky Linux version.
Review each DNF removal transaction before confirming it. If you installed the CUDA Toolkit or other NVIDIA packages separately, keep those package names out of the removal command unless you want to remove them too.
Rocky Linux 9 and 8
Remove NVIDIA packages installed by the module profiles when they are present, then reset the module stream:
packages=(
  kmod-nvidia-latest-dkms
  kmod-nvidia-open-dkms
  nvidia-driver
  nvidia-driver-cuda
  nvidia-driver-cuda-libs
  nvidia-driver-libs
  nvidia-kmod-common
  nvidia-libXNVCtrl
  nvidia-libXNVCtrl-devel
  nvidia-modprobe
  nvidia-open
  nvidia-persistenced
  nvidia-settings
  nvidia-xconfig
  xorg-x11-nvidia
)

installed=()
for package in "${packages[@]}"; do
  if rpm -q "$package" >/dev/null 2>&1; then
    installed+=("$package")
  fi
done

if ((${#installed[@]})); then
  sudo dnf remove "${installed[@]}"
else
  echo "No matching NVIDIA driver packages are installed"
fi

sudo dnf module reset nvidia-driver
Then clean up dependencies:
sudo dnf autoremoveRocky Linux 10 (Proprietary DKMS Packages)
Remove the driver packages directly:
sudo dnf remove kmod-nvidia-latest-dkms nvidia-driver nvidia-driver-libs nvidia-driver-cuda
sudo dnf autoremove
Rocky Linux 10 (Open Kernel Modules)
Remove the open kernel module package and related driver packages:
sudo dnf remove nvidia-open kmod-nvidia-open-dkms nvidia-driver nvidia-driver-libs nvidia-driver-cuda
sudo dnf autoremove
If you installed NVIDIA Settings separately on Rocky Linux 10, remove that package too:
sudo dnf remove nvidia-settingsRe-enable Nouveau (Optional)
If you previously blocked Nouveau and want to restore it, remove the configuration files you created earlier:
sudo rm -f /etc/modprobe.d/blacklist-nouveau.conf
sudo rm -f /etc/dracut.conf.d/blacklist-nouveau.conf
sudo dracut --regenerate-all --force
Remove the NVIDIA Repository (Optional)
If you do not want future NVIDIA packages from the CUDA repository, remove the repo file:
sudo rm -f /etc/yum.repos.d/cuda-rhel*.repo
sudo dnf clean all
Reboot to complete the removal and load the Nouveau driver:
sudo rebootNVIDIA Drivers on Rocky Linux: Install the CUDA Toolkit (Optional)
If you plan to compile CUDA applications, install the CUDA compiler package from the NVIDIA repository. The current CUDA 13 minor branch can change over time, so list the available cuda-nvcc-13-* packages before choosing a branch.
dnf list --showduplicates 'cuda-nvcc-13-*'Install the newest listed compiler package. Current CUDA repository metadata publishes cuda-nvcc-13-2:
sudo dnf install cuda-nvcc-13-2 -yIf you need the full toolkit, including libraries, profilers, and Nsight tools, install cuda-toolkit instead. It is a larger install and does not replace the driver package workflow.
sudo dnf install cuda-toolkit -yThe nvcc binary is installed under the selected /usr/local/cuda-* prefix. Use the full path if it is not in your PATH:
/usr/local/cuda-13.2/bin/nvcc --version | head -n 1nvcc: NVIDIA (R) Cuda compiler driver
CUDA compiler and toolkit packages update through normal DNF upgrades:
sudo dnf upgrade --refreshTo remove the compiler-only package used in this example, remove the same branch package you installed:
sudo dnf remove cuda-nvcc-13-2If you installed the full toolkit, review the installed CUDA packages before removing them so you do not remove a package needed by another workflow:
rpm -qa 'cuda*' | sortThen remove the toolkit metapackage and confirm the transaction:
sudo dnf remove cuda-toolkitConclusion
NVIDIA drivers are now installed on Rocky Linux from NVIDIA’s CUDA repository, with DKMS handling module rebuilds after kernel updates. Use nvidia-smi for driver and GPU checks, keep the packages current with DNF, and return to the troubleshooting section if Secure Boot, Nouveau, or an older GPU branch blocks the module from loading.

Formatting tips for your comment
You can use basic HTML to format your comment. Useful tags currently allowed in published comments:
<code>command</code>command<strong>bold</strong><em>italic</em><blockquote>quote</blockquote>