
Linux Mint can run NVIDIA GPUs, but it starts with the open-source Nouveau driver instead of NVIDIA’s proprietary stack. Install NVIDIA drivers on Linux Mint when you need proper 3D acceleration, gaming performance, NVENC encoding, or CUDA-ready GPU compute support.
Install NVIDIA Drivers on Linux Mint
Linux Mint 22.x and 21.x give you three practical paths: Driver Manager for the easiest desktop workflow, the ubuntu-drivers command-line path when you want a terminal-only install, and NVIDIA’s CUDA repository when you need NVIDIA-managed packages, CUDA-oriented meta packages, or headless compute driver components.
| Method | Version/Channel | Stability | Best For |
|---|---|---|---|
| Driver Manager (GUI) | Linux Mint-tested stable | Very stable, LTS lifecycle | Desktop users who prefer graphical tools and maximum stability |
Command line (APT and ubuntu-drivers) | Standard Linux Mint and Ubuntu package flow | Very stable, same packages as Driver Manager | Terminal-first installs, remote shells, and users who want the recommended driver without the GUI |
| CUDA Repository | NVIDIA-managed repository meta packages | Stable, but more hands-on | CUDA workloads, headless compute installs, branch pinning, and users who specifically want NVIDIA’s own repository |
These instructions apply to Ubuntu-based Linux Mint 22.x and 21.x. LMDE uses Debian packages instead, so use the guide to install NVIDIA drivers on Debian when you are working on Linux Mint Debian Edition.
Start with the branch marked recommended in Driver Manager or ubuntu-drivers devices. Mint 21.x can still expose legacy 390.x packages, while Mint 22.x mainly offers 470.x and newer branches; very old GPUs may need Nouveau, Mint 21.x, or a Mint 22.x install that stays on the older LTS kernel. Secure Boot, Turing-or-newer GPUs, and Blackwell hardware can make the open kernel module the better fit. If you are switching methods, remove the old driver stack first so DKMS and package metadata stay in sync.
After the driver is installed, the main NVIDIA app on Linux Mint is NVIDIA X Server Settings, launched with nvidia-settings. Driver Manager remains the package selector, while NVIDIA X Server Settings handles display layout, GPU details, and driver-side tweaks after reboot.
Updating your system, installing kernel headers, and verifying GPU compatibility prevent common installation failures. These preparation steps reduce the most common NVIDIA driver installation problems on Linux Mint.
Update Linux Mint System Packages
Update your system packages to minimize conflicts during driver installation. This is especially important for kernel and graphics driver installations.
Update your package list and upgrade any outdated packages:
sudo apt update && sudo apt upgradeThese commands require a user account with sudo privileges on Linux Mint. Most desktop installations grant sudo access to the first user account automatically.
Customized Linux Mint installs and VM templates can miss kernel headers, yet DKMS (Dynamic Kernel Module Support, the system that compiles kernel modules) requires them to build NVIDIA modules. DKMS also rebuilds those modules after kernel updates, so installing the matching headers up front avoids the most common driver-load failure.
sudo apt install linux-headers-$(uname -r)If you compile OpenGL or EGL applications locally, install NVIDIA’s GLVND development stack and build helpers now. These libraries are optional for driver installation but save time when you later build GPU-aware software:
sudo apt install pkg-config libglvnd-dev libegl-dev libgl-dev libgles-dev libglx-dev libopengl-dev gcc makeVerify Graphics Card Compatibility
Verify your graphics card compatibility if you have older hardware. Users with recent cards can skip this step.
Find your graphics card model:
lspci | grep -Ei 'vga|3d'This command displays information about your graphics card. The grep filter keeps only VGA and 3D controller lines; if you want a quick refresher on that filter, see the guide to grep command in Linux with examples. Example output:
03:00.0 VGA compatible controller: NVIDIA Corporation TU117 [GeForce GTX 1650] (rev a1)
After obtaining your card model, verify compatibility if you have older hardware. Check the NVIDIA driver support matrix to confirm your card is supported by current drivers. Cards that need 470.x are especially sensitive to newer Mint 22.x HWE kernels, while older 390.x-era cards are usually better served by Mint 21.x or the open-source Nouveau driver.
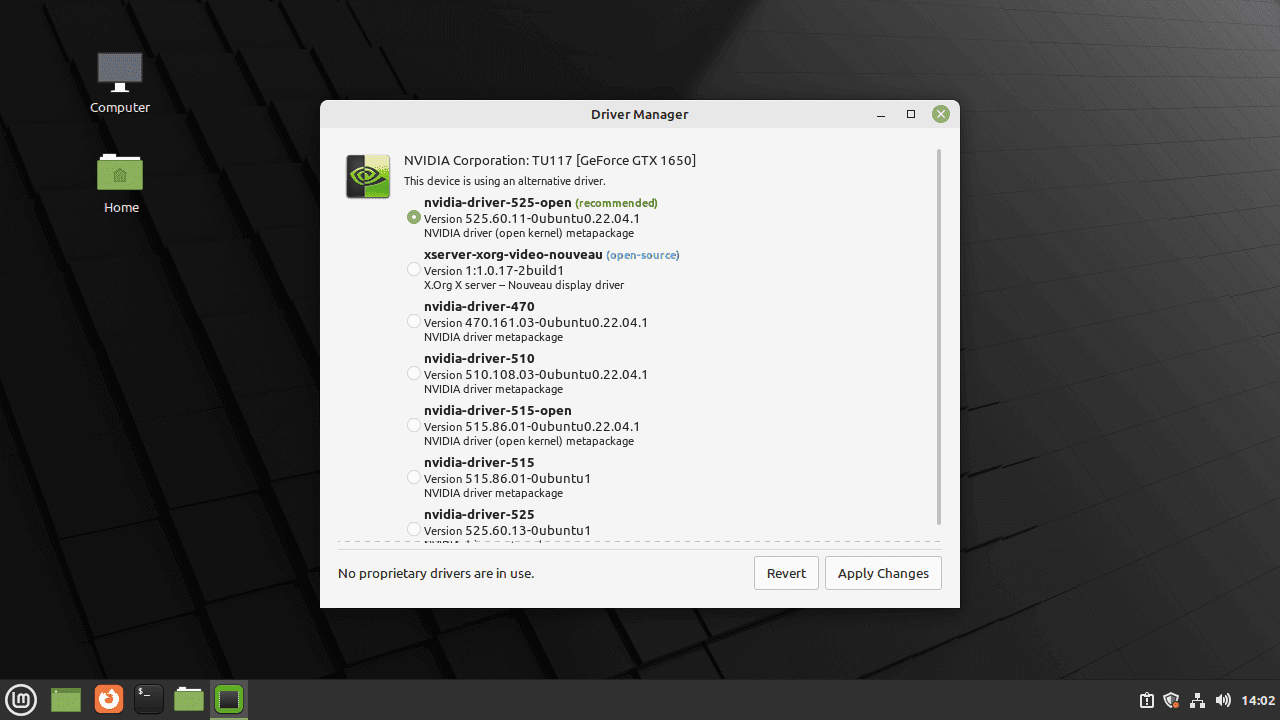
Method 1: Install NVIDIA Drivers via Driver Manager (GUI)
The graphical Driver Manager is the easiest method for most Linux Mint desktop users. It automatically detects your graphics card and offers tested driver branches without making you work through the terminal.
Open the Driver Manager on Linux Mint
Open the Driver Manager from the application menu:
- Open the menu in the lower-left corner of your screen.
- Navigate to Administration.
- Click on Driver Manager.

Install NVIDIA Drivers on Linux Mint via Driver Manager
Select and install your NVIDIA driver:
- The Driver Manager will prompt you for your password. Enter your password and click on Authenticate.
- The Driver Manager will scan your system for available drivers. Once the scanning is complete, you will see a list of available drivers for your graphics card.
- Select the recommended NVIDIA driver from the list.
- Click on Apply Changes to start the installation process.
Reboot Linux Mint After NVIDIA Driver Installation
After installing the NVIDIA drivers via Driver Manager, reboot your system for the changes to take effect:
sudo rebootLinux needs a reboot here so the new NVIDIA kernel modules replace the currently loaded graphics stack cleanly. After startup, the desktop should come back on the new driver branch automatically.
Method 2: Install NVIDIA Drivers from the Command Line
The ubuntu-drivers CLI uses the same package flow as Driver Manager, but it fits terminal-only installs, remote shells, and readers who do not want to switch into the GUI. On Linux Mint 22.x and 21.x, the standard repositories already expose supported nvidia-driver-* branches, so you do not need the legacy graphics-drivers PPA just to install the recommended driver.
Install Command-Line Detection Tools
The ubuntu-drivers command is already present on many Linux Mint desktop installs. If it is missing on your system, install the detection package first:
sudo apt install ubuntu-drivers-common -yList Recommended NVIDIA Drivers
Scan the available branches and look for the line marked recommended:
ubuntu-drivers devicesThis command answers two common questions at once: which package branch Linux Mint recommends, and whether your card needs a legacy line such as 470.x or 390.x instead of a newer desktop branch.

Install the Recommended NVIDIA Driver
For most systems, let ubuntu-drivers install the recommended branch automatically:
sudo ubuntu-drivers autoinstallIf you want a specific branch instead, install it directly with APT. Replace <version> with the branch you noted from ubuntu-drivers devices:
sudo apt install nvidia-driver-<version>Use the open kernel module variant when that branch better matches your hardware or Secure Boot plan:
sudo apt install nvidia-driver-<version>-openReboot After Command-Line Installation
Reboot your system for the new kernel module to take effect:
sudo rebootMethod 3: Install NVIDIA Drivers via CUDA Repository
NVIDIA publishes CUDA network repositories for the Ubuntu bases used by Linux Mint. Use this method when you want NVIDIA’s repository to manage driver packages, need headless compute packages, need branch pinning, or need open-module packages beyond the standard Driver Manager workflow. For a normal desktop gaming setup, Driver Manager or
ubuntu-driversremains the simpler default.
| Linux Mint Version | Ubuntu Base | Ubuntu Codename | CUDA Repo Suffix |
|---|---|---|---|
| Mint 22.x (Wilma, Xia, Zara, Zena) | Ubuntu 24.04 LTS | noble | ubuntu2404 |
| Mint 21.x (Vanessa, Vera, Victoria, Virginia) | Ubuntu 22.04 LTS | jammy | ubuntu2204 |
Install CUDA Repository Prerequisites on Linux Mint
The NVIDIA CUDA repository provides drivers alongside development tools. Install the packages needed for HTTPS downloads, the repository keyring, and DKMS module builds:
sudo apt install build-essential dkms curl ca-certificates -yInstall NVIDIA CUDA Repository Keyring
Confirm your Ubuntu base codename before choosing a CUDA repository suffix:
source /etc/os-release && echo "$UBUNTU_CODENAME"This returns the Ubuntu base codename: noble (Ubuntu 24.04 LTS) or jammy (Ubuntu 22.04 LTS). Install NVIDIA’s binary CUDA repository keyring for the matching repository suffix:
For Linux Mint 22.x with an Ubuntu 24.04 LTS base:
curl -fsSLo cuda-archive-keyring.gpg https://developer.download.nvidia.com/compute/cuda/repos/ubuntu2404/x86_64/cuda-archive-keyring.gpg
sudo install -m 0644 cuda-archive-keyring.gpg /usr/share/keyrings/nvidia-cuda-archive-keyring.gpg
rm -f cuda-archive-keyring.gpg
For Linux Mint 21.x with an Ubuntu 22.04 LTS base:
curl -fsSLo cuda-archive-keyring.gpg https://developer.download.nvidia.com/compute/cuda/repos/ubuntu2204/x86_64/cuda-archive-keyring.gpg
sudo install -m 0644 cuda-archive-keyring.gpg /usr/share/keyrings/nvidia-cuda-archive-keyring.gpg
rm -f cuda-archive-keyring.gpg
Add NVIDIA CUDA Repository (DEB822 Format)
Add the NVIDIA repository in modern DEB822 .sources format. These printf | sudo tee commands write the file directly as root, which is more copy-paste friendly than a heredoc for a short source stanza.
For Linux Mint 22.x with an Ubuntu 24.04 LTS base:
printf '%s\n' 'Types: deb' 'URIs: https://developer.download.nvidia.com/compute/cuda/repos/ubuntu2404/x86_64/' 'Suites: /' 'Architectures: amd64' 'Signed-By: /usr/share/keyrings/nvidia-cuda-archive-keyring.gpg' | sudo tee /etc/apt/sources.list.d/nvidia-cuda.sources > /dev/nullFor Linux Mint 21.x with an Ubuntu 22.04 LTS base:
printf '%s\n' 'Types: deb' 'URIs: https://developer.download.nvidia.com/compute/cuda/repos/ubuntu2204/x86_64/' 'Suites: /' 'Architectures: amd64' 'Signed-By: /usr/share/keyrings/nvidia-cuda-archive-keyring.gpg' | sudo tee /etc/apt/sources.list.d/nvidia-cuda.sources > /dev/nullThe DEB822
.sourcesformat replaces the legacy single-line.listformat with a cleaner, more maintainable structure. TheSuites: /line indicates this repository uses an exact path rather than a distribution suite name, so noComponents:field is needed. TheArchitectures: amd64line keeps APT from requesting unsupported foreign-architecture indexes after you enablei386packages for Steam or older games.
Update APT After Adding NVIDIA CUDA Repository
Update your package list:
sudo apt updateInstall NVIDIA Drivers from CUDA Repository
Check which NVIDIA repository packages are visible after the refresh:
apt-cache policy nvidia-driver nvidia-driver-open cuda-drivers nvidia-open nvidia-headless nvidia-headless-openAfter the APT refresh, use the generic package names for newer CUDA repository branches. Older versioned packages may still appear, but branch 590 and newer use generic names plus optional pinning packages instead of nvidia-driver-<version> as the primary install target.
| Driver Type | Install Package | Best For |
|---|---|---|
| Proprietary module | cuda-drivers | Older GPUs, mixed old/new GPU systems, and workloads that still require NVIDIA’s proprietary kernel module |
| Open kernel module | nvidia-open | Turing and newer GPUs, Secure Boot-friendly plans, and Blackwell or Grace Hopper systems that require open modules |
| Branch pinning | nvidia-driver-pinning-<branch> | Systems that must stay on a specific branch instead of tracking the moving CUDA repository driver |
Choose one of the following install commands. For the proprietary module path:
sudo apt install cuda-driversFor the open kernel module path:
sudo apt install nvidia-openTo stay on a specific NVIDIA branch from the CUDA repository, install the matching pinning package before installing the driver. Replace <branch> with the branch number you need, such as 580 or 595:
sudo apt install nvidia-driver-pinning-<branch>Then install either cuda-drivers or nvidia-open. If you later want to track the repository’s default branch again, remove the pinning package and run a normal APT upgrade.
sudo apt remove nvidia-driver-pinning-<branch>
sudo apt update && sudo apt upgrade
Install Headless NVIDIA Drivers
For headless compute systems that do not need desktop GL, EGL, Vulkan, or X driver components, use NVIDIA’s headless meta package instead. The package keeps the compute libraries, kernel source, kernel common package, and DKMS module on the same branch:
sudo apt install nvidia-headlessInstall Open Headless NVIDIA Drivers
Use the open headless package for Turing-or-newer GPUs when you want the open kernel module without desktop display components:
sudo apt install nvidia-headless-openBoth headless choices still support nvidia-smi verification because the compute library package supplies the utility even without desktop display components.
Install Fabric Manager for NVSwitch Systems
Fabric Manager and NSCQ telemetry are datacenter components for NVSwitch systems, not normal desktop gaming packages. Confirm the generic CUDA repository packages are available before installing them:
apt-cache policy nvidia-fabricmanager libnvidia-nscqIf both packages have candidates from the NVIDIA CUDA repository and your hardware needs them, install them together:
sudo apt install nvidia-fabricmanager libnvidia-nscqAfter any CUDA repository driver install, reboot to load the new modules:
sudo rebootVerify NVIDIA Driver Installation on Linux Mint
After installing NVIDIA drivers and rebooting your Linux Mint system, verify the installation using command-line tools or the graphical NVIDIA Settings application.
Verify NVIDIA Driver Installation via Terminal on Linux Mint
Confirm which kernel module version is loaded:
cat /proc/driver/nvidia/versionThe output should include an NVRM version line and a compiler line for the module build. If the file is missing, the NVIDIA kernel module is not loaded for the running kernel.
Use nvidia-smi to see GPU utilization, memory usage, and driver status:
nvidia-smi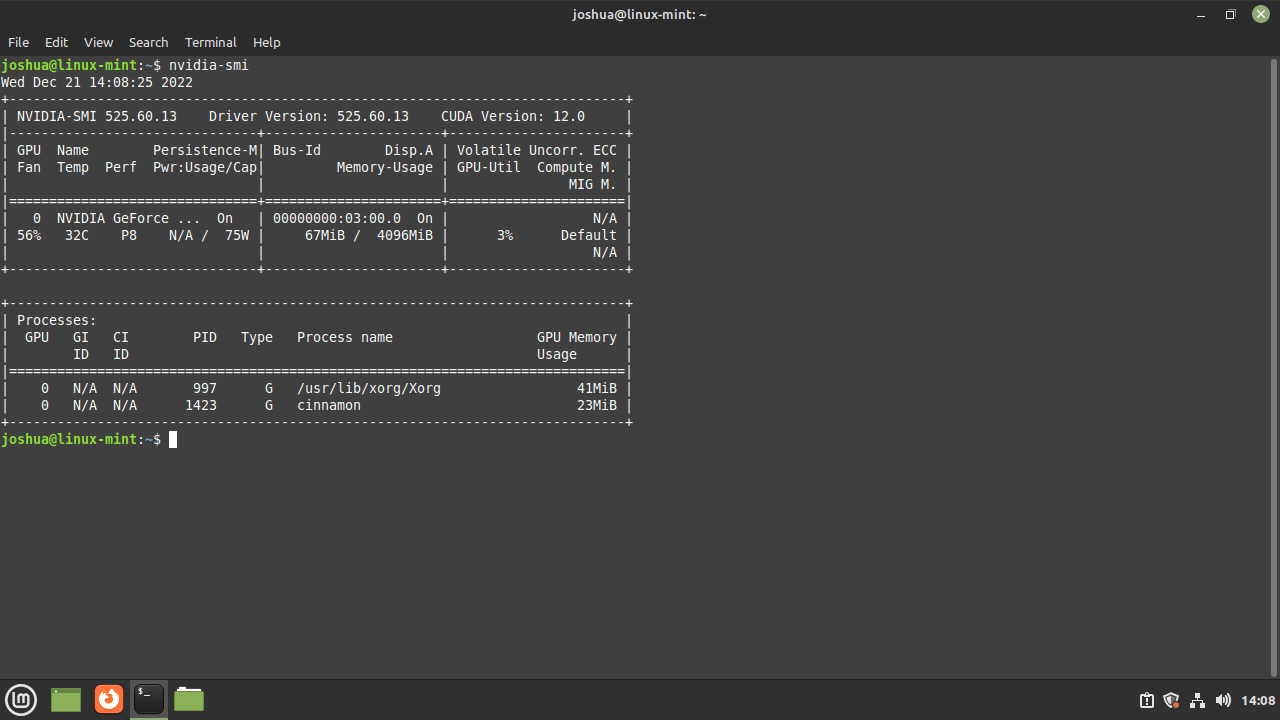
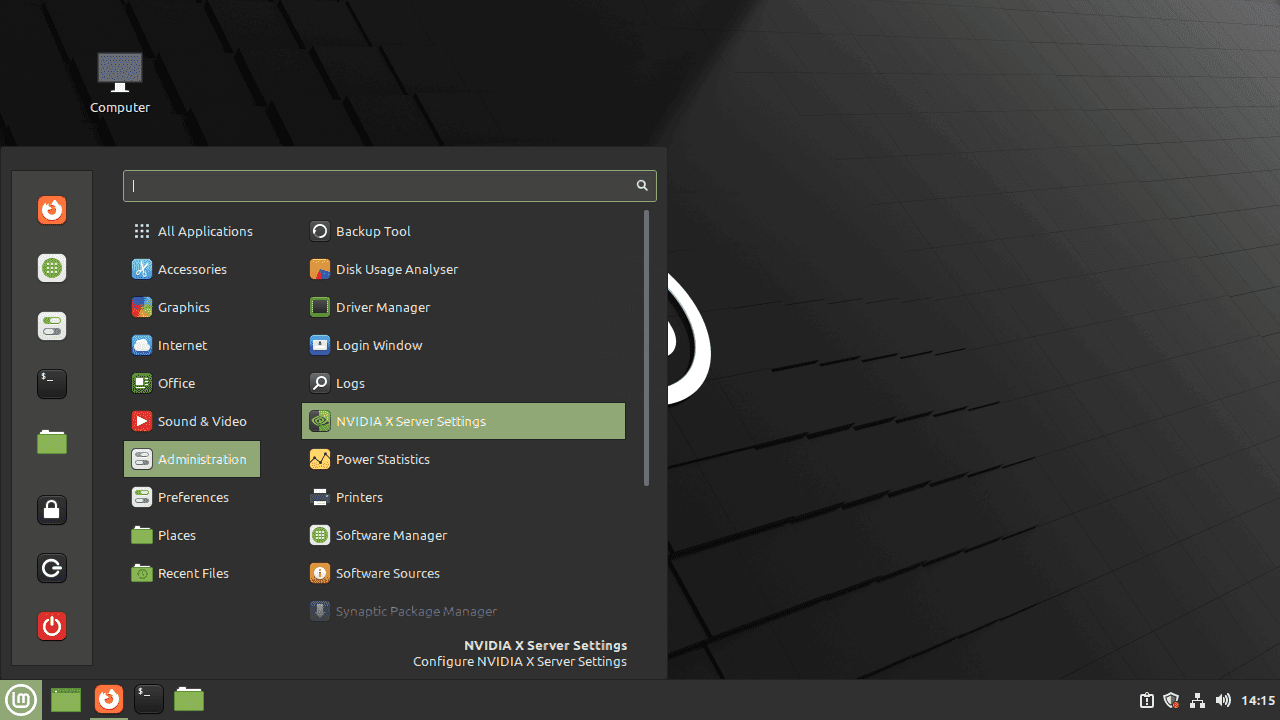
Open NVIDIA X Server Settings on Linux Mint
Launch the NVIDIA Settings GUI for graphical driver configuration and monitoring:
nvidia-settingsOn desktop installs, if the command is missing after a minimal or compute-focused driver install, install the GUI package from the same APT source set and try again:
sudo apt install nvidia-settingsYou can also access NVIDIA settings through the application menu: Menu > Administration > NVIDIA X Server Settings.
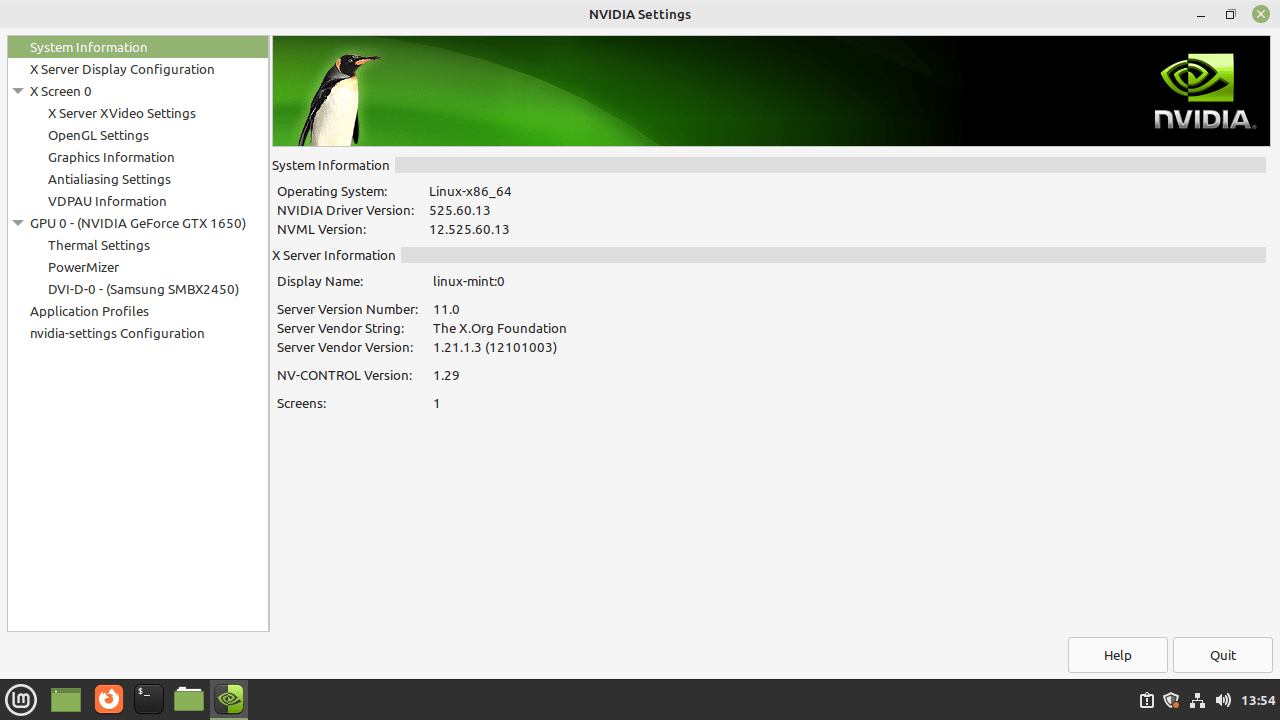
The NVIDIA settings GUI displays your GPU configuration, information, and customizable settings. From here, you can adjust display settings, manage performance profiles, and configure advanced driver options.
Check Compute Capability and CUDA Toolkit
Confirm GPU name, driver version, and compute capability (important for CUDA application support):
nvidia-smi --query-gpu=name,driver_version,compute_cap --format=csvThe output should show your GPU name, active driver branch, and compute capability. If the compute capability is below an application’s minimum requirement, only newer hardware resolves that limitation.
If you also installed the CUDA Toolkit from NVIDIA’s repository, verify the compiler version:
nvcc --versionFor full CUDA Toolkit validation, compile and run the deviceQuery CUDA sample after installing the toolkit packages.
Update or Refresh NVIDIA Drivers on Linux Mint
Keeping NVIDIA drivers current improves performance, fixes bugs, and maintains compatibility with new applications. Update frequency depends on your installation method.
Refresh NVIDIA Drivers via Driver Manager
To refresh NVIDIA drivers on Linux Mint through the GUI, open Driver Manager (Menu > Administration > Driver Manager), click Refresh, apply a newer tested branch if one appears, then reboot.
Update NVIDIA Drivers via APT
If you installed drivers with APT, an apt upgrade updates the installed meta package. Standard Mint packages usually stay within the selected branch, while NVIDIA CUDA repository moving meta packages can advance to a newer branch unless you installed a pinning package.
sudo apt update && sudo apt upgradeTo upgrade a single versioned driver package from the standard Mint/Ubuntu package flow without touching other system packages, use --only-upgrade and replace <version> with your installed branch:
sudo apt install --only-upgrade nvidia-driver-<version>To switch to another versioned branch from the standard Mint/Ubuntu package flow, install the target branch directly. Replace <version> with the branch you selected from Driver Manager or ubuntu-drivers devices:
sudo apt install nvidia-driver-<version>Reboot after any driver update to load the new kernel module:
sudo rebootVerify the Updated NVIDIA Driver Version
After rebooting, confirm the new driver version is active:
nvidia-smi --query-gpu=driver_version --format=csv,noheaderOnly the active driver version should print. If it still shows the old branch after a reboot, check DKMS status and mixed package sources.
Remove Existing NVIDIA Drivers on Linux Mint
Before switching installation methods, remove existing NVIDIA drivers completely to avoid conflicts. Mixing driver sources can cause boot failures or graphics instability. Clean up APT-based drivers, runfile installations, and CUDA Toolkit remnants before reinstalling from another source. After removal, the system falls back to Nouveau and the Mesa graphics stack until new NVIDIA drivers are installed; use the Mesa drivers on Linux Mint guide only when you intentionally return to the open-source stack.
If you have not previously installed NVIDIA drivers through any method, no removal step is needed. These cleanup commands are for users switching installation methods or fully removing NVIDIA from the system.
Remove Old NVIDIA Repositories
If you previously enabled the graphics-drivers PPA or the NVIDIA CUDA repository, first list matching source files so you can see what APT is using:
grep -RInE "graphics-drivers/ppa|developer.download.nvidia.com/compute/cuda" /etc/apt/sources.list /etc/apt/sources.list.d 2>/dev/nullWhen you no longer need those sources, remove the PPA helper entry, known legacy files, the DEB822 source created earlier, and CUDA keyrings that are no longer referenced:
sudo add-apt-repository --remove ppa:graphics-drivers/ppa
sudo rm -f /etc/apt/sources.list.d/graphics-drivers-ubuntu-ppa*.list
sudo rm -f /etc/apt/sources.list.d/graphics-drivers-ubuntu-ppa*.sources
sudo rm -f /etc/apt/keyrings/graphics-drivers-ppa-*.gpg
sudo rm -f /etc/apt/sources.list.d/nvidia-drivers.list
sudo rm -f /etc/apt/sources.list.d/nvidia-drivers.sources
sudo rm -f /etc/apt/sources.list.d/nvidia-cuda.sources
sudo rm -f /etc/apt/sources.list.d/cuda-*.list
sudo rm -f /usr/share/keyrings/nvidia-drivers.gpg
sudo rm -f /usr/share/keyrings/nvidia-cuda-archive-keyring.gpg
sudo rm -f /usr/share/keyrings/cuda-archive-keyring.gpg
Run sudo apt update after removing these entries so APT stops pulling packages from the old sources.
Remove NVIDIA Packages via APT
To begin, remove any NVIDIA-related packages installed through APT. Quoting the package globs ensures the shell passes them to APT without expanding them prematurely:
sudo apt remove --purge 'nvidia*' 'libnvidia*'
sudo apt autoremove --purge
If you previously installed the CUDA Toolkit through APT, purge those packages as well before installing a new driver source. This removes meta-packages such as cuda-drivers, cuda-toolkit-12-4, and libcuda1 that keep NVIDIA components pinned in place:
sudo apt remove --purge 'cuda-*' 'libcuda*' 'nvidia-cuda-toolkit'
sudo apt autoremove --purge
Remove NVIDIA Drivers Installed via Runfile
Alternatively, if you installed NVIDIA drivers using NVIDIA’s standalone runfile installer, the uninstallation process differs from APT-based installations. Fortunately, runfile installs include their own uninstaller script.
The uninstaller refuses to run while GNOME, KDE, or Wayland sessions are active. Press Ctrl+Alt+F3 to reach a text console, sign in, and stop your display manager before continuing. Linux Mint typically uses lightdm, but alternatives include sddm (KDE) or gdm3 (GNOME). Stop your active display manager with the appropriate command (for example, sudo systemctl stop lightdm). After cleanup, reboot or start the display manager again.
Before running the uninstaller, inspect any NVIDIA-created modprobe blacklist files. Remove only the files that came from the runfile installer so the system can boot back into the open-source Nouveau driver if needed:
find /lib/modprobe.d /etc/modprobe.d /usr/lib/modprobe.d -maxdepth 1 -name 'nvidia-installer-*' -print 2>/dev/nullsudo rm -f /lib/modprobe.d/nvidia-installer-*
sudo rm -f /etc/modprobe.d/nvidia-installer-*
sudo rm -f /usr/lib/modprobe.d/nvidia-installer-*Before running the uninstaller, first determine its location since it may be in different directories depending on your installation method:
command -v nvidia-uninstallNext, edit /etc/default/grub and remove any custom parameters such as nvidia-drm.modeset=1 or nvidia-drm.fbdev=1 that were added to support the proprietary driver. After saving the file, rebuild GRUB and your initramfs:
sudo update-grub
sudo update-initramfs -u
Finally, run the bundled uninstaller to remove the driver. Replace <nvidia-uninstall-path> with the path returned by command -v:
sudo <nvidia-uninstall-path>Remove CUDA Toolkit Installed via Runfile
Similarly, if you installed the CUDA Toolkit using a runfile, remove it using the included cuda-uninstall script. First, find your installed CUDA version:
cuda_dir=$(find /usr/local -maxdepth 1 -type d -name 'cuda-*' -print 2>/dev/null | sort -V | tail -n 1)
printf '%s\n' "$cuda_dir"
This shows your CUDA installation directory, such as /usr/local/cuda-13.3. Keep the same terminal session and run the uninstaller from that directory:
sudo "$cuda_dir/bin/cuda-uninstall"If cuda_dir is empty, no runfile-style CUDA directory was found under /usr/local; use the APT cleanup commands instead.
Troubleshoot Common NVIDIA Driver Issues on Linux Mint
Installation failures and display issues usually stem from driver conflicts, kernel header mismatches, DKMS build failures, or Secure Boot blocking modules. The following troubleshooting steps resolve the most common NVIDIA driver problems on Linux Mint.
Secure Boot Blocks NVIDIA Driver Loading
Systems with Secure Boot enabled block unsigned kernel modules, preventing NVIDIA drivers from loading. You have two options: disable Secure Boot in BIOS/UEFI settings during installation, or enroll a Machine Owner Key (MOK) to sign DKMS-built modules. Most Linux Mint users find temporarily disabling Secure Boot the simplest approach.
To disable Secure Boot temporarily during driver installation:
- Reboot and enter BIOS/UEFI (usually by pressing Del, F2, or F12 during startup)
- Find “Secure Boot” in Security settings and disable it
- Save and reboot
- Install NVIDIA drivers with Driver Manager,
ubuntu-drivers, or the CUDA repository method - Re-enable Secure Boot only after enrolling a key that signs the NVIDIA modules; otherwise leave it disabled
Black Screen or No Display After Installation
If your system boots to a black screen, the NVIDIA driver failed to load or Nouveau (the open-source driver) is still active. Press Ctrl+Alt+F3 to access a virtual console and check driver status:
lsmod | grep nvidiaIf this shows no output, the NVIDIA driver didn’t load. Next, check DKMS status:
dkms statusIf the driver shows as “unbuilt” or “failed,” force DKMS to rebuild the kernel modules:
sudo dkms autoinstallIf you see Nouveau loading instead of NVIDIA, blacklist it permanently:
printf '%s\n' 'blacklist nouveau' 'options nouveau modeset=0' | sudo tee /etc/modprobe.d/blacklist-nouveau.conf > /dev/nullRebuild your initramfs and reboot:
sudo update-initramfs -u && sudo rebootnvidia-smi Cannot Communicate with the NVIDIA Driver
When nvidia-smi says it cannot communicate with the NVIDIA driver, the NVIDIA kernel module is not loaded for your current kernel. The usual causes are a failed DKMS build, Secure Boot blocking the module, or leftover packages from multiple driver sources.
Check whether the NVIDIA modules are active:
lsmod | grep nvidiaIf that returns no lines, inspect the DKMS state next:
dkms statusIf DKMS reports a failed or missing NVIDIA module for the active kernel, rebuild the module and refresh initramfs:
sudo dkms autoinstall
sudo update-initramfs -u
Reboot, retest nvidia-smi, then check Secure Boot state and mixed package sources if the module still refuses to load.
DKMS Build Failures After Kernel Updates
If DKMS fails to rebuild drivers after a kernel update, ensure kernel headers match your running kernel:
uname -rsudo apt install linux-headers-$(uname -r)If you installed a custom kernel such as XanMod kernel on Linux Mint, install headers matching that specific kernel version, as the default headers package may not match your running kernel.
On Mint 22.x point releases with newer HWE kernels, old GPUs that require the 470 driver can fail because that legacy branch no longer tracks every newer kernel. If Driver Manager recommends 470 and DKMS repeatedly fails on a newer HWE kernel, use Mint 21.x, Nouveau, or a Mint 22.x install that remains on the older LTS kernel rather than forcing random newer driver branches onto unsupported hardware.
Then force DKMS to rebuild:
sudo dkms autoinstall && sudo update-initramfs -uMixed Driver Sources Causing Conflicts
Installing NVIDIA drivers from multiple sources simultaneously, such as the standard Linux Mint packages, the legacy graphics-drivers PPA, and the CUDA repository, creates package conflicts and prevents proper driver loading. Common symptoms include package manager errors mentioning held packages, DKMS build failures, or nvidia-smi reporting mismatched driver versions.
First, identify which driver packages are currently installed:
dpkg -l | grep nvidia-driverCheck which repositories are providing NVIDIA packages. For a versioned branch, replace <version> with the branch installed on your system:
apt-cache policy nvidia-driver nvidia-driver-open cuda-drivers nvidia-open nvidia-headless nvidia-headless-open
apt-cache policy nvidia-driver-<version>
The output shows all available sources. If you see packages from multiple repositories, especially a mix of Linux Mint packages, the legacy graphics-drivers PPA, and NVIDIA’s CUDA repository, conflicts are likely. Remove the mixed NVIDIA packages and old repository files, then choose one installation method and stick with it consistently.
After cleanup, verify no NVIDIA packages remain:
dpkg -l | grep -i nvidiaIf lingering packages appear, replace <package-name> with the exact package name from dpkg -l before removing it:
sudo apt remove --purge <package-name>
sudo apt autoremove --purge
GPU Not Used (Software Rendering Fallback)
When your system boots normally but the GPU sits idle, the desktop environment fell back to software rendering through Mesa’s LLVMpipe. This occurs when the NVIDIA driver loads successfully but X.org or Wayland fails to recognize it. Performance feels sluggish, videos stutter, and games run at single-digit framerates.
Install the renderer inspection tool if it is missing, then check which renderer your desktop session is using:
sudo apt install mesa-utilsglxinfo | grep "OpenGL renderer"If the output shows llvmpipe or software rasterizer instead of your NVIDIA GPU model, the system isn’t using the GPU. Example of software rendering:
OpenGL renderer string: llvmpipe (LLVM 15.0.7, 256 bits)
Verify the NVIDIA kernel module loaded successfully:
lsmod | grep nvidiaIf nvidia, nvidia_drm, and nvidia_modeset appear in the output, the driver loaded but the desktop session is still not using it. On hybrid laptops or selectable-GPU systems, check the PRIME profile:
sudo apt install nvidia-prime
prime-select query
If the query returns intel or on-demand when you want the NVIDIA GPU for the whole session, switch profiles and reboot:
sudo prime-select nvidia
sudo reboot
On desktop systems without PRIME switching, reselect the recommended NVIDIA driver in Driver Manager, reboot, and check glxinfo again. If the issue persists, check for conflicting Mesa drivers:
ldconfig -p | grep libGL.soThe output should prioritize NVIDIA’s libGL.so over Mesa’s version. If Mesa’s library appears first, reinstall the NVIDIA driver to restore proper library priorities. To revert to the open-source stack instead, see the guide to upgrade Mesa drivers on Linux Mint.
Multi-Monitor Detection Problems
When one monitor works but additional displays remain undetected, the issue typically involves cable types, display port assignment, or X.org configuration not matching your physical setup. NVIDIA drivers handle multi-monitor setups through X screens and RandR extensions, requiring explicit configuration when autodetection fails.
First, verify which displays the driver detects:
nvidia-smi -q | grep -A 5 "Attached GPUs"xrandr --listprovidersThen list connected displays and their current state:
xrandr --queryMonitors show as connected, disconnected, or unknown connection. Example output:
DP-0 connected primary 1920x1080+0+0 (normal left inverted right x axis y axis) 527mm x 296mm
DP-2 connected 1920x1080+1920+0 (normal left inverted right x axis y axis) 527mm x 296mm
HDMI-0 disconnected (normal left inverted right x axis y axis)
If a physically connected monitor shows as disconnected, try a different cable or port. DisplayPort and HDMI sometimes require specific ports on multi-output GPUs. When monitors appear as unknown connection, force detection through the NVIDIA Settings GUI:
nvidia-settingsNavigate to X Server Display Configuration, click “Detect Displays,” arrange monitors in the desired layout, and apply settings. Save an X.org configuration only when the corrected monitor layout does not persist after reboot, and back up any existing file first:
if [ -f /etc/X11/xorg.conf ]; then sudo cp -a /etc/X11/xorg.conf "/etc/X11/xorg.conf.backup.$(date +%Y%m%d%H%M%S)"; fiSteam and Gaming Library Mismatches
Games launched through Steam sometimes fail with Vulkan initialization errors or OpenGL warnings about missing libraries. This typically occurs when Steam’s bundled runtime libraries conflict with system-installed NVIDIA libraries, or when 32-bit library support is incomplete. Common symptoms include black screens at game launch, immediate crashes, or errors mentioning libvulkan.so or libGL.so.
If you still need Valve’s client itself or want to compare package sources before testing the game runtime, see the guide to install Steam on Linux Mint.
First, verify Vulkan drivers are installed for both 64-bit and 32-bit applications:
dpkg -l | grep vulkanEnable 32-bit architecture support if you have not already, then refresh your package lists:
sudo dpkg --add-architecture i386
sudo apt update
Install missing Vulkan libraries if needed:
sudo apt install libvulkan1 libvulkan1:i386 vulkan-toolsTest Vulkan functionality with vulkaninfo:
vulkaninfo | grep "deviceName"The output should show your NVIDIA GPU name. If Vulkan reports errors or shows a software renderer, check whether the 32-bit NVIDIA GL package exists for your installed branch. Replace <version> with your installed branch from nvidia-smi or Driver Manager:
apt-cache policy libnvidia-gl-<version>:i386If the package has a candidate, install the branch-matched 32-bit NVIDIA libraries along with the common 32-bit GL packages:
sudo apt install libnvidia-gl-<version>:i386 libgl1:i386 libglx0:i386If you installed a very new CUDA repository branch and no matching i386 package exists from the Ubuntu base, use Driver Manager or a standard Mint/Ubuntu branch for gaming. Do not disable the Steam runtime globally as a first fix; mismatched 32-bit NVIDIA libraries are the safer problem to solve first.
Laptop GPU Switching Issues
Laptops with hybrid graphics (Intel integrated GPU plus NVIDIA discrete GPU) often struggle with power management and GPU switching on Linux Mint. Common symptoms include the discrete GPU staying active constantly (draining battery), applications refusing to use the NVIDIA GPU, or system freezes when switching between GPUs.
Check current GPU power state and active processes:
nvidia-smiIf the GPU shows persistent power draw with no applications listed, NVIDIA’s persistence daemon might be keeping it active. For laptops, you typically want on-demand GPU activation rather than always-on behavior to preserve battery life. Check the current power management mode:
cat /proc/driver/nvidia/params | grep "RegistryDwords"Next, install and configure NVIDIA Prime for proper GPU switching on your laptop:
sudo apt install nvidia-primeSwitch to on-demand mode where the integrated GPU handles desktop rendering and NVIDIA GPU activates only when needed:
sudo prime-select on-demandAfter switching modes, reboot and verify the active profile:
prime-select queryLaunch applications with the NVIDIA GPU explicitly when needed. Replace <application-command> with the executable you want to start, such as a game launcher or renderer:
prime-run <application-command>For more aggressive power management, enable runtime power management for the GPU. Create or edit /etc/modprobe.d/nvidia-pm.conf:
printf '%s\n' 'options nvidia NVreg_DynamicPowerManagement=0x02' | sudo tee /etc/modprobe.d/nvidia-pm.conf > /dev/nullThen rebuild initramfs and reboot:
sudo update-initramfs -u && sudo rebootWayland Session Performance Problems
Linux Mint defaults to X11 (Xorg), but some users experiment with Wayland sessions for better multi-monitor support or modern display features. NVIDIA’s Wayland support improved significantly in recent drivers, though issues still occur with older driver versions or specific desktop environments. Common symptoms include screen tearing, stuttering animations, applications refusing to launch, or the session falling back to software rendering.
First, verify you’re actually running a Wayland session:
echo $XDG_SESSION_TYPEIf the output shows wayland and you’re experiencing issues, the easiest solution is switching back to X11 for better stability. Log out, click the settings gear icon at the login screen, and select “Linux Mint (X11)” or “Cinnamon (X11)” instead of the Wayland option. X11 provides more stable NVIDIA support on Linux Mint.
If you need Wayland for specific features, ensure you’re running a recent driver version (565 or newer) with proper Wayland support. Check your current driver:
nvidia-smi --query-gpu=driver_version --format=csv,noheaderEnable NVIDIA’s DRM kernel mode setting, which Wayland requires. Back up /etc/default/grub, then edit it and add nvidia-drm.modeset=1 to the kernel parameters:
sudo cp -a /etc/default/grub "/etc/default/grub.backup.$(date +%Y%m%d%H%M%S)"
sudo nano /etc/default/grub
Find the line starting with GRUB_CMDLINE_LINUX_DEFAULT and add the parameter inside the quotes:
GRUB_CMDLINE_LINUX_DEFAULT="quiet splash nvidia-drm.modeset=1"
Update GRUB and rebuild initramfs:
sudo update-grub
sudo update-initramfs -u
Reboot and verify DRM mode setting is active:
cat /sys/module/nvidia_drm/parameters/modesetThe output should show Y to confirm DRM mode setting is active. If Wayland still performs poorly or applications crash, switch back to X11 permanently. NVIDIA’s X11 support remains more mature and stable than Wayland integration on Linux Mint.
Conclusion
After a successful install and reboot, NVIDIA’s driver stack lets games, Blender renders, external displays, and GPU-aware workloads use the card instead of falling back to Nouveau. For gaming issues, check branch-matched 32-bit libraries before changing Steam runtime behavior. If you return to open-source graphics later, move back to Nouveau and Mesa deliberately instead of mixing driver sources.

Dear Sir,
Just want to say a big thanks. I’d been looking for a solution to slow frame rates with Empyrion on Mint. This solved my problem. Thank you very much,
Jonathan.
quick question ;
did you use root terminal to do all this or did you just user terminal with sudo
Thanks for asking, prawin. All commands in this guide use sudo with a regular user account, not the root terminal directly. This follows Linux security best practices since sudo provides better audit logging, limits privilege scope to individual commands, and reduces the risk of accidental system damage from running an entire session as root.
You can verify this by checking any command block in the guide. They all start with sudo rather than running from a root prompt. If you prefer using a root shell for convenience during driver installation, you can switch with this command:
Then run the commands without sudo prefixes, but the standard sudo approach shown here is safer for most users.
Thank you for all this popularization.
In my RSS feeds