

phpMyAdmin provides a web-based interface for managing MySQL and MariaDB databases without requiring command-line expertise. Whether you need to create databases for WordPress sites, manage user permissions, import SQL backups, or run queries on your data, phpMyAdmin handles these tasks through an intuitive browser interface. By the end of this guide, you will have a complete LEMP stack (Linux, Nginx, MariaDB, PHP) with phpMyAdmin configured and secured with SSL encryption.
This guide covers Ubuntu 22.04 LTS, 24.04 LTS, and 26.04 LTS installations. Each release includes different default PHP versions (8.1, 8.3, and 8.4 respectively), so the guide includes version-specific instructions where necessary. All commands work identically across supported LTS releases unless noted otherwise.
Update Ubuntu Before LEMP Installation
First, for a smooth installation process and to prevent conflicts before starting the tutorial, update your system with the latest packages:
sudo apt update && sudo apt upgradeInstall LEMP Stack for phpMyAdmin
Install the Nginx Part of LEMP
First, install Nginx from Ubuntu’s default repository. This provides a stable version suitable for most use cases. For the latest features and performance improvements, see our guide on installing Nginx mainline on Ubuntu.
sudo apt install nginxTypically, the service is enabled by default after installation. However, always verify it’s functioning correctly:
sudo systemctl status nginx● nginx.service - A high performance web server and a reverse proxy server
Loaded: loaded (/usr/lib/systemd/system/nginx.service; enabled; preset: enabled)
Active: active (running) since Sat 2025-12-28 08:30:15 UTC; 5s ago
Docs: man:nginx(8)
Process: 1234 ExecStartPre=/usr/sbin/nginx -t -q -g daemon on; master_process on; (code=exited, status=0/SUCCESS)
Process: 1235 ExecStart=/usr/sbin/nginx -g daemon on; master_process on; (code=exited, status=0/SUCCESS)
Main PID: 1236 (nginx)
Tasks: 3 (limit: 4556)
Memory: 3.2M
CPU: 25ms
CGroup: /system.slice/nginx.service
├─1236 "nginx: master process /usr/sbin/nginx -g daemon on; master_process on;"
└─1237 "nginx: worker process"
If the server isn’t activated, use the following command to activate it and set Nginx to start automatically upon each reboot:
sudo systemctl enable nginx --nowInstall the MariaDB Part of LEMP
Next, install the database component. MariaDB is the preferred choice in LEMP stacks over MySQL due to its improved performance and drop-in MySQL compatibility. If you prefer a specific version from the official MariaDB.org repositories, see our guide on installing MariaDB 11.x or 10.x on Ubuntu.
To begin, run the following command in your terminal to install MariaDB.
sudo apt install mariadb-server mariadb-clientOnce installed, verify the MariaDB service status to ensure it’s running without errors:
sudo systemctl status mariadb● mariadb.service - MariaDB 11.8.5 database server
Loaded: loaded (/usr/lib/systemd/system/mariadb.service; enabled; preset: enabled)
Active: active (running) since Sat 2025-12-28 08:31:22 UTC; 3s ago
Docs: man:mariadbd(8)
https://mariadb.com/kb/en/library/systemd/
Process: 2345 ExecStartPre=/usr/bin/install -m 755 -o mysql -g root -d /var/run/mysqld (code=exited, status=0/SUCCESS)
Process: 2346 ExecStartPre=/bin/sh -c systemctl unset-environment _WSREP_START_POSITION (code=exited, status=0/SUCCESS)
Process: 2348 ExecStartPre=/bin/sh -c [ ! -e /usr/bin/galera_recovery ] (code=exited, status=0/SUCCESS)
Process: 2349 ExecStartPost=/bin/sh -c systemctl unset-environment _WSREP_START_POSITION (code=exited, status=0/SUCCESS)
Main PID: 2347 (mariadbd)
Status: "Taking your SQL requests now..."
Tasks: 8 (limit: 4556)
Memory: 81.5M
CPU: 420ms
CGroup: /system.slice/mariadb.service
└─2347 /usr/sbin/mariadbd
Otherwise, if the service is inactive, enable and start MariaDB with this command:
sudo systemctl enable mariadb --nowRun MariaDB Security Script
After installation, run the security script to lock down your MariaDB instance. This script removes insecure defaults that could leave your database vulnerable.
Run the security script:
sudo mysql_secure_installationThe security script walks you through several prompts. Answer Y (yes) to each question to apply the recommended security settings:
- Switch to unix_socket authentication: Y (enables socket-based root authentication)
- Change the root password: Y (set a strong password)
- Remove anonymous users: Y (prevents unauthenticated access)
- Disallow root login remotely: Y (restricts root to localhost only)
- Remove test database: Y (removes the insecure default test database)
- Reload privilege tables: Y (applies all changes immediately)
Once complete, your MariaDB installation is now secured against common attack vectors including anonymous access and remote root logins.
Install the PHP Part of LEMP
Finally, install PHP-FPM (FastCGI Process Manager), which acts as the bridge between Nginx and MariaDB. Ubuntu’s default repositories include different PHP versions depending on your release: PHP 8.1 on Ubuntu 22.04, PHP 8.3 on Ubuntu 24.04, and PHP 8.4 on Ubuntu 26.04. For custom PHP versions from external repositories, consult our PHP installation guide on Ubuntu.
Install PHP-FPM and the modules required by phpMyAdmin:
sudo apt install php-fpm php-mbstring php-bcmath php-xml php-mysql php-common php-gd php-cli php-curl php-zipAfter installation, identify your PHP version to determine the correct service name:
php -vThe output shows your installed version. Subsequently, use this version number (for example, 8.1, 8.3, or 8.4) in PHP-FPM service commands. To check the service status:
For Ubuntu 22.04 (PHP 8.1):
sudo systemctl status php8.1-fpmOn Ubuntu 24.04 (PHP 8.3):
sudo systemctl status php8.3-fpmWith Ubuntu 26.04 (PHP 8.4):
sudo systemctl status php8.4-fpm● php8.4-fpm.service - The PHP 8.4 FastCGI Process Manager
Loaded: loaded (/usr/lib/systemd/system/php8.4-fpm.service; enabled; preset: enabled)
Active: active (running) since Sat 2025-12-28 08:32:45 UTC; 2s ago
Docs: man:php-fpm8.4(8)
Process: 3456 ExecStartPost=/usr/lib/php/php-fpm-socket-helper install /run/php/php-fpm.sock /etc/php/8.4/fpm/pool.d/www.conf 84 (code=exited, status=0/SUCCESS)
Main PID: 3455 (php-fpm8.4)
Status: "Processes active: 0, idle: 2, Requests: 0, slow: 0, Traffic: 0req/sec"
Tasks: 3 (limit: 4556)
Memory: 8.5M
CPU: 52ms
CGroup: /system.slice/php8.4-fpm.service
├─3455 "php-fpm: master process (/etc/php/8.4/fpm/php-fpm.conf)"
├─3457 "php-fpm: pool www"
└─3458 "php-fpm: pool www"
If the PHP-FPM service is not running, enable and start it with your specific version number:
sudo systemctl enable php8.3-fpm --nowReplace 8.3 with your actual PHP version (8.1 for 22.04, 8.4 for 26.04).
Install phpMyAdmin Backend on Ubuntu
Now, this section covers downloading the phpMyAdmin archive and setting up the necessary directories, permissions, and database entries.
Create a phpMyAdmin Database User
While you can log into phpMyAdmin with the MariaDB root account, creating a dedicated user is more secure. Essentially, this follows the same principle as using sudo instead of logging in as root. First, access the MariaDB shell:
sudo mariadbThen, within the MariaDB shell, create the phpMyAdmin user and grant full privileges:
CREATE USER 'pmauser'@'localhost' IDENTIFIED BY 'your_secure_password';
GRANT ALL PRIVILEGES ON *.* TO 'pmauser'@'localhost' WITH GRANT OPTION;
FLUSH PRIVILEGES;
Replace
your_secure_passwordwith a strong password. Do not use the example password in production.
Finally, to exit the MariaDB terminal, use the following command.
QUIT;Download phpMyAdmin Source
The following commands download the latest phpMyAdmin release directly from the official website. This approach automatically fetches the current version number, so you always get the newest stable release:
DATA="$(wget https://www.phpmyadmin.net/home_page/version.txt -q -O-)"
URL="$(echo $DATA | cut -d ' ' -f 3)"
VERSION="$(echo $DATA | cut -d ' ' -f 1)"
wget https://files.phpmyadmin.net/phpMyAdmin/${VERSION}/phpMyAdmin-${VERSION}-all-languages.tar.gz
Alternatively, if you prefer to download the English version only of phpMyAdmin, replace the end line of the previous command with the following:
wget https://files.phpmyadmin.net/phpMyAdmin/${VERSION}/phpMyAdmin-${VERSION}-english.tar.gzNext, extract the downloaded archive:
tar xvf phpMyAdmin-${VERSION}-all-languages.tar.gzConfigure phpMyAdmin
First, move the extracted files to the web server directory:
sudo mv phpMyAdmin-*/ /var/www/phpmyadminAdditionally, phpMyAdmin needs a temporary directory for caching. Create it manually:
sudo mkdir /var/www/phpmyadmin/tmpNext, phpMyAdmin includes a sample configuration file. Copy it to create the active configuration:
sudo cp /var/www/phpmyadmin/config.sample.inc.php /var/www/phpmyadmin/config.inc.phpNow, open the configuration file with your preferred text editor:
sudo nano /var/www/phpmyadmin/config.inc.phpSpecifically, phpMyAdmin requires a Blowfish cipher for cookie authentication. Locate the line that starts with $cfg['blowfish_secret']:
$cfg['blowfish_secret'] = ''; /* YOU MUST FILL IN THIS FOR COOKIE AUTH! */Importantly, this field requires 32 random characters. The easiest way to generate them is with the pwgen utility:
sudo apt install pwgenAfter installing pwgen, execute the following command to generate a secure secret:
pwgen -s 32 1This command will provide you with a string of 32 random characters to use as the blowfish secret. For example:
6IoPoJBpV9pd0UJm6EENlgQXHuZpxvRL
Example of adding the cipher to the configuration file (Do not copy):
$cfg['blowfish_secret'] = 'GO4GpscnhJbzB3HN7dgqvRzdIvIxXaaq'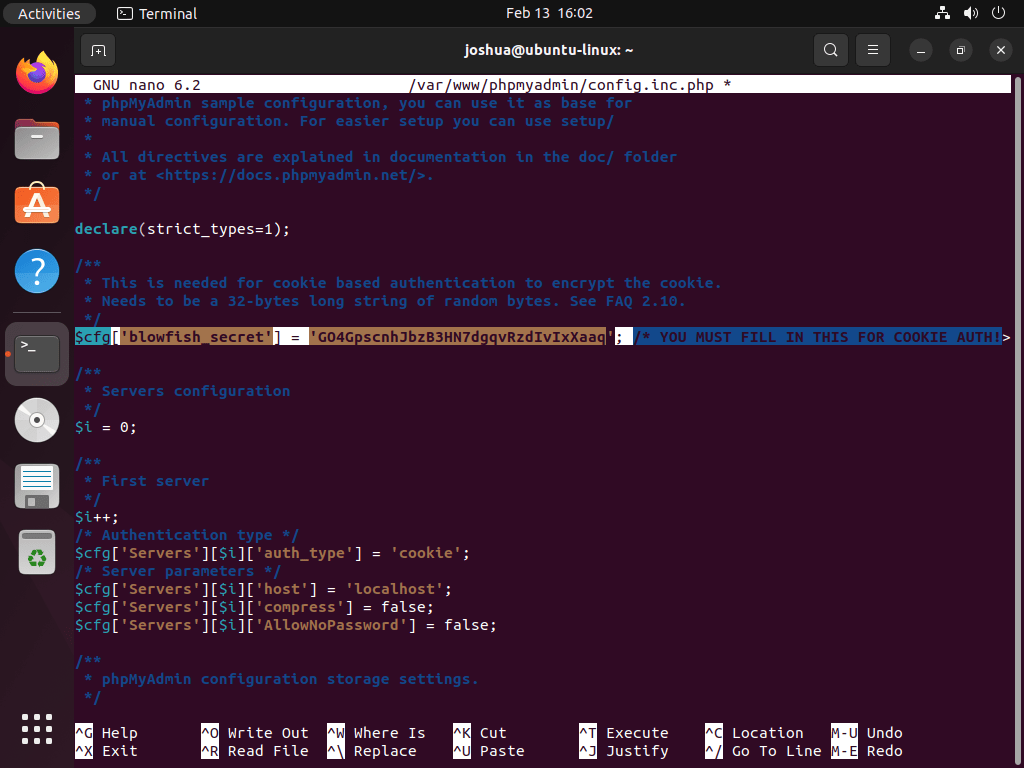
For most users, the default settings work well. However, if your MariaDB database runs on a separate server instead of localhost, update the host setting with that server’s IP address:
$cfg['Servers'][$i]['host'] = '192.168.55.101';Configure phpMyAdmin File Permissions
Properly setting the directory owner to the www-data user (the default web server user on Ubuntu) ensures both compatibility and security.
First, set the directory ownership:
sudo chown -R www-data:www-data /var/www/phpmyadmin/Similarly, set the correct file permissions:
sudo find /var/www/phpmyadmin/ -type d -exec chmod 755 {} \;
sudo find /var/www/phpmyadmin/ -type f -exec chmod 644 {} \;
Create Nginx Server Block for phpMyAdmin
Now, create an Nginx server block to access the phpMyAdmin web interface. For security purposes and to prevent brute-force attacks, use a separate subdomain:
To begin, create and open your server block using the nano text editor, as shown below:
sudo nano /etc/nginx/sites-available/phpmyadmin.confThen, paste the following configuration, replacing pma.example.com with your actual domain:
server {
  listen 80;
  listen [::]:80;
  server_name pma.example.com;
  root /var/www/phpmyadmin/;
  index index.php index.html index.htm index.nginx-debian.html;

  access_log /var/log/nginx/phpmyadmin_access.log;
  error_log /var/log/nginx/phpmyadmin_error.log;

  location / {
    try_files $uri $uri/ /index.php;
  }

  location ~ ^/(doc|sql|setup)/ {
    deny all;
  }

  location ~ \.php$ {
    fastcgi_pass unix:/run/php/php8.3-fpm.sock;
    fastcgi_param SCRIPT_FILENAME $document_root$fastcgi_script_name;
    include fastcgi_params;
    include snippets/fastcgi-php.conf;
  }

  location ~ /\.ht {
    deny all;
  }
}
The above example includes some important notes:
- PHP-FPM socket path: The
fastcgi_passline specifiesphp8.3-fpm.sockas an example. Change this to match your installed PHP version:php8.1-fpm.sockfor Ubuntu 22.04 orphp8.4-fpm.sockfor Ubuntu 26.04. - Document root: The
/var/www/phpmyadmin/path matches this tutorial. Update this line if you chose a different installation directory. - Server name: Replace
pma.example.comwith your actual subdomain.
If you are the only person accessing the server from a static IP address, you can add the following code above the first location entry. An example of this is provided below:
  allow <your-ip-address>;
  deny all;

  location / {
    try_files $uri $uri/ /index.php;
  }
This approach effectively blocks unauthorized visitors with a 403 error, thereby stopping brute force attacks. However, it may not suit all setups. Afterward, save changes with CTRL+O and exit with CTRL+X.
Next, enable the server block by creating a symbolic link from sites-available to sites-enabled:
sudo ln -s /etc/nginx/sites-available/phpmyadmin.conf /etc/nginx/sites-enabled/Before restarting Nginx, always test the configuration to catch any syntax errors:
sudo nginx -tIf your configuration is error-free, you should receive the following output:
nginx: the configuration file /etc/nginx/nginx.conf syntax is ok
nginx: configuration file /etc/nginx/nginx.conf test is successful
Finally, restart Nginx to apply the changes:
sudo systemctl restart nginxAccess the phpMyAdmin Web UI
To access the web interface, open your preferred internet browser and navigate to pma.example.com, replacing “example” with your actual domain. Subsequently, you should arrive at the login screen of phpMyAdmin, as shown below:
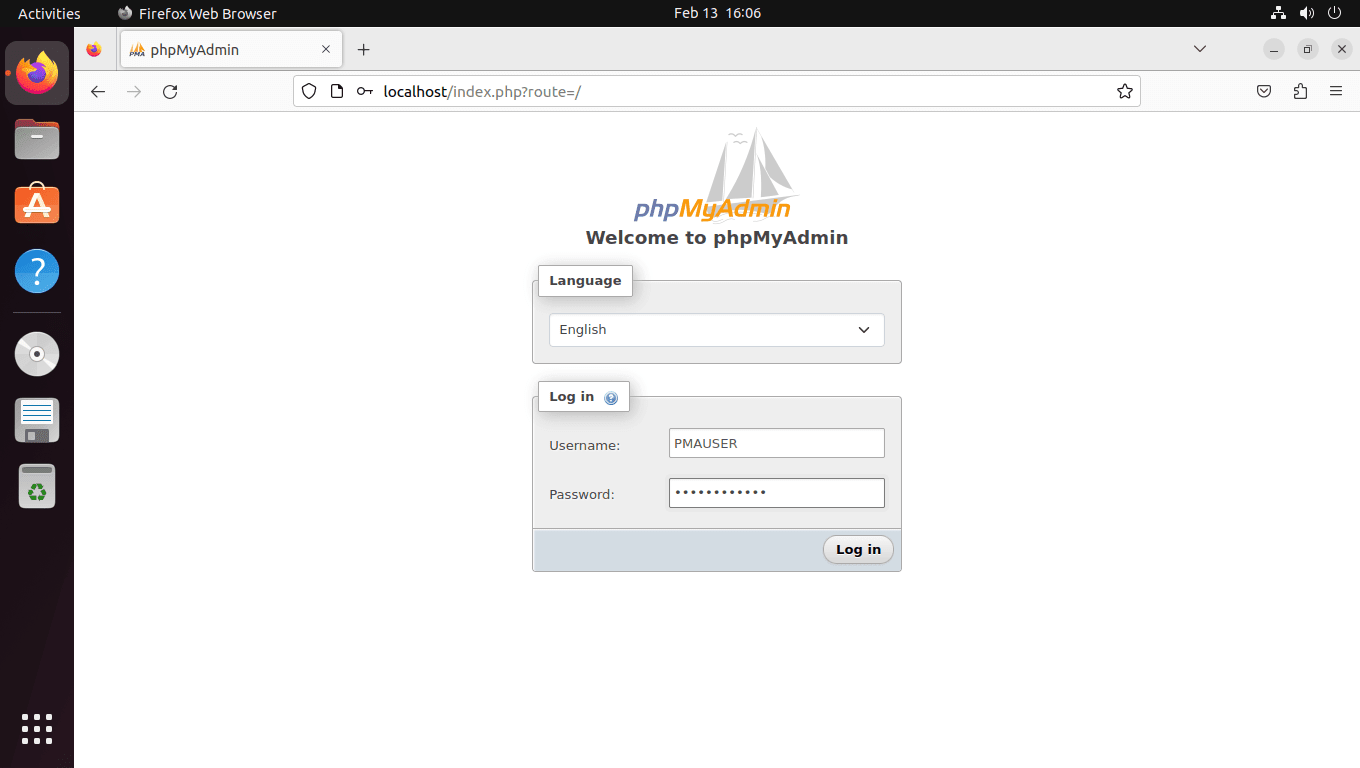
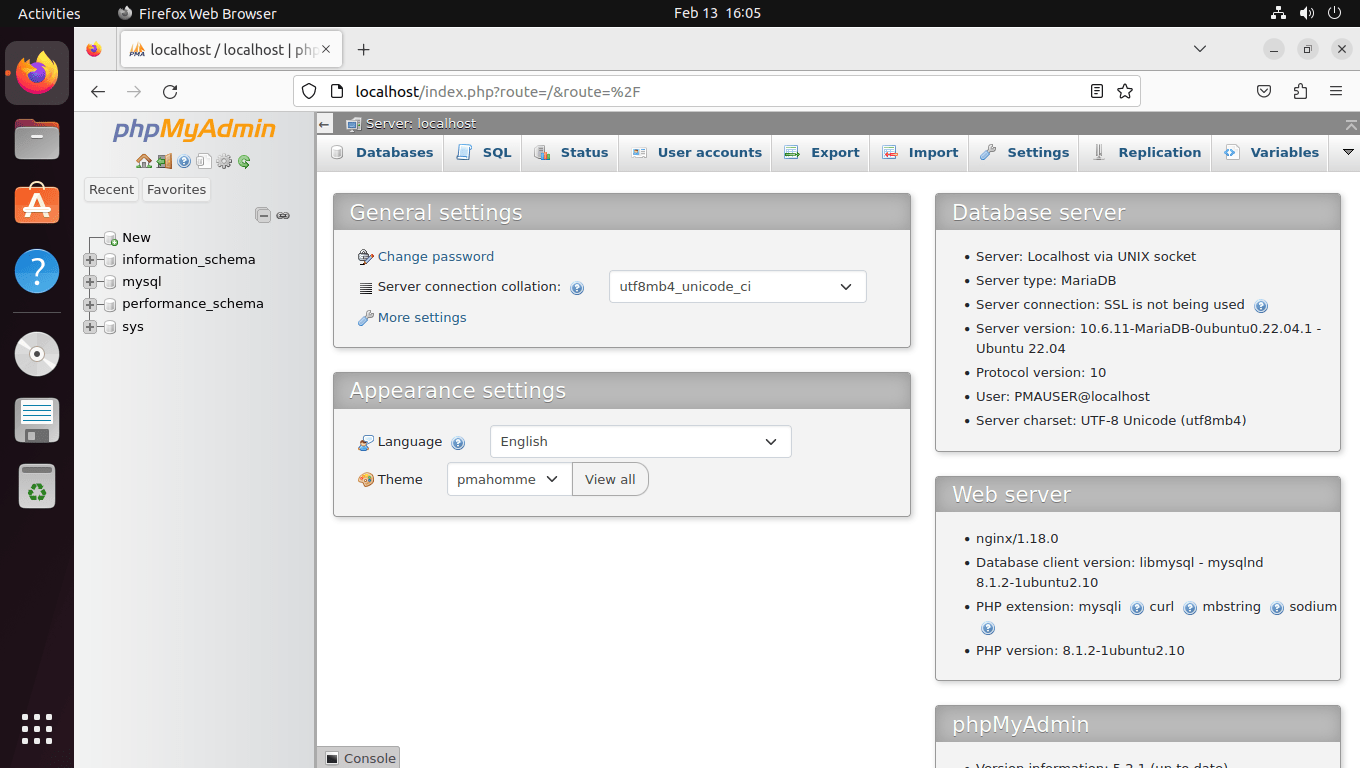
Next, enter your login credentials and proceed to the phpMyAdmin dashboard, which you can see an example of below.
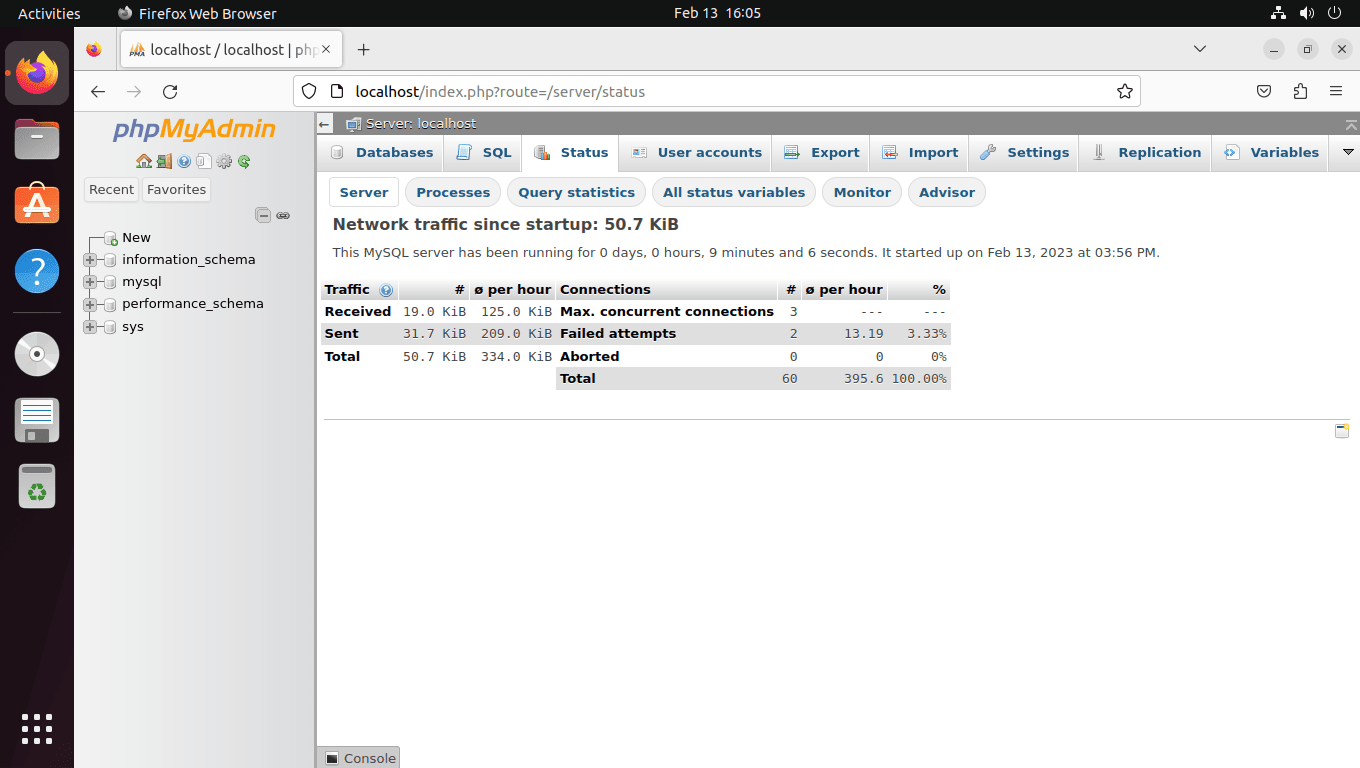
The Status page shows real-time server statistics and query performance metrics:
The Advisor page analyzes your MariaDB configuration and suggests performance improvements:
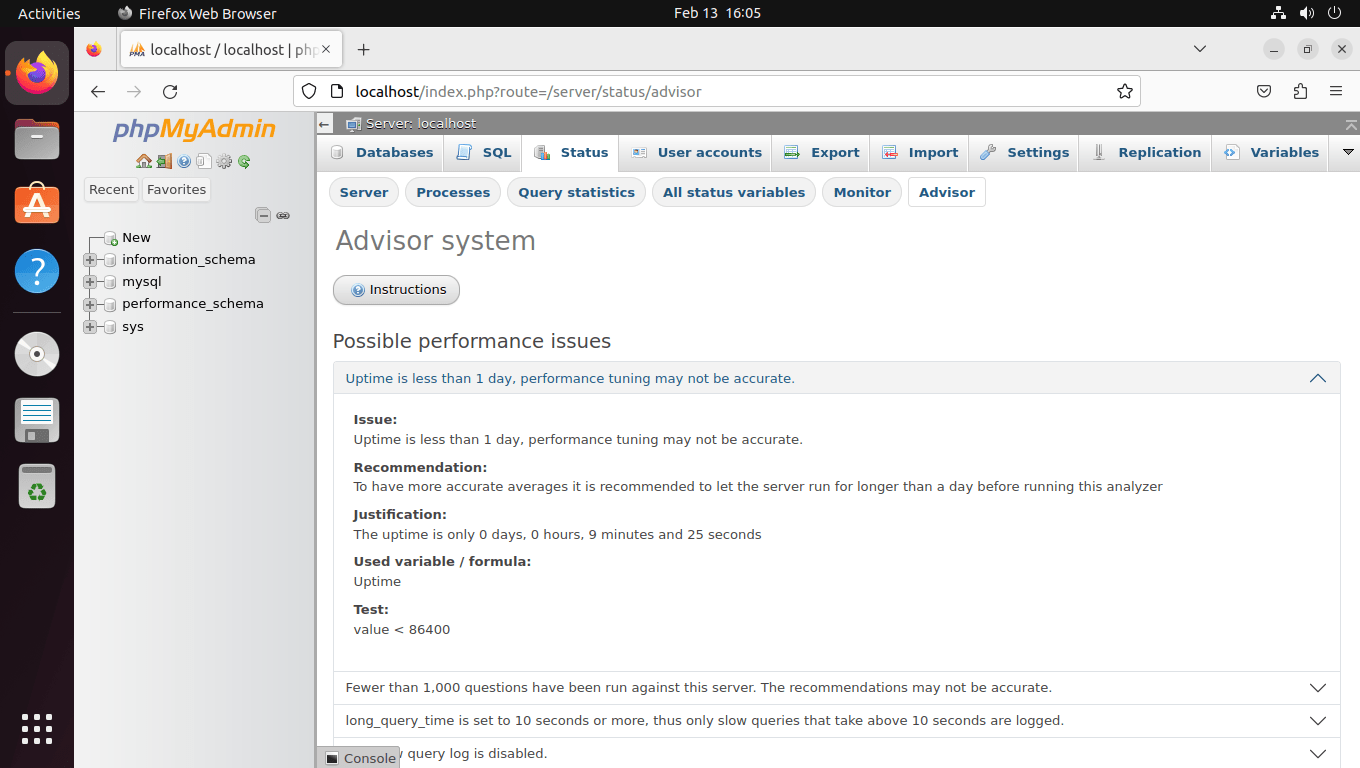
Generally, the advisor recommends waiting 24 hours but consider a minimum of 72 hours for accurate results. Additionally, do not rely exclusively on the advisor page; instead, make changes after thorough consideration and testing. Optimizing MySQL or MariaDB configuration files demands time, and consequently, you might need to edit and test multiple times to achieve the desired results.
Secure phpMyAdmin LEMP Installation via SSL
For best security, you should run Nginx over HTTPS with an SSL certificate. Fortunately, the easiest approach uses Let’s Encrypt, a free, automated certificate authority run by the nonprofit Internet Security Research Group (ISRG).
To start, install the certbot package with the following command:
sudo apt install python3-certbot-nginx -yNext, generate and install your certificate:
sudo certbot --nginx --agree-tos --redirect --hsts --staple-ocsp --email you@example.com -d pma.example.comDuring the certificate installation, the system will prompt you to receive emails from EFF (Electronic Frontier Foundation). Choose Y or N based on your preference. Subsequently, this choice will trigger the automatic installation and configuration of your TLS certificate with optimal settings. These settings include HTTPS 301 redirects, a Strict-Transport-Security header, and OCSP Stapling, all tailored to your email and domain name. Once installed, your URL will transition from HTTP://pma.example.com to the secure HTTPS://pma.example.com, thereby automatically redirecting the old HTTP URL to the secure version.
Importantly, certificates expire after 90 days. First, verify automatic renewal works:
sudo certbot renew --dry-runCertbot automatically installs a systemd timer that handles certificate renewal. Verify this timer is active:
sudo systemctl status certbot.timerAlternatively, if you prefer a custom cron job for more control:
0 3 * * * /usr/bin/certbot renew --quietThis cron job runs at 3 AM daily and only renews certificates nearing expiration (specifically, those within 30 days of expiry).
Troubleshoot Common phpMyAdmin Issues
502 Bad Gateway Error
This error typically indicates that PHP-FPM is not running or the socket path in your Nginx configuration is incorrect. First, verify the PHP-FPM service status:
sudo systemctl status php8.3-fpmIf the service is not running, start it and check for errors:
sudo systemctl start php8.3-fpm
sudo journalctl -xeu php8.3-fpm
Additionally, confirm the socket path exists and matches your Nginx configuration:
ls -la /run/php/403 Forbidden Error
This issue typically indicates incorrect file permissions or ownership. To resolve it, reset the permissions:
sudo chown -R www-data:www-data /var/www/phpmyadmin/
sudo find /var/www/phpmyadmin/ -type d -exec chmod 755 {} \;
sudo find /var/www/phpmyadmin/ -type f -exec chmod 644 {} \;
Blank Page or PHP Errors
Check the Nginx error log for details:
sudo tail -50 /var/log/nginx/phpmyadmin_error.logOften, missing PHP extensions cause these issues. Therefore, verify all required modules are installed:
php -m | grep -E "mbstring|xml|mysql|curl|gd|zip"Cannot Log In with Correct Credentials
If login fails despite correct credentials, verify the MariaDB user exists and has proper privileges:
sudo mariadb -e "SELECT User, Host FROM mysql.user;"If your user is missing or has incorrect privileges, then recreate it using the following commands:
sudo mariadb -e "DROP USER IF EXISTS 'pmauser'@'localhost';"
sudo mariadb -e "CREATE USER 'pmauser'@'localhost' IDENTIFIED BY 'your_password';"
sudo mariadb -e "GRANT ALL PRIVILEGES ON *.* TO 'pmauser'@'localhost' WITH GRANT OPTION;"
sudo mariadb -e "FLUSH PRIVILEGES;"Remove phpMyAdmin and LEMP Components
If you need to uninstall phpMyAdmin or the entire LEMP stack, then follow these steps in reverse order.
Remove phpMyAdmin
First, delete the phpMyAdmin files and Nginx configuration:
sudo rm -rf /var/www/phpmyadmin/
sudo rm /etc/nginx/sites-enabled/phpmyadmin.conf
sudo rm /etc/nginx/sites-available/phpmyadmin.conf
sudo nginx -t && sudo systemctl reload nginx
Additionally, remove the dedicated database user if no longer needed:
sudo mariadb -e "DROP USER IF EXISTS 'pmauser'@'localhost'; FLUSH PRIVILEGES;"Remove LEMP Stack Components
Removing MariaDB will delete all databases. Export critical data first using
mariadb-dump --all-databases > backup.sqlbefore proceeding.
First, uninstall PHP-FPM and its extensions (replace 8.3 with your version):
sudo apt remove php-fpm php-mbstring php-bcmath php-xml php-mysql php-common php-gd php-cli php-curl php-zip
sudo apt autoremove
Next, uninstall MariaDB:
sudo apt remove mariadb-server mariadb-client
sudo apt autoremove
Finally, uninstall Nginx:
sudo apt remove nginx
sudo apt autoremove
Conclusion
This guide covered installing phpMyAdmin with a complete LEMP stack on Ubuntu 22.04, 24.04, and 26.04 LTS. Your installation is now secured with proper file permissions, a dedicated database user, and SSL encryption. To maintain security, regularly update phpMyAdmin by downloading new releases from the official website and replacing the files in /var/www/phpmyadmin/. For production environments, consider additional hardening measures such as IP whitelisting in your Nginx configuration and enabling two-factor authentication through phpMyAdmin’s settings.
Useful Links
Here are some valuable links related to using phpMyAdmin and related tools:
- phpMyAdmin Official Website: Visit the official phpMyAdmin website for information about the database management tool, features, and download options.
- phpMyAdmin Documentation: Access comprehensive documentation for detailed guides on installing, configuring, and using phpMyAdmin.
- phpMyAdmin Themes: Explore available themes to customize the appearance of phpMyAdmin.
- phpMyAdmin GitHub Repository: Access the phpMyAdmin GitHub repository to view the source code, report issues, and contribute to the development.
Related Guides
- Install WordPress with LEMP on Ubuntu: Deploy WordPress on your newly configured LEMP stack.
- Configure UFW Firewall on Ubuntu: Secure your server by allowing only necessary ports (80, 443, 22).
- Set Up Nginx FastCGI Cache on Ubuntu: Improve phpMyAdmin and website performance with caching.
External Resources
- MariaDB Official Website: Visit the MariaDB website for information about the database system, download options, and community resources.
- MySQL Official Website: Access the MySQL website for product information, features, and download options.
- PHP Official Website: Explore the PHP website for documentation, installation guides, and resources for PHP development.
Thanks Its Working