
Kodi turns a Linux Mint desktop into a TV-friendly media center for local movies, music, photos, live TV add-ons, and remote-control workflows. To install Kodi on Linux Mint today, the package source matters more than the command length: Flathub carries the current upstream Linux build, the Linux Mint repository package stays inside APT, and a user-local source build gives advanced users custom compile-time control.
Kodi is not a headless streaming server. If the goal is browser or smart-TV streaming from a central machine, use Jellyfin Media Server on Linux Mint or Plex Media Server on Linux Mint instead. Kodi fits best on the desktop or media PC connected to the display.
Install Kodi on Linux Mint
The official Kodi Linux download page points Linux users to Flathub and the upstream Linux install documentation. The older Team Kodi PPA is no longer a good fresh-install path, so standard Linux Mint desktop users should normally choose between Flathub and the repository package.
Choose a Kodi Installation Path
| Path | Status | Source or Channel | Updates | Best For |
|---|---|---|---|---|
| Flathub Flatpak | Recommended for most desktops | Flathub app tv.kodi.Kodi | Through Flatpak | Current upstream Kodi release on Mint 22.x and 21.x with launcher and icon exported automatically |
| Linux Mint repository | Supported APT alternative | Ubuntu universe package through Mint’s Ubuntu base | Through APT | Users who prefer distro-managed packages and accept older Kodi branches on supported Mint releases |
| Source build | Advanced source path | Kodi 21.3 Linux build guide | Through update-kodi-source | Developers who need custom patches, build flags, or a separate Kodi Source Build launcher |
| Team Kodi PPA | Retired for fresh installs | Old Launchpad PPA | Do not use for new Mint setups | Cleanup only when an older system still has the PPA configured |
Flathub is the practical default because it currently ships Kodi 21.3-Omega on both Mint 22.x and 21.x. The APT package installs cleanly, but Mint 22.x currently receives Kodi 20.5, and Mint 21.x currently receives Kodi 19.4. The source helper in this section supports Mint 22.x and 21.x, installs as kodi-source under your home directory, and creates a separate Cinnamon menu entry. Use only one main method unless you intentionally need to compare builds.
Update Linux Mint Before Installing Kodi
Refresh APT before installing the repository package or related diagnostics:
sudo apt updateThese commands use
sudofor package-management and system-scope Flatpak tasks. If the current account does not have administrator access yet, create and add users to sudoers on Linux Mint before continuing.
Install Kodi from Flathub on Linux Mint
Linux Mint desktop installs normally include Flatpak with Flathub already configured at system scope. Confirm the remote before installing Kodi:
flatpak remotes --columns=name,optionsExpected output on a stock Mint desktop includes:
flathub system
If Flathub is missing on a customized or trimmed-down Mint installation, restore the system remote first:
sudo flatpak remote-add --if-not-exists flathub https://dl.flathub.org/repo/flathub.flatpakrepoInstall Kodi from the Flathub remote:
sudo flatpak install flathub tv.kodi.Kodi -yVerify the installed Flatpak app:
flatpak info tv.kodi.KodiRelevant output includes:
          ID: tv.kodi.Kodi
         Ref: app/tv.kodi.Kodi/x86_64/stable
        Arch: x86_64
      Branch: stable
     Version: 21.3-Omega
      Origin: flathub
Installation: system
     Runtime: org.freedesktop.Platform/x86_64/24.08
The Flathub build uses broad media-center permissions rather than a narrow document-only sandbox. Current metadata grants network access, audio and display sockets, device access, Bluetooth support, remote-control device paths such as /run/lirc, and common media locations such as xdg-videos, xdg-music, xdg-pictures, /media, /mnt, and /run/media.
Install Kodi from Linux Mint Repositories
Use the APT package when you want Kodi managed like other Linux Mint packages. This path installs the Debian-derived Kodi package from the Ubuntu base repository used by your Mint release.
sudo apt install -y kodiCheck the installed package and candidate source:
apt-cache policy kodiOn Linux Mint 22.x, relevant output includes:
kodi:
  Installed: 2:20.5+dfsg-1ubuntu1
  Candidate: 2:20.5+dfsg-1ubuntu1
  Version table:
 *** 2:20.5+dfsg-1ubuntu1 500
        500 http://archive.ubuntu.com/ubuntu noble-updates/universe amd64 Packages
Linux Mint 21.x currently shows 2:19.4+dfsg1-2 from jammy/universe. That version gap is the main reason to prefer Flathub when you want the current stable Kodi branch on both supported Mint series.
Confirm the terminal launcher and packaged version:
command -v kodi
kodi --version
On Linux Mint 22.x, relevant output includes:
/usr/bin/kodi
Kodi from Debian Media Center 20.5 Debian package version: 2:20.5+dfsg-1ubuntu1
Copyright (C) 2005-2021 Team Kodi from Debian - http://kodi.tv
The Kodi from Debian label is normal for this APT package because Mint receives Debian-derived Kodi packaging through its Ubuntu base.
Build Kodi from Source on Linux Mint
Build Kodi from source only when you have a specific development reason, such as testing a patch, changing build flags, or keeping a user-local build separate from the distro package. The helper targets Kodi 21.3-Omega on Linux Mint 22.x and 21.x, but Flathub remains the lower-maintenance choice for most desktops.
Install the common build dependencies first. This list follows Kodi’s Linux build guide for the 21.3-Omega release but keeps the build focused on an X11 desktop target instead of every possible windowing backend:
sudo apt install -y autoconf automake autopoint autotools-dev build-essential \
    ca-certificates cmake curl gawk gdc gettext git gperf \
    lsb-release meson nasm ninja-build python3-dev python3-pil python3-venv \
    rapidjson-dev swig unzip uuid-dev zip zlib1g-dev \
    flatbuffers-compiler libflatbuffers-dev libasound2-dev libass-dev \
    libavahi-client-dev libavahi-common-dev libbluetooth-dev libbluray-dev \
    libbz2-dev libcurl4-openssl-dev libdbus-1-dev libdav1d-dev libdrm-dev \
    libegl1-mesa-dev libenca-dev libexiv2-dev libflac-dev libfmt-dev \
    libfontconfig-dev libfreetype-dev libfribidi-dev libfstrcmp-dev \
    libgcrypt20-dev libgif-dev libgl1-mesa-dev libglew-dev libglu1-mesa-dev \
    libgnutls28-dev libgpg-error-dev libgtest-dev libiso9660-dev libjpeg-dev \
    liblcms2-dev liblirc-dev libltdl-dev liblzo2-dev libmicrohttpd-dev \
    libmysqlclient-dev libnfs-dev libogg-dev libp8-platform-dev libplist-dev \
    libpng-dev libpulse-dev libshairplay-dev libsmbclient-dev libspdlog-dev \
    libsqlite3-dev libssl-dev libtag1-dev libtiff-dev libtinyxml-dev \
    libtinyxml2-dev libtool libudev-dev libunistring-dev libva-dev \
    libvdpau-dev libvorbis-dev libxkbcommon-dev libxmu-dev libxrandr-dev \
    libxslt1-dev default-jre libpcre3-dev
Create a reusable helper at ~/.local/bin/update-kodi-source. It accepts a tag such as 21.3-Omega, or detects the latest GitHub release when you run it without an argument. The setup block exports ~/.local/bin for the current terminal; Mint’s default profile will also load that path after the next sign-in now that the directory exists. The helper installs into a versioned prefix under your home directory, checks the new binary, then moves the current symlink only after the install succeeds:
mkdir -p "$HOME/.local/bin"

case ":$PATH:" in
    *":$HOME/.local/bin:"*) ;;
    *) export PATH="$HOME/.local/bin:$PATH" ;;
esac

cat > "$HOME/.local/bin/update-kodi-source" <<'EOF'
#!/usr/bin/env bash
set -euo pipefail

install_root="$HOME/.local/opt/kodi"
source_root="$HOME/kodi-source"
launcher_link="$HOME/.local/bin/kodi-source"
desktop_file="$HOME/.local/share/applications/kodi-source.desktop"
tag="${1:-}"

if [ -z "$tag" ]; then
    tag="$(
        python3 - <<'PY'
import json
import urllib.request

with urllib.request.urlopen("https://api.github.com/repos/xbmc/xbmc/releases/latest", timeout=20) as response:
    release = json.load(response)

print(release["tag_name"])
PY
    )"
fi

release="$(awk -F= '$1 == "RELEASE" {print $2; exit}' /etc/linuxmint/info)"
case "$release" in
22.* | 21.*)
    cmake_bin="cmake"
    ;;
*)
    echo "This helper is scoped to Linux Mint 22.x and 21.x. Use Flathub or APT on this Mint release."
    exit 1
    ;;
esac

prefix="$install_root/$tag"
build_dir="$HOME/kodi-build-$tag"
backup=""

mkdir -p "$install_root"

ensure_launchers() {
    if [ -e "$launcher_link" ] && [ ! -L "$launcher_link" ]; then
        echo "Refusing to replace non-symlink $launcher_link"
        exit 1
    fi

    ln -sfnT "$prefix" "$install_root/current"
    ln -sfnT "$install_root/current/bin/kodi" "$launcher_link"

    mkdir -p "$HOME/.local/share/applications"
    cat >"$desktop_file" <<DESKTOP
[Desktop Entry]
Type=Application
Name=Kodi Source Build
Comment=Run the user-local Kodi source build
Exec=$HOME/.local/bin/kodi-source
Icon=$install_root/current/share/icons/hicolor/256x256/apps/kodi.png
Terminal=false
Categories=AudioVideo;Video;Player;TV;
StartupNotify=false
DESKTOP
    chmod 0644 "$desktop_file"
    if command -v update-desktop-database >/dev/null 2>&1; then
        update-desktop-database "$HOME/.local/share/applications" >/dev/null 2>&1 || true
    fi
    hash -r 2>/dev/null || true
}

if [ -x "$prefix/bin/kodi" ] && [ "$(readlink -f "$install_root/current" 2>/dev/null || true)" = "$prefix" ]; then
    ensure_launchers
    echo "Kodi source build $tag is already active."
    "$prefix/bin/kodi" --version
    exit 0
fi

restore_previous_on_failure() {
    status=$?
    if [ "$status" -ne 0 ]; then
        rm -rf "$prefix"
        if [ -n "$backup" ] && [ -d "$backup" ]; then
            mv "$backup" "$prefix"
        fi
    fi
    exit "$status"
}

echo "Fetching Kodi $tag source..."
rm -rf "$source_root" "$build_dir"
git clone --depth 1 --branch "$tag" https://github.com/xbmc/xbmc.git "$source_root"

if [ -d "$prefix" ]; then
    backup="$prefix.previous.$(date +%Y%m%d%H%M%S)"
    mv "$prefix" "$backup"
    echo "Previous prefix moved to $backup"
fi

trap restore_previous_on_failure EXIT

cmake_options=(
    -DCMAKE_INSTALL_PREFIX="$prefix"
    -DCORE_PLATFORM_NAME=x11
    -DAPP_RENDER_SYSTEM=gl
    -DENABLE_INTERNAL_CROSSGUID=ON
    -DENABLE_INTERNAL_FLATBUFFERS=ON
    -DENABLE_INTERNAL_FMT=ON
    -DENABLE_INTERNAL_SPDLOG=ON
)

echo "Configuring Kodi $tag..."
"$cmake_bin" -S "$source_root" -B "$build_dir" "${cmake_options[@]}"

echo "Building Kodi $tag..."
"$cmake_bin" --build "$build_dir" -- -j2

echo "Installing Kodi $tag into $prefix..."
"$cmake_bin" --install "$build_dir"

echo "Checking installed binary..."
"$prefix/bin/kodi" --version

ensure_launchers

trap - EXIT

echo "Kodi source build is active at $prefix"
EOF

chmod +x "$HOME/.local/bin/update-kodi-source"
Confirm the helper is available through the current shell before starting the long build:
hash -r
command -v update-kodi-source
The command should print a path ending in ~/.local/bin/update-kodi-source. Keep using this terminal for the first build; after the next sign-in, standard Mint profile handling should make the same short command available in new terminals too.
Run the helper with the validated Kodi 21.3 tag. The build is large, so the example uses two compile jobs to avoid memory pressure on small systems; increase -j2 inside the helper only if the machine has enough RAM:
update-kodi-source 21.3-OmegaAfter the helper finishes, verify the separate source-build launcher:
kodi-source --versionKodi Media Center 21.3 (21.3.0) Git:20251031-a3a448d Copyright (C) 2005-2025 Team Kodi - http://kodi.tv
Run the same tag again when you want to confirm the no-op path before depending on the helper for later updates:
update-kodi-source 21.3-OmegaRelevant output from an already-active build includes:
Kodi source build 21.3-Omega is already active.
Kodi Media Center 21.3 (21.3.0) Git:20251031-a3a448d
Copyright (C) 2005-2025 Team Kodi - http://kodi.tv
The source helper does not install a system package or replace /usr/bin/kodi. Keep using kodi-source or the Kodi Source Build menu entry for this build so you can remove it without touching an APT or Flatpak installation.
Team Kodi PPA Status on Linux Mint
The Team Kodi PPA should not be used for a fresh Linux Mint install. Team Kodi officially retired the Ubuntu PPA, and current Mint 22.x systems do not have a usable noble PPA release. Keep PPA handling for cleanup if an older Mint installation still has ppa:team-xbmc/ppa, ppa:team-xbmc/unstable, or ppa:team-xbmc/xbmc-nightly configured.
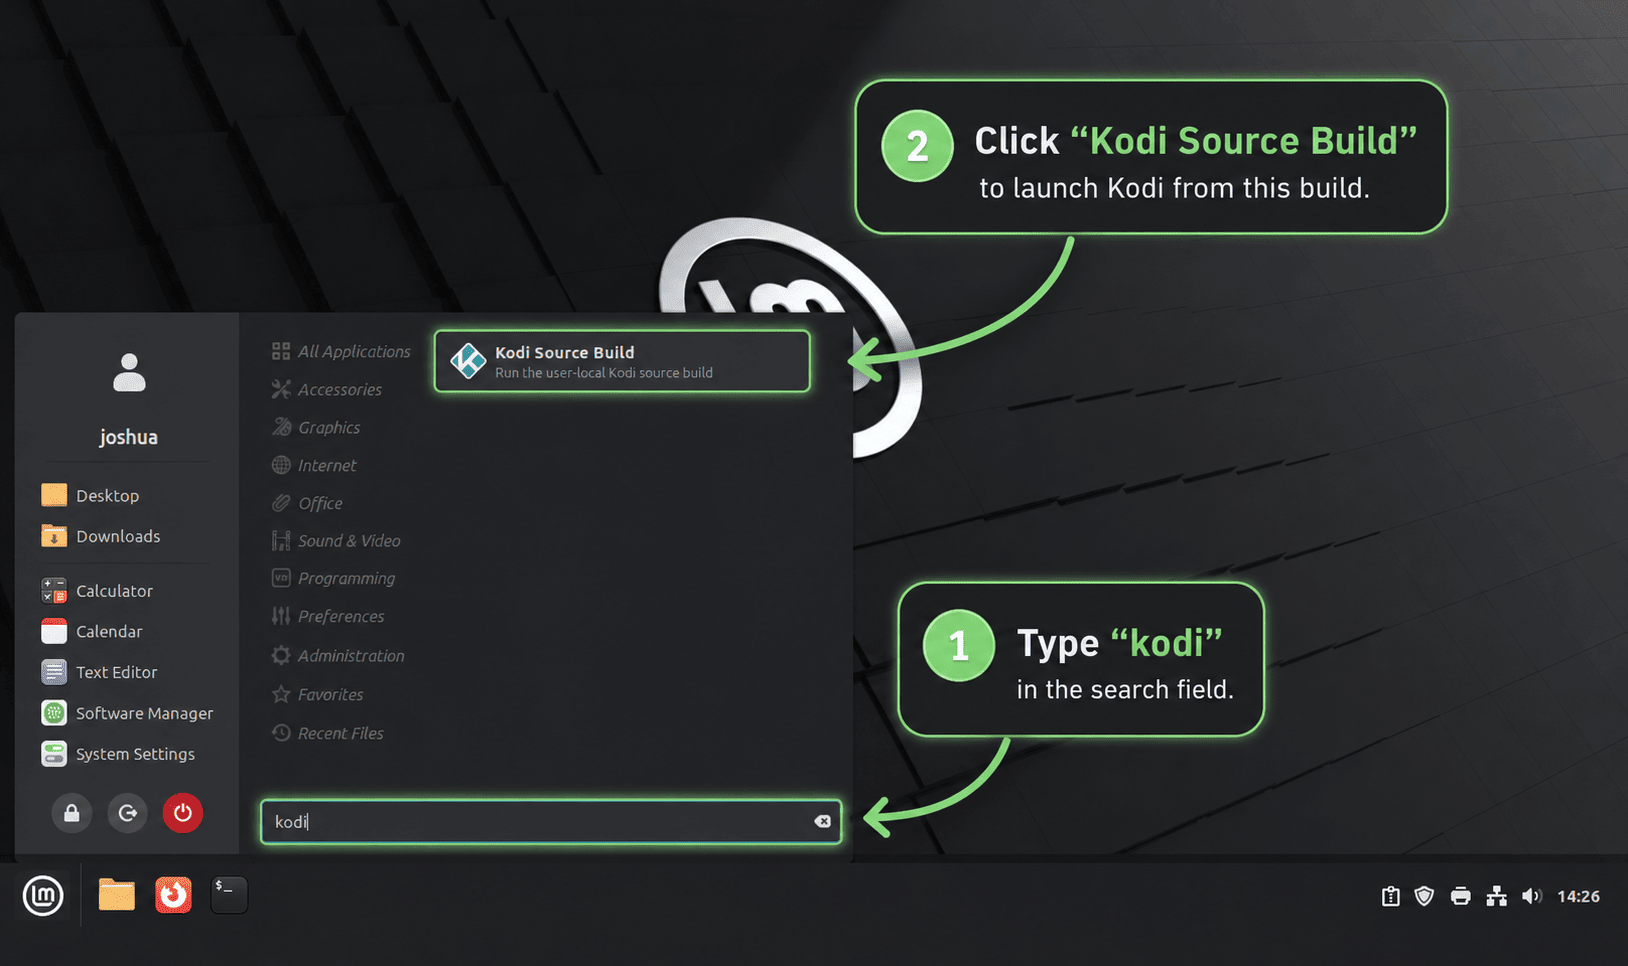
Launch Kodi on Linux Mint
Kodi needs a running graphical desktop session. Cinnamon uses the Linux Mint menu rather than a GNOME Activities screen. Search for Kodi or open it from the Sound & Video category. The APT and Flathub methods both install desktop launchers and hicolor icons, and the source helper creates a separate Kodi Source Build launcher.
Use the Flatpak command when Kodi was installed from Flathub:
flatpak run tv.kodi.KodiUse the regular launcher command when Kodi was installed from APT:
kodiUse the separate user-local launcher when Kodi was built from source:
kodi-sourceThe APT method installs /usr/share/applications/kodi.desktop and a 256px hicolor icon. The Flathub method exports tv.kodi.Kodi.desktop and tv.kodi.Kodi.png under Flatpak’s system export path, which is why the menu entry and icon are handled by the package source rather than by a separate manual icon step. The source helper writes ~/.local/share/applications/kodi-source.desktop and uses the icon from the active source-build prefix.
Configure Kodi After First Launch
Kodi opens to an empty media library until you add sources, choose content types, and configure optional services. Set these basics before scanning a large library.
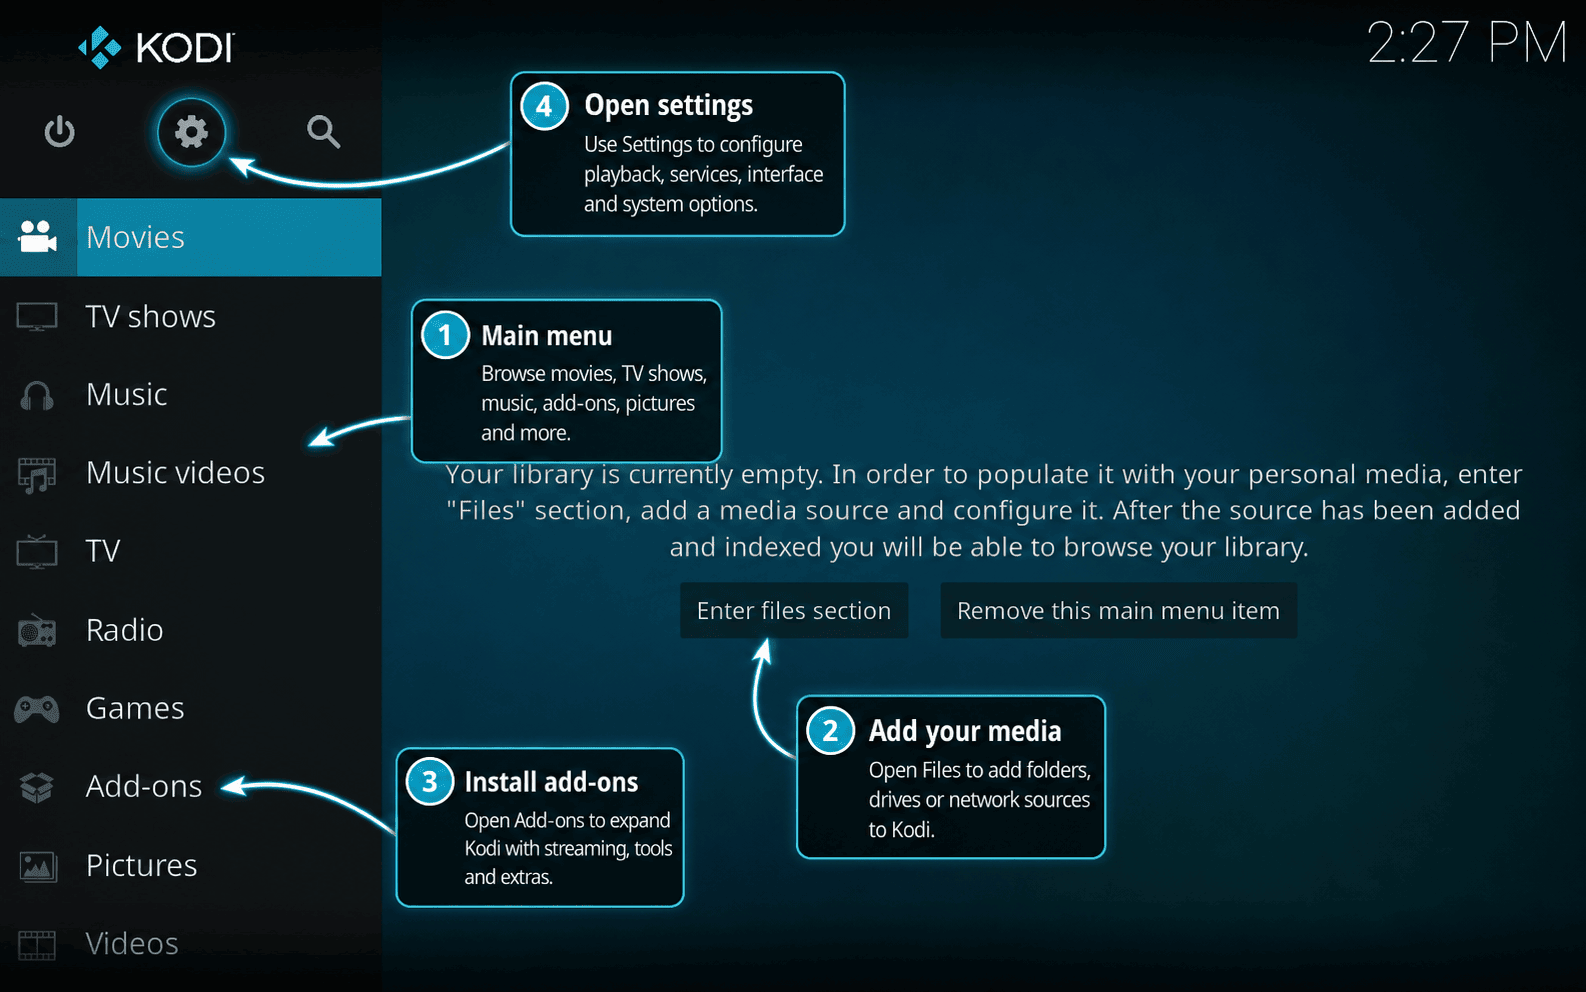
Add Media Sources
Open Videos, then Files, then Add videos to choose movie or TV folders. Select the content type so Kodi can use the right scraper and metadata layout. Consistent filenames help Kodi match titles correctly:
- Movies:
Movie Name (Year).mkvorMovie Name (Year)/Movie Name (Year).mkv - TV shows:
Show Name/Season 01/Show Name S01E01.mkv
Enable Remote Control Carefully
Open Settings, then Services, then Control when you want a phone remote, browser control, or another local device to manage Kodi. Kodi’s official control settings warn against exposing the web server to the internet and recommend authentication for the web interface. Set a username and password before allowing remote control from other systems.
The default browser example uses port 8080, such as http://192.168.1.7:8080. If you change the port inside Kodi, use the same port in any firewall rule or remote-control app configuration.
Install Add-ons
Use Add-ons, then Download to browse Kodi’s official add-on categories. Common first additions include subtitle providers, PVR clients for live TV backends, weather providers, visualizations, and skins. These add-ons are managed inside Kodi, not through APT or Flatpak in the normal desktop workflow.
Check Audio and Playback Settings
Open Settings, then System, then Audio to choose the output device. Enable passthrough only for formats your receiver actually supports. Under Services, you can also enable UPnP/DLNA sharing or discovery when compatible devices on the local network should see Kodi.
Configure UFW for Kodi Remote Control
Firewall rules are needed only when another device must reach Kodi’s web interface or remote-control service and UFW is active. Keep the port closed when Kodi is controlled only from the keyboard, mouse, or remote attached to the same Mint machine.
Check UFW state before adding rules:
sudo ufw status verboseIf UFW is active, allow only your local network to reach Kodi’s default web interface port. Replace 192.168.1.0/24 with the LAN range that should control Kodi:
sudo ufw allow from 192.168.1.0/24 to any port 8080 proto tcpVerify the rule after adding it:
sudo ufw status numberedIf you later disable Kodi remote control or change the web interface port, remove the exact rule you added:
sudo ufw delete allow from 192.168.1.0/24 to any port 8080 proto tcpIf this Mint system is administered over SSH, confirm the SSH access rule and a second working SSH connection before enabling or tightening UFW. The guide to install OpenSSH on Linux Mint covers the package and service side of that remote-access path.
Update Kodi on Linux Mint
Update Kodi with the same package manager used for the install.
For the Flathub build, update Kodi and any required runtimes with Flatpak:
sudo flatpak update tv.kodi.Kodi -yFor broader Flatpak maintenance on Mint, including app and runtime updates, see upgrade Flatpak on Linux Mint.
For the APT package, refresh metadata and upgrade Kodi’s package set:
sudo apt update
sudo apt install --only-upgrade kodi kodi-bin kodi-data kodi-repository-kodi kodi-visualization-spectrum
APT updates keep you on the Kodi branch published for your Mint release’s Ubuntu base. They do not move Mint 21.x or 22.x to the current upstream branch unless Ubuntu publishes that branch for the matching base release.
For a source build, rerun the helper without an argument to build the latest GitHub release tag, or pass a specific tag when you need to stay on a tested branch. Use 21.3-Omega when you want the tested source version; newer tags may need different dependencies or build flags:
update-kodi-sourceThe helper builds into a versioned prefix, verifies the new binary, and switches ~/.local/opt/kodi/current only after the new install works. If you want to roll back, point current and kodi-source back to an older versioned prefix or .previous backup under ~/.local/opt/kodi.
Remove Kodi from Linux Mint
Remove Kodi with the same manager that installed it. Removing the application does not delete your movies, music, photos, or other media files.
For the Flathub build, uninstall the app:
sudo flatpak uninstall tv.kodi.Kodi -yThen confirm that the system Flatpak installation no longer has the app installed:
flatpak list --system --app --columns=application | grep -Fx tv.kodi.Kodi || echo "NOT_INSTALLED"Expected output after removal is:
NOT_INSTALLED
For the APT package, remove Kodi and the companion packages installed with it:
sudo apt remove --purge kodi kodi-bin kodi-data kodi-repository-kodi kodi-visualization-spectrumPreview orphaned dependency cleanup before running it, especially on desktops that already have other multimedia packages installed:
sudo apt autoremove --simulateIf the preview only lists packages you no longer need, run the cleanup:
sudo apt autoremoveFor the source build, remove the launcher, helper, source tree, versioned install prefixes, and the build directories for the tags you compiled. Add any other tags you built to KODI_TAGS before running the cleanup:
KODI_TAGS=("21.3-Omega")
KODI_SOURCE_LINK="$HOME/.local/bin/kodi-source"

if [ -L "$KODI_SOURCE_LINK" ]; then
    case "$(readlink "$KODI_SOURCE_LINK")" in
        "$HOME"/.local/opt/kodi/*) rm -f "$KODI_SOURCE_LINK" ;;
        *) echo "Skipping non-Kodi symlink: $KODI_SOURCE_LINK" ;;
    esac
elif [ -e "$KODI_SOURCE_LINK" ]; then
    echo "Skipping non-symlink file: $KODI_SOURCE_LINK"
fi

rm -f "$HOME/.local/bin/update-kodi-source" \
    "$HOME/.local/share/applications/kodi-source.desktop"
rm -rf "$HOME/.local/opt/kodi" "$HOME/kodi-source"

for tag in "${KODI_TAGS[@]}"; do
    rm -rf "$HOME/kodi-build-$tag"
done
Verify the source-build files are gone from the current account:
hash -r
test ! -e "$HOME/.local/opt/kodi" && echo "Source prefix removed"
test ! -e "$HOME/.local/share/applications/kodi-source.desktop" && echo "Source launcher removed"
command -v kodi-source >/dev/null 2>&1 || echo "kodi-source command removed"
command -v update-kodi-source >/dev/null 2>&1 || echo "update helper removed"
Relevant output after source-build cleanup includes:
Source prefix removed
Source launcher removed
kodi-source command removed
update helper removed
The next commands remove Kodi profile data, including library databases, add-on settings, watched status, thumbnails, and cached metadata. Back up the matching profile directory first if you may reuse the library later.
For the APT package or the source build, remove the native Linux profile:
rm -rf ~/.kodiFor the Flathub build, remove the Flatpak app data directory:
rm -rf ~/.var/app/tv.kodi.KodiTroubleshoot Kodi on Linux Mint
Remove an Old Team Kodi PPA
If an older Mint installation still has the retired Team Kodi PPA configured, remove it before switching to Flathub or the repository package:
sudo add-apt-repository --remove ppa:team-xbmc/ppa
sudo apt update
If unstable or nightly PPAs were also added, repeat the removal with ppa:team-xbmc/unstable or ppa:team-xbmc/xbmc-nightly. Then check the active package source again:
apt-cache policy kodiFix libspdlog Errors
A launch error that names libspdlog.so usually means the Kodi binary on the system was built for a different host library set than the one Mint currently provides. Do not fix that by creating manual symlinks between different libspdlog versions. Remove the mismatched build or stale PPA package, then install either the verified APT package or the Flathub build.
sudo apt remove --purge kodi kodi-bin
sudo apt autoremove
Then reinstall Kodi from Mint’s repository or, after confirming Flathub is configured, install the Flatpak build:
sudo flatpak install flathub tv.kodi.Kodi -yIf you intentionally compiled Kodi yourself, rebuild against the libraries on the same Mint release rather than reusing binaries from another system or an old build directory.
Fix Source Build Dependency Errors
A source build can fail near the final kodi-x11 link with undefined reference lines for fmt or spdlog symbols when CMake cached one dependency set but the final link step sees another. Do not fix that by creating manual symlinks in /usr/local. Rebuild in a clean build directory and use Kodi’s internal dependency options for fmt, spdlog, crossguid, and flatbuffers.
If you are repairing a manual tree instead of rerunning the helper, keep the install prefix under your home directory and remove only the generated build directory:
SOURCE_DIR="$HOME/kodi"
BUILD_DIR="$HOME/kodi-build-clean"
PREFIX="$HOME/.local/opt/kodi/manual-clean"

test -f "$SOURCE_DIR/CMakeLists.txt" || {
    echo "Set SOURCE_DIR to your Kodi source tree before continuing."
    exit 1
}

rm -rf "$BUILD_DIR"
cmake -S "$SOURCE_DIR" -B "$BUILD_DIR" \
    -DCMAKE_INSTALL_PREFIX="$PREFIX" \
    -DCORE_PLATFORM_NAME=x11 \
    -DAPP_RENDER_SYSTEM=gl \
    -DENABLE_INTERNAL_CROSSGUID=ON \
    -DENABLE_INTERNAL_FLATBUFFERS=ON \
    -DENABLE_INTERNAL_FMT=ON \
    -DENABLE_INTERNAL_SPDLOG=ON
cmake --build "$BUILD_DIR" -- -j2
Kodi Command Not Found
A missing kodi command usually means Kodi was installed with Flatpak, not APT. Use the Flatpak launcher for the Flathub build:
flatpak run tv.kodi.KodiIf you expected the APT package, check the package state and reinstall it if needed:
apt-cache policy kodi
sudo apt install -y kodi
If you expected the source build, check whether the separate launcher exists and rerun the helper when it is missing:
case ":$PATH:" in
    *":$HOME/.local/bin:"*) ;;
    *) export PATH="$HOME/.local/bin:$PATH" ;;
esac

if command -v update-kodi-source >/dev/null 2>&1; then
    test -x "$HOME/.local/bin/kodi-source" && kodi-source --version || update-kodi-source 21.3-Omega
else
    echo "Recreate update-kodi-source from the source-build setup block first."
fi
Kodi Is Missing from the Cinnamon Menu
Cinnamon reads desktop entries from the system and per-user application directories. If Kodi launches from a terminal but does not appear in the Mint menu, confirm that the desktop entry for the install method exists:
test -f /usr/share/applications/kodi.desktop && echo "APT launcher found"
test -f /var/lib/flatpak/exports/share/applications/tv.kodi.Kodi.desktop && echo "Flatpak launcher found"
test -f "$HOME/.local/share/applications/kodi-source.desktop" && echo "Source launcher found"
Refresh the per-user desktop-entry cache after creating or repairing the source-build launcher when the cache tool is installed:
if command -v update-desktop-database >/dev/null 2>&1; then
    update-desktop-database "$HOME/.local/share/applications" >/dev/null 2>&1 || true
fi
If the Flatpak or source launcher was installed during the current desktop session, close and reopen the Mint menu. Sign out and back in when the entry still does not appear, because the desktop session may need to reread application paths and menu caches.
Kodi Does Not Launch
Run the version check that matches the install method first. This separates package problems from desktop-session or graphics problems. For the Flathub build, use:
flatpak run tv.kodi.Kodi --versionFor the APT package, use:
kodi --versionFor the source build, use:
kodi-source --versionIf the version check works but the window does not open from the menu, confirm that you are in a graphical session and that OpenGL is available. Install mesa-utils only when glxinfo is missing:
command -v glxinfo || sudo apt install -y mesa-utils
glxinfo -B
The output should show an OpenGL renderer and version. If it does not, fix the graphics driver or session issue before reinstalling Kodi. The Mesa drivers on Linux Mint guide covers the graphics-driver side when the installed Mesa stack is the problem.
If you installed mesa-utils only for this check and do not need it for later graphics diagnostics, remove it with APT:
sudo apt remove mesa-utilsFlatpak Kodi Cannot See a Media Folder
The Flathub package already grants access to common media folders and mounted storage paths. If your library lives somewhere custom, such as /srv/media, add a per-user Flatpak override and relaunch Kodi:
flatpak override --user --filesystem=/srv/media tv.kodi.Kodi
flatpak run tv.kodi.Kodi
Remove that override later if the custom path is no longer needed:
flatpak override --user --nofilesystem=/srv/media tv.kodi.KodiConclusion
Kodi is ready on Linux Mint through Flathub’s current upstream build, the lower-maintenance APT package from the Mint Ubuntu base, or a user-local source build when custom compile-time control matters. Use Flathub when release freshness matters, keep APT when distro-managed packages matter more, reserve the source helper for advanced builds, and treat old Team Kodi PPA entries as cleanup targets rather than new install paths.

Formatting tips for your comment
You can use basic HTML to format your comment. Useful tags currently allowed in published comments:
<code>command</code>command<strong>bold</strong><em>italic</em><a href="https://example.com">link</a><blockquote>quote</blockquote>