If you’re a developer or system administrator aiming to boost your application’s scalability and portability, Docker stands out as a remarkable solution. This platform excels in packaging, distributing, and running applications within isolated containers, ensuring consistency across various environments. In this article, we will provide a detailed walkthrough on how to install Docker CE on Fedora Linux, a widely-used and robust Linux distribution.
Docker CE (Community Edition) on Fedora Linux brings several advantages:
- Isolation: Docker containers operate in isolated environments, ensuring each application runs with its dependencies, enhancing security, and reducing conflicts.
- Resource Efficiency: Containers share the host system’s kernel but run in isolated user spaces, ensuring efficient utilization of system resources.
- Rapid Deployment: Docker ensures quick and consistent deployments, as containers include everything needed to run an application.
- Ease of Use: Docker’s straightforward commands and extensive documentation make it user-friendly, even for those new to containerization.
- Community Support: Being a popular open-source project, Docker has a vast community, providing ample support and resources.
By the end of this guide, you will have Docker CE up and running on your Fedora system, ready to containerize and deploy your applications with ease. We will cover the installation steps, configuration, and basic Docker commands to get you started.
Docker Pre-installation Steps on Fedora Linux
Step 1: Remove Previous Docker Installation
Before installing Docker on Fedora, it is crucial to remove any older versions of Docker to prevent conflicts and ensure a smooth installation. Execute the following command to remove any previously installed Docker versions from your system:
sudo dnf remove docker \
                  docker-client \
                  docker-client-latest \
                  docker-common \
                  docker-latest \
                  docker-latest-logrotate \
                  docker-logrotate \
                  docker-selinux \
                  docker-engine-selinux \
                  docker-engine
If none of these packages are installed, DNF will notify you that there’s nothing to remove. The contents of /var/lib/docker/, including images, containers, volumes, and networks, will be preserved. The Docker Engine package is now called docker-ce.
Step 2: Refresh Fedora System Packages
Before proceeding further, do a quick dnf package index refresh, and proceed to upgrade your system if you have outstanding updates:
sudo dnf upgrade --refreshImport Docker RPM Repository on Fedora Linux
Step 1: Install Initial Required Packages
This step involves importing the Docker RPM to install the latest version. Begin by ensuring the dnf-plugins-core package (which provides commands for managing your DNF repositories) is installed with the following command:
sudo dnf install dnf-plugins-coreWhile this package should be installed by default, running the command is considered the best practice.
Step 2: Import Docker CE RPM
Next, execute the following command to import the Docker Community Edition repository:
sudo dnf config-manager --add-repo https://download.docker.com/linux/fedora/docker-ce.repoIf successful, you should see the following output:
Adding repo from: https://download.docker.com/linux/fedora/docker-ce.repoInstall Docker CE on Fedora Linux
Step 1: Proceed to Install Docker CE via DNF Command
With the Docker Fedora RPM now imported, initiate the Docker CE installation by running the following command:
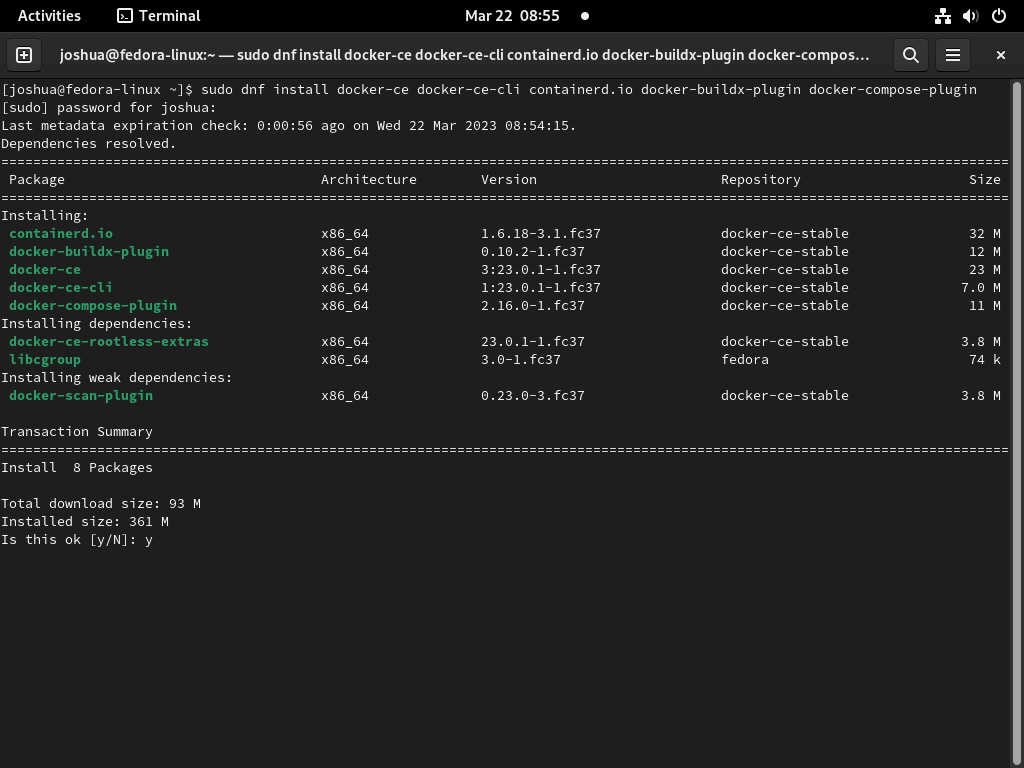
sudo dnf install docker-ce docker-ce-cli containerd.io docker-buildx-plugin docker-compose-pluginThis command installs Docker along with several additional plugins.
You should see an example output you see if the command works correctly:
Step 2: Working with Docker Service Commands on Fedora
By default, the Docker service is not activated; run the command to start the Docker service immediately:
systemctl start docker.serviceTo start the service immediately and enable it on system reboot, use the following command:
systemctl enable docker.service --nowStep 3: Confirm Docker Works on Fedora
Next, execute the following command to verify that Docker is working correctly:
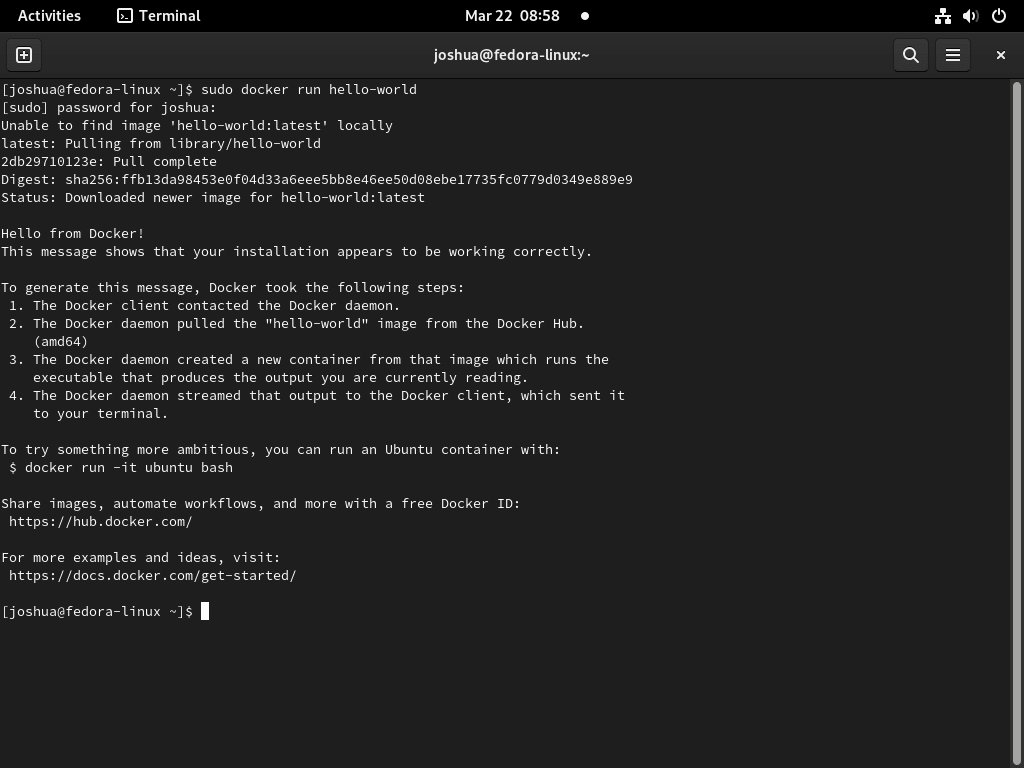
sudo docker run hello-worldThis command downloads a test image and runs it in a container. Upon running, the container prints a confirmation message before exiting.
Example of using hello-world on Docker with Fedora:
Keep in mind that the docker command requires root privileges to execute. However, configuring Docker to run as a non-root user offers a more secure method for managing containers and images.
If you encounter any issues while working with Docker images, try restarting your system, as this can sometimes resolve problems related to path generation.
rebootManage Docker with systemd Commands on Fedora
Systemd is a system and service manager that simplifies the management of processes and services on Fedora. Upon installing Docker on Fedora, a systemd unit is created to manage the Docker service. This unit can be controlled using various systemd commands, offering a convenient way to start, stop, and manage Docker containers and images.
Here are some commonly used systemd commands for managing Docker on Fedora:
Start the Docker service, allowing it to run on system boot:
systemctl start docker.serviceStop the Docker service and prevent it from running on the system boot:
systemctl stop docker.serviceRestart the Docker service:
systemctl restart docker.serviceDisplay the status of the Docker service and whether it is currently running:
systemctl status docker.serviceEnables the Docker service to start on system boot:
systemctl enable docker.serviceDisables the Docker service from starting on the system boot:
systemctl disable docker.serviceDocker Configuration Setup on Fedora Linux
Manage Docker as a Non-Root User
Operating Docker as a root user can expose your system to security risks and unintended changes. It’s advisable to manage Docker as a non-root user.
To create a new user and add it to the Docker group, execute the following commands:
sudo useradd -m dockeruser
sudo usermod -aG docker dockeruser
Additionally, you can add your current username to the Docker group. For example, if your username is “joshua”, run the following command:
sudo usermod -aG docker joshuaThese commands create a new user called “dockeruser” and add them to the Docker group. After adding the user to the Docker group, log out and back in to apply the changes.
Remember that you may need to restart if logging out doesn’t work.
To confirm that the user can run Docker commands, use this command:
docker psThis command will display a running container list if Docker is correctly installed.
Configure Default Logging Driver
By default, Docker logs use the JSON file format. However, you can configure the default logging driver to utilize a different format or send logs to a remote log management system.
To change the default logging driver, create a new file called “daemon.json” in the “/etc/docker/” directory using a text editor such as nano. For instance, run the following command:
sudo nano /etc/docker/daemon.jsonOnce the file is open, add the following contents:
{
  "log-driver": "syslog",
  "log-opts": {
    "syslog-address": "tcp://logs.example.com:514",
    "syslog-facility": "daemon",
    "tag": "{{.Name}}"
  }
}
In this example, Docker is configured to use the syslog driver and send logs to a remote syslog server. Replace “logs.example.com” with the address of your syslog server.
After creating the file, restart the Docker daemon to ensure that the changes made to the logging driver take effect:
sudo systemctl restart docker.serviceRemember that if you modify the “daemon.json” file, restart the Docker daemon again to reload the changes.
Using the Docker Command
Familiarity with the docker command is essential when working with Docker, as it manages Docker containers, images, networks, and volumes. Some of the most commonly used docker commands include:
| Command | Description |
|---|---|
| docker run | Run a new container from an image. |
| docker ps | List all running containers. |
| docker images | List all available images. |
| docker build | Build a new image from a Dockerfile. |
| docker stop | Stop a running container. |
| docker rm | Remove a container. |
| docker rmi | Remove an image. |
| docker network | Manage Docker networks. |
| docker volume | Manage Docker volumes. |
docker run
The docker run command runs a new container from an image. For example, to run a container from the Ubuntu image, use this command:
docker run -it ubuntu:latest /bin/bashThis command starts a new container from the Ubuntu image and opens a shell inside the container.
docker ps
The docker ps command lists all running containers. This command provides information about each container, such as the container ID, image name, and status.
docker psThis command will display a list of all running containers.
docker images
The docker images command lists all available images. This command provides information about each image, such as the image ID, repository, and tag.
docker imagesThis command will display a list of all available images.
docker build
The docker build command is used to build a new image from a Dockerfile. A Dockerfile is a script containing instructions for building an image.
docker build -t myimage:latest .This command will build a new image called “myimage” using the Dockerfile located in the current directory.
docker stop
The docker stop command stops a running container. For example, to stop a container with the ID “abcdefg”, use this command:
docker stop abcdefgThis command will stop the container with the ID “abcdefg.”
docker rm
The docker rm command removes a container. For example, to remove a container with the ID “abcdefg”, use this command:
docker rm abcdefgThis command will remove the container with the ID “abcdefg.”
docker rmi
The docker rmi command removes an image. For example, to remove an image with the ID “1234567”, use this command:
docker rmi 1234567This command will remove the image with the ID “1234567.”
docker network
The docker network command manages Docker networks. This command provides options for creating, listing, and removing networks.
docker network create mynetworkThis command will create a new network called “mynetwork.”
docker volume
The docker volume command manages Docker volumes. This command provides options for creating, listing, and removing volumes.
docker volume create myvolumeThis command will create a new volume called “myvolume.”
Running a Docker Container
To run a container from an image, use the docker run command followed by the image name. For example, to run a container from the Ubuntu image, use this command:
docker run ubuntuThis command will download the Ubuntu image and run a container from it. You can also specify the version of the image by adding a tag. For example, to run a container from the Ubuntu image version 22.04, use this command:
docker run ubuntu:22.04This command will download and run a container from the Ubuntu image version 22.04.
When you run a container, Docker creates a new instance of the image as a container. Each container is isolated from others and has its own file system, networking, and resources.
After the container runs, you can interact with it through a shell or a command prompt. For example, to open a shell inside the container, use the following command:
docker run -it ubuntu /bin/bashManaging Docker Containers
To manage Docker containers, use the docker ps command to list all running containers. For example, to list all running containers on your system, use the following command:
docker psThis command will display a list of all running containers, including their container ID, image name, and status.
To stop a running container, use the docker stop command followed by the container ID or name. For example, to stop a container with the ID “abcdefg”, use the following command:
docker stop abcdefgThis command will stop the container with the ID “abcdefg.”
To remove a container, use the docker rm command followed by the container ID or name. For example, to remove a container with the ID “abcdefg”, use the following command:
docker rm abcdefgThis command will remove the container with the ID “abcdefg.”
When you remove a container, any changes made to the container will be lost. If you want to save the changes made to a container as a new image, you can use the docker commit command to create a new image from the container.
Committing Changes in a Container to a Docker Image
When working with Docker containers, it’s common to make changes to the container that you want to save as a new image. To commit changes in a container to a Docker image, you can use the docker commit command.
First, start a new container from the base image and make any necessary changes to the container. For example, to start a new container from the Ubuntu image and open a shell inside the container, use the following command:
docker run -it --name mycontainer ubuntu:latest /bin/bashThis command will start a new container from the Ubuntu image and open a shell inside the container. You can make any necessary changes to the container, such as installing new software or modifying configuration files.
Once you have made the necessary changes, you can use the docker commit command to create a new image from the container. For example, to create a new image called “myimage” with the changes made in the “mycontainer” container, use the following command:
docker commit mycontainer myimage:latestThis command will create a new image called “myimage” with the changes made in the “mycontainer” container. You can now use this new image to create and run new containers with the updated software or configuration.
It’s important to note that the docker commit command only saves the changes made to the container’s file system and does not save any changes to the container’s networking or storage. If you need to save changes to these areas, use other Docker commands such as docker network or docker volume.
Conclusion
Installing Docker CE on Fedora Linux can significantly improve your container management experience by providing a reliable and efficient platform for containerized applications. Following the steps outlined in this guide, you can seamlessly set up Docker on your Fedora Linux system, enabling you to create, manage, and deploy containers quickly.


