Harnessing the power of Nvidia GPUs on Ubuntu systems requires the right tools, and the NVIDIA CUDA Toolkit stands out as the premier choice. For those aiming to install the NVIDIA CUDA Toolkit on Ubuntu 22.04 Jammy Jellyfish or its older stable release of Ubuntu 20.04 Focal Fossa, this introduction provides a comprehensive overview of its capabilities and significance.
Key Features of the NVIDIA CUDA Toolkit:
- Optimized Performance: The CUDA Toolkit leverages the parallel processing capabilities of Nvidia GPUs, offering significant acceleration for computationally intensive tasks.
- Broad Language Integration: The toolkit supports programming languages like C, C++, Python, and Fortran, making GPU-accelerated computing widely accessible.
- Versatile Use Cases: Beyond graphics, the CUDA Toolkit finds applications in data analysis, scientific simulations, and deep learning, showcasing its versatility.
- Extensive Resources: Nvidia’s commitment to the CUDA community shines through its detailed documentation, tutorials, and active user community.
Benefits of Using Nvidia’s Official Repository:
- Latest Innovations: Regular updates ensure users benefit from the newest features and improvements in the CUDA Toolkit.
- Enhanced Compatibility: Staying updated is essential to maximize the performance of the latest Nvidia GPUs.
- Streamlined Updates: Integrating Nvidia’s official APT repository simplifies the toolkit’s update process, eliminating manual installations.
With a clear understanding of the NVIDIA CUDA Toolkit’s advantages, the following sections will guide you through the installation process on Ubuntu 22.04 Jammy Jellyfish or Ubuntu 20.04 Focal Fossa, equipping your system with the latest Nvidia drivers and CUDA tools.
Remove Existing CUDA, and NVIDIA Installations on Ubuntu 22.04 or 20.04
If you have a fresh system without any prior NVIDIA or CUDA installations, you can skip this recommendation. However, if you already have an existing NVIDIA or CUDA installation, it’s crucial to remove it first. Failing to do so can lead to installation problems or system instabilities related to the software.
It’s crucial to start with a clean slate when installing NVIDIA drivers, especially when planning to upgrade or change the version. This means removing any existing NVIDIA installation packages from your system. This step helps prevent potential conflicts and issues arising from overlapping installations. However, if you haven’t installed NVIDIA drivers before, skip this section and proceed to the next one.
Remove NVIDIA Packages Installed via APT From Ubuntu
If you’ve installed NVIDIA drivers using the APT package manager, you can use a single command to remove all traces of NVIDIA from your system. This command searches for all NVIDIA-related packages and purges them from your system. Run the following command in your terminal:
sudo apt autoremove cuda* nvidia* --purgeThis command uses the autoremove option of the apt command, which removes packages that were automatically installed to satisfy dependencies for other packages and are now no longer needed. The nvidia* pattern matches all packages starting with ‘nvidia’. The --purge option tells apt to remove not only the packages but also their configuration files.
Remove NVIDIA Drivers Installed via Runfile from Ubuntu
If you’ve installed the NVIDIA drivers using a .run file (which is generally not recommended due to better alternatives like the NVIDIA CUDA repository), you’ll need to use a different approach to remove them.
To uninstall the runfile type of installation, use the following command:
sudo /usr/bin/nvidia-uninstallThe command executes the nvidia-uninstall script included in the runfile installation. This script ensures the clean removal of the NVIDIA driver installed through the runfile.
Remove CUDA Toolkit Installed via Runfile from Ubuntu
If you installed the CUDA toolkit using a runfile, you must remove it. Use a method similar to the one for uninstalling NVIDIA drivers. To remove the CUDA toolkit, run the following command:
sudo /usr/local/cuda-X.Y/bin/cuda-uninstallReplace X.Y with the version number of the CUDA toolkit you have installed. Use this command to run the cuda-uninstall script that comes with the runfile installation of the CUDA toolkit. This script ensures the clean removal of the CUDA toolkit from your system.
Install NVIDIA CUDA on Ubuntu 22.04 or 20.04 via CUDA APT PPA
This section is specifically designed for Ubuntu 22.04 and 20.04 LTS releases. Unfortunately, short-term releases are not compatible with this method.
As previously discussed, installing CUDA directly from the NVIDIA CUDA repository is the most efficient approach. This method ensures you’ll be the first to receive any new enhancements, bug fixes, security updates, or features.
Step 1: Preparing Your System for NVIDIA CUDA PPA on Ubuntu
Before diving into the installation process, we must ensure your system is ready. This involves installing several necessary packages. These packages might already be on your system, but double-checking doesn’t hurt. Run the following command in your terminal:
sudo apt install build-essential gcc dirmngr ca-certificates software-properties-common apt-transport-https dkms curl -yThis command installs several packages that are essential for the following steps. These packages include dirmngr (for managing keys), ca-certificates (for handling SSL certificates), software-properties-common (for managing software repositories), apt-transport-https (for secure package downloads), dkms (for managing kernel modules), and curl (for downloading files from the internet).
Step 2: Import GPG Key for NVIDIA PPA on Ubuntu 22.04 or 20.04
Security takes top priority during software installations. To verify the authenticity and integrity of the packages we want to install, we must import the GPG key for our specific distribution version. The repository uses this key to sign the packages. We instruct our system to trust packages that this key has signed by importing it.
For Ubuntu 22.04 Jammy Jellyfish release, use the following command:
curl -fSsL https://developer.download.nvidia.com/compute/cuda/repos/ubuntu2204/x86_64/3bf863cc.pub | sudo gpg --dearmor | sudo tee /usr/share/keyrings/nvidia-drivers.gpg > /dev/null 2>&1For Ubuntu 20.04 Focal Fossa release, use this command instead:
curl -fSsL https://developer.download.nvidia.com/compute/cuda/repos/ubuntu2004/x86_64/3bf863cc.pub | sudo gpg --dearmor | sudo tee /usr/share/keyrings/nvidia-drivers.gpg > /dev/null 2>&1Step 3: Import NVIDIA Repository to Your Ubuntu System
With the GPG key in place, we can now add the NVIDIA repository to our system. This repository contains the packages we need for our CUDA installation.
For Ubuntu 22.04 Jammy Jellyfish release, use the following command:
echo 'deb [signed-by=/usr/share/keyrings/nvidia-drivers.gpg] https://developer.download.nvidia.com/compute/cuda/repos/ubuntu2204/x86_64/ /' | sudo tee /etc/apt/sources.list.d/nvidia-drivers.listFor Ubuntu 20.04 Focal Fossa release, use this command instead:
echo 'deb [signed-by=/usr/share/keyrings/nvidia-drivers.gpg] https://developer.download.nvidia.com/compute/cuda/repos/ubuntu2004/x86_64/ /' | sudo tee /etc/apt/sources.list.d/nvidia-drivers.listStep 4: Refreshing the Package List for NVIDIA Cuda PPA
Now that we’ve added the NVIDIA repository, we must update our system’s package list. This ensures that our system knows the new packages available in the NVIDIA repository. To do this, run the following command:
sudo apt updateThis command fetches the latest package information from all configured repositories, including the newly added NVIDIA repository.
Step 5: Install CUDA Toolkit on Ubuntu 22.04 or 20.04
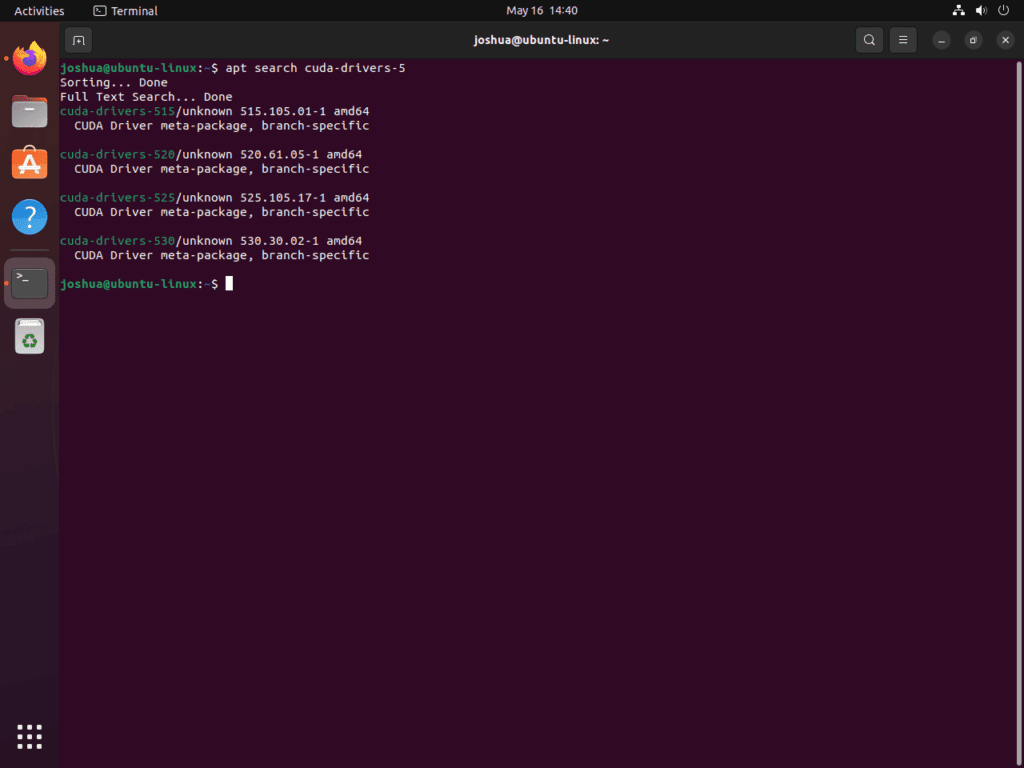
We can install CUDA with the latest NVIDIA drivers with everything set up. But before we do that, it’s a good idea to check the available driver versions. You can do this using the APT search command:
apt search cuda-driversThis command lists all the available CUDA versions. You can choose the one that suits your needs best. For the purpose of this guide, we’ll demonstrate how to install the latest version currently available.
Remember to replace 545 with 535, 530, 525, 520, 515, etc., depending on your preference.
sudo apt install nvidia-driver cuda-drivers-545 cudaKeep in mind that the aforementioned command is merely an example. By utilizing the APT search, as shown earlier, you can install the version you need.
Once installed, you will need to reboot your system:
sudo rebootGetting Started with CUDA with Ubuntu 22.04 or 20.04
Embarking on your journey with CUDA on Ubuntu Linux can be exciting. To help you navigate this path more smoothly, here are some tips and tricks to enhance your experience and boost your productivity.
Understanding GPU Capabilities with NVIDIA CUDA on Ubuntu
Before diving into CUDA programming, understanding your GPU’s capabilities is crucial. Different GPUs support different versions of CUDA and have varying numbers of cores, memory sizes, and other features. You can use the nvidia-smi command to get detailed information about your GPU:
nvidia-smiThis command provides information about your GPU’s name, total memory, CUDA version, and more. Understanding your GPU’s capabilities can help you write more efficient CUDA programs.
CUDA Toolkit Documentation on Ubuntu 22.04 or 20.04
The CUDA Toolkit has extensive documentation, including a programming guide, best practices guide, and API references. Familiarizing yourself with these resources can be incredibly beneficial. You can access the documentation online on the NVIDIA CUDA Toolkit Documentation page.
CUDA Samples on Ubuntu 22.04 or 20.04
The CUDA Toolkit includes sample programs demonstrating various aspects of CUDA programming, from basic concepts to advanced techniques. These samples can be a great learning resource. You can find them in the /usr/local/cuda/samples directory after installing the CUDA Toolkit.
Update NVIDIA Cuda on Ubuntu 22.04 or 20.04
NVIDIA regularly releases new versions of the CUDA Toolkit, often including performance improvements, bug fixes, and new features. Keeping your CUDA installation up-to-date ensures you can use these enhancements. Remember, you’ve set up your system to receive updates directly from the NVIDIA CUDA repository, so you can easily update your CUDA installation using the APT package manager:
sudo apt update
sudo apt upgrade
Exploring CUDA Libraries with NVIDIA CUDA on Ubuntu
CUDA offers several libraries that provide high-level functionalities for common computational tasks like linear algebra, Fourier transform, and more. Libraries such as cuBLAS, cuFFT, and cuDNN are highly optimized, saving time and effort. The CUDA Toolkit documentation contains more details about these libraries.
Debugging and Profiling CUDA Programs Ubuntu
Debugging and profiling are essential aspects of CUDA programming. Tools like cuda-gdb and nvprof can help you debug your CUDA programs and analyze their performance. These tools are part of the CUDA Toolkit and can be invaluable in optimizing your CUDA programs.
Closing Thoughts
In conclusion, installing CUDA on Ubuntu Linux is straightforward and allows you to access high-performance, GPU-accelerated computing. We guided you through the steps to prepare your system, remove any existing NVIDIA installations, set up the NVIDIA drivers from the CUDA repository, and launch CUDA. We also offered useful tips for starting with CUDA programming on Ubuntu Linux.


You should change that
sudo apt autoremove ‘^cuda.*’ ‘^nvidia.*’ –purge
as right now bash is expanding those * to match anything in the current folder…
Section 5 is is supposed to provide instruction on installing the cuda toolkit but instead only addresses checking the drivers.
I did follow the previous steps … however when running
$ sudo apt install nvidia-cuda-toolkit
it errors with broken package messages.
or is there some other method ?
Hi Paul,
What version of Ubuntu are you using? Also, there is under the apt-search some installation instructions like for 535 example, unless I have misunderstood your message.
If I have, let me know and I’ll try and address it, but knowning the ubuntu version helps since I will try and replicate on your same installation if possible.
Thanks.