This guide will demonstrate how to install Chkrootkit on Ubuntu 24.04, 22.04, or 20.04 LTS Linux releases using the command-line terminal with the APT Package Manager or via source archive.
Chkrootkit stands as a beacon of security in the Linux ecosystem, offering users a robust toolkit for checking their systems for signs of rootkits. Rootkits, sophisticated malware types that can hide deep within your system, pose a significant threat to system integrity and data security. Chkrootkit leverages advanced detection techniques to unearth these threats, ensuring that system administrators and security professionals can maintain a clean, secure operating environment. Its design prioritizes simplicity and effectiveness, making it an indispensable tool for Linux users who value their system’s security.
Key highlights of Chkrootkit include:
- Comprehensive Scanning Capabilities: Detects numerous known rootkits, worms, and trojans.
- User-Friendly Interface: Ensures ease of use for both novices and experts in cybersecurity.
- Regular Updates: Keeps pace with the evolving landscape of cyber threats through frequent database updates.
- Open-Source Nature: Allows for community-driven improvements and ensures transparency.
- Minimal Resource Requirements: Can run on various systems without impacting performance.
- Flexible Deployment Options: Capable of running from external media for analyzing compromised systems.
- Detailed Reporting: Offers insights into detected threats and system vulnerabilities.
- Wide Compatibility: Supports a broad range of Linux distributions, enhancing its versatility.
Chkrootkit empowers users to take proactive steps towards their system’s security, providing peace of mind in an increasingly digital world.
Now, let’s proceed with the installation steps.
Install Chkrootkit on Ubuntu via APT
Update Package Lists Before Chkrootkit Installation
Before installing Chkrootkit, updating the package lists on your system is essential. This step ensures you have the latest information about available packages and the most recent versions. To update the package lists, open a terminal and run the following command:
sudo apt update & sudo apt upgradeThis command will fetch the latest package information from the repositories and upgrade any installed packages with newer versions.
Install Chkrootkit on Ubuntu via APT Command
To install Chkrootkit, you can utilize the APT package manager. This package manager is a convenient and efficient way to manage software on your Ubuntu system. Run the following command to install Chkrootkit:
sudo apt install chkrootkitThis command will install the Chkrootkit package, which includes the necessary tools and scripts to detect and prevent rootkits on your system. These tools will help you safeguard your system against malicious software and maintain its security.
Verify the Chkrootkit Installation
After installing Chkrootkit, verifying that the installation was successful is crucial. This step ensures that the software is correctly installed and ready to use. To verify the installation, run the Chkrootkit version command in the terminal:
chkrootkit -VInstall Chkrootkit on Ubuntu via Source
Download the Chkrootkit Source Code
First, you must download the Chkrootkit source code from the official website. This process ensures that you have the most recent version of the software. Open a terminal and navigate to the directory where you want to download the source code. Then, run the following command:
wget ftp://chkrootkit.org/pub/seg/pac/chkrootkit.tar.gzThis command will download the Chkrootkit source code archive to your chosen directory.
Extract the Chkrootkit source archive
Next, you must extract the source code from the downloaded archive. Extracting the source code is necessary to access the files required for compilation and installation. Run the following command to extract the source code:
tar -xvzf chkrootkit.tar.gzCompile and Install Chkrootkit on Ubuntu
Before compiling Chkrootkit, ensure you have the necessary packages installed on your system. These packages include the GNU Compiler Collection (GCC) and the make utility. To check if you have these packages installed or to install them, run the following command:
sudo apt install gcc make build-essentialNow, navigate to the extracted Chkrootkit source code directory and run the following command to compile and install Chkrootkit:
cd chkrootkit-{your-version-number}
make sense
This command will compile the Chkrootkit source code and create an executable binary file.
Verify the Chkrootkit Installation
You can verify the installation by running the Chkrootkit command in the terminal. This step confirms that the software has been successfully compiled and installed. Run the following command:
./chkrootkit -VSetting Up Chkrootkit for Global Accessibility
This section will focus on organizing the Chkrootkit installation on your Ubuntu system, making it globally accessible. This is important for the ease of use and keeping in line with the conventional structure of file systems in Linux.
Positioning Chkrootkit in a Standard Directory with Chkrootkit
After successfully compiling Chkrootkit, it is considered best practice to move its directory to a standardized location in the file system. This not only organizes your files but also simplifies the accessibility of the Chkrootkit executable.
The convention is to place such software in /usr/local/bin for global accessibility. However, before doing that, we’ll move the Chkrootkit directory to /usr/local/share.
Make sure you are in the parent directory of the Chkrootkit directory. This should be one level above chkrootkit-{your-version-number}. To move Chkrootkit to /usr/local/share, execute the following command:
sudo mv chkrootkit-{your-version-number} /usr/local/share/chkrootkitThis command utilizes sudo to execute the move (mv) command with administrative privileges. It relocates the Chkrootkit directory to /usr/local/share, which is a common location for storing shared data.
Creating a Symbolic Link for Easy Access with Chkrootkit
Now that we’ve moved Chkrootkit to a more appropriate location, let’s make it easily accessible from anywhere in the system by creating a symbolic link in /usr/local/bin. A symbolic link acts like a shortcut, enabling you to execute Chkrootkit without navigating to its directory every time.
To create this symbolic link, execute the following command:
sudo ln -s /usr/local/share/chkrootkit/chkrootkit /usr/local/bin/chkrootkit
This creates a symbolic link named chkrootkit in /usr/local/bin which points to the actual Chkrootkit executable in /usr/local/share/chkrootkit.
Verifying Chkrootkit’s Accessibility
You should now be able to run Chkrootkit from anywhere in the terminal. To verify this, let’s use the version command to check Chkrootkit’s version:
chkrootkit -VIf you receive an output showing the version of Chkrootkit, it confirms that Chkrootkit is globally accessible.
Basic Commands with Chkrootkit on Ubuntu
Run a Scan for Rootkits with Chkrootkit
Once Chkrootkit is installed, you can scan your system to detect any rootkits. To run a scan, open a terminal and execute the following command:
sudo chkrootkitThis command will display the version of Chkrootkit and initiate a comprehensive scan of your system, searching for any potential rootkits.
If you prefer a more concise output that only displays potential issues, you can use the quiet mode:
sudo chkrootkit -qConfigure Automatic Scanning with Chkrootkit
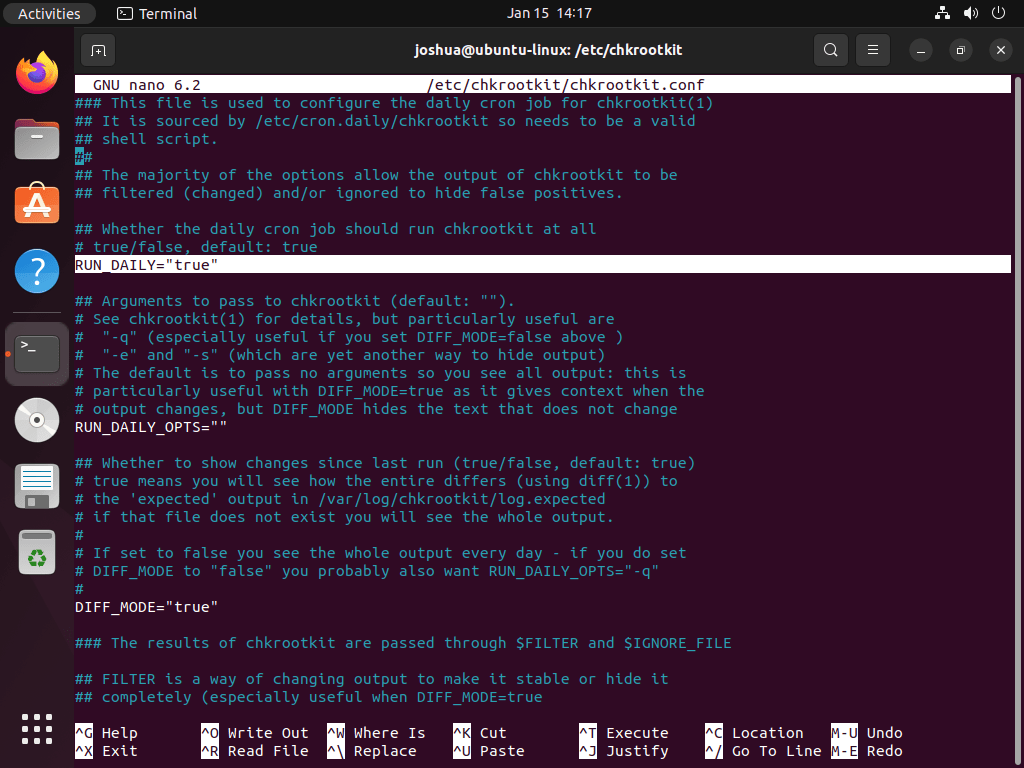
You can enable automatic daily scanning with the APT version of Chkrootkit to enhance your system’s security. First, open the configuration file by running the following command:
sudo nano /etc/chkrootkit/chkrootkit.confNext, find the line containing RUN_DAILY and change its value to TRUE. By default, this value should already be set to TRUE, but it’s a good practice to verify this setting.
Save the changes by pressing CTRL+O and exit the editor with CTRL+X.
Explore Chkrootkit Commands and Documentation
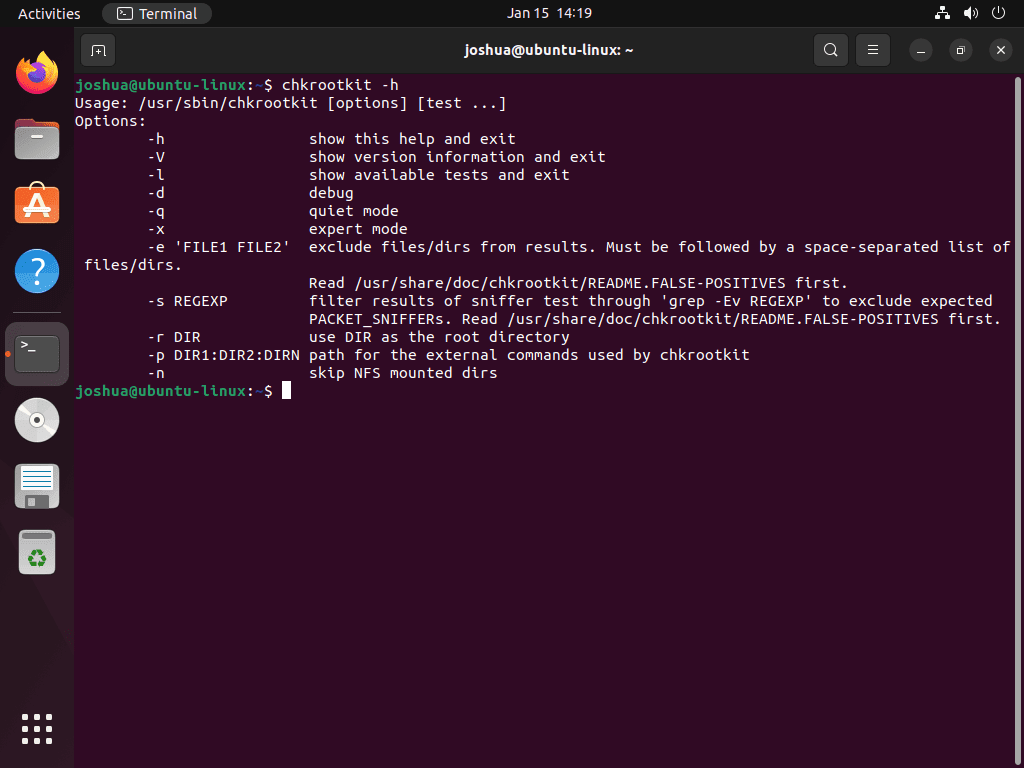
To learn more about Chkrootkit commands and options, you can access its Help menu by running the following command:
chkrootkit -hAlternatively, you can access Chkrootkit’s manual page using the man command:
man chkrootkitConclusion
In wrapping up, we’ve walked through the steps to get Chkrootkit up and running on Ubuntu, covering both the straightforward APT method and the more hands-on approach of compiling the latest version. This guide aimed to simplify what might seem like a daunting task into manageable steps, making sure you’re equipped to bolster your system’s defenses against rootkits. As a final nudge, don’t forget to run regular scans and keep your Chkrootkit installation updated. It’s a small but powerful habit that goes a long way in keeping your digital space secure. Stay vigilant and happy scanning!


