
Budgie Desktop provides a modern, GTK-based desktop environment that balances visual polish with efficient resource usage. Originally developed by the Solus project and now maintained by Buddies of Budgie, this desktop environment works well for users who want a clean interface with integrated notifications through the Raven sidebar. By the end of this guide, you will have a fully functional Budgie Desktop installation with LightDM as your display manager, ready to customize with optional applets and themes.
Choose Your Budgie Installation Method
Debian offers multiple ways to install Budgie Desktop, ranging from a minimal core installation to a complete desktop environment. The table below summarizes your options:
| Method | Package | Best For |
|---|---|---|
| Basic Installation | budgie-desktop | Users who want Budgie core with minimal additions |
| Full Environment (Debian 13 only) | budgie-desktop-environment | Complete setup with themes, icons, file manager, and terminal |
For most users, the basic installation is recommended because it provides the essential Budgie components while allowing you to add extras as needed. The full environment metapackage is only available on Debian 13 (Trixie) and includes additional applications like Nemo file manager, Arc theme, and Papirus icons.
Debian version differences: Budgie Desktop versions vary across Debian releases. Debian 13 (Trixie) includes Budgie 10.9.x with the new
budgie-desktop-environmentmetapackage. Debian 12 (Bookworm) provides Budgie 10.7.x, while Debian 11 (Bullseye) offers Budgie 10.5.x. All versions follow the same installation process, though available extras differ.
Update Debian Before Installing Budgie
Before installing any desktop environment, update your package lists and upgrade existing packages. This ensures compatibility and prevents dependency conflicts during installation.
Run the following command to update and upgrade your system:
sudo apt update && sudo apt upgradeThe apt update command refreshes the package index, while apt upgrade installs available updates for your existing packages.
Install Budgie Desktop
With your system updated, install the Budgie Desktop package. This command pulls in all required dependencies, including the Budgie panel, Raven sidebar, and window manager:
sudo apt install budgie-desktopAPT automatically installs recommended packages by default, which includes budgie-desktop-view for desktop icons and the necessary introspection libraries. The installation downloads approximately 50-100 MB depending on your existing GNOME components.
Debian 13: Install the Full Environment (Optional)
Debian 13 (Trixie) users can alternatively install the complete Budgie environment, which includes a curated set of applications and themes:
sudo apt install budgie-desktop-environmentThis metapackage adds Nemo file manager, GNOME Terminal, Arc theme, Papirus icon theme, Bibata cursor theme, and PipeWire audio configuration. Choose this option if you want a complete, polished setup without manual configuration.
The
budgie-desktop-environmentpackage does not exist on Debian 11 or Debian 12. Users on these versions should install the basicbudgie-desktoppackage and add extras manually as shown in the Optional Extras section below.
Select LightDM as Your Display Manager
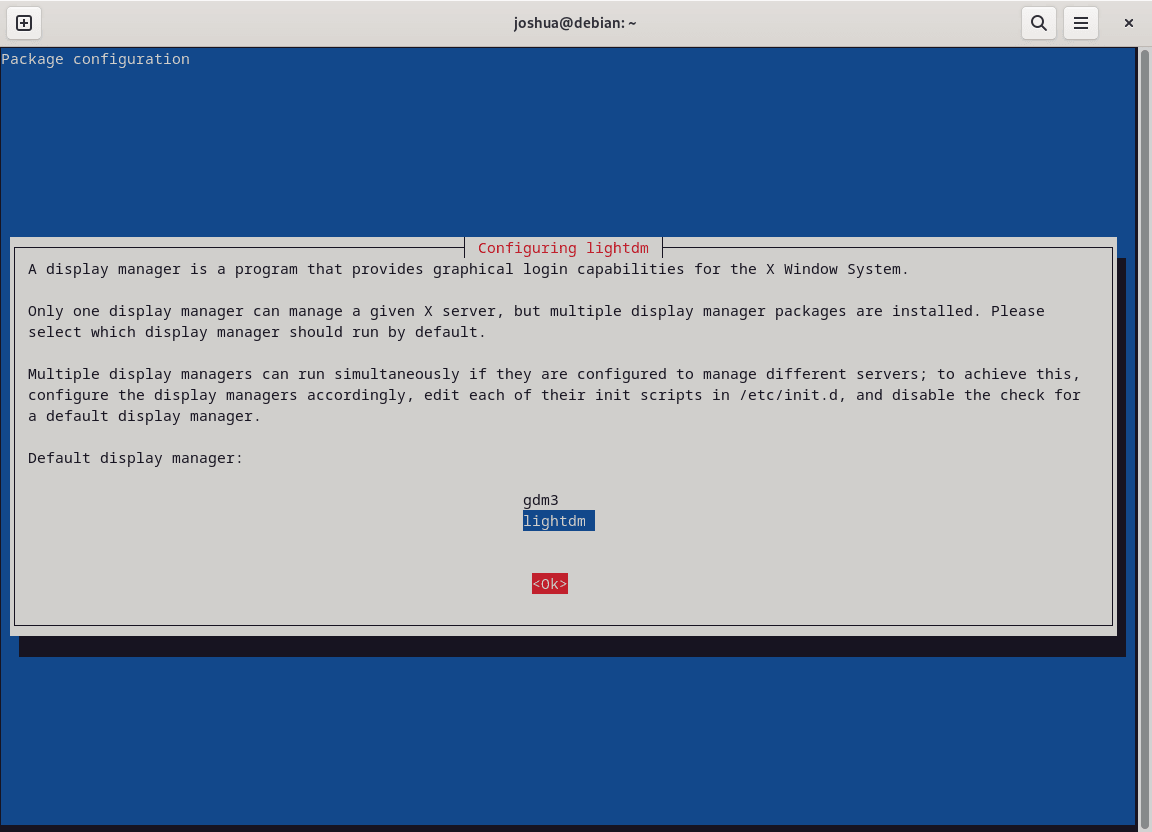
During installation, the package manager prompts you to choose between display managers. LightDM provides better compatibility with Budgie and uses fewer resources than GDM (GNOME Display Manager).
When the configuration dialog appears, use the arrow keys to select lightdm and press Enter to confirm:
If this prompt does not appear, your system may already have a display manager configured. You can change it later using
sudo dpkg-reconfigure lightdmas described in the Switch Display Managers section below.
Verify the Installation
After installation completes, verify that Budgie Desktop is properly installed by checking the package status:
apt-cache policy budgie-desktopExpected output showing a successful installation:
budgie-desktop:
  Installed: 10.x.x
  Candidate: 10.x.x
  Version table:
 *** 10.x.x 500
        500 http://deb.debian.org/debian trixie/main amd64 Packages
        100 /var/lib/dpkg/status
The version number varies by Debian release: Debian 13 shows 10.9.x, Debian 12 shows 10.7.x, and Debian 11 shows 10.5.x. The
Installedline confirms the package is ready to use.
Reboot and Log Into Budgie
Restart your system to apply the display manager changes and load the Budgie session:
sudo rebootAfter rebooting, the LightDM login screen appears. Before entering your password, click the session selector icon (typically a gear or cog near the username field) and choose Budgie from the available sessions:

Enter your password and press Enter to log into the Budgie Desktop. Your session choice is remembered for future logins.
Install Optional Budgie Extras
Debian provides over 30 optional Budgie applets and utilities that extend the desktop’s functionality. These extras add features like window previews, hot corners, weather widgets, and advanced window management.
Popular Applets
Install useful productivity applets with a single command:
sudo apt install budgie-hotcorners-applet budgie-window-shuffler budgie-previews budgie-weathershow-appletThese applets provide the following functionality:
- budgie-hotcorners-applet: Trigger actions when moving the cursor to screen corners
- budgie-window-shuffler: Keyboard-driven window tiling and arrangement
- budgie-previews: Show window previews when hovering over taskbar items
- budgie-weathershow-applet: Display current weather and forecast in your panel
View All Available Extras
To see all available Budgie packages in the Debian repositories, run:
apt-cache search budgieAfter installing applets, access them through Budgie Settings by right-clicking the panel and selecting Budgie Desktop Settings, then navigating to the Applets section.
Switch Display Managers
If you need to change your display manager after installation (for example, switching between LightDM and GDM), use the dpkg-reconfigure command:
sudo dpkg-reconfigure lightdmThis command displays the display manager selection dialog, allowing you to choose between installed options. After selecting a different display manager, restart your system for the change to take effect:
sudo rebootTroubleshoot Common Issues
Budgie Session Not Appearing at Login
If the Budgie session option does not appear in the session selector, verify that the session file exists:
ls /usr/share/xsessions/ | grep -i budgieExpected output:
budgie-desktop.desktop
If the file is missing, reinstall the budgie-core package:
sudo apt install --reinstall budgie-coreBlank Screen After Login
A blank screen after entering your password typically indicates a graphics driver issue. Press Ctrl+Alt+F2 to switch to a text console, log in, and check the Xorg log:
cat ~/.local/share/xorg/Xorg.0.log | grep -i errorIf you see errors related to your graphics driver, installing proprietary drivers may resolve the issue. For NVIDIA cards, see our guide on installing NVIDIA drivers on Debian.
Display Manager Fails to Start
If the system boots to a text console instead of the graphical login, check the LightDM service status:
systemctl status lightdmIf the service shows errors, view the full log for diagnostic information:
journalctl -xeu lightdmCommon fixes include ensuring a greeter is installed (sudo apt install lightdm-gtk-greeter) and verifying X server packages are present (sudo apt install xserver-xorg).
Remove Budgie Desktop
If you decide to remove Budgie Desktop, first switch to a different display manager to avoid login issues. Run the display manager reconfiguration and select GDM or another available option:
sudo dpkg-reconfigure lightdmAfter selecting a different display manager, remove all Budgie-related packages:
sudo apt remove --purge 'budgie-*'Next, remove packages that were automatically installed as dependencies and are no longer needed:
sudo apt autoremoveReinstall GNOME (Optional)
If you want to restore the default GNOME desktop after removing Budgie, reinstall the GNOME packages and GDM display manager:
sudo apt install gnome gdm3 task-gnome-desktop --reinstallVerify Removal
After removing packages, update APT and verify that Budgie is no longer installed:
sudo apt update
apt-cache policy budgie-desktop
Expected output confirming removal:
budgie-desktop:
  Installed: (none)
  Candidate: 10.x.x
  Version table:
     10.x.x 500
        500 http://deb.debian.org/debian trixie/main amd64 Packages
Finally, reboot your system to complete the removal and load your new display manager:
sudo rebootLearn More
For additional information about Budgie Desktop configuration and development, refer to the following resources:
- Buddies of Budgie: Official project homepage with documentation and news
- Budgie Desktop GitHub: Source code and issue tracker
If you are exploring desktop environments for Debian, you may also find these guides helpful:
- Install KDE Plasma on Debian: Feature-rich desktop with extensive customization options
- Install Cinnamon on Debian: Traditional desktop layout with modern features
- Install XFCE on Debian: Lightweight desktop environment for older hardware
- Install LXQt on Debian: Minimal Qt-based desktop for maximum performance
Conclusion
You now have Budgie Desktop running on Debian with LightDM as your display manager. The installation provides the Raven notification sidebar, a customizable panel, and compatibility with GTK applications. Extend your setup with optional applets for window tiling, weather display, and hot corners. If you later decide to switch desktops, the removal process cleanly uninstalls Budgie while preserving your system configuration.