

This guide will demonstrate how to install Flameshot on Ubuntu 24.04, 22.04, or 20.04 LTS Linux releases utilizing the command-line terminal and either APT Package Manager or a third-party package manager such as Snap or Flatpak with Flathub for an alternative installation.
Flameshot stands out as a versatile screenshot tool designed for Linux systems, offering extensive customization and editing features straight from its intuitive interface. Unlike traditional screenshot tools, Flameshot is equipped with robust functionalities that cater to a wide range of user needs, from basic screenshot capture to advanced image editing and annotation capabilities. Here’s why Flameshot is highly regarded:
- Ease of Use: Simple, user-friendly interface allowing quick access to its features.
- Powerful Annotation Tools: Includes arrows, lines, text, and shapes to highlight or explain parts of your screenshot.
- Customization Options: Customize color, size, and even the blur effect for sensitive information.
- Flexible Capture Options: Choose from full-screen, window, or custom area captures.
- In-App Editing: Edit screenshots immediately after capture without needing an external editor.
- Screenshot Sharing: Easily share your screenshots through various platforms with minimal steps.
- Command-Line Support: Offers command-line options for automation and integration with other tools.
- Cross-Distribution Support: Available on multiple Linux distributions, ensuring wide accessibility.
Transitioning from a snapshot of Flameshot’s capabilities to applying these in practice, the following steps will guide you through a seamless installation process.
Install Flameshot on Ubuntu via APT
Update Ubuntu Packages Before Flameshot Installation
Before proceeding with the tutorial, ensuring your system is up-to-date with all existing packages is good.
sudo apt updateProceed to upgrade any outdated packages using the following command.
sudo apt upgradeInstall Flameshot on Ubuntu via APT Command
By default, Flameshot is available in Ubuntu’s standard repository. This would be the best option for most users who prefer not to use a third-party package manager.
sudo apt install flameshotInstall Flameshot on Ubuntu via Flatpak and Flathub
The second option involves using the Flatpak package manager. While Ubuntu doesn’t natively include Flatpak because Canonical supports both Ubuntu and Snaps, you can install it from the repository.
Enable Flathub for Flameshot
Next, you must enable Flatpack using the following command in your terminal.
sudo flatpak remote-add --if-not-exists flathub https://flathub.org/repo/flathub.flatpakrepoInstall Flameshot on Ubuntu via Flatpak Command
Next, you can install Flameshot Flatpak with the following command.
flatpak install flathub org.flameshot.Flameshot -yInstall Flameshot on Ubuntu via Snap
The third method to get Flameshot on Ubuntu is through Snapcraft. While Snapcraft might not be as widely recognized as Flatpak in the broader Linux community, it remains efficient on Ubuntu, especially with Canonical advocating for increased Snap usage.
Verify Snap is Installed on Ubuntu for Flameshot Installation
To deploy Flameshot using Snapcraft, initiate by installing the Snap Manager. If you had previously uninstalled it, reinstall it using the command:
sudo apt install snapd -ySubsequently, set up the core files for SNAP to prevent potential complications:
sudo snap install coreInstall Flameshot on Ubuntu via Snap Command
Conclusively, install Flameshot with the command:
sudo snap install flameshotThis command will set up Flameshot on your Ubuntu 22.04 Jammy Jellyfish or Ubuntu 20.04 Focal Fossa via Snapcraft from the terminal.
Launch Flameshot on Ubuntu via CLI Commands or GUI Path
CLI Commands to Launch Flameshot
With Flameshot installed, you can launch the software immediately using the command terminal.
flameshotflatpak run org.flameshot.Flameshotsnap run flameshotGUI Path to Launch Flameshot
Ubuntu desktop users often prefer using the application icon, which you can pin to your sidebar. You can find the application icon at the following path:
Activites > Show Applications > Flameshot
First-Time Tips on Using Flameshot on Ubuntu
Now that you have successfully installed Flameshot on your Ubuntu system, here are some essential tips to help you get started and make the most out of this powerful screenshot tool:
General Tips for First-Time Users
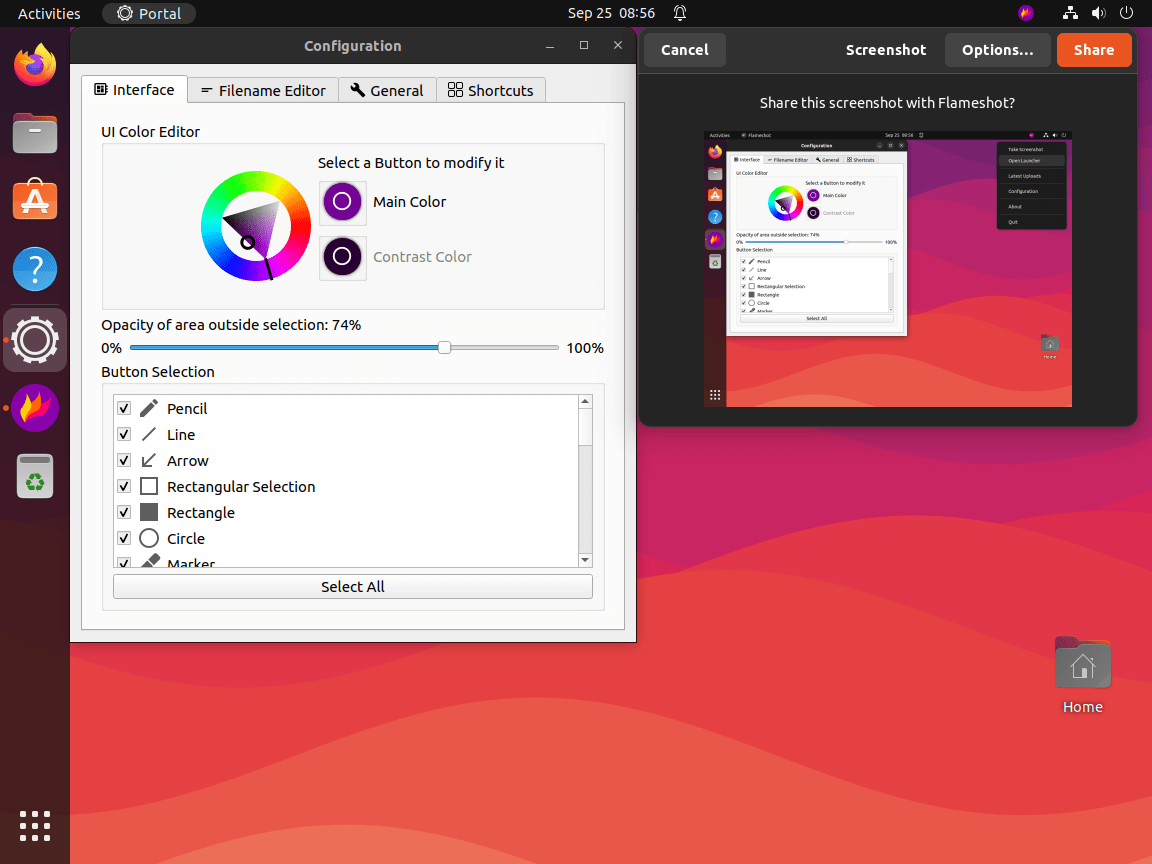
- Explore the Configuration Options: Dive into Flameshot’s settings by right-clicking the Flameshot icon in your system tray and selecting “Configuration.” Here, you can tailor the application’s behavior to suit your needs, such as setting the default save path or choosing your preferred image format (PNG, JPG, BMP, etc.).
- Utilize the Tray Icon: The Flameshot tray icon is your gateway to quickly taking screenshots without remembering complex commands. Use it to initiate captures or access the configuration menu easily.
- Check for Software Updates: While this guide doesn’t cover the update process, staying current with the latest version of Flameshot through your package manager ensures access to new features and bug fixes.
- Familiarize with the Interface: Upon taking a screenshot, Flameshot presents an overlay with tools on the bottom. Hovering over each icon displays its function, offering a quick way to learn what each tool does.
Customization Tips
- Modify Button Selection Area Colors: Customize the color of the selection area to make it more visible against your screen content. Access this option through the configuration menu under the “Appearance” tab.
- Set Keyboard Shortcuts: While this section will cover specific shortcuts, remember that you can create or modify existing shortcuts for Flameshot through your desktop environment’s settings, allowing quick access to its functionalities.
- Enable Autostart: Ensure Flameshot starts with your system for immediate access. This can usually be set within your desktop environment’s “Startup Applications” preferences.
- Use the Imgur Uploader: Flameshot includes a built-in feature to upload screenshots directly to Imgur, making sharing screenshots online effortless. Look for the Imgur icon in the editing overlay.
Keyboard Shortcuts
Flameshot’s efficiency comes from its use of keyboard shortcuts, allowing for rapid screenshot capture and editing:
- Prt Sc: Start a new screenshot session.
- Ctrl + Shift + Prt Sc: Capture the entire screen to the clipboard.
- Shift + Prt Sc: Capture a specific region of the screen.
- Esc: Cancel the screenshot session.
Advanced Usage Tips
- Command-Line Usage: Flameshot can be used entirely from the command line, offering scripts and shortcuts to streamline your workflow. For example,
flameshot guilaunches the GUI mode directly, whileflameshot full -p ~/Picturescaptures the full screen and saves it to your Pictures directory. - Integration with Other Apps: Consider integrating Flameshot with your productivity or design tools. For instance, you can set up a custom command in your IDE or editor to take screenshots of your code or designs without leaving the application.
- Utilize Delayed Screenshots: If you need to capture a menu or hover state that disappears when pressing a key, use the delay feature by accessing it through the Flameshot GUI options.
- Experiment with CLI Commands: The command-line interface (CLI) of Flameshot is powerful. Explore commands like
flameshot configto tweak your settings orflameshot screen -n 1 -cto capture your primary monitor and copy it to the clipboard directly.
Other Helpful Tips
- Annotation Tools: Make extensive use of Flameshot’s annotation tools during capture. You can add text, arrows, circles, and even pixelate parts of your screenshot before saving or sharing it.
- Custom Save Paths: Use the configuration menu to set custom save paths for your screenshots, organizing them efficiently from the get-go.
- Use the Color Picker: The color picker tool within the annotation options is great for maintaining consistency in your edits or matching your annotations to specific colors on the screen.
- Keyboard Navigation: Learn the keyboard shortcuts for navigating and selecting tools within the capture mode. This speeds up your workflow considerably.
Following these tips, you’ll be well on your way to mastering Flameshot on Ubuntu, enhancing both your productivity and the quality of your screenshots.
Flameshot CLI Command Examples on Ubuntu
Below are some basic CLI commands you can use with Flameshot for users who prefer using terminal actions over GUI methods.
Common Example Commands For Flameshot
capture with GUI:
flameshot guiCapture with GUI with custom save path:
flameshot gui --path ~/myStuff/capturesOpen GUI with a delay of 3 seconds:
flameshot gui --delay 3000Fullscreen capture (asking to save path):
flameshot fullFullscreen capture with custom save path (no GUI) and delayed:
flameshot full --path ~/myStuff/captures --delay 5000Capture fullscreen with custom save path copying to clipboard:
flameshot full --clipboard --path ~/myStuff/capturesCLI Configuration Commands For Flameshot
Open the configuration menu:
flameshot configShow the initial help message in the capture mode:
flameshot config --showhelp trueTo check mistakes and issues in the configuration file:
flameshot config --checkFor more information about the available options, use the help flag:
flameshot config --helpAdditional Flameshot Commands with Ubuntu
Update Flameshot
To keep Flameshot up-to-date, it is often recommended to check routinely for updates using the cli command terminal; this was, you are sure your system is up to date.
APT Update Command For Flameshot
sudo apt update && sudo apt upgradeFlatpak Update Command For Flameshot
flatpak updateSnap Update Command For Flameshot
snap refreshRemove Flameshot
The removal of the Flameshot is straightforward. Use the following command that matches your installation.
APT Remove Command For Flameshot
sudo apt remove flameshotFlatpak Remove Command For Flameshot
To remove the Flatpack version, run the following command.
flatpak uninstall --delete-data org.flameshot.Flameshot -ySnap Remove Commands For Flameshot
sudo snap remove flameshotConclusion
Throughout this guide, we’ve walked through the steps to install Flameshot on Ubuntu versions 24.04, 22.04, and 20.04 LTS, diving into first-time user tips, customization tricks, and handy keyboard shortcuts to enhance your screenshot experience. Flameshot is a powerful tool that can significantly improve how you capture and annotate screenshots on Linux. Whether you’re aiming for efficiency in your workflow or need detailed captures for your projects, Flameshot’s flexibility and ease of use make it a top choice. Remember to explore its rich features and integrate them into your daily tasks for better productivity. Happy screenshotting!