This guide will demonstrate how to install Open-VM Tools on Ubuntu 24.04, 22.04, or 20.04 LTS utilizing the command-line terminal.
Open-VM Tools is an open-source implementation of VMware Tools, providing a suite of utilities that enhance the performance and manageability of virtual machines within a VMware environment. This essential toolkit is designed to improve the overall user experience and efficiency of virtual machines running on Ubuntu LTS versions. With a focus on seamless integration and optimization, Open-VM Tools offers a range of functionalities that are vital for anyone utilizing virtual machines in a VMware setup.
- Optimized Performance: Enhances the interaction between the host and guest operating systems, ensuring smooth and efficient operation.
- Improved User Experience: Facilitates better graphics and mouse performance, contributing to a more responsive and enjoyable user experience.
- Enhanced Clipboard Functionality: Allows for easy text and file copying between the host and the guest OS, streamlining workflow processes.
- Automatic Screen Resizing: Adjusts the guest display automatically when the window size changes, offering a seamless user interface experience.
- Time Synchronization: Keeps the virtual machine’s clock in sync with the host, preventing any time-related issues.
- Drag-and-Drop Support: Enables simple file transfer between the host and the guest OS, enhancing usability and productivity.
- Shared Folders: Allows for easy sharing of directories and files between the host and guest systems, facilitating efficient data exchange.
- Device Drivers: Includes optimized drivers for virtual hardware, improving the overall performance and compatibility of the guest OS.
Now, let’s move forward with the technical steps to install Open-VM Tools on your Ubuntu system.
Update Ubuntu Before VMware Tools Installation
Before installing any new software, it’s crucial to ensure that your existing Ubuntu packages are up-to-date. This not only ensures better compatibility but also reduces potential security vulnerabilities. We accomplish this with the help of apt, Ubuntu’s built-in package manager.
To update your package list, open your terminal and execute the following command:
sudo apt updateAfter completing the update operation, the terminal will display the number of packages available for upgrade. You can then upgrade these outdated packages using the following command:
sudo apt upgradeSelect Open-VM Tools Installation Type on Ubuntu
After updating your Ubuntu system, proceed with the installation of either VMware Tools or Open-VM Tools. Choose the package based on your Ubuntu environment: Ubuntu Desktop or Ubuntu Server.
Install Open-VM Tools Desktop Package
For users operating in a graphical desktop environment, we recommend installing open-vm-tools-desktop. This version of Open-VM Tools includes features specifically catered to GUI-based systems.
You can install this package by executing the following command in your terminal:
sudo apt install open-vm-tools-desktopInstall Open-VM Tools Server Package
In a headless Ubuntu Server environment, where no GUI is present, a more minimal approach is beneficial to maintain system performance and security. You would not need the desktop-specific features provided by open-vm-tools-desktop. Instead, the open-vm-tools package is recommended.
Install it with this command:
sudo apt install open-vm-toolsInstall VMware Dev Packages Tools
The package is available for users requiring additional features not found in the standard package or those who wish to contribute to the open-vm-tools project. This version includes extra tools beneficial for development purposes. If needed, you can install this with:
sudo apt install open-vm-tools-devSystem Reboot
After successfully installing the appropriate package, a system reboot is necessary for the changes to take effect. You can trigger a system reboot by entering the following command:
rebootVerify Installation of Open-VM Tools on Ubuntu
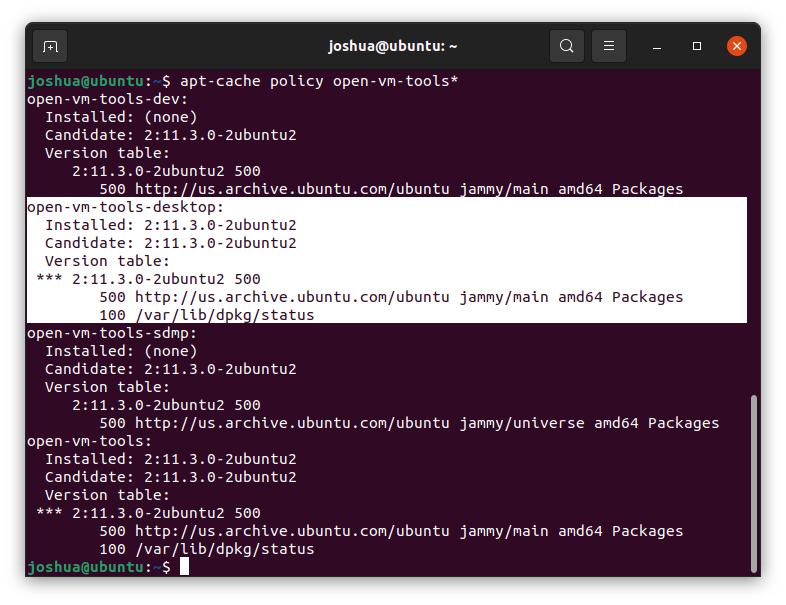
Upon rebooting, verify that Open-VM Tools installs correctly and functions as expected. Use Ubuntu’s package manager to confirm the installation. Execute the following coUbuntu’s your terminal:
apt-cache policy open-vm-tools*The output lists the installed versions of all Open-VM Tools packages and details the versions available in Ubuntu’s repositories, ensuring correct installation and use of the most current version.

Conclusion
We’ve walked through the steps to get Open-VM Tools up and running on your Ubuntu 24.04, 22.04, or 20.04 LTS system. By now, you should be enjoying a smoother, more integrated virtual machine experience. Just a final nudge – don’t forget to keep your system and Open-VM Tools updated for the best performance and security. And hey, if you ever get stuck or need to tweak something, the community’s always there to lend a hand. Keep exploring and making the most of your Ubuntu VM!

