RethinkDB stands out as a powerful open-source database designed for applications with real-time feeds and scalable architecture. This guide will demonstrate how to install RethinkDB on Ubuntu 22.04 or 20.04, offering a straightforward approach for both beginners and experienced users. RethinkDB’s architecture is particularly suited for applications requiring live updates, such as collaborative tools and streaming analytics.
Key Features of RethinkDB:
- Real-time push architecture: Automatically pushes updated query results to applications in real-time.
- Distributed database: Offers horizontal scalability with sharding and replication.
- Rich query language (ReQL): Allows complex queries with chainable operations.
- High availability: Provides automatic failover and robust fault tolerance.
- Geospatial queries support: Ideal for location-based services and applications.
- Flexible data models: Supports JSON document models with dynamic schema.
As we delve into the installation process, you’ll find that setting up RethinkDB on Ubuntu is a seamless experience, tailored to leverage its exceptional features effectively. Whether you’re building a sophisticated real-time analytics system or a dynamic collaborative application, RethinkDB offers the robustness and flexibility required in today’s fast-paced development environment. Let’s get started with the installation steps.
Install RethinkDB on Ubuntu 22.04 or 20.04
Step 1: Update Ubuntu System Before RethinkDB Installation
For an optimal installation of RethinkDB, it is crucial to ensure that all the packages existing in your system are up-to-date. This step will help to prevent potential conflicts during the installation process. In your terminal, enter the following commands:
sudo apt update
sudo apt upgrade
The first command updates the package lists for upgrades, while the second command installs the newest versions of all packages currently installed on the system.
Step 2: Install Initial Packages Required for RethinkDB Installation
Several dependencies are required for a successful RethinkDB installation. While most of these packages may already exist on your system, executing the following command will ensure their presence:
sudo apt install software-properties-common apt-transport-https curl -yThis command installs
software-properties-common(providing useful scripts for adding and removing PPAs),apt-transport-https(allowing the package manager to transfer files and data over https), andcurl(a tool for transferring data with URLs).
Step 3: Import RethinkDB APT Repository on Ubuntu
In this step, you will import the GPG key to verify the authenticity of the packages you are about to install. This provides an additional layer of security, ensuring that the packages originated from a trustworthy source and were not tampered with during transmission. Execute the following command to import the key:
curl -fsSL https://download.rethinkdb.com/repository/raw/pubkey.gpg | sudo gpg --dearmor | sudo tee /usr/share/keyrings/rethinkdb-archive-keyrings.gpg > /dev/nullNext, add the RethinkDB APT repository to your sources listings:
echo "deb [arch=amd64 signed-by=/usr/share/keyrings/rethinkdb-archive-keyrings.gpg] https://download.rethinkdb.com/repository/ubuntu-$(lsb_release -cs) $(lsb_release -cs) main" | sudo tee /etc/apt/sources.list.d/rethinkdb.listThis command should be compatible with all current versions of Ubuntu.
Step 4: Updating the APT Index for RethinkDB on Ubuntu
Upon adding the new repository, you must update your system’s APT index to include the newly available RethinkDB packages. Use the following command to update the APT index:
sudo apt updateStep 5: Install RethinkDB on Ubuntu 22.04 or 20.04
With all the previous steps completed, you can now install RethinkDB using the following command:
sudo apt install rethinkdbStep 6: Verifying the RethinkDB Installation on Ubuntu
To confirm that the installation was successful, you can check the installed version of RethinkDB with this command:
rethinkdb --versionFor convenience and automatic startup of RethinkDB at system boot, enable the RethinkDB service and activate it immediately with the following command:
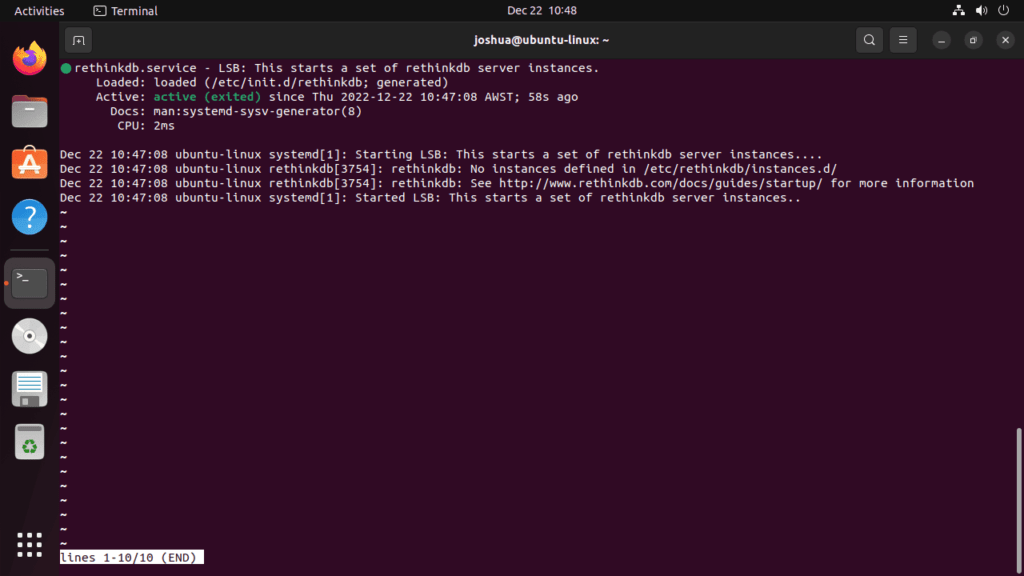
sudo systemctl enable rethinkdb --nowLastly, check the status of the RethinkDB service to ensure that it’s active and running without errors:
systemctl status rethinkdb
Configure RethinkDB Service on Ubuntu 22.04 or 20.04
In its default state, RethinkDB does not initiate on startup nor does it stay active. To change this, you will need to work with the sample configuration file provided in the installation. This process includes copying the sample file and personalizing it to suit your needs. Let’s break down this procedure.
Step 1: Copying the Sample Configuration File
Use the following command to copy the sample configuration file:
sudo cp /etc/rethinkdb/default.conf.sample /etc/rethinkdb/instances.d/instance1.confThis command creates a copy of the sample configuration file and renames it to ‘instance1.conf’. For those who want to run multiple instances of RethinkDB, you can choose any name for these configuration files.
In case you need a different configuration, it can be downloaded from the RethinkDB’s official GitHub repository. The repository also contains comprehensive details about the different configuration options.
Step 2: Configuration File Breakdown for RethinkDB on Ubuntu
The configuration file consists of several sections, each allowing you to modify a specific part of the service.
File Path Options
This section allows you to determine the storage directory for data and metadata, and specify the location of the log file. The default values are usually suitable for most use-cases, however, you may need to change these if you have specific requirements. Here is the structure:
### File path options

## Directory to store data and metadata.
# directory=/var/lib/rethinkdb/default

## Log file options.
# log-file=/var/log/rethinkdb
WebUI Options
In the WebUI Options section, you can change the default HTTP port for RethinkDB’s web administration console. It’s a best practice to change this from the default “8080” to a random number for security purposes. The structure is:
### Web options

## Port for the HTTP admin console.
# http-port=8080

## Disable web administration console.
# no-http-admin
Network Options
The Network Options section enables you to set automatic IP address binds. By default, RethinkDB is set to bind to all IP addresses, but you can specify specific IP addresses or ranges. The structure is:
### Network options

## Address of local interfaces to listen on when accepting connections.
# bind=127.0.0.1
Meta Name
The Meta section allows you to change the server name. The structure is:
### Meta

## The name for this server.
# server-name=server1
The above are some of the options. Given RethinkDB will be deployed in different environments, you may or may not need to modify these and other settings.
Access RethinkDB Web User Interface on Ubuntu 22.04 or 20.04
RethinkDB offers a web-based user interface (Web UI) that can be utilized in local environments. For situations that necessitate remote access or use in external environments, a reverse proxy setup with Nginx would be appropriate. By default, the Web UI can be accessed locally via port “8080”.
Let’s dive deeper into how we can launch an instance and access RethinkDB using the Web UI.
Step 1: Launching an Instance
If you haven’t configured a specific RethinkDB instance and wish to quickly launch one, the command below will start RethinkDB and enable connections from any computer:
rethinkdb --bind allThe --bind all option allows RethinkDB to accept connections from all network interfaces. This command will yield an output similar to the following:
joshua@ubuntu-linux:~$ rethinkdb --bind  all
Recursively removing directory /home/joshua/rethinkdb_data/tmp
Initializing directory /home/joshua/rethinkdb_data
Running rethinkdb 2.4.2~0jammy (GCC 11.2.0)...
Running on Linux 5.15.0-56-generic x86_64
Loading data from directory /home/joshua/rethinkdb_data
Listening for intracluster connections on port 29015
Listening for client driver connections on port 28015
Listening for administrative HTTP connections on port 8080
Listening on cluster addresses: 127.0.0.1, 192.168.50.234, ::1, fe80::e5c7:3efa:3294:ffca%2
Listening on driver addresses: 127.0.0.1, 192.168.50.234, ::1, fe80::e5c7:3efa:3294:ffca%2
Listening on http addresses: 127.0.0.1, 192.168.50.234, ::1, fe80::e5c7:3efa:3294:ffca%2
Server ready, "ubuntu_linux_ofk" 044e2d46-1111-40a2-9b04-efeadf9a52a2
This output verifies that the RethinkDB instance has started successfully and is listening on various addresses for different types of connections.
If you wish to restrict the IP addresses that can connect to your RethinkDB instance, use the --bind command with a specific IP address, like so:
rethinkdb --bind ip-addressThis command restricts connections to the specified IP address only.
Step 2: Accessing the RethinkDB Web UI on Ubuntu
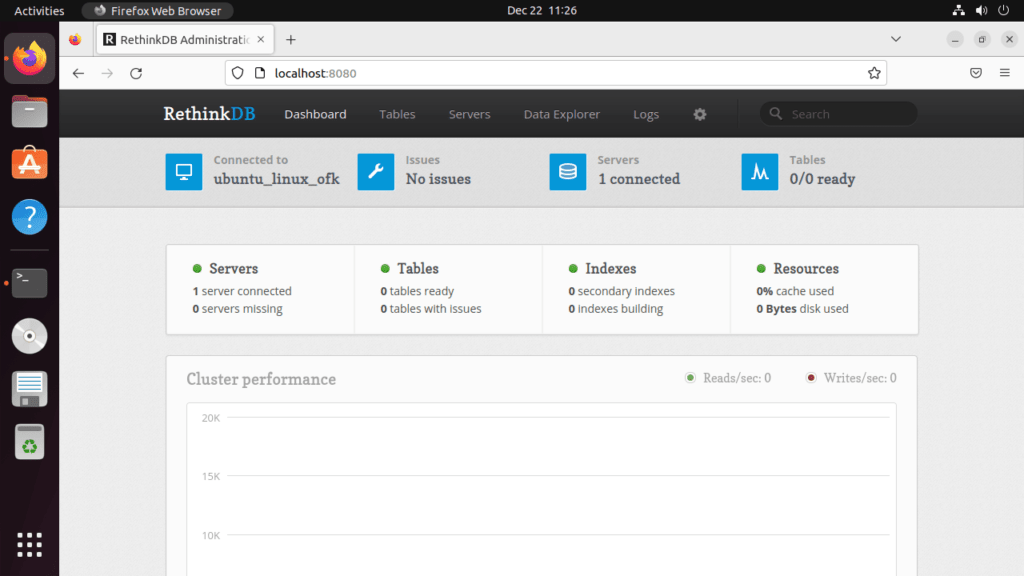
With the RethinkDB instance running, you can now access the Web UI. If you’re working in a local environment, you can simply navigate to the following URL in your web browser:
For localhost:
### localhost
http://localhost:8080
If you are connecting from a remote location, replace “localhost” with your server’s IP address. For instance:
For server-ip:
### server-ip
http://192.168.xx.xx:8080
Replace “192.168.xx.xx” with your actual server IP address.
Accessing the Web UI provides a graphical interface to interact with your RethinkDB instance. It’s a valuable tool for managing databases, troubleshooting issues, and monitoring performance.
Final Thoughts
In conclusion, the process of installing and configuring RethinkDB on an Ubuntu Linux distribution is a manageable task that entails specific steps to ensure optimal functioning. The covered content emphasizes the importance of adequate installation, appropriate setup of the configuration files, and understanding how to access the RethinkDB Web User Interface. This knowledge is crucial as it lays the groundwork for managing your RethinkDB databases effectively.
Remember, the skills acquired in this tutorial are essential and transferable, assisting you in managing other forms of databases or systems. Continue to explore and learn to enhance your abilities further. As you progress, the processes discussed will become second nature, enabling you to deploy RethinkDB instances swiftly and securely.


