Python 3.11 marked a significant update in the Python programming landscape, offering enhanced performance and new features that promise to streamline coding experiences. This guide will demonstrate how to install Python 3.11 on Linux Mint 21 or 20, ensuring you can leverage its capabilities on your system.
The release is notable for several key features:
- Faster Performance: Python 3.11 introduces numerous optimizations, making it faster than its predecessors.
- Precise Error Reporting: Enhanced error messages provide more accurate information, simplifying debugging.
- Pattern Matching Enhancements: The introduction of advanced pattern-matching techniques allows for more efficient and readable code.
- Improved Typing Module: The typing module has received updates for better consistency and functionality.
- Exception Groups and
except*Syntax: This new feature provides a more nuanced handling of multiple exceptions.
As we dive into the installation process on Linux Mint, it’s important to understand the impact of these features on your programming. Not only do they make Python more robust and efficient, but they also pave the way for cleaner, more maintainable code.
Let’s get started with the installation of Python 3.11 on Linux Mint.
Import Python PPA on Linux Mint 21 or 20
The first step in installing Python 3.11 on Linux Mint is to add the appropriate Personal Package Archive (PPA). PPAs allow Linux users to install software that may not be included in the official repositories or to access newer versions of existing software. Python 3.11 comes in two variants: the stable branch and the nightly branch. The stable branch is recommended for most users due to its reliability and regular updates. It contains the officially released version of Python 3.11. In contrast, the nightly branch offers the latest development changes but may be less stable.
Step 1: Import Python PPA on Linux Mint
Option 1: Import Python Stable PPA for Python 3.11
For users seeking a stable and tested version of Python 3.11, importing the stable PPA is the preferred method. Open a terminal on your Linux Mint system and run the following command:
sudo add-apt-repository ppa:deadsnakes/ppa -yThis command adds the ‘deadsnakes’ PPA to your system, which is a well-known source for newer versions of Python. The -y flag automatically confirms the addition, streamlining the process.
Option 2: Import Python Nightly PPA for Python 3.11 (Upstream)
For those interested in the cutting-edge development of Python, the nightly PPA is the go-to choice. It includes the latest changes and features being developed for Python. To import the nightly PPA, execute the following command in the terminal:
sudo add-apt-repository ppa:deadsnakes/nightly -yThis command functions similarly to the previous one but targets the nightly branch instead, offering the latest, albeit less tested, updates.
Step 2: Refreshing the APT Sources List
Once the desired PPA is added, it’s essential to update the APT package manager’s sources list. This update allows the system to recognize the newly available packages from the PPA.
To refresh the APT sources list, use this command:
sudo apt updateRunning sudo apt update ensures your system’s package list is current, allowing for the smooth installation of Python 3.11 from the newly added PPA.
Install Python 3.11 on Linux Mint 21 or 20
After successfully importing the Python PPA and updating the APT sources list, the next step is to install Python 3.11 on your Linux Mint system. This section provides a detailed guide on how to install Python 3.11 and verify its installation. Additionally, it covers optional modules that can enhance your Python development environment.
Step 1: Install Python 3.11 on Linux Mint Using APT Command
To install Python 3.11, open your terminal and execute the following command:
sudo apt install python3.11This command instructs the Advanced Package Tool (APT) to install Python 3.11 from the previously added PPA. The sudo prefix grants administrative privileges for the installation.
Step 2: Verifying the Installation of Python 3.11 on Linux Mint
Once Python 3.11 is installed, it’s important to verify the installation. To check the installed version of Python 3.11, run this command in the terminal:
python3.11 --versionThis command outputs the version of Python 3.11 installed, confirming the successful installation.
Optional Extras for Python 3.11 on Linux Mint 21 or 20
To further enhance your Python development experience, several optional modules are available. These modules add functionalities like debugging, development utilities, and virtual environment support. Here are the commands to install these optional modules:
- Debug Module (
python3.11-dbg):- Installs the debugging symbols for Python 3.11. Essential for developers who need to debug Python code at a lower level.
sudo apt install python3.11-dbg- Developer (dev) Module (
python3.11-dev):- Contains the header files and static libraries necessary for building Python extensions. A must-have for developers creating native C/C++ extensions for Python.
sudo apt install python3.11-dev- VENV (Virtual Environment) Module (
python3.11-venv):- Provides the venv module, which allows the creation of lightweight, isolated Python environments. It’s invaluable for managing dependencies and versions for different projects.
sudo apt install python3.11-venv- Distutils Module (
python3.11-distutils):- A crucial module for Python software packaging and distribution. It’s widely used for automating the deployment of Python applications and libraries.
sudo apt install python3.11-distutils- lib2to3 Utility Module (
python3.11-lib2to3):- Offers the lib2to3 library, which helps in converting Python 2 code to Python 3. It’s particularly useful for developers maintaining legacy codebases.
sudo apt install python3.11-lib2to3- DBM.GNU Module (
python3.11-gdbm):- Installs the GNU dbm database support for Python, providing simple database functionalities for storing key-value pairs.
sudo apt install python3.11-gdbm- Tkinter Module (
python3.11-tk):- Adds support for Tkinter, a standard GUI toolkit for Python. Ideal for developers creating desktop applications with Python.
sudo apt install python3.11-tkFor convenience, you can install all these extras at once using the following command:
sudo apt install python3.11-fullTest Python 3.11 Shell on Linux Mint 21 or 20
Once Python 3.11 is installed on your Linux Mint system, it’s essential to verify that it operates correctly. This section provides guidance on how to access and exit the Python 3.11 shell, allowing you to execute Python commands and explore the new features of this version.
Opening the Python 3.11 Shell
To initiate the Python 3.11 shell, execute this command in your terminal:
python3.11Upon running this command, the interactive shell for Python 3.11 will open. This shell is an environment where you can directly type and execute Python commands. It’s an ideal space for quick testing of code snippets or experimenting with Python 3.11’s new capabilities.
Exiting the Python 3.11 Shell
To conclude your session in the Python 3.11 shell, you can gracefully exit by typing the following command:
exit()Alternatively, for a quicker exit, the keyboard shortcut Ctrl+D can be used. This shortcut is a common way to send an EOF (End of File) signal in Linux terminals, effectively closing the current shell session.
Install Pip on Linux Mint 21 or 20
Installing PIP (Python Package Installer) is a crucial step for enhancing your Python 3.11 experience on Linux Mint. PIP is a package management system used to install and manage software packages written in Python. This section will guide you through the installation and upgrading of PIP for Python 3.11 on Linux Mint.
Install Python PIP on Linux Mint
Generally, PIP is automatically installed with Python 3.11, especially if Python was installed using the Python PPA repository. If PIP is not installed, you can install it manually with the following command:
sudo apt install python3-pipThis command uses the APT package manager to install PIP directly from the Linux Mint repository.
Download and Install PIP Manually on Linux Mint
If the standard installation method does not work, or if you prefer manual installation, PIP can be installed by downloading the get-pip.py script. Use the wget command to download the script:
wget https://bootstrap.pypa.io/get-pip.pyAfter downloading, execute the script to install PIP:
python3 get-pip.pyThis method fetches the latest version of PIP directly from the Python Packaging Authority (PyPA).
Upgrade PIP to the Latest Version on Linux Mint
Once PIP is installed, it’s a good practice to upgrade it to the latest version. This ensures access to the latest features and security updates. Upgrade PIP using the following command:
python3 -m pip install --upgrade pipThis command instructs Python to use PIP to upgrade itself to the latest version.
Verifying the Installed Version of PIP on Linux Mint
To confirm that PIP is installed and check its version, run:
pip --versionThis command displays the current version of PIP installed on your system, verifying that PIP is ready for use.
Managing Python 3.11 on Linux Mint 21 or 20
Effectively managing Python 3.11 on your Linux Mint system is crucial for maintaining a stable and up-to-date development environment. This section provides insights into updating Python, removing it, and managing the nightly and stable PPA repositories.
Update Python 3.11 on Linux Mint
Keeping Python 3.11 up-to-date ensures you have the latest features and security patches. To update Python 3.11, follow these steps:
First, refresh your APT package list to fetch the latest package information:
sudo apt updateThis step informs the system about the latest available versions of all installed packages, including Python 3.11.
If an update for Python 3.11 is available, it will be listed along with other package upgrades.
Proceed with the upgrade using this command:
sudo apt upgrade- This command will update all your system’s packages to their latest versions, including Python 3.11.
Remove Python 3.11 From Linux Mint
There may be scenarios where you need to remove Python 3.11 from your system. To do this, execute the following command:
sudo apt remove python3.11This command uses APT to uninstall Python 3.11. It’s a straightforward way to remove Python if you no longer require it or need to reinstall it.
Managing Nightly and Stable PPA Repositories
For users who have added the nightly PPA and wish to switch back to the stable PPA, or for those who want to remove the nightly PPA, follow these instructions:
Remove the nightly PPA using the following terminal command:
sudo add-apt-repository --remove ppa:deadsnakes/nightly -yTo switch back to the stable version of the deadsnakes/ppa repository, use the following command:
sudo add-apt-repository ppa:deadsnakes/ppa -ySwitching Default Python Versions on Linux Mint 21 or 20
When managing multiple Python versions on a Linux Mint system, setting a specific version as the default is often necessary. This section will guide you through the process of switching between different Python versions, ensuring the desired version is set as the system’s default.
Adding Symbolic Links for Python Versions
Symbolic links act as pointers, directing the ‘python’ command to the appropriate Python version. To set these up for each version, execute the following commands, adjusting them based on the Python versions installed on your system:
sudo update-alternatives --install /usr/bin/python python /usr/bin/python2.7 1
sudo update-alternatives --install /usr/bin/python python /usr/bin/python3.7 2
sudo update-alternatives --install /usr/bin/python python /usr/bin/python3.8 3
sudo update-alternatives --install /usr/bin/python python /usr/bin/python3.9 4
sudo update-alternatives --install /usr/bin/python python /usr/bin/python3.10 5
sudo update-alternatives --install /usr/bin/python python /usr/bin/python3.11 6
sudo update-alternatives --install /usr/bin/python python /usr/bin/python3.12 7
The number at the end of each command signifies the priority of that version, with a higher number indicating a higher priority. For instance, Python 3.12 is given the highest priority (7) in this example, while Python 2.7 has the lowest (1).
Switching to a Different Python Version on Linux Mint
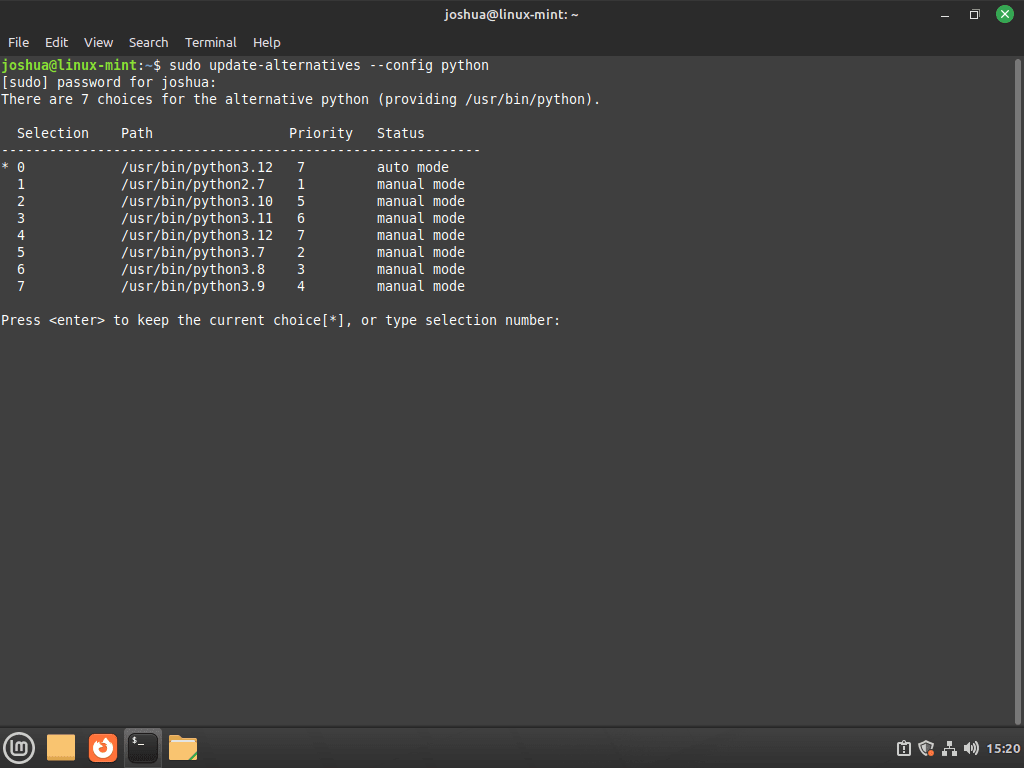
To select a different default Python version, use this command and choose the appropriate selection number:
sudo update-alternatives --config python
For instance, to make Python 3.11 the default, enter the number corresponding to it.
The command’s output will confirm the change:
update-alternatives: using /usr/bin/python3.11 to provide /usr/bin/python (python) in manual modeThis message verifies that Python 3.11 is now the default version. These steps enable you to seamlessly alternate between various Python versions on your Linux Mint system.
Conclusion
Throughout this guide, we’ve covered the installation and management of Python 3.11 on Linux Mint 21 or 20. By following the provided steps, you’re now equipped potential of Python 3.11 on your system. As you delve into Python’s extensive features, remember to tailor the environment to your needs and explore the multitude of resources at your disposal for mastering Python.

