
APT gives you more control than a graphical app store when you need to remove packages on Ubuntu without guessing what happens to dependencies, cached downloads, or leftover system configuration files. The same workflow applies on Ubuntu 26.04, 24.04, and 22.04, whether you are cleaning up a desktop install, a server, or a minimal image.
That matters when you need to remove one package cleanly, remove a package and its dependencies, clear old APT downloads, or figure out why apt uninstall does not work on Ubuntu. In practice, that means knowing when to use apt remove, apt purge, apt remove --autoremove, apt autoremove, apt autoclean, and apt clean, plus how to preview removals and check reverse dependencies with live-validated output.
Ubuntu 26.04 uses the newer APT 3 summary format in the example outputs below. Ubuntu 24.04 and 22.04 still show the older
The following packages will be REMOVEDwording, but the command behavior is the same across all supported Ubuntu LTS releases. If you need to confirm which release you are running first, check Ubuntu version.
Remove Packages on Ubuntu with APT
Use the command that matches the cleanup level you want. apt remove keeps package-managed conffiles in place, apt purge removes them, and apt remove --autoremove removes the package plus dependencies that nothing else needs.
| Command | Removes the package | Removes system conffiles | Removes now-unused dependencies | Best use |
|---|---|---|---|---|
sudo apt remove package-name | Yes | No | No | Uninstall software but keep package-managed settings under /etc/ |
sudo apt purge package-name | Yes | Yes | No | Reset a package completely at the system level |
sudo apt remove --autoremove package-name | Yes | No | Yes | Remove a package and the dependencies it pulled in |
sudo apt autoremove | No | No | Yes | Clean up dependencies left behind from earlier removals |
- Use
apt removewhen you may reinstall the package later and want to keep package-managed system settings. - Use
apt purgewhen you want Ubuntu to remove the package and its conffiles from/etc/. - Use
apt remove --autoremovewhen you want one command to remove the package and anything it made unnecessary. - Use
apt autoremovelater when you have already removed packages and want APT to clean up the leftovers.
Ubuntu does not ship an apt uninstall subcommand. For package removal on Ubuntu, use apt remove for a standard uninstall and apt purge when you also want the package’s system conffiles removed.
Remove One Ubuntu Package with apt remove
The standard uninstall command removes the package itself but leaves any package-managed conffiles behind. The example below uses mc (Midnight Commander), which makes that difference easy to verify.
These commands use
sudobecause APT changes the system package database. If your account does not have admin access yet, add a new user to sudoers on Ubuntu or run the commands as root.
sudo apt remove -y mcExpected output on Ubuntu 26.04 looks like this:
WARNING: apt does not have a stable CLI interface. Use with caution in scripts.

REMOVING:
  mc

Summary:
  Upgrading: 0, Installing: 0, Removing: 1, Not Upgrading: 43
  Freed space: 1,653 kB

(Reading database... 190004 files and directories currently installed.)
Removing mc (3:4.8.33-1.1build1)...
On Ubuntu 24.04 and 22.04, the same command still works, but APT prints the older The following packages will be REMOVED format instead of the new REMOVING summary block.
Verify that the package is gone but its conffile is still present:
dpkg -l mc | tail -n 1
test -e /etc/mc/mc.menu && echo conffile-present || echo conffile-absent
After apt remove, you should see residual-config state plus the remaining conffile:
rc  mc             3:4.8.33-1.1build1 amd64        Midnight Commander - a powerful file manager
conffile-present
Purge Ubuntu Package Configuration Files with apt purge
Use apt purge when you want Ubuntu to remove package-managed conffiles as well as the package itself. This is the right choice when you want a clean reinstall or no longer need the package’s system-level configuration under /etc/.
sudo apt purge -y mcExpected output on Ubuntu 26.04:
WARNING: apt does not have a stable CLI interface. Use with caution in scripts.

  mailcap  mc-data
Use 'sudo apt autoremove' to remove them.

REMOVING:
  mc*

Summary:
  Upgrading: 0, Installing: 0, Removing: 1, Not Upgrading: 43
  Space needed: 0 B / 113 GB available

(Reading database... 189913 files and directories currently installed.)
Purging configuration files for mc (3:4.8.33-1.1build1)...
If you prefer the long form, sudo apt remove --purge mc is equivalent to sudo apt purge mc.
Run the same verification command again after the purge:
dpkg -l mc | tail -n 1
test -e /etc/mc/mc.menu && echo conffile-present || echo conffile-absent
After apt purge, the package record is gone and the conffile has been removed:
un  mc             <none>       <none>       (no description available)
conffile-absent
Remove Ubuntu Packages and Dependencies with apt remove –autoremove
When you want to remove a package and the dependencies it pulled in, use apt remove --autoremove. The example below uses nmap, which pulls in separate support packages that APT can remove in the same pass.
sudo apt remove --autoremove --dry-run nmapStart with a dry run so you can see the full removal set before anything changes:
WARNING: apt does not have a stable CLI interface. Use with caution in scripts.

Reading package lists...
Building dependency tree...
Reading state information...
Solving dependencies...
REMOVING:
  libblas3  liblinear4  nmap  nmap-common

Summary:
  Upgrading: 0, Installing: 0, Removing: 4, Not Upgrading: 43
Remv nmap [7.98+dfsg-1]
Remv liblinear4 [2.3.0+dfsg-5build2]
Remv libblas3 [3.12.1-7ubuntu1]
Remv nmap-common [7.98+dfsg-1]
The exact dependency list varies by package, but the pattern stays the same. If the dry run looks correct, repeat the command without --dry-run to perform the removal.
Preview Ubuntu Package Removal Before You Commit
Previewing a removal matters most when the target package is shared, transitional, or part of a larger toolchain. These checks tell you what APT plans to remove, what depends on the package, and which system files the package owns before you commit to the change.
Check Reverse Dependencies Before Removing an Ubuntu Package
apt-cache rdepends lists packages that depend on the target package or on the implementation it pulls in. This is a good check before you remove something that might be part of a wider Ubuntu meta-package.
apt-cache rdepends telnetExpected output begins like this:
telnet
Reverse Depends:
  ubuntu-standard
    inetutils-telnet
 |zssh
    inetutils-telnet
 |tucnak
    inetutils-telnet
 |ser2net
    inetutils-telnet
 |procserv
    inetutils-telnet
If a shared package appears in several dependency chains, use a dry run before you remove it so you can see the exact impact on your machine.
List Ubuntu Package Configuration Files Before You Purge
If you want to know exactly which package-owned system files will disappear during a purge, list them first. This is especially useful before you remove packages that write into /etc/.
dpkg -L mc | grep '^/etc/'The grep filter keeps the output focused on system configuration files. If you want to adapt the pattern, you can use the grep command in Linux to narrow longer package lists.
/etc/mc
/etc/mc/edit.indent.rc
/etc/mc/filehighlight.ini
/etc/mc/mc.default.keymap
/etc/mc/mc.emacs.keymap
/etc/mc/mc.ext.ini
/etc/mc/mc.menu
/etc/mc/mc.vim.keymap
/etc/mc/mcedit.menu
/etc/mc/sfs.ini
/etc/mc/mc.keymap
Clean Up Unused Ubuntu Dependencies and APT Cache
apt autoremove, apt autoclean, and apt clean solve different cleanup jobs. apt autoremove deletes now-unused packages, apt autoclean removes obsolete downloaded .deb files, and apt clean clears the entire package cache.
Remove Orphaned Dependencies with apt autoremove
Run apt autoremove after standard removals when APT tells you some automatically installed packages are no longer required. This keeps your package set lean without touching packages you installed manually.
sudo apt autoremoveAPT lists the packages it plans to remove before it changes anything:
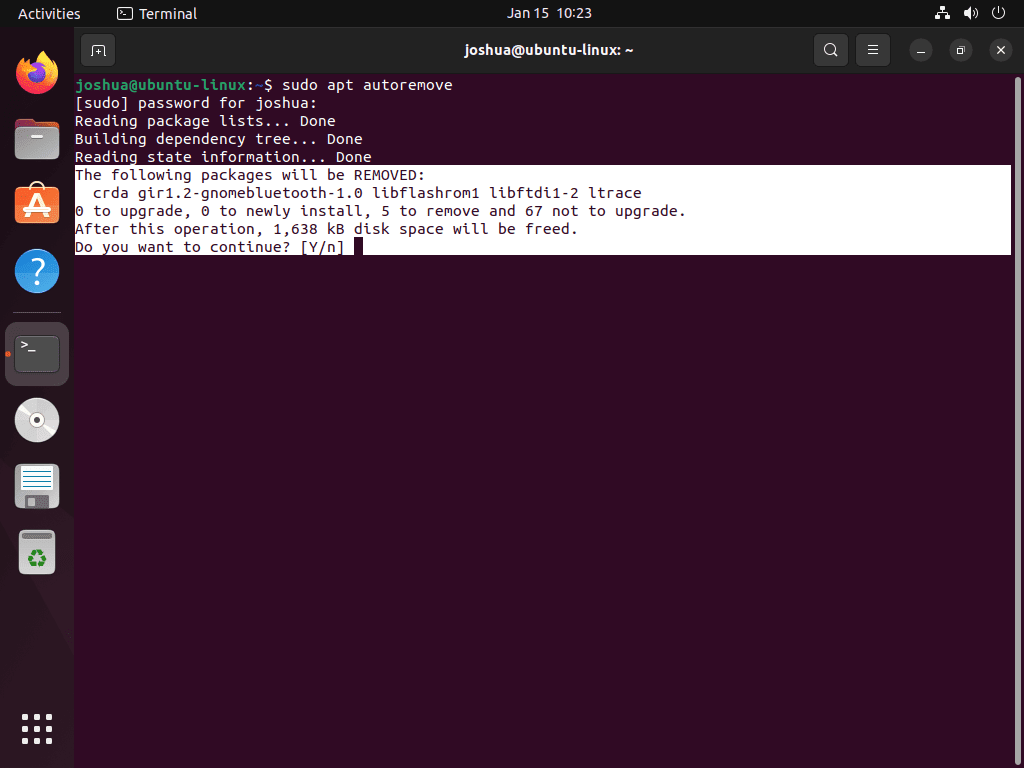
apt autoremove removing leftover orphan packages on Ubuntu LinuxWhen the packages came from a third-party repository, remove a PPA from Ubuntu after the package cleanup so APT stops offering packages from that source.
Remove Obsolete Package Files with apt autoclean
Use apt autoclean when you want Ubuntu to delete only cached .deb files that are no longer downloadable from your configured repositories. It is the safer cache cleanup option when you still want to keep current package downloads around.
sudo apt autocleanOn a clean cache or a system with no obsolete packages, the command is quiet apart from the standard APT status lines:
Reading package lists...
Building dependency tree...
Reading state information...
Clear the Full APT Cache with apt clean
Use apt clean when disk space matters more than keeping cached downloads. This removes all downloaded .deb files from /var/cache/apt/archives/ and forces Ubuntu to fetch them again the next time you install or reinstall a package.
sudo apt clean
ls -la /var/cache/apt/archives/
After a full cache cleanup, only the lock file and the partial directory should remain:
total 48
drwxr-xr-x 3 root root 36864 Mar 21 09:18 .
drwxr-xr-x 4 root root  4096 Mar 21 09:18 ..
-rw-r----- 1 root root     0 Jan 29 13:37 lock
drwx------ 2 _apt root  4096 Mar 21 09:18 partial
Troubleshoot Package Removal on Ubuntu
Most package-removal problems come down to one of four causes: the package is already gone, the package name is wrong, the package is too important to remove casually, or the package database needs repair. These checks help you separate those cases quickly.
Restore a Removed Ubuntu Package
If you removed the wrong package, reinstall it with the normal APT install command. This restores the package itself immediately, but it does not bring back custom system conffiles that were already purged.
sudo apt install -y mc
dpkg -l mc | tail -n 1
Verify that the package is installed again:
ii mc 3:4.8.33-1.1build1 amd64 Midnight Commander - a powerful file manager
Fix Unable to Locate Package Errors on Ubuntu
If Ubuntu responds with E: Unable to locate package package-name, the name is wrong, the package lists are stale, or you are using the command name instead of the actual package name. Start by checking the installed list with a keyword rather than the full package name.
apt list --installed 2>/dev/null | grep -i '^mc/'
sudo apt update
A valid match shows the exact package name before the slash, and apt update refreshes the package lists if they are stale:
mc/resolute,now 3:4.8.33-1.1build1 amd64 [installed]
Hit:1 http://au.archive.ubuntu.com/ubuntu resolute InRelease
Hit:2 http://security.ubuntu.com/ubuntu resolute-security InRelease
Reading package lists...
Building dependency tree...
Reading state information...
Check Essential Status Before Removing Core Ubuntu Packages
APT blocks many essential packages, but you should still check before you experiment with core components. dpkg is a good example of a package that Ubuntu marks as essential.
apt-cache show dpkg | grep -i '^Essential:'Expected output:
Essential: yes
A blank result here does not automatically make a package safe to remove. Packages such as
sudo, desktop meta-packages, and kernel packages can still be disruptive even when they are not marked withEssential: yes.
Repair Broken Dependencies After Package Removal on Ubuntu
When a removal leaves APT in a broken state, start with a diagnostic check before you repair anything. dpkg --audit reports half-installed or half-configured packages, and no output means the package database is currently clean.
dpkg --auditExpected output on a healthy system:
(No output means no issues were detected.)
If dpkg --audit reports problems, repair the dependency graph with the standard fix command:
sudo apt install -fAfter the repair completes, rerun dpkg --audit. If you still see no output, the package database is back in a consistent state.
Ubuntu Package Removal FAQ
No. Ubuntu uses apt remove for a standard uninstall and apt purge when you also want package-managed system conffiles removed. If you run apt uninstall, APT returns Invalid operation uninstall.
apt remove uninstalls the package but keeps package-managed conffiles, which is why dpkg -l can show an rc state afterward. apt purge removes those conffiles as well, which is why the same package drops to un state after the purge completes.
Use sudo apt remove --autoremove package-name when you want one command to remove the package and dependencies that are no longer required. If you already removed the package earlier, run sudo apt autoremove afterward to clean up the leftover dependency packages.
apt autoremove removes packages that were installed automatically and are no longer required, while apt autoclean only removes obsolete cached .deb files from /var/cache/apt/archives/. One changes the installed package set, and the other only trims the download cache.
Conclusion
Package removal on Ubuntu is more predictable now, whether you need a quick uninstall, a full purge, or a cache cleanup. If the package came from a third-party source, remove a PPA from Ubuntu after the package cleanup, then update packages via Ubuntu command line so the remaining system stays current. If you prefer a visual workflow, install Synaptic Package Manager on Ubuntu.

Formatting tips for your comment
You can use basic HTML to format your comment. Useful tags currently allowed in published comments:
<code>command</code>command<strong>bold</strong><em>italic</em><blockquote>quote</blockquote>