
Older laptops, small virtual machines, and local console systems often need a desktop that feels responsive without the weight of GNOME or KDE Plasma. To install Xfce on Debian, use Debian’s own APT packages: task-xfce-desktop for a complete Debian desktop task, or xfce4 with xfce4-goodies for a smaller add-on session.
Debian 13 (Trixie), Debian 12 (Bookworm), and Debian 11 (Bullseye) all provide Xfce packages from the main archive. For a fresh operating-system install or ISO download, use official Debian installation media and select Xfce during Debian Installer’s software-selection step. Use APT after Debian is already installed and you want to add Xfce to the current system.
Install Xfce on Debian
Choose an Xfce Package Set
Choose the package set before installing Xfce. All three paths update through Debian’s normal APT workflow, but they install different desktop surfaces and cleanup differently later.
| Package Set | APT Package | What It Installs | Best For |
|---|---|---|---|
| Full Debian desktop task | task-xfce-desktop (package search) | Xfce, LightDM, Debian desktop task packages, office tools, printer/scanner helpers, Synaptic, accessibility tools, and common desktop applications | Fresh desktops, laptops, and VMs where Xfce should feel ready after login |
| Balanced Xfce add-on | xfce4 + xfce4-goodies | Core Xfce session, panel, window manager, Thunar, settings tools, terminal, applets, and common plugins | Existing Debian desktops where you want Xfce beside GNOME, KDE Plasma, Cinnamon, or another session |
| Minimal Xfce desktop | xfce4 (package search) | Core Xfce components without the broader task package or goodies plugin set | Custom workstations, small VMs, or systems where you plan to add applications manually |
Use task-xfce-desktop when you want the Debian Installer style Xfce desktop with a broad application set. Use xfce4 with xfce4-goodies when the system already has a login manager and desktop applications. Use xfce4 alone only when you deliberately want a lean base.
Check Xfce Package Availability
Check the Debian archive candidates when you need to confirm the package source or release branch before installing:
apt-cache policy task-xfce-desktop xfce4 xfce4-goodies xfce4-sessionDebian 13 provides the Xfce 4.20 package branch, Debian 12 provides Xfce 4.18, and Debian 11 provides Xfce 4.16. The xfce4-goodies package is available on all three releases, but individual plugin packages can differ; for example, Debian 13 provides xfce4-docklike-plugin and xfce4-notes-plugin, while Debian 12 and Debian 11 do not expose those exact package names from the default archive.
Update Debian Before Installing Xfce
Refresh APT metadata and apply pending upgrades before adding a desktop environment. A current base system reduces avoidable dependency conflicts during a large desktop transaction.
sudo apt update
sudo apt upgrade
These commands use sudo for package-management tasks that require root privileges. If the first package command fails with a sudo permission error, add the user to sudoers on Debian before continuing.
Install the Full Debian Xfce Desktop Task
The full task package mirrors Debian’s desktop task selection more closely than the smaller metapackages. It depends on task-desktop, xfce4, and lightdm, then recommends the common desktop applications and helpers most users expect on a ready workstation.
sudo apt install task-xfce-desktopAPT shows the package list and disk-space impact before confirmation. Review the transaction before accepting it, especially on systems that already have another desktop environment installed.
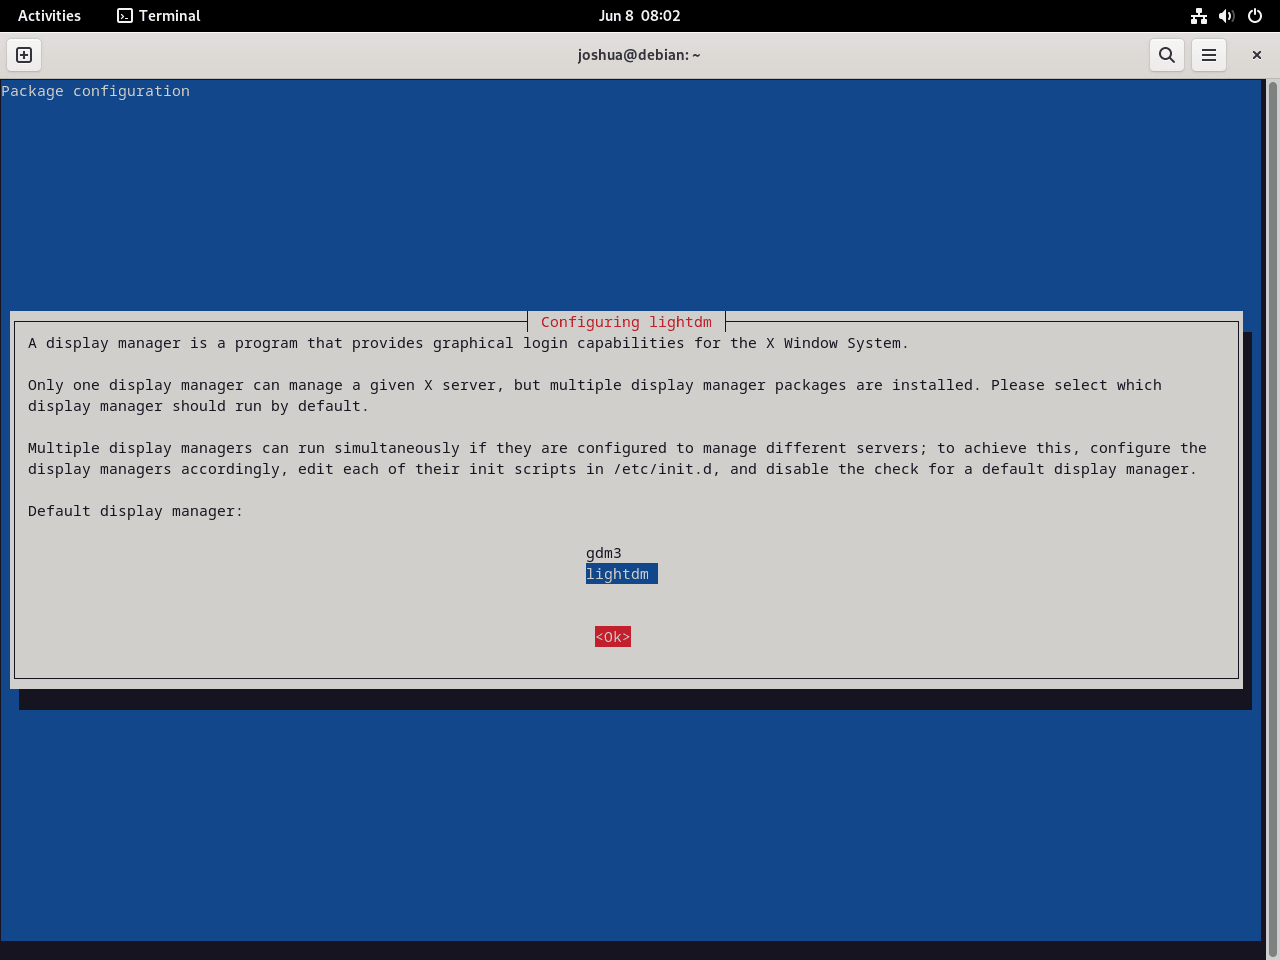
If Debian asks which display manager should run by default, choose LightDM for the normal Xfce login path. Use Tab to move to <Ok>, then press Enter.
Install a Smaller Xfce Package Set
Use xfce4 with xfce4-goodies when you want the Xfce session plus common panel plugins and desktop helpers without the broader Debian task package:
sudo apt install xfce4 xfce4-goodiesUse only the core xfce4 metapackage when you want the smallest normal Xfce base and plan to add plugins, applications, and helpers yourself:
sudo apt install xfce4If the system has no graphical login manager, the full task is the cleaner starting point because it installs LightDM. The smaller metapackages can still work, but they may boot to a text login until a display manager is installed and enabled.
Install only one package set at first unless you deliberately want to expand a smaller Xfce install later. Adding
task-xfce-desktopafter a smaller install is possible, but it makes later removal less clear.
Verify Xfce Packages on Debian
Confirm that Debian installed the Xfce session file and core session packages:
ls /usr/share/xsessions/xfce.desktop
dpkg-query -W -f='${db:Status-Abbrev} ${binary:Package} ${Version}\n' xfce4-session xfdesktop4 xfwm4
A successful check prints the session file path and ii rows for xfce4-session, xfdesktop4, and xfwm4. Reboot after the package transaction finishes so the display manager starts from a clean graphical login state.
sudo rebootLog In to Xfce on Debian
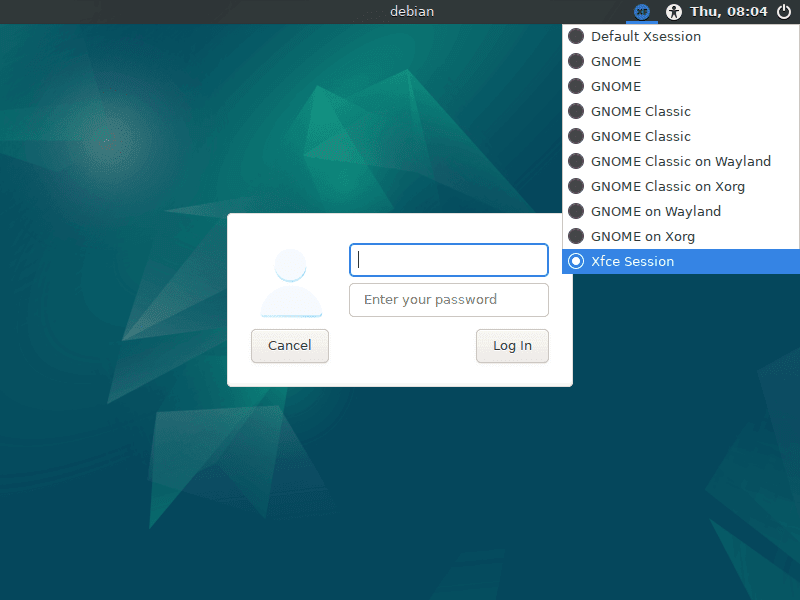
At the graphical login screen, select your user first, then open the session selector before entering the password. LightDM usually shows a session menu near the top panel or login field, while GDM3 usually uses a gear icon near the password field. Choose Xfce Session, then sign in.
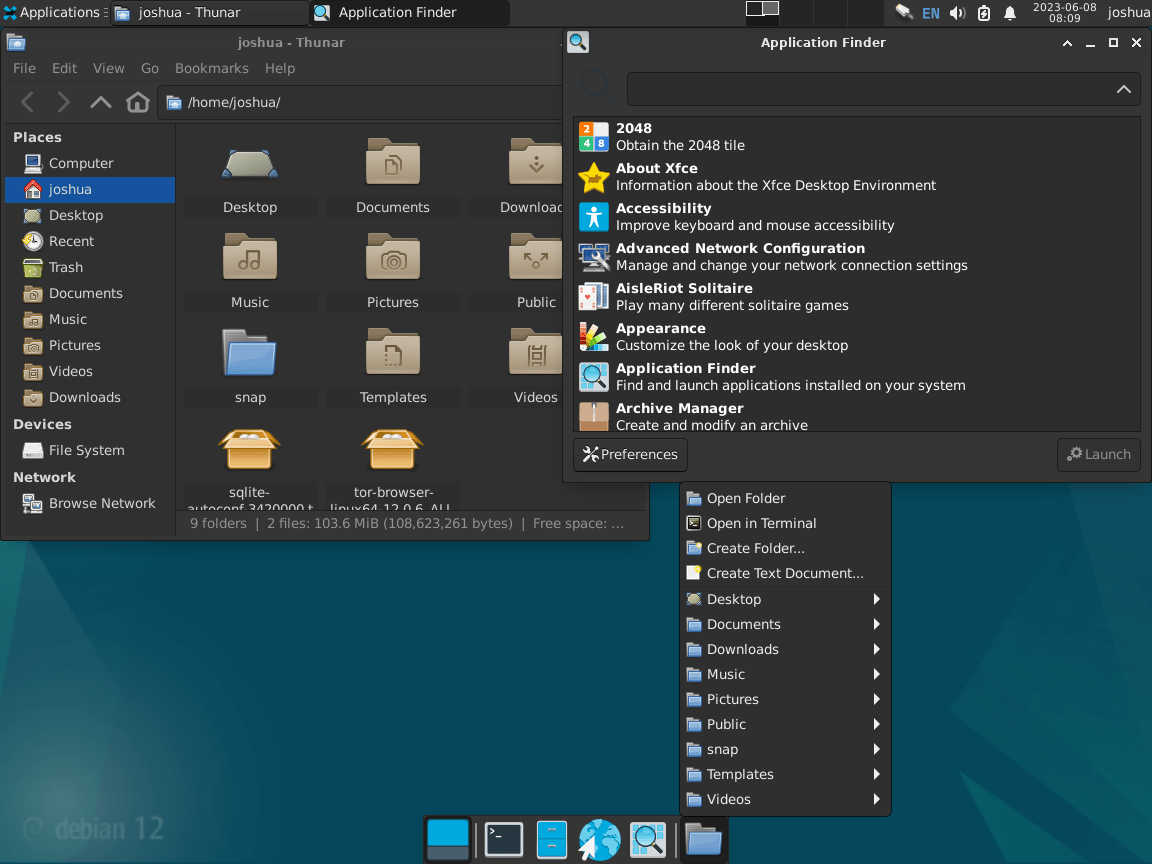
After login, Xfce opens with its panel, application menu, Thunar file manager, settings tools, and desktop workspace available from the menu.
Open a terminal inside the Xfce session and check the running session branch when you need version proof from the desktop itself:
xfce4-session --versionThe branch should match the Debian release family: Xfce 4.20 on Debian 13, Xfce 4.18 on Debian 12, and Xfce 4.16 on Debian 11.
Manage Xfce on Debian
Check the Active Display Manager
Check which display manager Debian currently starts before changing it:
cat /etc/X11/default-display-managertask-xfce-desktop depends on LightDM, and LightDM is the normal login manager for a Debian Xfce task install. Existing GNOME systems can keep GDM3 and still launch the Xfce session, so switch display managers only when you want to change the login screen for every desktop on the system.
Reopen Debian’s display-manager selector when both LightDM and another display manager are installed:
sudo dpkg-reconfigure lightdmUse the matching package instead when you want to return to GDM3 for a GNOME-first system:
sudo dpkg-reconfigure gdm3Update Xfce Packages
Xfce packages installed from Debian’s repositories update with normal APT upgrades. Use the regular system update path rather than downloading Xfce manually:
sudo apt update
sudo apt upgrade
APT upgrades the installed Xfce session packages, goodies plugins, LightDM packages, and shared desktop libraries when Debian publishes updates for your release.
Remove Xfce from Debian
Remove Xfce in phases: keep or restore another desktop first, remove the Xfce metapackages, review APT’s dependency cleanup, and handle per-user settings only when you no longer need that account’s Xfce layout.
Do not remove the only graphical desktop from a remote system unless you have console access or another confirmed remote-management path. Removing Xfce can also remove LightDM if no other desktop needs it.
Restore GNOME Before Removing Xfce
If the system should return to GNOME, reinstall the GNOME task and GDM3 before removing the Xfce packages:
sudo apt update
sudo apt install --reinstall gnome gdm3 task-gnome-desktop
sudo dpkg-reconfigure gdm3
Remove Xfce Packages
Remove the Xfce metapackages that match the package set you installed. APT ignores package names that are available but not installed.
sudo apt purge task-xfce-desktop xfce4 xfce4-goodiesReview the proposed dependency cleanup before confirming it. Cancel if APT proposes removing another desktop environment, display manager, or application stack you still need.
sudo apt autoremove --purgeConfirm whether the main Xfce package records remain installed:
dpkg-query -W -f='${db:Status-Abbrev} ${binary:Package}\n' task-xfce-desktop xfce4 xfce4-goodies xfce4-session xfdesktop4 xfwm4 2>/dev/null | grep '^ii' || trueNo output means the checked Xfce packages are not installed. If an installed row appears, rerun the matching purge command and review APT’s proposed removals.
Back Up Xfce User Settings
Package removal does not delete personal Xfce settings. Print the common per-user paths before changing anything:
for path in "$HOME/.config/xfce4" "$HOME/.cache/xfce4"; do
    [ -e "$path" ] && printf '%s\n' "$path"
done
These backup commands rename Xfce panel layouts, session preferences, and cache directories for the current account. Keep the backup directories if you may want to restore the same desktop layout later.
timestamp=$(date +%Y%m%d%H%M%S)
[ -d "$HOME/.config/xfce4" ] && mv "$HOME/.config/xfce4" "$HOME/.config/xfce4.backup.$timestamp"
[ -d "$HOME/.cache/xfce4" ] && mv "$HOME/.cache/xfce4" "$HOME/.cache/xfce4.backup.$timestamp"
Reboot after package and display-manager changes so Debian starts the remaining desktop from a clean state.
sudo rebootTroubleshoot Xfce on Debian
Most Xfce login problems come from missing session packages, a display manager that is not running, graphics issues, or user-owned configuration files. Start with the diagnostic for the visible symptom, apply the matching fix, then retest the same layer.
Xfce Session Is Missing from the Login Screen
A missing session entry usually means xfce4-session is absent or its desktop file was not installed. Check the package state and session file:
dpkg-query -W -f='${db:Status-Abbrev} ${binary:Package}\n' xfce4-session 2>/dev/null
ls /usr/share/xsessions/xfce.desktop
Reinstall the session package when either check fails:
sudo apt install --reinstall xfce4-sessionRetest the package state and session file, then log out completely and check the login screen again.
Xfce Fails to Start After Login
The message failed to start session, a black screen, or an immediate return to the login screen can mean one of the core Xfce packages is missing or only partially configured. Check the session, panel, desktop, and window-manager packages together:
dpkg-query -W -f='${db:Status-Abbrev} ${binary:Package}\n' xfce4-session xfce4-panel xfdesktop4 xfwm4 2>/dev/null || trueEach listed row should begin with ii. Missing rows or rows with another status mean the core set needs repair:
sudo apt install --reinstall xfce4-session xfce4-panel xfdesktop4 xfwm4If the same failure returns, inspect recent Xfce, Xsession, display-manager, and X.org messages before changing more packages. Keep the excerpt short enough to read:
sudo journalctl -b --no-pager | grep -Ei 'xfce4|xfwm4|xfdesktop|xsession|lightdm|gdm3|xorg' | tail -n 30Graphics-specific failures on systems with proprietary NVIDIA hardware may need the packaged NVIDIA driver stack rather than repeated desktop reinstalls. Enable the required Debian repository components if needed, then follow installing NVIDIA drivers on Debian.
Debian Boots to a Text Login
A server or minimal image can install Xfce packages without switching the default boot target. Check the current target and LightDM service state:
systemctl get-default
systemctl status lightdm --no-pager
Install or re-enable LightDM when the system should boot to a graphical Xfce login:
sudo apt install lightdm
sudo systemctl set-default graphical.target
sudo systemctl enable lightdm
sudo reboot
XRDP Shows a Blue Screen with Xfce
This applies only to systems where you already use XRDP for remote desktop access. Installing Xfce locally does not create an RDP service by itself.
Check whether both XRDP and its X.org backend are installed:
dpkg-query -W -f='${db:Status-Abbrev} ${binary:Package}\n' xrdp xorgxrdp 2>/dev/null | grep '^ii' || trueInstall or repair both XRDP packages and restart XRDP when the check does not show both packages with an ii status:
sudo apt install xrdp xorgxrdp
sudo systemctl restart xrdp
Confirm that the service is active before reconnecting:
systemctl is-active xrdpXfce Documentation and Desktop Next Steps
Use the upstream Xfce resources for desktop-specific settings, panel behavior, plugins, and project news:
- Xfce official website for project information and release announcements.
- Xfce documentation for desktop, panel, session, and application references.
- Xfce forum for community troubleshooting and usage questions.
For desktop application delivery outside the Debian archive, configure Flatpak on Debian after Xfce is working.
Related Debian Desktop Guides
Other Debian desktop environments may fit better if you want a different toolkit, layout, or application set:
- Install LXQt on Debian for an even lighter Qt-based desktop.
- Install Cinnamon on Debian for a familiar panel-and-menu desktop layout.
- Install KDE Plasma on Debian when you want a more configurable Qt desktop with a larger feature set.
- Install Budgie on Debian for a modern desktop shell with a simpler settings surface.
Conclusion
Xfce is installed through Debian’s main archive, selected from the login screen, and updated with normal APT upgrades. Keep task-xfce-desktop for a ready desktop task, use the smaller xfce4 package set for a lean session, then add desktop applications through APT or Flatpak after the session is working.

That’s a very well put together webpage, and very easy to follow.
With many thanks.
Though I have used Xfce on Mint as (almost) my only Linux DE since saying goodbye to Mr. Gates’s and Mr. Jobs’s offerings, and have not had to know much at all about the backend, I have recently started distro-hopping, just for the sake of playing and learning, and this page is a must.
Thanks for the comment, Matthew, enjoy the Linux distro hopping. It is something we all do in our spare time 🙂