WordPress is a beacon of versatility and user-centric design in the dynamic landscape of content management systems. For those keen on setting up this renowned CMS on Debian systems, this guide is tailored to demonstrate how to Install WordPress with LEMP on Debian 12, 11, or 10, ensuring a seamless integration tailored to your web development needs.
Why WordPress Dominates the CMS Arena:
- User-Centric Design: WordPress’s intuitive interface caters to both tech-savvy users and beginners, simplifying the process of website creation and management.
- Boundless Customization: With an extensive repository of templates, plugins, and themes, WordPress empowers users to mold their websites to mirror their unique vision and brand identity.
- Vibrant Community: The heart of WordPress lies in its passionate community. This vast network of developers and enthusiasts drives the platform’s evolution and offers invaluable support to fellow users.
- Cost Efficiency: Being open-source, WordPress is free to use. Coupled with the flexibility to choose from many hosting providers, it emerges as a cost-effective solution for website development.
- Market Leadership: While CMSs like Drupal and Joomla have their merits, WordPress’s unmatched ease of use and adaptability have cemented its position as the preferred choice for a significant portion of the web.
As we delve deeper into this guide, you’ll gain insights into harnessing the full potential of WordPress on your Debian system, paving the way for a robust and dynamic web presence.
Install LEMP For WordPress on Debian 12, 11 or 10
Step 1: Update Debian Before Installing LEMP Stack
Before you install WordPress, update your Debian system to prevent potential conflicts. Open your terminal and run:
sudo apt update && sudo apt upgradeThis command updates available packages and upgrades your system.
Step 2: Install the Necessary Packages
Even if you have some essential packages for WordPress, double-check to ensure you didn’t miss any. Run the following command:
sudo apt install curl git wget unzip zipThis command installs or confirms the necessary packages for WordPress.
Step 3: Install Nginx – Part 1 of LEMP Installation
To set up a LEMP stack, you need to install Nginx. Run this command:
sudo apt install nginxAfter installing, check if Nginx is running:
systemctl status nginx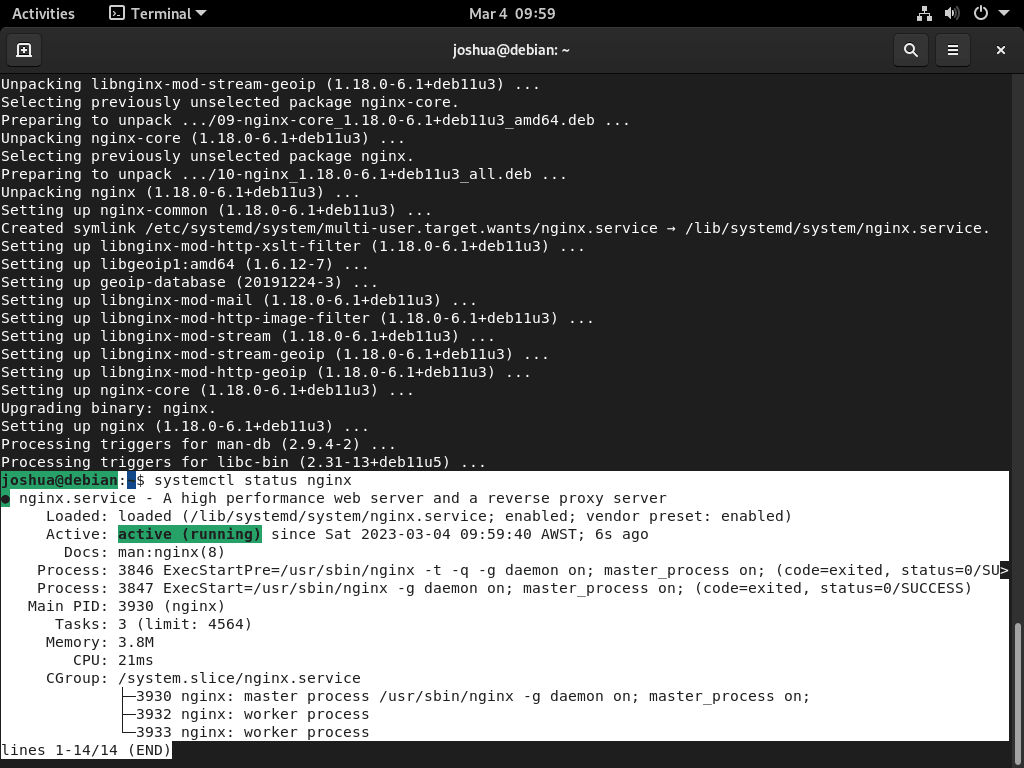
If the Nginx service isn’t active, you can set it in motion with the following command:
sudo systemctl enable nginx --nowThis command ensures Nginx starts with each server reboot, which is essential for a functional LEMP stack.
It’s best to use the latest Nginx mainline version to optimize your WordPress performance. You can follow the guide on installing Nginx Mainline on Debian Linux to install the latest version. This version offers additional features and improvements to enhance your website’s speed and overall performance.
Setting Up UFW Firewall for Nginx
For security and to permit external access to standard web ports, it’s crucial to configure the UFW firewall with your Nginx server. The good news is that Nginx offers profiles that simplify the UFW setup process.
Installing UFW:
If you haven’t installed UFW on your Debian system yet, execute the command below:
sudo apt install ufwActivating UFW:
Once installed, it’s time to activate UFW. By default, UFW blocks all incoming connections while allowing all outgoing ones. Activate the firewall with:
sudo ufw enableViewing Nginx Profiles:
To check the Nginx profiles available for UFW, run the following:
sudo ufw app listFrom the output, you’ll notice that:
- Nginx operates on port 80 (HTTP)
- Nginx Secure operates on port 443 (HTTPS)
- Nginx Full encompasses both ports
Configuring UFW for Nginx:
If you want to enable both HTTP and HTTPS access, opt for the Nginx Full profile:
sudo ufw allow 'Nginx Full'However, your requirements might differ:
For HTTPS-only access, choose the Nginx Secure profile:
sudo ufw allow 'Nginx Secure'HTTP-only access, go with the Nginx HTTP profile:
sudo ufw allow 'Nginx HTTP'You can make other UFW rules to secure your server and LEMP setup with WordPress, and you should ensure, if facing the public, that you invest time in locking your server down.
Step 4: Install MariaDB – Part 2 of LEMP Installation
MariaDB, known for its enhanced performance over MySQL, is the database component in the LEMP stack. If you want to install a specific version of MariaDB from MariaDB.org’s official repositories, refer to guides on installing MariaDB 11.x or 10.x on Debian. This can further optimize your WordPress performance.
To install MariaDB, run:
sudo apt install mariadb-server mariadb-clientAfter installation, check MariaDB’s status:
systemctl status mariadb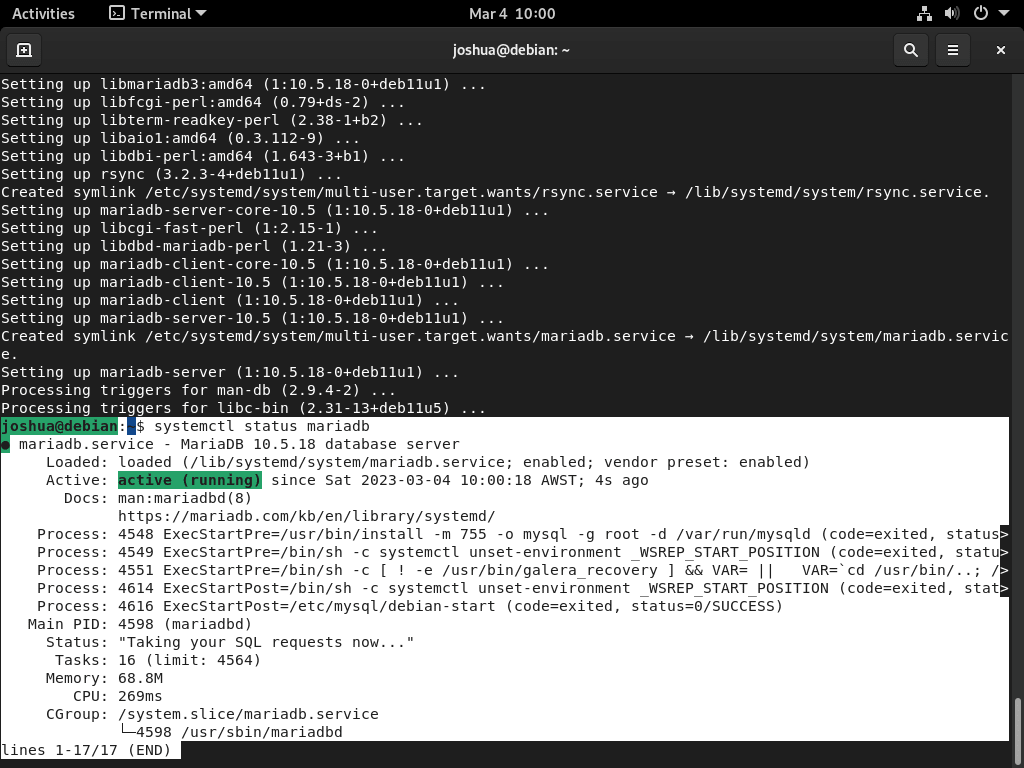
This command displays MariaDB’s service status and any potential errors.
If MariaDB isn’t running, start it with:
sudo systemctl enable mariadb --nowThis ensures MariaDB starts with each system reboot, which is vital for a stable LEMP stack and WordPress setup.
Secure MariaDB with Security Script
For data protection, you must secure your MariaDB installation. Fresh MariaDB installations might have lax security defaults, exposing them to threats. However, the mysql_secure_installation script can bolster your database’s defenses.
Run the security script:
sudo mysql_secure_installationThis script guides you through several security configurations:
- Setting the root password or opting for the
unix_socketfor unauthorized access prevention. - Deleting anonymous user accounts to limit database access to authorized users.
- Restricting remote login for root user accounts.
- Removing the test database to avoid unauthorized access and potential data leaks.
Answer each prompt attentively; these settings profoundly affect your database’s security. After completing the steps, your MariaDB setup should be secure and operational.
NOTE: RUNNING ALL PARTS OF THIS SCRIPT IS RECOMMENDED FOR ALL MariaDB
      SERVERS IN PRODUCTION USE!  PLEASE READ EACH STEP CAREFULLY!

In order to log into MariaDB to secure it, we'll need the current
password for the root user. If you've just installed MariaDB, and
haven't set the root password yet, you should just press enter here.

Enter current password for root (enter for none):
OK, successfully used password, moving on...

Setting the root password or using the unix_socket ensures that nobody
can log into the MariaDB root user without the proper authorisation.

You already have your root account protected, so you can safely answer 'n'.

Switch to unix_socket authentication [Y/n] Y <---- Type Y then press the ENTER KEY.
Enabled successfully!
Reloading privilege tables..
 ... Success!


You already have your root account protected, so you can safely answer 'n'.

Change the root password? [Y/n] Y <---- Type Y then press the ENTER KEY.
New password:
Re-enter new password:
Password updated successfully!
Reloading privilege tables..
 ... Success!


By default, a MariaDB installation has an anonymous user, allowing anyone
to log into MariaDB without having to have a user account created for
them.  This is intended only for testing, and to make the installation
go a bit smoother.  You should remove them before moving into a
production environment.

Remove anonymous users? [Y/n] Y <---- Type Y then press the ENTER KEY.
 ... Success!

Normally, root should only be allowed to connect from 'localhost'.  This
ensures that someone cannot guess at the root password from the network.

Disallow root login remotely? [Y/n] Y <---- Type Y then press the ENTER KEY.
 ... Success!

By default, MariaDB comes with a database named 'test' that anyone can
access.  This is also intended only for testing, and should be removed
before moving into a production environment.

Remove test database and access to it? [Y/n] Y <---- Type Y then press the ENTER KEY.
 - Dropping test database...
 ... Success!
 - Removing privileges on test database...
 ... Success!

Reloading the privilege tables will ensure that all changes made so far
will take effect immediately.

Reload privilege tables now? [Y/n] Y <---- Type Y then press the ENTER KEY.
 ... Success!

Cleaning up...

All done!  If you've completed all of the above steps, your MariaDB
installation should now be secure.

Thanks for using MariaDB!
These security measures ensure your MariaDB installation is secure and protected against threats.
Step 5: Install PHP, PHP-FPM – Part 3 of LEMP Installation
For a complete LEMP stack, you need to install PHP. PHP acts as the bridge between Nginx and MariaDB, facilitated by PHP-FPM and other essential modules for WordPress.
If you want a specific PHP version tailored to your needs, consult our guide on installing PHP on Debian. New users to Linux should for now use the default before installing custom versions.
Run the following command to install PHP, PHP-FPM, and the required modules:
sudo apt install php php-fpm php-mbstring php-bcmath php-xml php-mysql php-common php-gd php-cli php-curl php-zip php-imagick php-ldap php-intlAfter the installation, check the PHP service’s status, similar to what you did for MariaDB and Nginx. For this example, we’re using PHP 7.4:
systemctl status php7.4-fpmThe output should look like this:
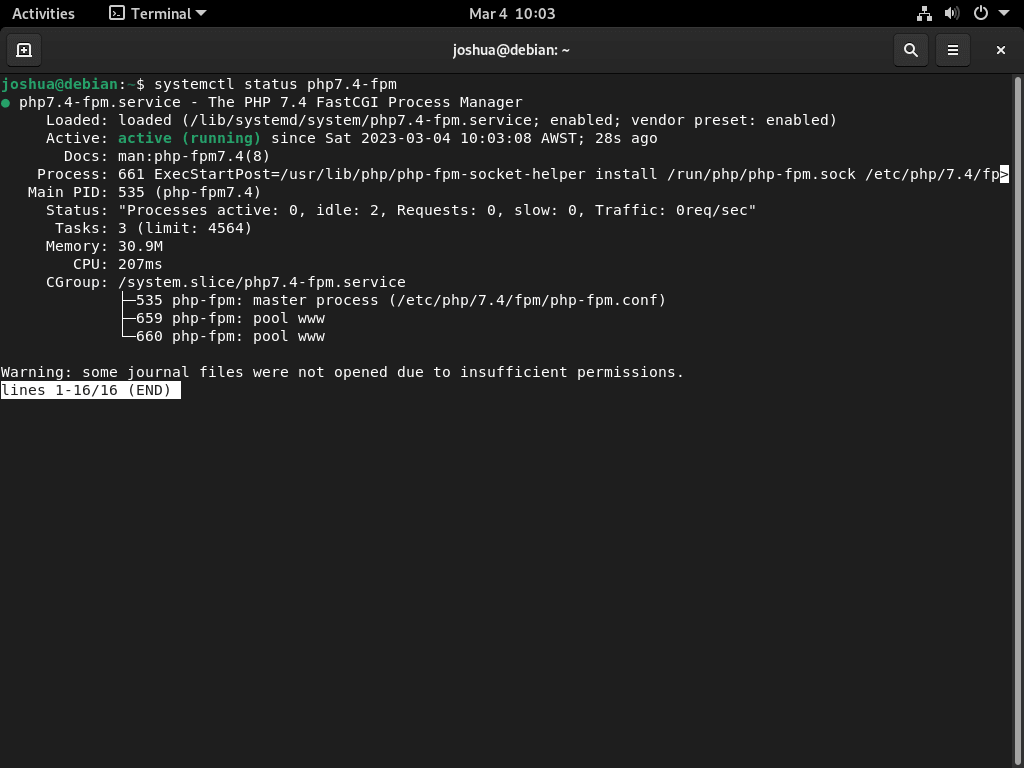
The PHP-FPM version varies with each stable Debian release. If you’re uncertain about your version, run
php -vto find out.
Pre-Installation Configurement For WordPress with LEMP on Debian 12, 11, or 10
Create WordPress Directory Structure
To install WordPress on your Debian LEMP stack, you can either download the latest version from the official WordPress.org download page or use the following command to download it directly:
wget https://wordpress.org/latest.zipOnce downloaded, unzip the archive to the /var/www/html directory using the following command:
sudo unzip latest.zip -d /var/www/html/Next, ensure that WordPress has the correct write permissions by setting the directory owner permissions to the web server user.
This can be done with the following command:
sudo chown -R www-data:www-data /var/www/html/wordpress/After setting the directory owner permission, you must set the correct permissions for the WordPress folders and files using the following commands:
For folders:
sudo find /var/www/html/wordpress -type d -exec chmod 755 {} \;And for files:
sudo find /var/www/html/wordpress -type f -exec chmod 644 {} \;Setting the correct folder and file permissions ensures your WordPress installation is secure and functions correctly.
Create a Database for WordPress
To run WordPress on your Debian LEMP stack, you must create a database using MariaDB. Access the MariaDB shell as root using the following command:
sudo mariadb -u rootOnce in the MariaDB shell, create a new database using the following command:
CREATE DATABASE WORDPRESSDB;Next, create a new user account for WordPress with the following command:
CREATE USER 'WPUSER'@localhost IDENTIFIED BY 'PASSWORD';Replace “WPUSER” and “PASSWORD” with your desired username and password.
Finally, assign the newly created user account access to the WordPress website database only using the following command:
GRANT ALL PRIVILEGES ON WORDPRESSDB.* TO WPUSER@localhost IDENTIFIED BY 'PASSWORD';After creating the user account, flush the privileges to ensure the new changes take effect with the following command:
FLUSH PRIVILEGES;Lastly, exit the MariaDB shell by typing:
EXIT;Set WordPress Configuration Files
Setting up the WordPress configuration files is an essential step in the installation process. This involves renaming the sample wp-config.php file and entering the necessary configuration details.
Navigate to the WordPress directory using the following command:
cd /var/www/html/wordpress/Copy the wp-config-sample.php to wp-config.php using the following command:
sudo cp wp-config-sample.php wp-config.phpUsing a text editor, bring up the newly copied wp-config.php file:
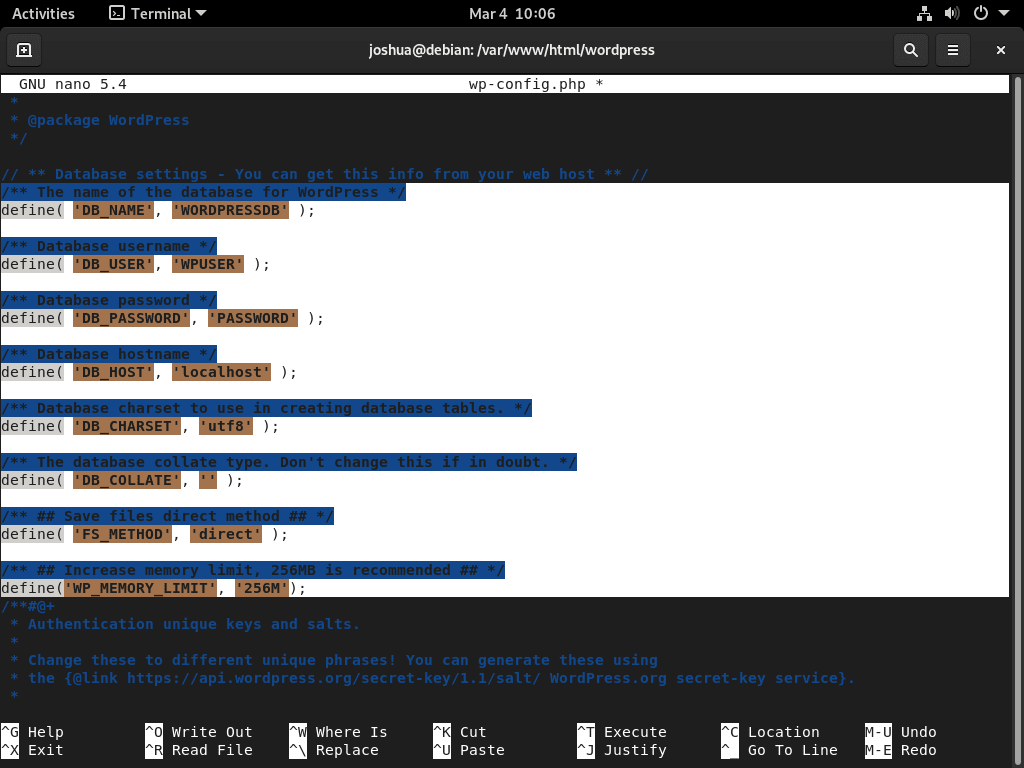
sudo nano wp-config.phpNext, enter the database name, user account with a password, and host IP address if necessary.
// ** MySQL settings - You can get this info from your web host ** //
/** The name of the database for WordPress */

define( 'DB_NAME', 'WORDPRESSDB' );                 <--------------- change this

/* MySQL database username */

define( 'DB_USER', 'WPUSER );                               <--------------- change this

/* MySQL database password */

define( 'DB_PASSWORD', 'PASSWORD' );             <--------------- change this

/* MySQL hostname, change the IP here if external DB set up */

define( 'DB_HOST', 'localhost' );

/* Database Charset to use in creating database tables. */

define( 'DB_CHARSET', 'utf8' );

/* The Database Collate type. Don't change this if in doubt. */

define( 'DB_COLLATE', '' );
In addition to these settings, you can also add the following to the wp-config.php file to improve WordPress management:
/** ## Save files direct method ## */
define( 'FS_METHOD', 'direct' );

/** ## Increase memory limit, 256MB is recommended ## */
define('WP_MEMORY_LIMIT', '256M');
Your dedicated server’s or VPS’s memory limit can vary depending on your system’s capacity. It is possible to increase or decrease the 256 MB memory limit in small increments, such as 128 MB, 256 MB, 512 MB, etc.
It is important to note that it is recommended to only make small adjustments to the memory limit for optimal performance and stability.
Implementing WordPress Security Salt Keys
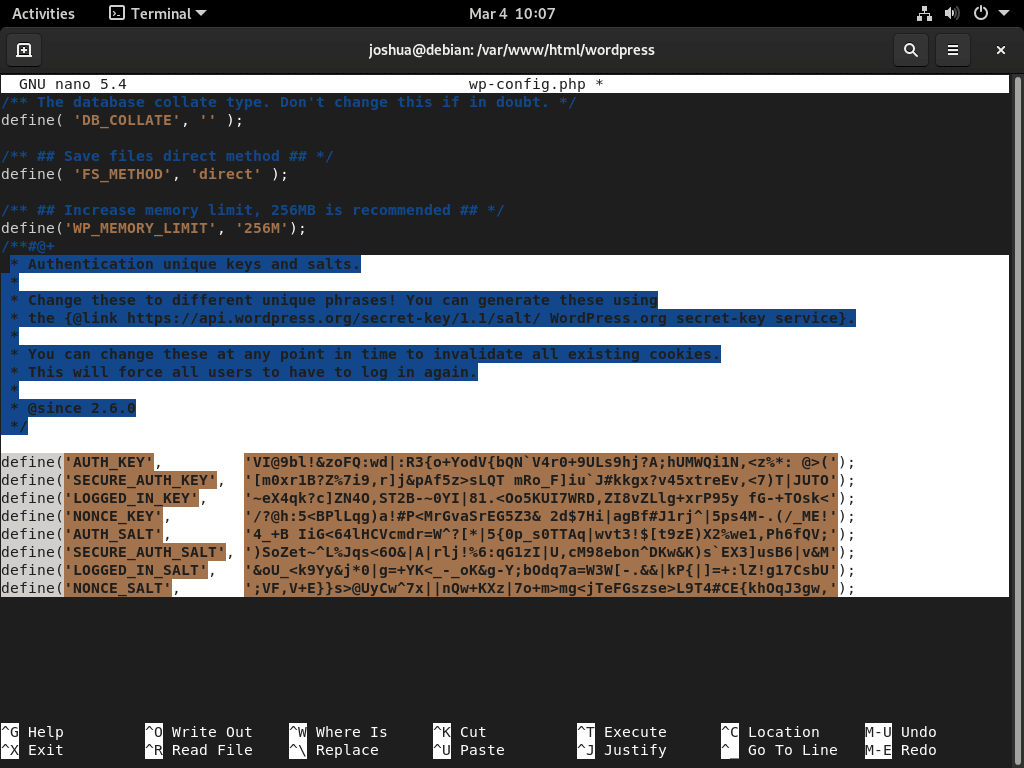
Enhancing your WordPress installation’s security is paramount, and one effective way to achieve this is by setting up WordPress security salt keys. These keys act as an augmented security shield, fortifying your WordPress site against potential threats and bolstering user authentication and data encryption.
Generating Security Salt Keys
To produce your security salt keys, navigate to the WordPress secret-key API: https://api.wordpress.org/secret-key/1.1/salt/. Once you’ve generated these keys, it’s vital to replace the placeholder lines in your wp-config.php file with your unique keys. This step fortifies user authentication and data encryption.
Do not use the example lines provided here or elsewhere as they are for illustrative purposes. Using pre-set salt keys can expose your site to vulnerabilities. Always generate distinct keys for every WordPress setup to ensure optimal security.
Integrating Security Salt Keys
To embed the freshly generated security salt keys into your wp-config.php file, open the file in a text editor:
sudo nano /var/www/html/wordpress/wp-config.phpNow, identify the lines in the wp-config.php file that correspond to the sample keys. Once located, replace each sample key in the wp-config.php file with your newly generated keys. After making the necessary replacements, ensure you save and close the file.
If you’re using the nano editor, save by pressing “CTRL+X” followed by “Y”.
Nginx Server Block Configuration for WordPress LEMP Setup
Setting up the Nginx server block correctly is vital for a seamless WordPress installation via the web UI. It’s essential to get the “try_files $uri $uri/ /index.php?$args;” directive right. Leaving out the “?$args” can interfere with WordPress’s REST API. To avoid potential hiccups during the installation, follow these instructions closely.
Start by creating a new server configuration file for your WordPress installation on Nginx. Replace “example.com” with your actual domain name in the following command:
sudo nano /etc/nginx/sites-available/example.com.confFor Nginx to work harmoniously with PHP, you must include the “location ~ .php$” in the server block configuration file. Here’s a sample configuration you can use as a reference. Ensure you adjust the root path and domain names to fit your setup:
server {
  listen 80;
  listen [::]:80;
  server_name www.example.com example.com;
  root /var/www/html/wordpress;
  index index.php index.html index.htm index.nginx-debian.html;

  location / {
    try_files $uri $uri/ /index.php?$args;
  }

  location ~* /wp-sitemap.*\.xml {
    try_files $uri $uri/ /index.php$is_args$args;
  }

  client_max_body_size 100M;

  location ~ \.php$ {
    fastcgi_pass unix:/run/php/php7.4-fpm.sock;
    fastcgi_param SCRIPT_FILENAME $document_root$fastcgi_script_name;
    include fastcgi_params;
    include snippets/fastcgi-php.conf;
    fastcgi_buffer_size 128k;
    fastcgi_buffers 4 128k;
    fastcgi_intercept_errors on;
  }

  gzip on;
  gzip_comp_level 6;
  gzip_min_length 1000;
  gzip_proxied any;
  gzip_disable "msie6";
  gzip_types application/atom+xml application/geo+json application/javascript application/x-javascript application/json application/ld+json application/manifest+json application/rdf+xml application/rss+xml application/xhtml+xml application/xml font/eot font/otf font/ttf image/svg+xml text/css text/javascript text/plain text/xml;

  location ~* \.(?:css(\.map)?|js(\.map)?|jpe?g|png|gif|ico|cur|heic|webp|tiff?|mp3|m4a|aac|ogg|midi?|wav|mp4|mov|webm|mpe?g|avi|ogv|flv|wmv)$ {
    expires 90d;
    access_log off;
  }

  location ~* \.(?:svgz?|ttf|ttc|otf|eot|woff2?)$ {
    add_header Access-Control-Allow-Origin "*";
    expires 90d;
    access_log off;
  }

  location ~ /\.ht {
    access_log off;
    log_not_found off;
    deny all;
  }
}
Remember, adjust the Nginx configuration file accordingly if you’ve installed a different PHP or PHP-FPM version or your Debian version defaults to another PHP version.
For example, for PHP-FPM 8.2, change the line fastcgi_pass unix:/run/php/php8.1-fpm.sock; to fastcgi_pass unix:/run/php/php8.2-fpm.sock;. Matching the version in the configuration with the one on your system for smooth functionality is essential.
Understanding the WordPress Nginx Server Block
For those new to setting up Nginx and WordPress, here’s a breakdown of the server block example:
Basic Server Settings:
- These settings define the foundational aspects of the server block, such as the IP address, port for Nginx to listen on, and server names.
- The
rootdirective points to the primary directory containing the website files. - The
indexdirective instructs Nginx on how to identify index files when serving the site.
Location Settings:
- These settings include various
locationblocks that dictate how Nginx processes requests for different URLs. - The initial
locationblock manages requests to the site’s root URL, utilizing thetry_filesdirective. - The subsequent
locationblock processes requests specifically for the WordPress sitemap.xml file.
PHP Handling Settings:
- These settings determine how Nginx processes PHP files.
- The
fastcgi_passdirective points to the PHP-FPM socket file’s location. - The
fastcgi_paramdirective assigns theSCRIPT_FILENAMEparameter’s value to the requested PHP file’s location. - The
includedirectives pull in additional configuration files for the FastCGI module. - Directives like
fastcgi_buffer_sizeandfastcgi_buffersdesignate the buffer size for data transfer between Nginx and PHP-FPM. - The
fastcgi_intercept_errorsdirective empowers Nginx to capture and manage PHP errors.
Gzip Compression Settings:
- These settings configure Gzip compression, reducing the file size delivered to the client.
- The
gzipdirective activates Gzip compression. - Directives like
gzip_comp_levelandgzip_min_lengthdetermine the compression level and the minimum file size for compression, respectively. - The
gzip_proxieddirective identifies which request types undergo compression. - The
gzip_typesdirective enumerates the MIME types eligible for compression.
File Caching Settings:
- These settings optimize caching for static files, enhancing website speed.
- The initial
locationblock establishes the expiration duration for asset and media files. - The subsequent
locationblock sets the expiration for font and SVG files. - Directives such as
access_logandlog_not_foundgovern the request logging. - The
add_headerdirective appends theAccess-Control-Allow-Originheader, permitting font and SVG loading from external domains.
.htaccess File Blocking:
- This setting restricts access to files starting with
.ht, which are typically sensitive server configuration files.
Setting Up the Nginx Server Block with a Symbolic Link
To wrap up the Nginx server block configuration, you must activate the configuration file from the “sites-available” directory. This is achieved by creating a symbolic link to the “sites-enabled” directory.
Execute the command below, ensuring you replace “example.com.conf” with your configuration file’s name:
sudo ln -s /etc/nginx/sites-available/example.com.conf /etc/nginx/sites-enabled/This command establishes a symbolic link between the directories, granting Nginx access to the configuration file. After setting this up, validate the configuration with:
sudo nginx -tIf the test returns no errors, restart Nginx to apply the server block changes:
sudo systemctl restart nginxWith these steps completed, your WordPress site should now be accessible via Nginx.
Configuring PHP.ini for Optimal WordPress Performance
Tuning your PHP settings is crucial for achieving the best performance with WordPress. To handle media files efficiently in WordPress, consider increasing the maximum upload size, post size, and memory limit. You might also need to tweak the maximum execution time and input variables to prevent potential issues.
To access your php.ini file, use the terminal. Remember, the file’s location might differ based on your PHP version:
sudo nano /etc/php/8.0/fpm/php.inisudo nano /etc/php/8.1/fpm/php.inisudo nano /etc/php/8.2/fpm/php.inisudo nano /etc/php/8.3/fpm/php.iniTo tailor the PHP settings, find and adjust the following lines in your php.ini file:
##increase this to the maximum file size you want to upload, recommended 50 to 100MB##
 upload_max_filesize = 100M

##increase this to the maximum post size you want to allow, recommended 50 to 100MB##
 post_max_size = 100M

##increase this to the maximum execution time, recommended 150 to 300 seconds##
 max_execution_time = 300

##increase this to the maximum GET/POST/COOKIE input variables, recommended 5000 to 10000##
max_input_vars = 5000

##increase this to the maximum memory limit, recommended 256MB or 512MB. Note that you should ensure your system has enough RAM before raising this.##
memory_limit = 256M
After modifying your PHP settings, it’s vital to restart the PHP-FPM server. This ensures the new configurations are active, allowing your WordPress site to operate at its best.
Increase Nginx Server Client Max Body Size
To accommodate larger file uploads on your WordPress site, you’ll need to tweak the Nginx server block. This ensures that Nginx can handle larger HTTP request bodies, which is essential when dealing with sizable file uploads.
Modifying the Nginx Server Block
Open your server block configuration file and insert the following line:
##set to the maximum upload size you set in upload_max_filesize.##
client_max_body_size – <size>
Ensure that the value for client_max_body_size aligns with the upload_max_filesize you configured in your PHP settings.
Restarting PHP-FPM
After adjusting the PHP settings for optimal WordPress performance, including upload size, post size, and memory limit, it’s crucial to restart the PHP-FPM server for the changes to take effect. The exact command to restart the server depends on your PHP version. If you’re unsure about your PHP version, consult your system’s documentation.
For different PHP versions, use the corresponding commands to restart PHP-FPM:
sudo systemctl restart php8.0-fpmsudo systemctl restart php8.1-fpmsudo systemctl restart php8.2-fpmsudo systemctl restart php8.3-fpmInstall WordPress Front-end on Debian 12, 11 or 10
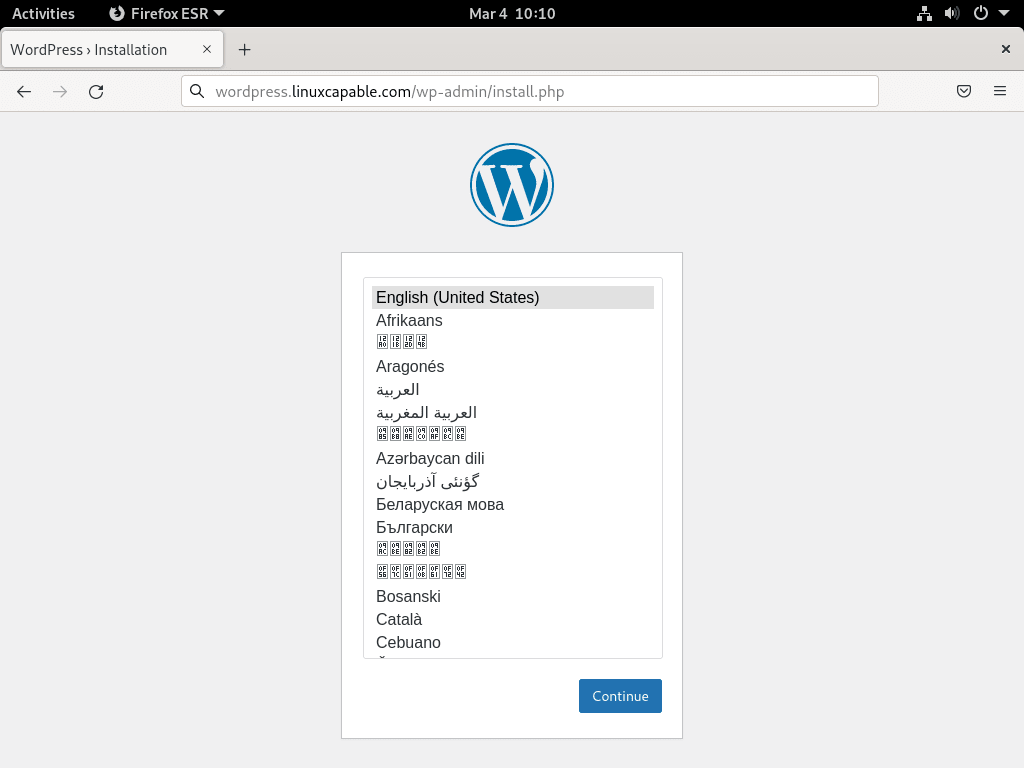
After finalizing the backend setup and configuration, launching the WordPress front-end on your domain is time. Start the installation by heading to your domain, prefixed by “https://” or “http://”. Alternatively, you can directly access “https://www.yoursite.com/wp-admin/install.php”.
This URL directs you to the front-end installation wizard.
Step 1: Select WordPress Language
Select your desired language and click “Continue.”
Step 2: Create Admin User For WordPress
Next, you’ll land on a page prompting you to input your site title, username, password, and the main admin’s email address for the WordPress site.
Ensure you choose a robust password and provide a valid email address for security reasons. Remember, you can modify other settings later within the WordPress settings panel.
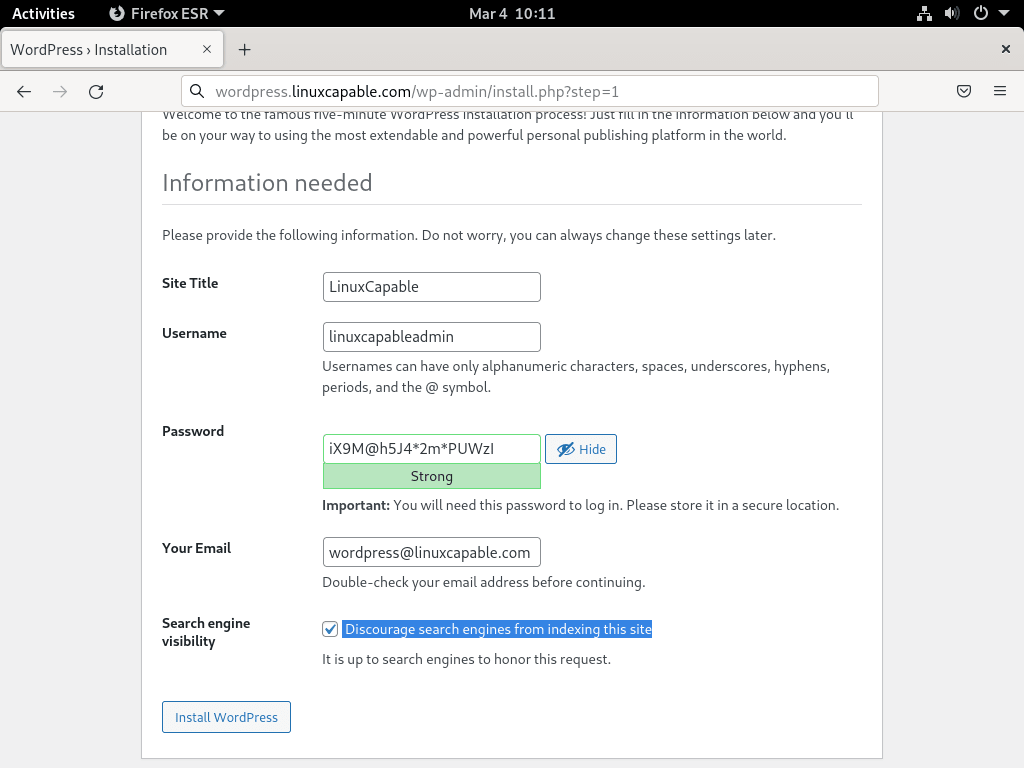
For those developing their site and wishing to keep it private from search engines like Google or Bing, there’s an option to “strongly discourage search engines from indexing.”
Step 3: Proceed and Click Install WordPress Button
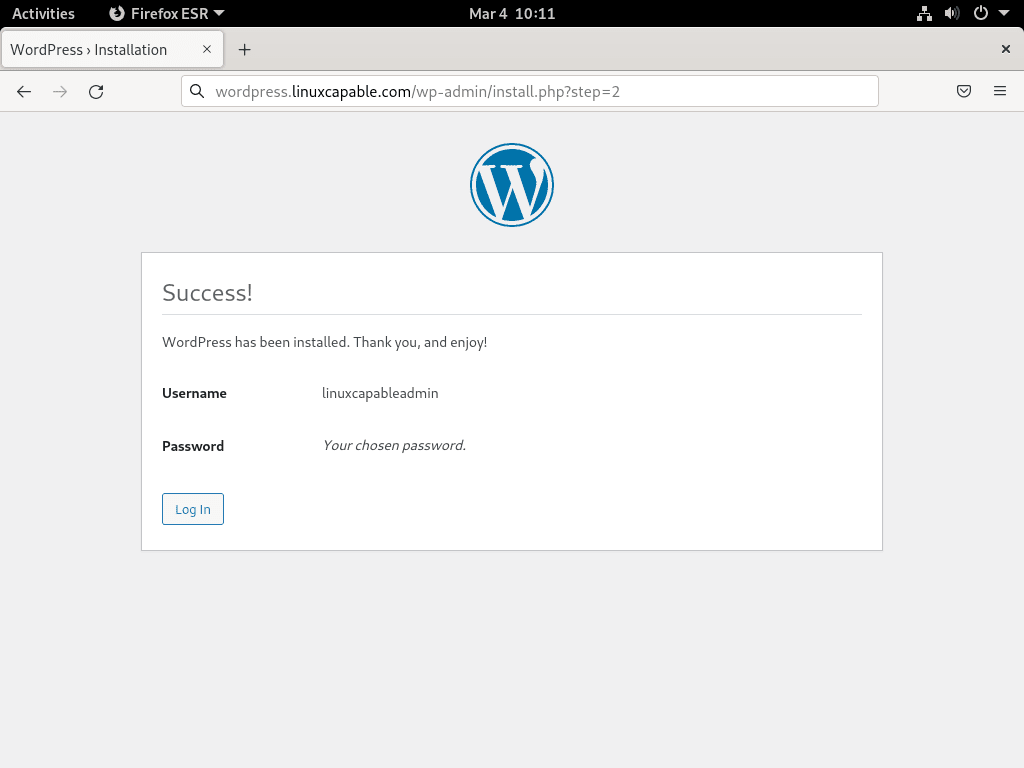
After filling out your details and preferences, hit the “Install WordPress” button. A successful installation will redirect you to the login page.
Step 4: Proceed to log in on the WordPress Admin Page
Input your login details and press “Log in.” This action will usher you into the WordPress dashboard, where you can craft or import your website.

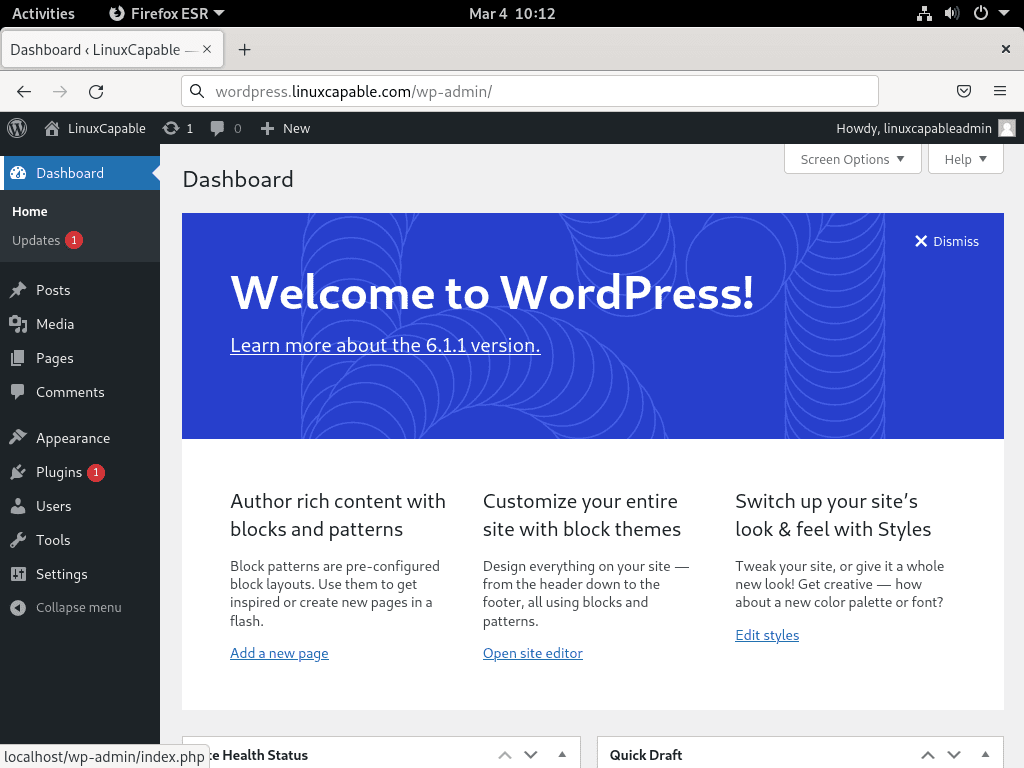
Step 5: View and Adjust the WordPress site via WordPress Admin
The WordPress dashboard is your command center. Here, you can draft new posts, design pages, handle themes and plugins, and tailor your site’s look, content, and operations.
With its user-friendly interface, the dashboard empowers you to swiftly establish your website, enabling you to design a captivating and professional site with minimal effort.
Additional Tips For WordPress with LEMP on Debian 12, 11 or 10
Securing WordPress and Nginx with Let’s Encrypt SSL Certificate
Enhancing your web server’s security is paramount, and one effective way to achieve this is by running Nginx on HTTPS using an SSL certificate. Let’s Encrypt offers a free, automated, and open certificate authority, making setting up SSL certificates for your Nginx server easier.
Installing Certbot
Start by installing the certbot package with the command:
sudo apt install python3-certbot-nginxGenerating the SSL Certificate
Once you’ve installed the certbot package, generate your SSL certificate with the following:
sudo certbot --nginx --agree-tos --redirect --hsts --staple-ocsp --email you@example.com -d www.example.comCertbot will prompt you to input your email and domain name during this process. You’ll also have the option to receive emails from the EFF. Decide whether to opt-in based on your preferences.
After installing the certificate, your website’s URL will switch from HTTP to HTTPS. Any visitors trying to access the old HTTP URL will automatically get redirected to the new HTTPS URL. This configuration ensures HTTPS 301 redirects, a Strict-Transport-Security header, and OCSP Stapling for top-tier security.
Setting Up Automatic Certificate Renewal
To keep your SSL certificate valid, set up a cron job for its automatic renewal. Certbot offers a script for this. Before finalizing the setup, run a dry run test:
sudo certbot renew --dry-runAccess the crontab configuration, enter:
sudo crontab -eTo automatically renew your SSL certificate, schedule it using a cron job with the following command:
00 00 */1 * * /usr/sbin/certbot-auto renewThis will attempt to renew the certificate every day at midnight.
Resolving PHP Session Errors
Encountering session-saving issues, especially when using certain plugins? The root of the problem might be incorrect user permissions in the /var/lib/php/sessions/ directory. But don’t worry; you can address this with a straightforward command.
Adjusting Directory Permissions
Run the command below to set the correct permissions:
sudo chown -R www-data:www-data /var/lib/php/sessions/This command sets the www-data user and group as the owners of the sessions directory. As a result, WordPress can write session data without any hitches. This adjustment is vital for the seamless operation of your WordPress site, mainly if you’re using plugins that handle automated tasks, such as posting to social media.
Addressing PHP session errors is key to boosting your website’s performance and improving the user experience.
Resolving HTTPS Redirect Loop in WordPress
If your WordPress site finds itself trapped in a redirect loop after activating HTTPS, it’s likely because WordPress keeps trying to redirect to the secure HTTPS version, but the loop never completes. To tackle this, you can modify your wp-config.php file with specific lines of code.
Modifying the wp-config.php File
Insert the following lines into your wp-config.php:
define('FORCE_SSL_ADMIN', true);

if (strpos($_SERVER['HTTP_X_FORWARDED_PROTO'], 'https') !== false) {
    $_SERVER['HTTPS'] = 'on';
}
Here’s a breakdown of what each line does:
- The first line sets the
FORCE_SSL_ADMINconstant to true, ensuring all admin pages use HTTPS. - The subsequent code checks if the
HTTP_X_FORWARDED_PROTOheader contains the term “https.” If it finds a match, it designates theHTTPSserver variable as “on.” This action informs WordPress that the connection is secure.
Integrating these lines into your wp-config.php file, you should be able to break free from the HTTPS redirect loop and ensure your WordPress site operates smoothly with its new secure connection.
Fix Domain Name Redirect Loop
A redirect loop in your WordPress site can sometimes stem from a mismatch between the domain name specified in your wp-config.php file and your website’s domain name. To address this, you’ll need to verify and possibly adjust the domain name in the configuration.
Checking the wp-config.php File
Inspect the following lines in your wp-config.php:
define('WP_HOME','http://example.com');
define('WP_SITEURL','http://example.com');
If the domain name doesn’t align with your website’s domain, correct it accordingly.
However, if you’ve made the necessary adjustments to the domain name and the redirect loop still lingers, the root cause might be a server configuration problem. In such scenarios, contacting your hosting provider for further guidance is best.
Wrapping Up
WordPress is a robust and adaptable content management system that’s straightforward to set up and fine-tune. Adhering to the procedures detailed in this guide can establish a fortified and streamlined WordPress setup on your Debian system. From fine-tuning Nginx to deploying and enhancing WordPress, you’ve gained insights into crafting a secure and operational WordPress website. It’s vital to consistently back up your website and refresh your software to guarantee peak performance and security. Armed with the right tools and insights, creating a polished and captivating website with WordPress becomes an achievable goal for anyone.


