
A failed package upgrade or risky config change can leave a Debian system unstable, and rebuilding from scratch is slow. You can install Timeshift on Debian from the default APT repositories, then use scheduled snapshots to roll the system back quickly when something breaks.
Update Debian Before Installing Timeshift
Open a terminal from your desktop application menu, then refresh APT before installing Timeshift. This makes sure Debian uses the current package index from every enabled source.
sudo apt updateThese commands use
sudofor system-level changes. If your account does not have sudo access yet, add your account to the sudoers group before continuing with the Debian sudoers setup guide.
If you have not updated the system recently, apply pending package upgrades before creating recovery snapshots for future rollbacks.
sudo apt upgradeInstall Timeshift on Debian
The Debian package index lists Timeshift in the default archive for Debian 13 (Trixie), Debian 12 (Bookworm), and Debian 11 (Bullseye), so no third-party repository is required. Install the timeshift package with APT:
sudo apt install timeshiftAPT installs the command-line tool, the graphical launcher, timeshift-gtk, and supporting packages such as rsync. On newer Debian releases, the package also depends on a cron-compatible scheduler so scheduled snapshots can run in the background.
After installation, confirm that Debian installed the expected package. On Debian 13, current output uses this shape:
dpkg-query -W -f='${db:Status-Abbrev} ${binary:Package} ${Version}\n' timeshiftii timeshift 24.06.6-2
The version string changes by Debian release. The package currently resolves as 24.06.6-2 on Debian 13, 22.11.2-1+deb12u1 on Debian 12, and 20.11.1-1 on Debian 11.
Next, verify that the timeshift command is accessible and prints its CLI options:
timeshift --helpThe output begins with the packaged Timeshift version and supported command groups:
Timeshift v24.06.6 by Tony George (teejeetech@gmail.com)

Syntax:

  timeshift --check
  timeshift --create [OPTIONS]
  timeshift --restore [OPTIONS]
  timeshift --delete-[all] [OPTIONS]
  timeshift --list-{snapshots|devices} [OPTIONS]
The package revision and the runtime version are not always identical. For example, Debian 12 packages Timeshift as
22.11.2-1+deb12u1, while the program itself reportsTimeshift v22.11.2.
Upstream GitHub releases may show newer Timeshift tags than Debian stable packages. This is expected: Debian ships distro-maintained versions and backports fixes through APT updates.
Launch Timeshift on Debian
Timeshift requires root privileges to access system files and create snapshots. To launch the graphical interface from the terminal, use:
sudo timeshift-gtkAlternatively, launch Timeshift from your desktop environment’s application menu. On GNOME, navigate to:
Activities > Show Applications > Timeshift
The system prompts for your administrator password since Timeshift requires elevated privileges to manage system snapshots. This behavior is handled by PolicyKit, which allows graphical applications to request root access securely.
Configure Timeshift Snapshots on Debian
When you first launch Timeshift, the setup wizard asks for a snapshot mode, storage location, schedule, and home-directory policy. These choices decide whether Timeshift behaves like a system rollback tool or a much larger backup job.
Choose a Timeshift Snapshot Mode
Timeshift offers two snapshot modes, each suited to different filesystem configurations:
RSYNC Mode
- Works with any Linux filesystem (ext4, XFS, BTRFS, etc.)
- Uses rsync and hard links to efficiently store incremental backups
- Recommended for Debian installations since the default installer creates ext4 partitions
- Snapshots can be stored on any mounted partition with sufficient space
BTRFS Mode
- Uses native BTRFS filesystem snapshots for near-instant backup creation
- Requires a BTRFS filesystem with Ubuntu-style subvolume layout (@, @home)
- Debian’s default installer does not create this subvolume layout automatically
- Only suitable if you manually configured BTRFS subvolumes during installation
For most Debian users, select RSYNC mode. BTRFS mode requires specific subvolume configuration that Debian does not create by default. If you installed Debian with the standard installer and default partitioning, RSYNC provides full functionality. You can verify your filesystem type by running
df -T /in a terminal.

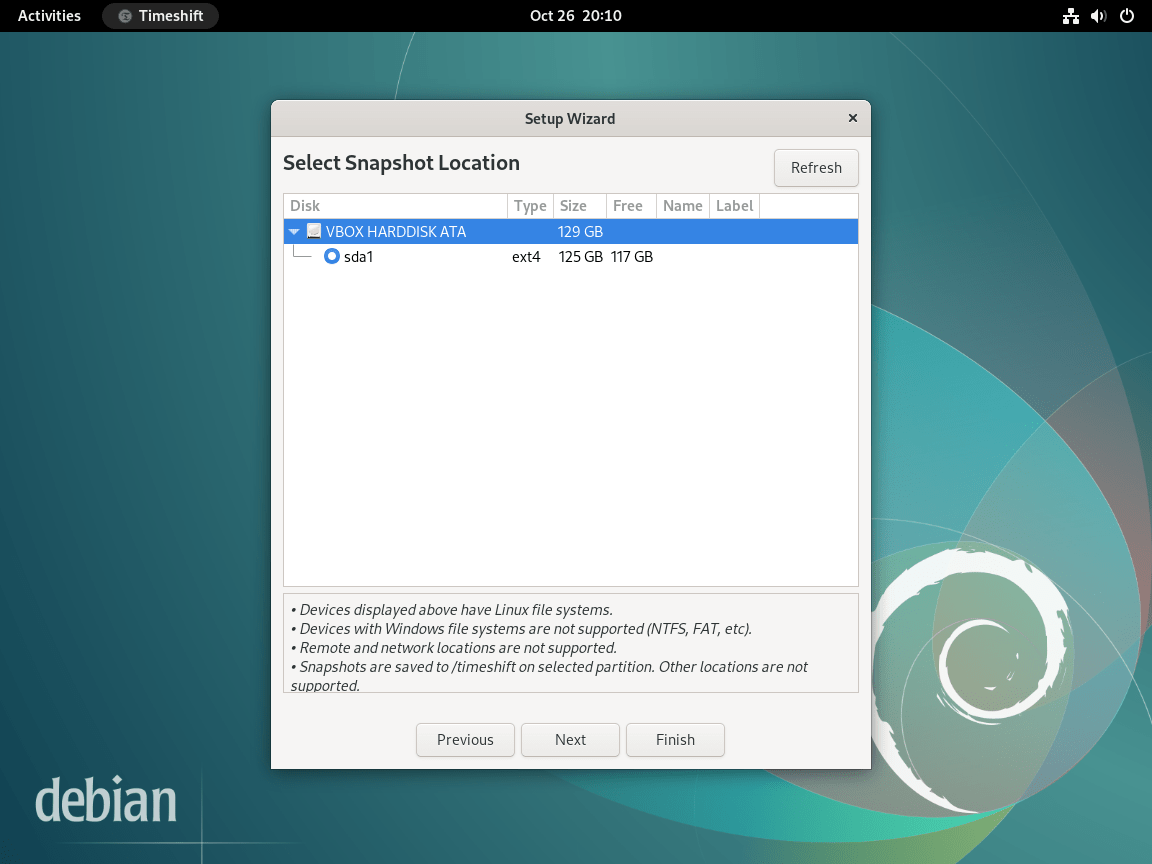
Select a Timeshift Snapshot Storage Location
Next, choose where Timeshift stores your snapshots. The wizard displays available partitions with their size and free space. Timeshift creates a timeshift/ directory on the selected device; on a single-drive system, that location commonly appears as /timeshift. For best results, select a location that meets these criteria:
- Sufficient free space for the first full system snapshot and later incremental changes
- Preferably on a separate drive or partition from your system drive
- Accessible during system recovery (internal drives recommended over USB for boot recovery)
Storing snapshots on a separate drive improves recovery options if the system drive fails. If you only have one drive, Timeshift can still protect against software issues, configuration mistakes, and failed updates. The first RSYNC snapshot is usually the largest because it records the current system state; later snapshots use hard links so unchanged files do not need another full copy.
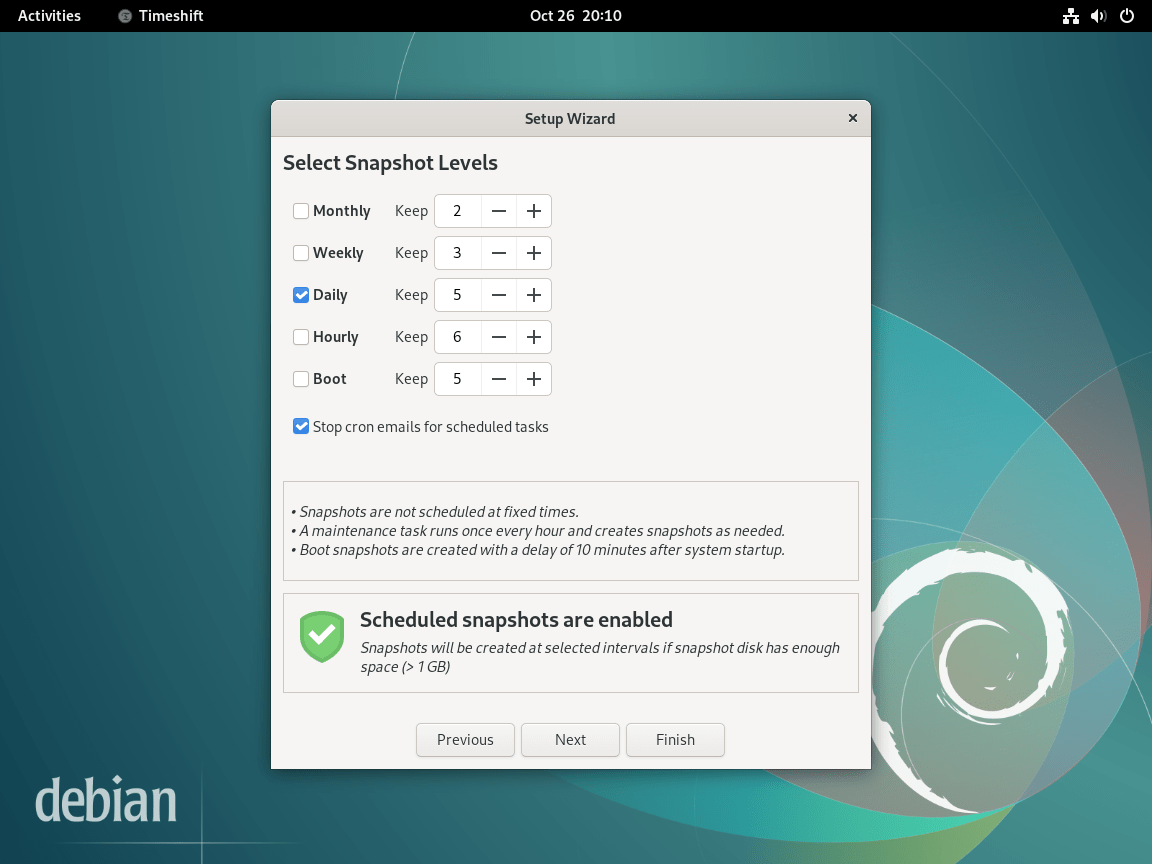
Configure Scheduled Timeshift Snapshots
Timeshift can automatically create snapshots on a schedule, ensuring you always have recent recovery points. The wizard offers multiple schedule levels that you can combine:
- Monthly: Long-term recovery points for major system changes
- Weekly: Balanced protection for regular updates
- Daily: Frequent protection for active development systems
- Hourly: Maximum protection for critical systems (uses more storage)
- Boot: Creates a snapshot each time the system starts
For desktop systems, weekly snapshots with 2-3 retained copies provide a good balance between protection and storage usage. Enable daily snapshots if you frequently install or update packages. Timeshift uses cron for scheduling, so scheduled snapshots run automatically in the background without requiring the GUI to be open.
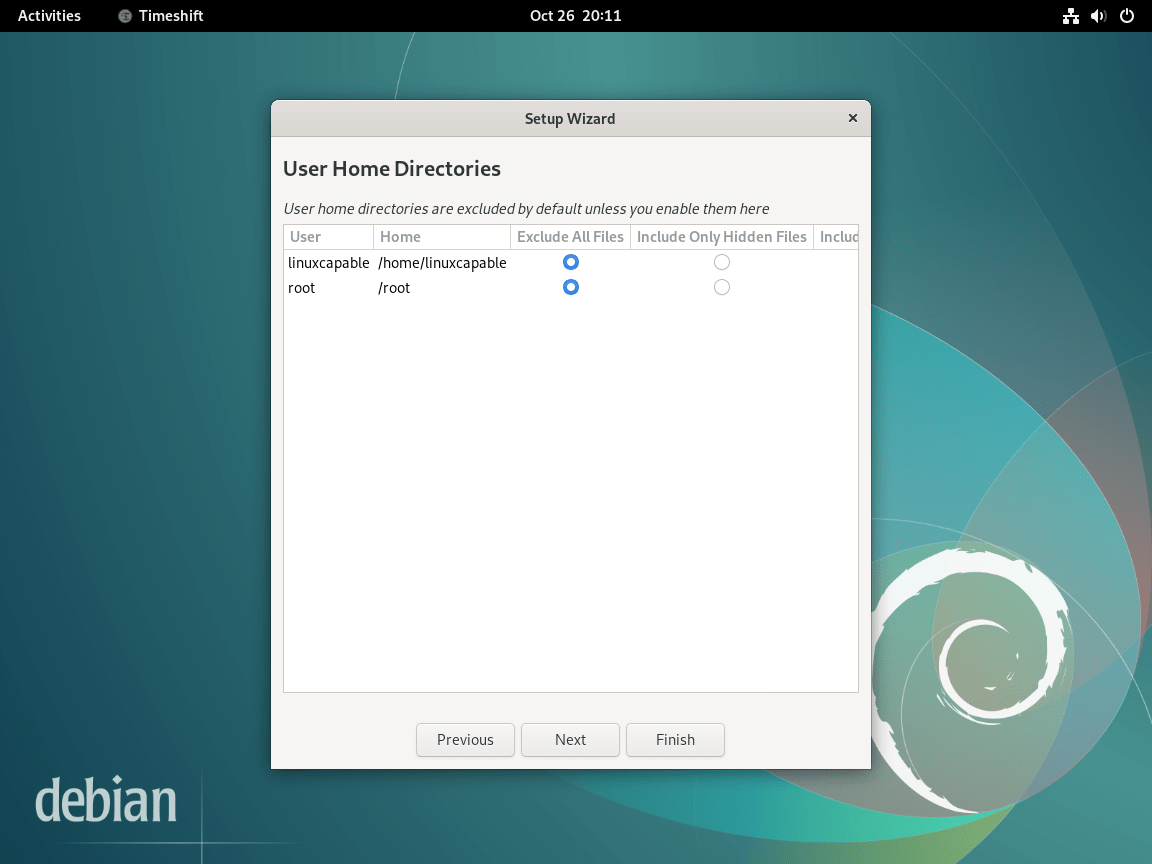
Configure Timeshift Home Directory Inclusion
By default, Timeshift excludes user home directories from snapshots. This design focuses on system recovery rather than personal file backup, which keeps snapshots smaller and allows faster restoration. You can adjust this behavior for each user:
- Exclude (default): Home directory is not included in snapshots
- Include hidden files: Backs up configuration files (dotfiles like
.bashrc,.config/) but not documents or media - Include all: Full home directory backup (significantly increases snapshot size)
For personal file backup, consider a dedicated tool like Deja Dup or rsync scripts. Timeshift excels at system recovery, allowing you to restore your Debian installation without affecting personal files stored in your home directory. This separation means you can roll back system changes while keeping your documents, downloads, and application data intact.
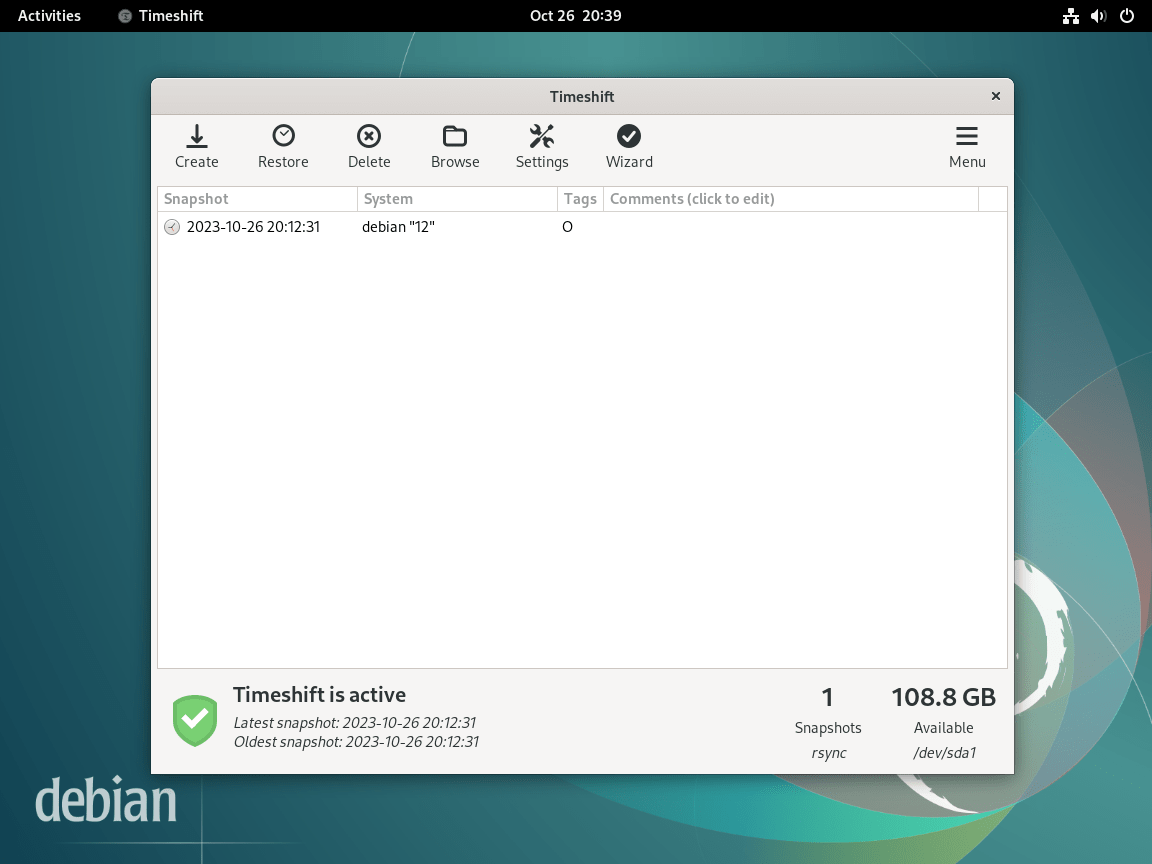
Complete Timeshift Setup and Create Your First Snapshot
After completing the wizard, Timeshift displays the main interface. Review your settings and click Create to generate your first snapshot. The initial snapshot takes longer since it copies all system files. Subsequent snapshots complete faster because RSYNC mode uses hard links to share unchanged files between snapshots, meaning only modified files require additional storage.

Use Timeshift from the Command Line on Debian
The graphical interface covers most desktop workflows, but the same package also provides a command-line interface for listing, creating, deleting, and restoring snapshots. Use these commands when you are working over SSH, recovering from a terminal, or scripting a pre-change snapshot.
Debian’s packaged Timeshift CLI does not include a
timeshift --setupoption. Use the graphical setup wizard for first-time configuration, then use the CLI for snapshot operations after Timeshift has a configured snapshot device.
List Timeshift Snapshots
View all existing snapshots with their creation dates and tags:
sudo timeshift --listExample output showing two snapshots:
Num   Name                   Tags  Description
------------------------------------------------------------------------------
0   > 2024-12-15_10-30-45   O     Initial snapshot
1   > 2024-12-19_08-00-01   W     Weekly scheduled
Create a Manual Timeshift Snapshot
Create a snapshot with a custom description, useful before making significant system changes:
sudo timeshift --create --comments "Before kernel upgrade"When you omit --tags, Timeshift creates an on-demand snapshot automatically. If you need schedule-style tags, use B (boot), H (hourly), D (daily), W (weekly), or M (monthly).
After the snapshot completes, verify it was created:
sudo timeshift --listNum Name Tags Description ------------------------------------------------------------------------------ 0 > 2026-03-05_09-25-27 O Before kernel upgrade
Delete Timeshift Snapshots from the Terminal
Delete a single snapshot by using the snapshot name shown by sudo timeshift --list:
sudo timeshift --delete --snapshot '2026-03-05_09-25-27'Deleting all snapshots removes every Timeshift recovery point managed by the selected snapshot device. List snapshots first, confirm that you do not need any recovery points, and keep a separate file backup before removing all snapshots.
sudo timeshift --delete-allRestore a Timeshift Snapshot
Restore the system to a previous state. Without additional arguments, Timeshift launches an interactive selection:
sudo timeshift --restoreTo restore a specific snapshot non-interactively:
sudo timeshift --restore --snapshot '2024-12-15_10-30-45' --yesAfter restoring a snapshot, reboot your system immediately so services load the restored configuration files. Some changes do not take effect until the next boot.
Manage Timeshift on Debian
Update Timeshift on Debian
Since Timeshift is installed from Debian’s repositories, it updates automatically with your regular system updates. To update only Timeshift without upgrading other packages:
sudo apt update
sudo apt install --only-upgrade timeshift
If Timeshift is already current, APT reports that no package upgrade is needed. On Debian 13, current output uses this shape:
Reading package lists...
Building dependency tree...
Reading state information...
timeshift is already the newest version (24.06.6-2).
This approach is useful when you want to apply a security fix to Timeshift without triggering a full system upgrade. For routine maintenance, consider enabling unattended upgrades on Debian to automatically install security updates.
Remove Timeshift from Debian
Before uninstalling Timeshift, decide whether to keep or delete existing snapshots. If you want to remove snapshot data, list the snapshots first:
sudo timeshift --listDelete Timeshift-managed snapshots before removing the package if you no longer need those recovery points:
sudo timeshift --delete-allThen remove the Timeshift package:
sudo apt remove timeshiftIf you also want to remove package-owned configuration files under /etc/timeshift/, purge the package instead of leaving residual configuration behind:
sudo apt purge timeshiftRemove dependencies that APT installed for Timeshift and no other package still needs. Review the package list before confirming, especially on desktop systems with shared GTK or XApp libraries:
sudo apt autoremoveVerify that Timeshift is no longer installed:
dpkg-query -W -f='${db:Status-Abbrev} ${binary:Package}\n' timeshift 2>/dev/null | grep '^ii'If the command returns no output, the package is not installed. If you removed Timeshift before deleting snapshots and still see a leftover timeshift/ directory on the selected backup device, inspect that path before deleting anything manually.
Troubleshoot Timeshift on Debian
Timeshift Shows No Devices for Snapshot Storage
If Timeshift shows “No devices found” when selecting a storage location, the available partitions may lack sufficient space or use an unsupported filesystem. Check available space on your partitions:
df -hTExample output showing available partitions:
Filesystem     Type  Size  Used Avail Use% Mounted on
/dev/sda1      ext4  100G   45G   50G  48% /
/dev/sdb1      ext4  500G   10G  465G   3% /mnt/backup
Ensure at least one supported Linux filesystem has enough free space for the initial snapshot and later changes. If you are using an external drive, verify that it is mounted and accessible before reopening the setup wizard. Timeshift works best with Linux filesystems such as ext4, XFS, and Btrfs for RSYNC snapshot storage.
Timeshift BTRFS Mode Is Grayed Out
If BTRFS mode appears grayed out in the setup wizard, your system either does not use a BTRFS filesystem or lacks the required subvolume layout. Check your root filesystem type:
df -T /Example output for an ext4 filesystem (BTRFS mode unavailable):
Filesystem     Type  1K-blocks     Used Available Use% Mounted on
/dev/sda1      ext4  102400000 47185920  50050080  49% /
If the Type column shows ext4, XFS, or another non-BTRFS type, use RSYNC mode instead. BTRFS mode requires both a BTRFS filesystem and Ubuntu-style subvolume configuration (@, @home), which Debian’s default installer does not create.
Timeshift Snapshot Creation Fails with Permission Error
Permission errors typically occur when running Timeshift without root privileges. Always launch the application with administrator rights:
sudo timeshift-gtkWhen launching from the application menu, the system should prompt for your password automatically through PolicyKit. If no password prompt appears, check whether the PolicyKit service is active:
systemctl is-active polkitA working service returns:
active
If the service is inactive, start it with:
sudo systemctl start polkitRun systemctl is-active polkit again, then reopen Timeshift from the application menu or with sudo timeshift-gtk.
Timeshift Scheduled Snapshots Are Not Running
If scheduled snapshots are not being created automatically, verify that the cron service is running:
systemctl is-active cronA running scheduler returns:
active
Timeshift uses cron to run scheduled snapshot jobs. If cron is not installed (common on minimal installations), install it:
sudo apt install cron
sudo systemctl enable --now cron
Run systemctl is-active cron again, then reopen Timeshift and configure your schedule again to register the cron jobs.
Conclusion
Timeshift is installed on Debian with a configured snapshot workflow, CLI recovery commands, and cleanup steps for later removal. Keep enough free space for scheduled snapshots, create a manual snapshot before risky system changes, and check the Timeshift GitHub repository when you need upstream release notes or project updates.

Formatting tips for your comment
You can use basic HTML to format your comment. Useful tags currently allowed in published comments:
<code>command</code>command<strong>bold</strong><em>italic</em><blockquote>quote</blockquote>