

Syncthing is a remarkable open-source tool designed to sync files across various devices in a private, secure, and trustworthy manner. As a decentralized system, it eradicates the need for cloud-based services, giving you full control over your data. Whether you’re using Ubuntu Linux 22.04 Jammy Jellyfish or 20.04 Focal Fossa LTS, Syncthing could be an indispensable addition to your software toolkit.
Here’s why you, as an Ubuntu user, might find Syncthing particularly useful:
- Data Ownership: With Syncthing, the power to control and manage your data remains in your hands. You don’t need to rely on third-party cloud services for data synchronization, meaning there’s no risk of unwanted data access or breaches.
- Cross-Platform Compatibility: Whether you’re using a different Linux distro, Windows, Mac, or even BSD, Syncthing enables data synchronization across all these platforms.
- Real-Time Sync: All changes made to your files and directories are instantly synchronized across all connected devices, making data handling swift and effortless.
- Security: Syncthing leverages top-notch security protocols, including TLS, for secure communication between devices, ensuring your data’s safety.
- Easy Network Configuration: Unlike some other synchronization tools, Syncthing manages NAT traversal and firewall configurations automatically, simplifying the setup process.
- Open Source: Being open source, Syncthing invites improvement, adaptation, and verification by a global community of developers. This transparency contributes to its reliability and longevity.
Syncthing does more than just synchronize files; it represents a new, privacy-focused way of handling data. You can customize it to your needs, check the code for any issues, and even contribute to its development. It’s a tool that grows with its users, meeting the demand for safe, private data synchronization in a digital world that increasingly values these attributes.
In the guide that follows, we’ll demonstrate how to install Syncthing on Ubuntu 22.04 Jammy Jellyfish or Ubuntu 20.04 Focal Fossa LTS Linux using the official Syncthing APT repository. This method will ensure you have access to the latest version and enable easy future upgrades via the apt command.
Section 1: Install Syncthing on Update Ubuntu Linux
Step 1: Updating Ubuntu System Packages
The initial step in this installation guide involves updating your system packages. This measure ensures that your system is up-to-date with the latest patches, fixes, and versions of installed software, minimizing potential conflicts during the installation of new software. Execute the command below to perform an update:
sudo apt update && sudo apt upgradeThis command effectively retrieves information about the newest versions of packages and their dependencies, and then upgrades the currently installed packages.
Step 2: Installing Necessary Packages
Next, we will install some critical packages that facilitate the installation of our desired software, Syncthing. Run the following command:
sudo apt install software-properties-common apt-transport-https wget curl -yThis command installs several packages, including:
software-properties-common: This provides useful scripts to manage software.apt-transport-https: This enables the APT package handling utility to handle https URIs.wgetandcurl: These are network utilities to retrieve files from the web.
Step 3: Integrating Syncthing’s Official APT Repository
While Syncthing is available in the default Ubuntu repositories, these versions might not be as current as some users would prefer. Thus, we opt to integrate the official Syncthing APT repository into our system for the most up-to-date releases.
Firstly, we add the GPG key, which ensures that the data from the Syncthing repository is authentic and has not been tampered with. Execute the following command:
sudo curl -o /usr/share/keyrings/syncthing-archive-keyring.gpg https://syncthing.net/release-key.gpgFollowing that, you need to integrate the repository of the version of Syncthing you want to install. For most users, the stable version is recommended. However, for those who prefer cutting-edge technology, the candidate (pre-release) version is available.
Import Stable Version of Syncthing
Run the following command to import the stable version:
echo "deb [signed-by=/usr/share/keyrings/syncthing-archive-keyring.gpg] https://apt.syncthing.net/ syncthing stable" | sudo tee /etc/apt/sources.list.d/syncthing.listImport Candidate (Pre-Release) Version of Syncthing
Run the following command to import the candidate version:
echo "deb [signed-by=/usr/share/keyrings/syncthing-archive-keyring.gpg] https://apt.syncthing.net/ syncthing candidate" | sudo tee /etc/apt/sources.list.d/syncthing.listStep 4: Refreshing the APT Packages Index
After integrating your desired Syncthing version repository, you need to refresh the APT package index to include the newly added software source. Run the following command:
sudo apt updateStep 5: Installing Syncthing
With the Syncthing repository now integrated into your system, proceed to install Syncthing with the following command:
sudo apt install syncthing -yAfter the installation, you need to confirm that Syncthing was correctly installed. You can do this by checking its version using the following command:
syncthing --versionSection 2: Establishing the Syncthing Systemd Service
In this section, we will create a Syncthing service to run in the background, regardless of whether a user is logged in or not. This is particularly useful for servers where Syncthing needs to operate continuously. We’ll employ systemd, the Linux system and service manager, to manage this Syncthing service.
Step 1: Understanding the Syncthing Systemd Service File
Upon installing Syncthing, a systemd service file, syncthing@.service, is created and placed in the /lib/systemd/system directory. This file is a template that systemd can use to run Syncthing as a service. The notation @ in syncthing@.service is a placeholder for the user account under which Syncthing will run. For example, if your username is ‘linuxcapable’, the service would be referred to as syncthing@linuxcapable.service.
Step 2: Enabling the Syncthing Service
To have the Syncthing service start automatically on system boot, we must enable it using the systemctl command. Replace ‘username’ with your actual username:
sudo systemctl enable syncthing@username.serviceWith this command, Syncthing will now start automatically each time your system boots up.
Step 3: Starting the Syncthing Service Manually
Even though the service is set to start automatically on system boot, it is currently not running right after the enable command. To start the service without a system reboot, use the systemctl start command. Here’s how:
sudo systemctl start syncthing@username.serviceFor instance, if your username was ‘joshua’, the command would look like:
sudo systemctl start syncthing@joshua.serviceStep 4: Checking the Syncthing Service Status
It’s always a good practice to check the status of the service you’ve just started. You can do this with the following systemctl command:
systemctl status syncthing@username.serviceFor instance, with ‘joshua’ as the username, it would look like this:
systemctl status syncthing@joshua.service
Step 5: Familiarizing Yourself with the Syncthing Configuration
Syncthing stores its configuration files under the directory /home/username/.config/syncthing/. In this directory, you will find several configuration files, including the main configuration file config.xml. It’s useful to know where this file resides in case you need to change or fix any settings. For instance, you might need to change the default IP address (127.0.0.1) to an internal or external IP address.
Additionally, Syncthing sets up a default home folder at /home/username/syncthing/. You can change this later if it does not suit your needs.
Section 3: Configuring the UFW Firewall for Syncthing
In this section, we’re going to detail the process of configuring the Uncomplicated Firewall (UFW) for Syncthing. Firewalls serve as a first line of defense, restricting unauthorized access to your system. It’s essential to ensure that the firewall is correctly set up to allow Syncthing to communicate properly with peers over the network.
Step 1: Understanding Syncthing’s Network Requirements
Before we get into the specifics of configuring the firewall, it’s important to understand why we need to do this in the first place. Syncthing communicates over the network on TCP port 22000. This port must be open for incoming and outgoing connections for Syncthing to operate correctly. If the port is blocked by your firewall, Syncthing won’t be able to establish a connection with its peers, thereby limiting its functionality.
Step 2: Allowing Syncthing Through UFW
UFW, or Uncomplicated Firewall, is a simplified firewall management tool available on Ubuntu and other Linux distributions. It’s known for its user-friendly command-line interface, which makes it a popular choice among both novice and experienced users.
If you’re using UFW, you will need to explicitly allow Syncthing’s communication port. To open TCP port 22000 on UFW, execute the following command:
sudo ufw allow 22000/tcpThis command tells UFW to allow incoming and outgoing TCP connections on port 22000.
Step 3: Activating UFW
If you’ve just installed UFW, or you’ve never activated it before, you’ll need to do so to put the rules into effect. This can be done using the following command:
sudo ufw enableOnce you’ve executed this command, UFW will start on boot by default, and the rule you just created will be active.
Step 4: Verifying UFW Configuration
After adjusting UFW’s rules, it’s always a good practice to confirm that they have been correctly implemented. You can check the status of UFW and view its rules with the following command:
sudo ufw status verboseThe output will list the current rules, including the one allowing traffic on TCP port 22000 for Syncthing. If you see the rule there, your configuration was successful.
Section 4: Establishing Connection and Syncing with Syncthing WebUI
The crux of Syncthing lies in the process of connecting peers and synchronizing files or folders between them. In this section, we will walk you through the steps of connecting two Syncthing peers, setting up the WebUI, and synchronizing your data.
Step 1: Setting Up Multiple Syncthing Instances
To exploit the power of Syncthing’s peer-to-peer file synchronization, you’ll need to have it installed on at least two separate devices or servers. A great advantage of Syncthing is its cross-platform compatibility – it supports a wide variety of operating systems, not just Linux.
However, if you’re planning to synchronize between a Linux system and a non-Linux platform, it’s crucial to configure your synchronization mode as “Receive Only”. This ensures that potential file permission issues between different operating systems are avoided.
Step 2: Accessing the Syncthing WebUI
By default, Syncthing’s WebUI is accessible locally at http://127.0.0.1:8384. Navigate to this address in your web browser.
http://127.0.0.1:8384Upon your first visit to the WebUI, Syncthing will ask for your permission for anonymous usage reporting. Choose an option that suits you to proceed.
Example:
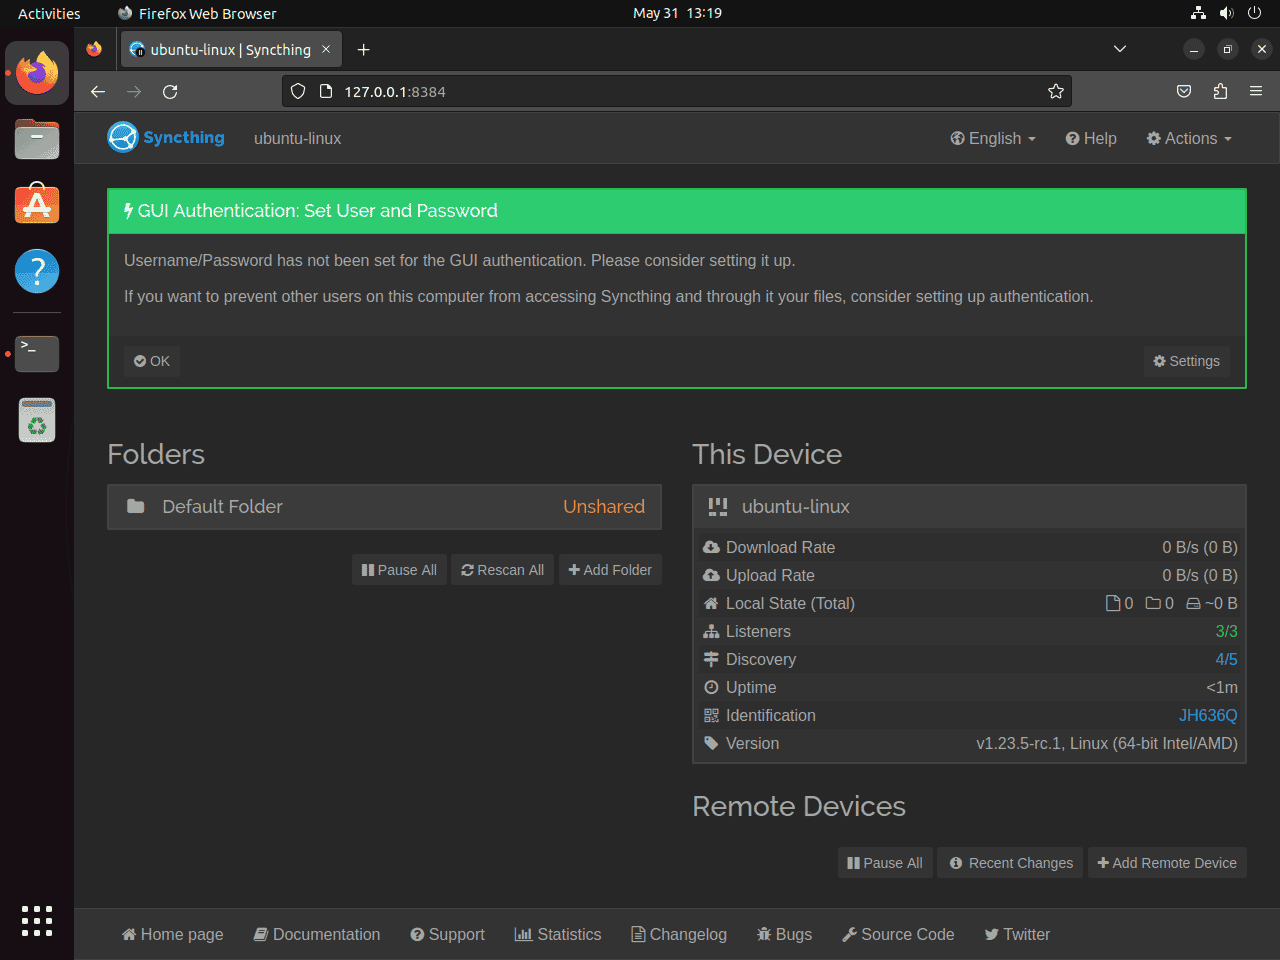
Step 3: Secure Your Syncthing Service
Syncthing places a premium on security. On your first run, it will prompt you to establish a username and password via a ‘GUI Authentication’ notice. Navigate to “Settings” to set this up.
In the subsequent GUI settings screen, establish a secure username and password. You also have the option here to set up HTTPS for GUI use, enhancing the security of your interactions with the Syncthing interface.
After setting up the security, click “Save” to store your configurations.
Step 4: Repeat the Process for a Second Device
Now, replicate all the steps we’ve just performed on a second device or server that you intend to use as a Syncthing peer. Once done, we’re ready to sync files and folders between devices.
Step 5: Synchronizing Files and Folders between Devices
Now that we have two active Syncthing clients installed on separate devices, we can proceed to set up file or folder synchronization between these peers.
In the WebUI of your first peer device, navigate to “Actions > Show ID” located at the top-right corner. This will display your device’s ID, which is a long string of alphanumeric characters. Copy this ID.
Next, open the WebUI of the second device and select “Add Remote Device” from the bottom right corner. Paste the copied Device ID here, give the new device a recognizable name, and hit “Save”.
Back on your first device, you should now see an attempt by the second device to connect. If you don’t see this, ensure that your firewall settings are correctly configured to allow this connection.
Upon successful connection, you’ll now be able to share directories and files between the two devices. Here’s how you set up a shared directory:
- In the WebUI of the first device, select “Add a Folder”.
- Choose a directory that you want to sync to the second device. Give the folder a unique ID and set the path accordingly.
- Navigate to the “Sharing” tab and select the remote device you want to share with (the second device in our case).
- Click “Save”.
Now, switch back to the second device. You’ll see a notification about the first device trying to share a directory. Click “
Section 5: Configuring Syncthing Permissions
Managing Syncthing permissions effectively is key to seamless file synchronization across devices. There might be instances where you encounter hurdles when sending or receiving data between remote nodes, primarily due to permission conflicts. This section delves into overcoming these challenges, ensuring your Syncthing peers can communicate without interruption.
Step 1: Install the Access Control List (ACL) Package
Linux systems use Access Control Lists (ACLs) to specify permissions for each file and directory, thereby enhancing their inherent permissions model. To set up these advanced permissions, we use the setfacl command, which is a part of the acl package.
Install the acl package using the following command:
sudo apt install acl -yStep 2: Set Up Advanced Permissions
Now, you’ll use the setfacl command to modify the ACL of your Syncthing folder. Replace “username” with your Linux username and “/folder/path/” with the path to your Syncthing folder:
sudo setfacl -R -m u:username:rwx /folder/path/Here, -R makes the command recursive, -m is for modifying the ACL, and u:username:rwx gives the user read, write, and execute permissions to the folder.
Step 3: Automate Permissions with a Cron Job
If you have files that frequently change and lead to permission issues, consider setting up a cron job. Cron is a time-based job scheduler in Linux and can be used to automate the setfacl command execution.
Open the crontab editor using the following command:
sudo crontab -eTo set up a cron job that adjusts the folder’s permissions every 5 minutes, add the following line to the crontab file:
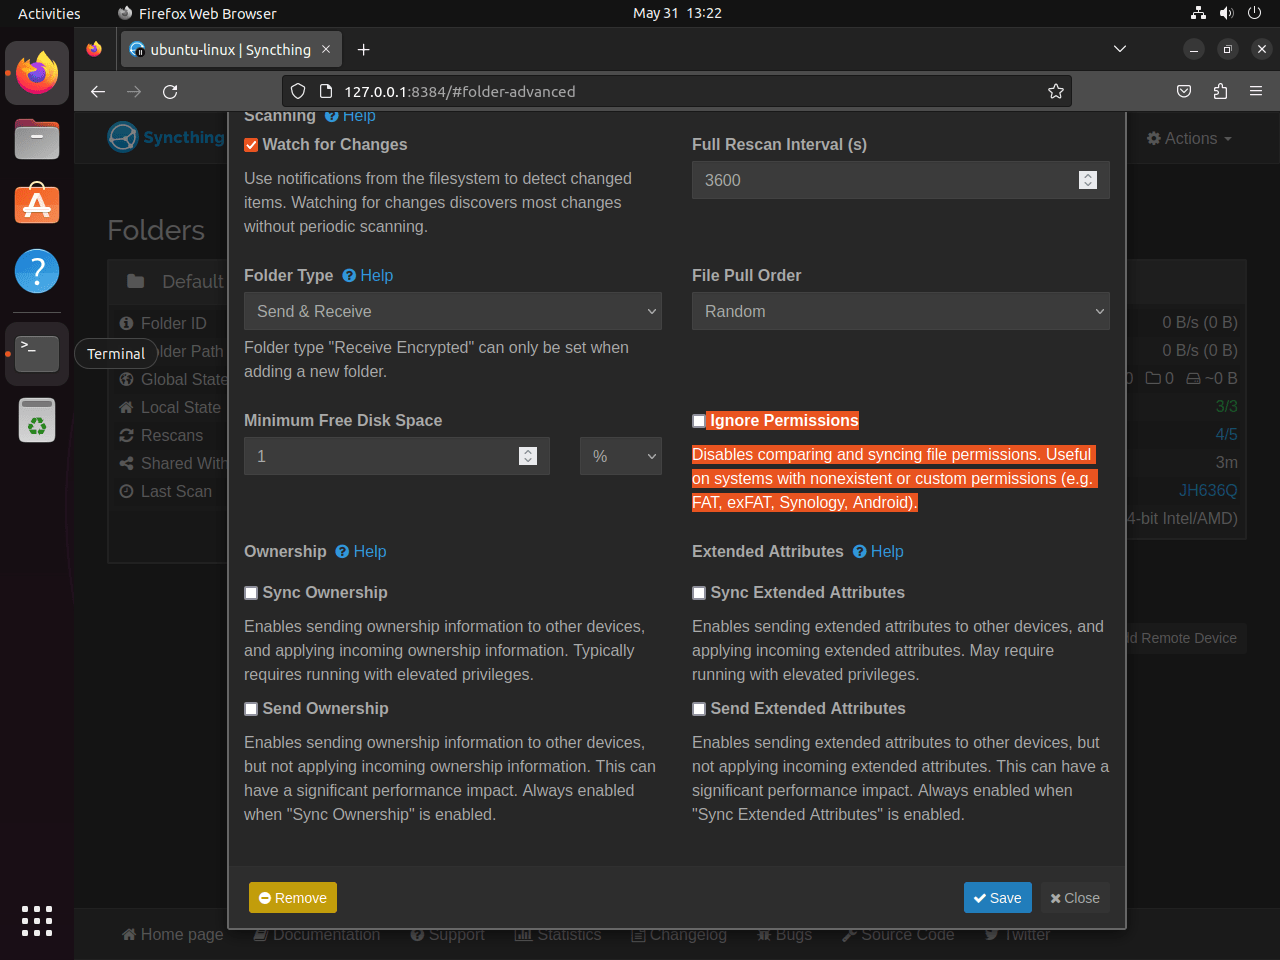
*/5 * * * * sudo setfacl -R -m u:username:rwx /folder/path/ -nStep 4: Enable Ignore Permissions in Syncthing
The last step involves a configuration within the Syncthing WebUI. Navigate to the “Advanced” options in the Syncthing WebUI and enable the “Ignore Permissions” feature. This could resolve possible permission issues.
However, bear in mind that using the “Ignore Permissions” feature doesn’t negate the necessity of the ACL setup. Both these strategies often work in conjunction to ensure smooth Syncthing operations.
Example:
Section 6: Configure Nginx as a Reverse Proxy for Syncthing
Harnessing the power of Nginx as a reverse proxy for Syncthing can provide numerous benefits, including simplified networking configuration, enhanced security, and potential performance gains. This guide will walk you through the process of configuring Nginx for this purpose.
Step 1: Install the Nginx PPA
The first task is to install Nginx, a highly efficient open-source web server and reverse proxy. For our setup, we recommend using the Personal Package Archive (PPA) provided by Ondřej Surý, known for its constant updates and enhanced features.
You have two options: either install the latest stable Nginx or the latest mainline version, depending on your requirements. Execute one of the following commands:
To install the latest stable version:
sudo add-apt-repository ppa:ondrej/nginx && sudo apt update -yOr the latest mainline version:
sudo add-apt-repository ppa:ondrej/nginx-mainline && sudo apt update -yStep 2: Update Your Sources List
After adding the PPA, you should update your system’s sources list with the following command:
sudo apt updateStep 3: Install Nginx
You’re now ready to install Nginx using the following command:
sudo apt install nginx-core nginx-common nginx nginx-full -yStep 4: Create a Server Block for Syncthing
Server blocks in Nginx function similarly to virtual hosts in Apache and are used to encapsulate configuration details. Create a new server block for Syncthing by opening a new configuration file:
sudo nano /etc/nginx/sites-available/syncthing.confIn this file, input the following Nginx server block configuration:
server {
  listen 80;
  server_name syncthing.example.com;

  access_log /var/log/nginx/syncthing.access.log;
  error_log /var/log/nginx/syncthing.error.log;
  location / {
    proxy_pass http://127.0.0.1:8384;
    proxy_set_header X-Real-IP $remote_addr;
    proxy_set_header X-Forwarded-For $proxy_add_x_forwarded_for;
    proxy_set_header X-Forwarded-Proto $scheme;

  ### IP LOCKDOWN FOR MORE SECURITY, UNCOMMENT TO USE WITH YOUR OWN IP ADDRESSES###
  # allow from <ip>;
  # deny all;

  }
}
If your Syncthing configuration differs from the standard setup, you may need to modify the “proxy_pass” line. After making the necessary changes, save the file using (CTRL+O) and exit using (CTRL+X).
Step 5: Verify Your Nginx Configuration
Before you can start using your new Nginx setup, you should verify that the configuration syntax is correct. You can do this by running the following command:
sudo nginx -tThis command checks your configuration files for syntax errors and will notify you if any issues are found. If the syntax is correct, it will produce an output similar to the one below:
nginx: the configuration file /etc/nginx/nginx.conf syntax is ok
nginx: configuration file /etc/nginx/nginx.conf test is successful
Step 6: Restart Nginx Service
Once the configuration has been verified, you can proceed to restart your Nginx service for the changes to take effect:
sudo systemctl restart nginxStep 7: Accessing Your Syncthing Server
Upon successful setup, you can now access your Syncthing server via the URL http://syncthing.example.com. If you do not have a domain name, you can still reach the server using the external server IP address.
Take note that the domain syncthing.example.com should be replaced with your actual domain name or server IP address. Ensure that your domain name is correctly pointed towards your server if you’re using a domain.
Final Thoughts on Installing Syncthing on Ubuntu Linux
In conclusion, the process of setting up Syncthing on the Ubuntu Linux distribution offers an excellent balance of control, security, and flexibility. It’s a meticulous procedure that demands attention to detail, yet the payoff is worth the effort. This guide has meticulously walked through the installation of Syncthing, configuring Syncthing permissions, and setting up Nginx as a reverse proxy for Syncthing. The endeavor to simplify and demystify these procedures should provide a boost to your server management skills and experience.
Additional Resources and Links
To further your understanding and provide you with more insightful and advanced knowledge on the topics discussed, please find below a list of official resources and documentation:
- Syncthing Official Documentation: This is the official Syncthing documentation, providing an in-depth and comprehensive guide on how to start with Syncthing.
- Nginx Official Documentation: The Nginx Documentation offers a detailed overview of the Nginx web server, including configuration, command usage, and troubleshooting tips.
- Ubuntu Documentation: The official Ubuntu documentation provides guides and tutorials on a wide array of topics related to Ubuntu, its features, and functionalities.
- Syncthing GitHub Repository: The Syncthing GitHub repository is a wealth of technical information, often including the latest updates and features.