

Redis, an acronym for Remote Dictionary Server, is an in-demand, open-source, in-memory data structure store. It’s lauded for its adaptability, supporting many data structures like strings, hashes, and lists. For those aiming to install Redis on Ubuntu 22.04 Jammy Jellyfish or its older stable release Ubuntu 20.04 Focal Fossa, understanding its core features and advantages is crucial.
Key Features and Benefits of Redis:
- Swift Performance: Redis’s in-memory design ensures lightning-fast operations, often executed within microseconds.
- Adaptable Scalability: With horizontal scalability, Redis can effortlessly manage increasing workloads by integrating more nodes, ensuring consistently high performance.
- Data Persistence: Redis, despite its in-memory nature, offers options for data persistence, safeguarding against data loss during system crashes or restarts.
- Diverse Data Structures: Redis’s support for many data structures, from strings to sorted sets, underscores its flexibility for diverse applications.
- Real-time Messaging: The built-in publish/subscribe system in Redis facilitates efficient real-time interactions between servers and clients.
- Uninterrupted Availability: Features like replication and automatic failover in Redis ensure system operability even amidst hardware or network disruptions.
- User-friendly: Redis’s intuitive commands and syntax make it accessible, eliminating the need for a steep learning curve.
- Robust Community Engagement: A thriving community around Redis offers extensive resources, tutorials, and support, catering to both novices and experts.
With a grasp of Redis’s capabilities, integration is the next step. The subsequent guide will detail the process to install Redis on Ubuntu 22.04 or 20.04, utilizing either the official Redis APT repository for the freshest version or Ubuntu’s default repository. This approach also applies to Ubuntu short-term releases that haven’t reached their end of life.
Install Redis on Ubuntu 22.04 or 20.04 via APT Default Repository
Step 1: Update Ubuntu Before Redis Installation
Before installing Redis, it is essential to ensure that your system’s packages are up-to-date. This step helps avoid any conflicts that may arise during the installation process. To update your Ubuntu system, execute the following command:
sudo apt update && sudo apt upgradeThis command will fetch the latest package information from the repositories and upgrade any outdated packages on your system.
Step 2: Install Redis on Ubuntu 22.04 or 20.04 via APT Command
By default, the Redis package is included in the Ubuntu repository. You can install Redis using the apt package manager with the following command:
sudo apt install redisThis command will download and install the Redis package and its dependencies on your system.
Step 3: Verify Redis Installation on Ubuntu
Now that you have installed Redis, verifying the installation is crucial by checking the installed version. This step ensures that Redis has been installed correctly and functions as expected. To verify the Redis installation, execute the following command:
redis-cli --versionThis command will display the Redis version installed on your system. If the output displays the Redis version, it confirms the installation succeeded.
Install Redis on Ubuntu 22.04 or 20.04 via Redis.io APT PPA
Step 1: Update Ubuntu Before Redis Installation with Redis.io
Before proceeding with the Redis installation, update your system’s packages to ensure compatibility and prevent conflicts:
sudo apt update && sudo apt upgradeStep 2: Install Initial Packages For Redis.io PPA
To complete the installation, you must install some prerequisite software packages. Execute the following command to install them:
sudo apt install software-properties-common apt-transport-https curl ca-certificates curl -yThese packages are required to add the Redis.io repository and securely fetch package information.
Step 3: Import Redis.io APT Repository on Ubuntu 22.04 or 20.04
First, import the GPG Key to authenticate the packages:
curl -fsSL https://packages.redis.io/gpg | sudo gpg --dearmor -o /usr/share/keyrings/redis-archive-keyring.gpgNext, add the Redis.io repository to your system:
echo "deb [signed-by=/usr/share/keyrings/redis-archive-keyring.gpg] https://packages.redis.io/deb $(lsb_release -cs) main" | sudo tee /etc/apt/sources.list.d/redis.listStep 4: Update Packages List After Redis.io PPA Import on Ubuntu
Update your sources list to include the newly added Redis.io repository:
sudo apt updateStep 5: Install Redis on Ubuntu 22.04 or 20.04 via APT Command
Now you can install Redis from the Redis.io repository. If you have Redis already installed, this command will upgrade it:
sudo apt install redis-server redis-toolsStep 6: Verifying Redis Installation on Ubuntu
To ensure you have installed the Redis.io version, use the apt-cache policy command:
apt-cache policy redis-server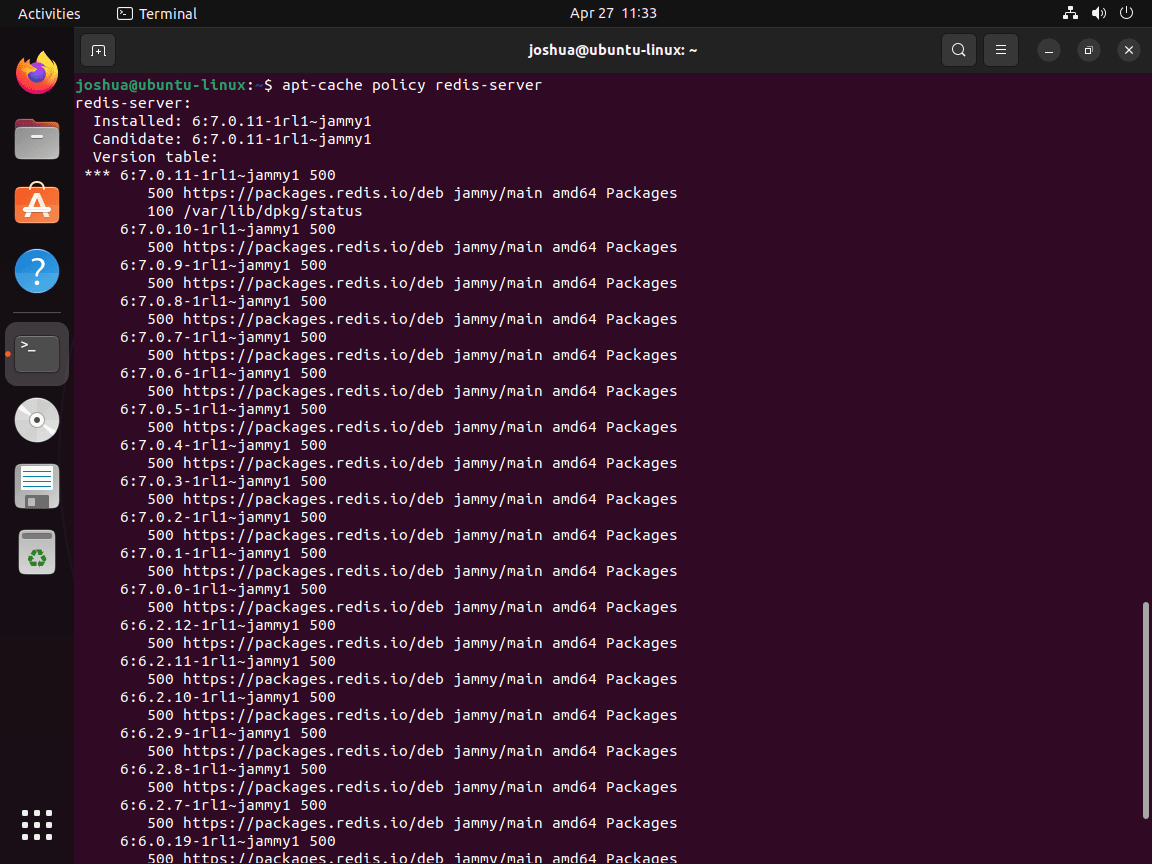
Verify that the output indicates the correct version.
Next, enable and start the Redis service:
sudo systemctl enable redis-server --nowCheck the status of the Redis service and ensure it is running without errors:
systemctl status redis-server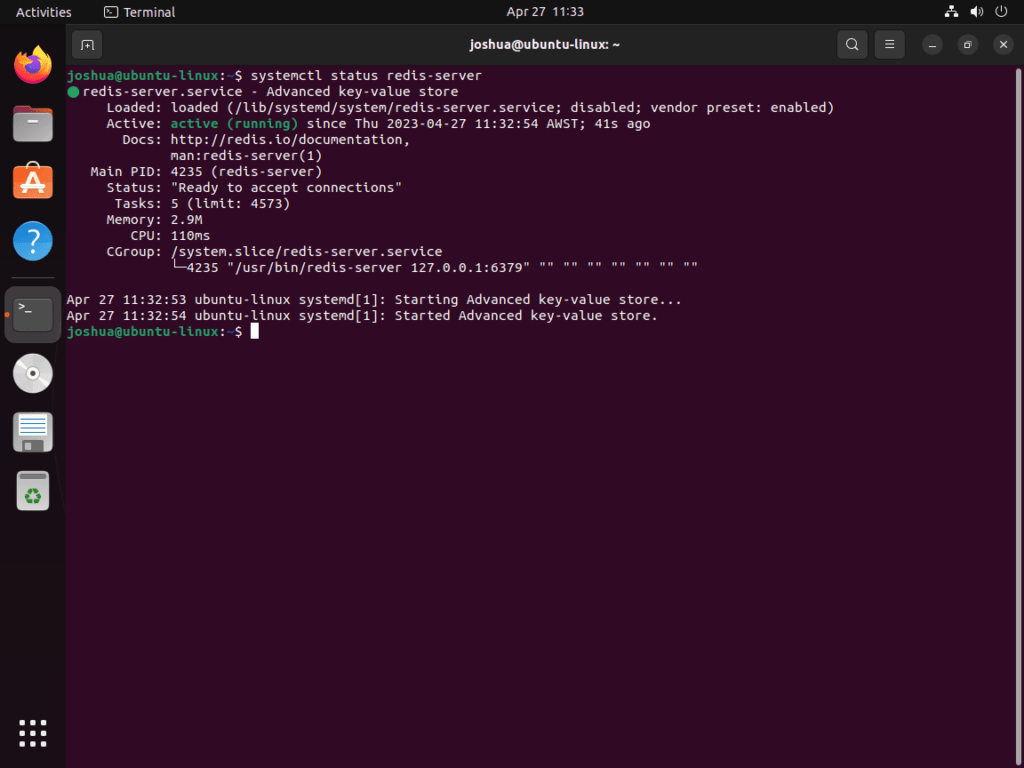
Redis should be actively listening on localhost at the default port 6379. To confirm this, execute the following command:
ps -ef | grep redisExample output:
redis       4171       1  0 23:35 ?        00:00:00 /usr/bin/redis-server 127.0.0.1:6379
joshua      4702    4691  0 23:36 pts/0    00:00:00 grep --color=auto redis
Step 7: Test Redis Connection on Ubuntu
To test your Redis installation, connect to the Redis service using the redis-cli command:
redis-cliOnce connected, your terminal will display 127.0.0.1:6379. Perform a ping test to ensure proper communication with the Redis service:
ping127.0.0.1:6379> ping
PONG
127.0.0.1:6379> The output should be PONG, indicating a successful connection. To exit the Redis instance, type:
exitCongratulations! You have successfully installed Redis on your system and verified that it is operational. You can now proceed to configure Redis as needed.
Configure Redis on Ubuntu 22.04 or 20.04
Redis is a versatile tool that can be configured in various ways to suit different use cases. This section will guide you through configuring Redis for caching, network access, and setting a password for enhanced security.
Step 1: Edit the Redis Configuration File on Ubuntu
To start configuring Redis, open the /etc/redis/redis.conf file using the nano editor:
sudo nano /etc/redis.confStep 2: Configure Max Memory For Redis on Ubuntu
One of the primary reasons people use Redis is for caching purposes. To allocate a specific amount of memory for Redis caching, add the following lines at the end of the configuration file:
maxmemory 500mb
maxmemory-policy allkeys-lru
In this example, we have dedicated 500 MB of memory to Redis. You can adjust this value based on your server’s hardware and your application’s requirements. Once the allocated memory is exhausted, Redis will remove keys based on the Least Recently Used (LRU) algorithm.
Step 3: Configure Network Access For Redis on Ubuntu
By default, Redis listens only on the localhost interface. You can configure it to listen on all network interfaces or specific IP addresses/subnets.
First, locate line 69 in the configuration file.
Option 1: Listen on all network interfaces
To listen on all network interfaces, comment out the bind line by adding a # at the beginning:
# bind 127.0.0.1 ::1Option 2: Bind to a specific IP address or subnet
To bind Redis to a specific IP address or subnet, replace the bind line with the desired IP or subnet:
bind 0.0.0.0/0or
bind 192.150.5.0/24Important: When binding Redis to an IP address or subnet, it is strongly recommended to set a password for added security.
Step 4: Configure Password For Redis on Ubuntu
To further secure your Redis instance, set a password for authentication.
Find the line starting with # requirepass (around line 507), uncomment it, and set a strong password:
requirepass YourStrongPasswordHereReplace YourStrongPasswordHere with a robust password containing a mix of uppercase letters, lowercase letters, numbers, and special symbols.
After setting a password, you will need to use the auth command with the password when connecting to Redis using redis-cli:
redis-cli
auth YourStrongPasswordHere
Users who fail to authenticate will receive an error message: (error) NOAUTH Authentication required.. Upon successful authentication, users will see an OK message.
Step 5: Save Changes and Restart Redis
After making the necessary changes to the configuration file, save your changes by pressing Ctrl + O, and then exit the nano editor by pressing Ctrl + X. Finally, restart the Redis service to apply the new settings:
Configure Redis UFW Firewall Rules on Ubuntu 22.04 or 20.04
When using Redis, especially if you have configured it to listen on specific IP addresses or subnets, it’s crucial to ensure that your firewall allows incoming connections on the TCP port 6379. In this section, we’ll discuss how to configure UFW (Uncomplicated Firewall) rules to allow Redis connections.
Step 1: Ensure UFW is Installed and Enabled on Ubuntu For Redis
First, make sure UFW is installed on your system:
sudo apt install ufw -yNext, enable UFW if it isn’t already:
sudo ufw enableStep 2: Create UFW Rules for Redis on Ubuntu
Depending on your requirements and network setup, you may need to create rules for a single server instance or multiple instances in a cluster.
Option 1: Allow access from a specific IP address
If you need to allow access to Redis from a single server, create a UFW rule for that specific IP address:
sudo ufw allow proto tcp from <ip address> to any port 6379Replace <ip_address> with the appropriate IP address.
Option 2: Allow access from a subnet
If you have a cluster network with multiple instances, you can create a UFW rule to allow access from an entire subnet:
sudo ufw allow proto tcp from <ip address>/24 to any port 6379Replace <subnet> with the appropriate subnet IP address. Before using this rule, make sure your internal network is secure and trustworthy.
Step 3: Test Redis Connectivity
After configuring your UFW rules, test your Redis service to ensure it is operational and accessible from the allowed IP addresses or subnets. Use the redis-cli command with the -h flag, followed by the IP address you want to connect to:
redis-cli -h <ip address> pingReplace <ip_address> with the appropriate IP address. If the configuration is correct, you should receive a “pong” response.
pongAdditional Redis Configuration Options on Ubuntu 22.04 or 20.04
Redis is a versatile and feature-rich in-memory data structure store, primarily used for caching, message brokering, and more. In this section, we’ll explore additional configuration options for Redis that can help you tailor its performance and behavior to your specific needs by modifying the Redis configuration file.
Configure Key-Value Expiration Policy For Redis on Ubuntu
In the Redis configuration file, you can set a default time-to-live (TTL) for keys by modifying the maxmemory-policy and maxmemory-samples settings. Open the /etc/redis/redis.conf file using nano editor:
sudo nano /etc/redis/redis.confFind the maxmemory-policy setting and configure it as desired. For example, to set the policy to expire keys using the least recently used (LRU) algorithm, update the configuration as follows:
maxmemory-policy volatile-lruNow find the maxmemory-samples setting and configure the number of samples Redis should check to make the eviction decision:
maxmemory-samples 5Configure TCP Keepalive For Redis on Ubuntu
TCP keepalive can help detect and close idle connections, freeing up resources. To enable TCP keepalive, find the tcp-keepalive setting in the /etc/redis/redis.conf file:
tcp-keepalive 300In this example, we set the keepalive interval to 300 seconds. Adjust the value according to your requirements.
Configure Slow Log Monitoring For Redis on Ubuntu
Slow logs can help identify performance issues by logging queries that take longer than a specified amount of time. To configure slow logs, find the slowlog-log-slower-than and slowlog-max-len settings in the /etc/redis/redis.conf file:
slowlog-log-slower-than 10000
slowlog-max-len 128
In this example, we set the slowlog threshold to 10,000 microseconds (10 milliseconds) and limit the slow log to the 128 most recent entries. Adjust these values according to your needs.
Configure Redis Event Notifications For Redis on Ubuntu
Redis can generate notifications for certain events, which can be useful for monitoring and debugging. To enable event notifications, find the notify-keyspace-events setting in the /etc/redis/redis.conf file:
notify-keyspace-events ExAIn this example, we configure Redis to send notifications for expired and evicted keys. For more information about event notifications and the available options, consult the official Redis documentation.
Configure Redis Logging Level For Redis on Ubuntu
Adjusting the Redis logging level can help you gather the right amount of information for troubleshooting and monitoring purposes. To set the logging level, find the loglevel setting in the /etc/redis/redis.conf file:
loglevel noticeIn this example, we set the logging level to notice, which is the default level. You can choose from the following options: debug, verbose, notice, and warning. Adjust the logging level according to your requirements.
After configuring the desired options, save your changes and restart Redis:
sudo systemctl restart redis-serverConclusion
Throughout this guide, we have covered installing and configuring Redis on Ubuntu Linux. We’ve demonstrated how to set up Redis for caching, configure network access and security features, adjust UFW firewall rules, and explored additional configuration options for optimizing Redis performance. Following these steps, you can deploy a fully functional and secure Redis instance tailored to your needs.