

Redis, an advanced key-value store known for its flexibility and performance, is a popular choice among developers for managing data. In this guide, we’ll demonstrate how to install Redis on Fedora Linux, ensuring that you can leverage its powerful features efficiently. Redis stands out for several reasons:
- High Performance: Redis delivers exceptional speed, making it ideal for high-throughput applications.
- Data Structure Variety: It supports strings, hashes, lists, sets, and more, offering versatility.
- Replication and Persistence: Ensures data durability and high availability.
- Wide Language Support: Compatible with many programming languages.
- Rich Feature Set: Includes transactions, pub/sub messaging systems, and Lua scripting.
By following this guide, you’ll be equipped to harness these features on your Fedora Linux system from Fedora’s default repository or from Remi’s RPM, enhancing your application’s data-handling capabilities. Let’s dive into the process of integrating Redis into your tech stack.
Install Redis on Fedora Linux via Default Appstream
Step 1: Update Fedora Before Redis Installation
To ensure a smooth Redis installation, it’s crucial to start by updating your Fedora system. This step helps prevent conflicts by aligning your system’s packages with the latest updates.
Execute the following command in your terminal to update your system:
sudo dnf upgrade --refreshThis command refreshes the repository metadata and upgrades all your system’s packages to their latest versions. It’s a good practice to perform this step before installing any new software to maintain system integrity and security.
Step 2: Install Redis via DNF Command
Fedora’s default repository typically includes the most recent version of Redis. This availability makes the installation process straightforward and reliable.
To install Redis on your Fedora system, use the command below:
sudo dnf install redisThis command will download and install Redis along with any required dependencies from the Fedora repository. It’s important to note that the version available in the Fedora repository might not always be the absolute latest released by the Redis developers. However, it is usually updated and stable, making it suitable for most applications.
For users needing the most recent or a specific version of Redis that may not be available in the Fedora repository, the next section provides instructions on installing Redis from the Remi RPM repository. This alternative method allows more flexibility in selecting specific Redis versions.
Install Redis on Fedora Linux via Remi RPM
Step 1: Import Remi RPM for Redis
To install the latest or specific long-term supported versions of Redis on Fedora Linux, using the Remi RPM repository is a reliable alternative. This method is simpler compared to Red Hat Enterprise Linux (RHEL) and its derivatives, as it does not require the preliminary installation of Extra Packages for Enterprise Linux (EPEL).
Selecting the correct version of the Remi repository that matches your Fedora version is crucial to ensure compatibility.
Use one of the following commands based on your Fedora version:
sudo dnf install http://rpms.remirepo.net/fedora/remi-release-39.rpm -ysudo dnf install http://rpms.remirepo.net/fedora/remi-release-38.rpm -ysudo dnf install http://rpms.remirepo.net/fedora/remi-release-37.rpm -yThese commands add the Remi repository to your system, paving the way for installing the desired version of Redis.
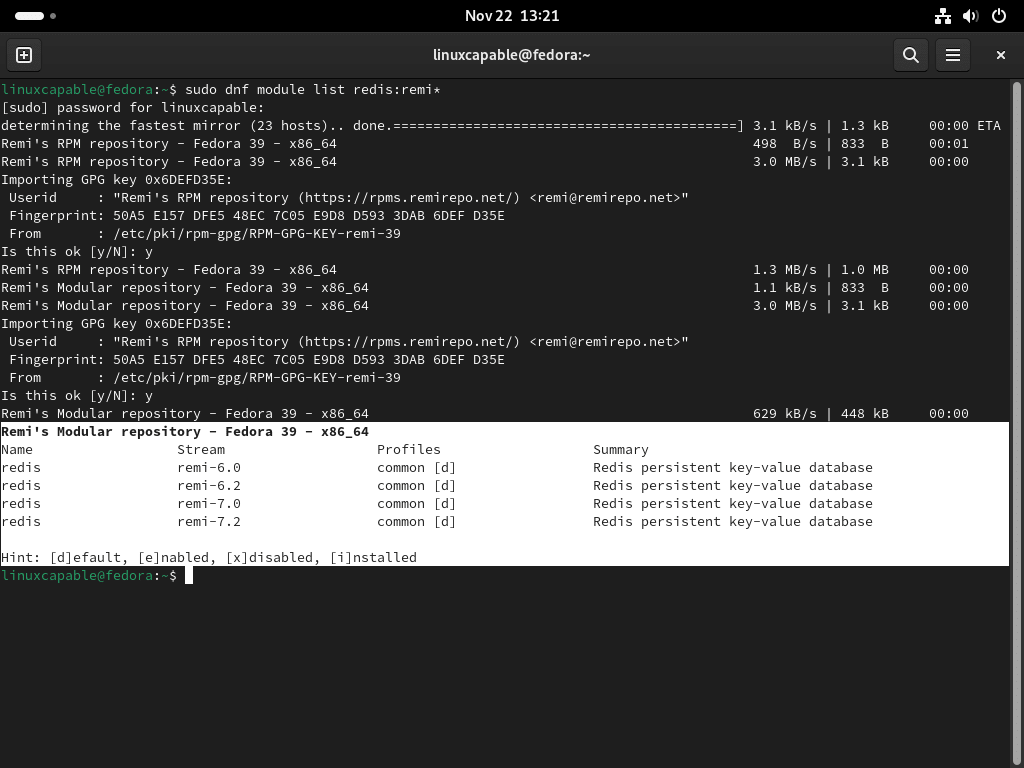
Step 2: List Redis Modules from Remi RPM
With the Remi repository integrated into your system, you can explore the available Redis versions. To view the list of Redis modules offered in the Remi repository, execute the following command:
sudo dnf module list redis:remi*This command displays various versions of Redis available for installation, allowing you to choose the one that best suits your needs.
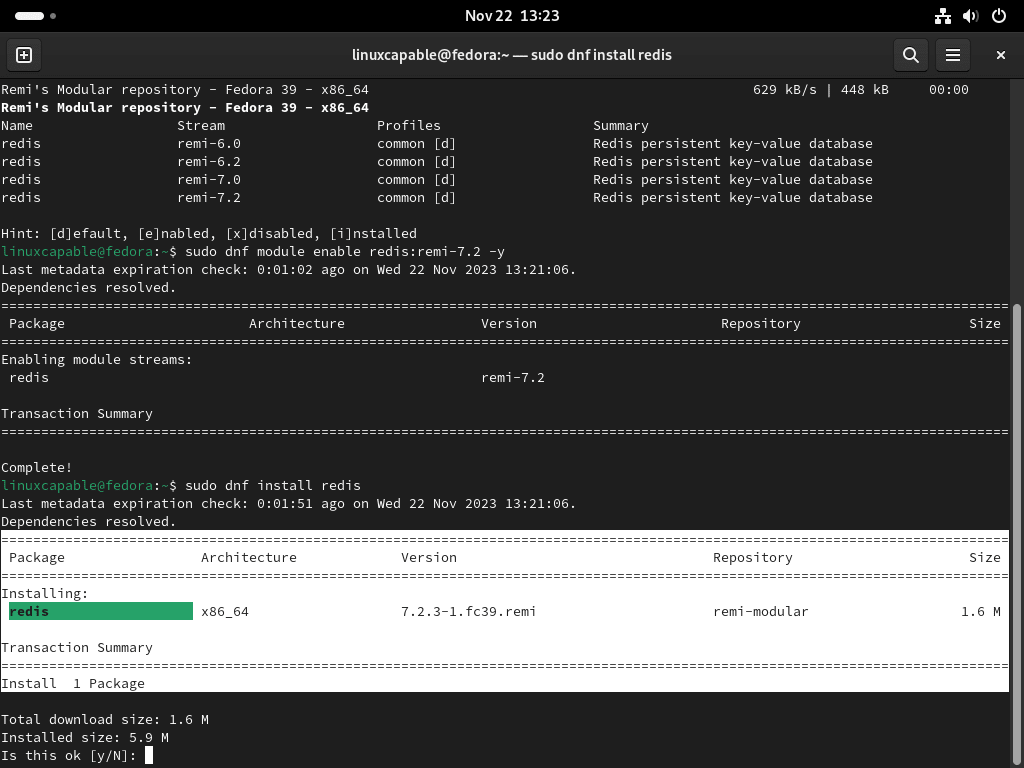
Step 3: Enable Redis Specific Version on Fedora
After identifying the desired Redis version from the list, the next step is to enable that specific version. Use the command below, replacing {version} with your chosen version number:
sudo dnf module enable redis:remi-{version}For example, to enable Redis version 7.2, the command would be:
sudo dnf module enable redis:remi-7.2 -yThis command sets your system to install the selected Redis version from the Remi repository.

Step 4: Install Redis via DNF Command from Remi RPM
Once the desired Redis module is enabled, you can proceed to install it. To install the specified version of Redis, or to update an existing installation to the newest version available in the Remi repository, use:
sudo dnf install redisThis command ensures that the specific version of Redis you’ve selected is installed on your Fedora system, leveraging the Remi RPM repository’s offerings.
Enable Redis Service on Fedora Linux
Starting and Enabling Redis Service
To ensure Redis runs automatically at system startup, start and enable the Redis service using the following command:
sudo systemctl enable redis --nowThis command not only starts Redis immediately but also sets it to launch on boot, ensuring Redis is always available when your system is running.
Verifying Redis Service Status
After starting Redis, it’s essential to confirm that the service is operational and error-free. Check the status of the Redis service with:
systemctl status redis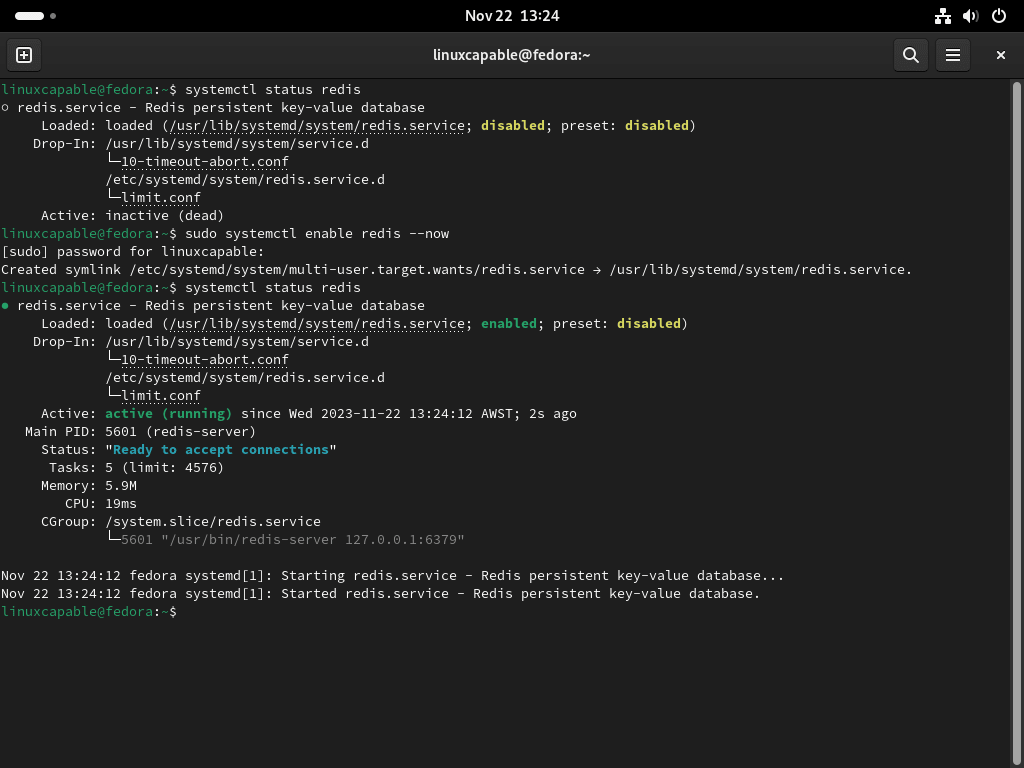
This check provides insights into the service’s current state, including whether it’s active and running without issues.
Confirming Redis Listening Port
Redis typically listens on localhost, port 6379, by default. To verify this, execute the following command:
ps -ef | grep redisExpected output:
redis       2969       1  0 11:17 ?        00:00:00 /usr/bin/redis-server 127.0.0.1:6379
joshua      3175    3095  0 11:19 pts/0    00:00:00 grep --color=auto redis
This output confirms that Redis is running and listening on the correct port.
Performing a Ping Test
To test the connectivity to your Redis service, initiate a ping test. First, connect to the Redis CLI with:
redis-cliOnce connected, the terminal will show (127.0.0.1:6379). Then, ping the Redis service:
pingExpected output:
PONGThis simple test ensures that the Redis service is responsive and functional.
Retrieving Redis Server Information
For detailed information about the Redis server, use the INFO command. To focus on specific details, such as server information, use:
INFO SERVER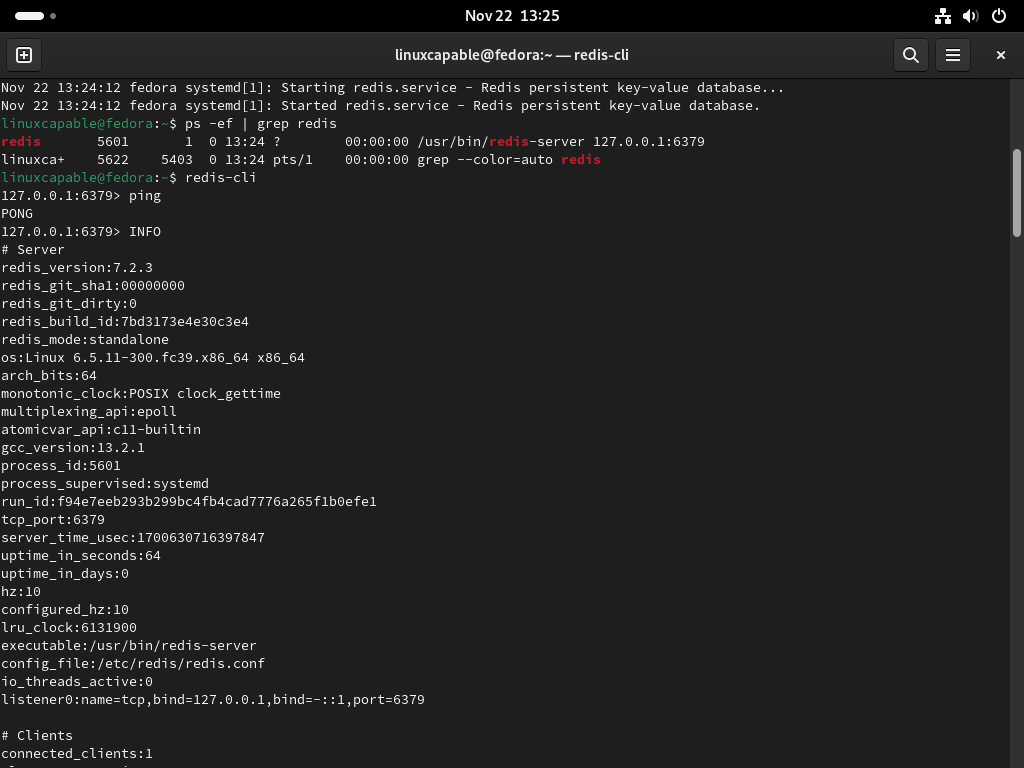
This command provides a comprehensive overview of the Redis server’s current configuration and status.
Exiting the Redis CLI
Once you’ve completed your checks or configurations, exit the Redis instance with the command:
exitConfigure Redis on Fedora Linux
Configuring Redis for Caching
Redis is often used for caching, and enhancing web application performance. Begin by opening the Redis configuration file with the following:
sudo nano /etc/redis/redis.confThis file, located at /etc/redis/redis.conf, contains settings crucial for customizing Redis behavior.
Configure Max Memory
To allocate memory for Redis, add these lines at the end of the file. Adjust the memory value according to your server’s capacity and your application’s requirements.
maxmemory 500mb
maxmemory-policy allkeys-lru
In this example, Redis is configured to use 500MB of memory. This setting is suitable for a server with ample RAM. The maxmemory-policy allkeys-lru directive specifies that when the maximum memory is reached, Redis will remove keys following the Least Recently Used (LRU) algorithm, optimizing memory usage.
Configure Network Access
Redis allows configuring network access for different scenarios.
Listening to All Network Interfaces
To make Redis listen on all network interfaces, comment out the bind line (line 69) in the configuration file:
# bind 127.0.0.1 ::1Alternatively, explicitly bind to all interfaces:
bind 0.0.0.0/0Ensure robust internal network security when using this configuration.
Binding to a Specific IP Address
For a more secure setup, bind Redis to a specific, static IP address:
bind 192.150.5.2Binding to a Network Subnet
To bind Redis to a subnet:
bind 192.150.5.0/24It is highly recommended to secure Redis with a password, especially when binding to broader network interfaces or subnets.
Configure Password for Security
Securing your Redis instance with a password adds an additional layer of protection.
Navigate to line 507 and uncomment the requiredpass line, setting a strong password:
requiredpass APASSWORDChoose a robust password with a mix of numbers, letters, special symbols, and capitals to prevent brute-force attacks.
Accessing Redis with a Password
When accessing Redis with Redis-CLI, use the command:
auth THEPASSWORDSETReplace THEPASSWORDSET with the password you set.
Users attempting to access without the correct password will encounter an error:
(error) NOAUTH Authentication required.A successful login will display:
OKConfiguring Snapshotting (RDB)
For regular snapshotting, which saves the dataset at specified intervals, adjust these settings:
save 900 1
save 300 10
save 60 10000
In this configuration, Redis will save the dataset:
- Every 900 seconds if at least 1 key changed.
- Every 300 seconds if at least 10 keys changed.
- Every 60 seconds if at least 10000 keys changed.
This method is effective for balancing data safety and performance.
Enabling Append Only File (AOF)
To enhance data durability with AOF, which logs every write operation, add:
appendonly yesThis setting turns on AOF, ensuring every change to your data is stored immediately. This method provides a higher level of data safety, as it allows recovery from the most recent write operation.
Setting Log Levels
Configuring the log level helps in monitoring and troubleshooting:
loglevel noticeOptions include:
debug: Extensive logging, useful for development.verbose: Fairly detailed, but less than debug.notice: Moderately detailed, suitable for production.warning: Only logs warnings and errors.
Configuring Eviction Policies
To manage memory more efficiently, set an eviction policy:
maxmemory-policy volatile-lruOptions include:
volatile-lru: Evicts the least recently used keys out of all keys with an expiry set.allkeys-lru: Evicts any least recently used key, regardless of expiry.volatile-random: Randomly evicts keys with an expiry set.allkeys-random: Randomly evicts keys regardless of expiry.volatile-ttl: Evicts keys with the shortest remaining time to live.noeviction: Returns an error when the memory limit is reached.
Securing Redis with TLS
To enable TLS for encrypted connections:
tls-port 6379
tls-cert-file /path/to/cert.pem
tls-key-file /path/to/privkey.pem
Replace /path/to/cert.pem and /path/to/privkey.pem with the actual paths to your TLS certificate and private key. This setup enhances security, especially when Redis is accessible over a network.
Adjusting Database Numbers
You can specify the number of databases Redis uses:
databases 16This setting, for example, configures Redis to use 16 databases, numbered from 0 to 15.
Saving Changes and Restarting Redis
After configuring Redis, save your changes (CTRL+O) and exit the editor (CTRL+X). To apply these changes, restart the Redis service:
sudo systemctl restart redisThis restart ensures that all your configuration changes take effect, securing and optimizing your Redis instance.
Configure Firewalld for Redis on Fedora Linux
Setting Up a Dedicated Firewalld Zone for Redis
For enhanced security, it’s crucial to establish specific firewall rules for Redis. Initially, there are no default rules set for Redis in Fedora’s firewalld. Setting up these rules is vital to prevent unauthorized access and potential attacks.
Create a new zone dedicated to Redis in firewalld using:
sudo firewall-cmd --permanent --new-zone=redisThis command adds a ‘redis’ zone in firewalld, laying the groundwork for more detailed rules.
Allowing Specific IP Addresses Access to Redis
Next, define which IP addresses are authorized to access Redis. This step is crucial for controlling access and ensuring only trusted sources can interact with your Redis server.
To add an allowed IP address to the Redis zone, use:
sudo firewall-cmd --permanent --zone=redis --add-source=1.2.3.4Replace 1.2.3.4 with the actual IP address you wish to permit. This setting ensures that only specified IP addresses can access your Redis installation.
Opening the Redis Port in the Firewall
By default, Redis communicates over TCP port 6379. You’ll need to open this port in the firewall to enable network communication with Redis.
Use the following command to open the default Redis port:
sudo firewall-cmd --permanent --zone=redis --add-port=6379/tcpIf you’ve changed the default Redis port in your configuration, remember to adjust the port in this command accordingly.
Reloading the Firewall to Apply New Rules
After setting up the rules, reload firewalld to implement the changes:
sudo firewall-cmd --reloadSuccessful execution of this command should return:
successVerifying Firewall Rules with Redis
To ensure your firewall configuration is effective, test the connectivity to your Redis service, particularly with the new IP restrictions in place.
Test the connection using:
redis-cli -h <ip address> pingReplace <ip address> with the allowed IP address. A successful setup will respond with:
pongThis response indicates that your firewall is correctly configured, allowing access to Redis only from specified sources.
Conclusion and Final Thoughts
In this guide, we’ve explored two efficient methods to install Redis on Fedora Linux, using either Fedora’s default repository or the versatile Remi RPM. We’ve walked through testing the service, adjusting memory limits, and configuring network interfaces to cater to diverse requirements. Remember, tailoring Redis to your specific setup enhances both performance and security. As you move forward, keep experimenting with Redis configurations to find the perfect balance for your application’s needs. This hands-on approach will help you make the most of Redis’s robust features on your Fedora Linux system.